Toy Soldiers
Last year, I was part of Knit The City and took part in the Nutcracker Knitmare Before Christmas piece. As the Nutcracker features Christmas presents which come to life, I wanted to make something which echoed traditional toys. I decided that the Nutcracker Prince's soldiers should be brightly coloured toy wooden soldiers.
Here's how you can make your own.
You will need (in the order you use them):
Dolly pegs - one for each soldier Fine tipped coloured pens Waterproof black paint (I used a tube of cheap acrylic) and a small brush 4 ply red and black wool 2.5mm knitting needles or crochet hook Tapestry needle ·Glittery thread Glue (I like a hot glue gun) Puffy/3-d gold coloured fabric/craft paint (I used Pebeo Touch Deco in pale gold metal finish) @ Marion Crick 2010. This pattern may be used to make your own toy soldier ornaments or as many gifts as you like. You may not distribute this pattern and please don't use it to make toys to Sell.
Making the doll:
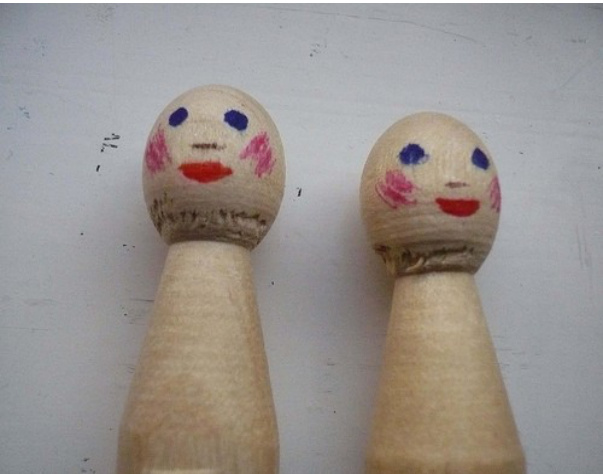
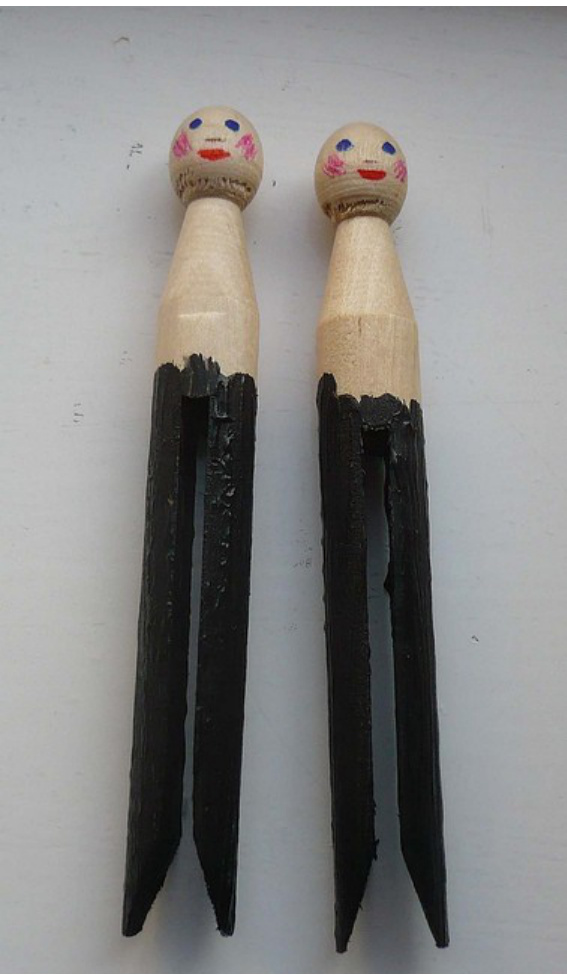
Using the felt tip pens, draw a face on the head of each peg Make sure the legs are positioned correctly. I like to use give the soldier little rosy cheeks as well as eyes and a mouth.
Using the black acrylic paint, paint the legs of the soldiers and allow paint to dry - I find putting the soldiers on some clingfilm prevents sticking from the wet paint.
@ Marion Crick 2010. This pattern may be used to make your own toy soldier ornaments or as many gifts as you like. You may not distribute this pattern and please don't use it to make toys to Sell.
Making the clothes:
Knitted:
With 2.5mm needles and 4 ply yarn I got a gauge of 8 stitches per inch in stocking stitch. The body of the jacket needs to be approx 2 inches wide.
Jacket body:
Cast on 16 stitches. Row 1: knit Row 2: knit Row 3: k2, p12, k2 repeat rows 2 and 3 until body measures 1.25 inches. Decrease as follows - Row 1: k3, k2tog, k6, ssk, k3 (14 stitches) Row 2: k2, p10, k2 Row 3: k3, k2tog, k4, ssk, k3 (12 stitches) Row 4: k2, p8, k2 Row 5: k3, k2tog, k2, ssk, k3 (10 stitches) Row 6: k2, p6, k2 Cast off and weave in ends
Arms (make 2)
Cast on 16 stitches knit 2 rows cast off and weave in ends
Hat:
Cast on 12 stitches knit in garter stitch until hat is one inch long. Decrease row: k2tog 6 times (6 stitches) cut yarn, leaving a long tail and pull through the 6 stitches still on the needle and pull tight. Using the long tail, sew the back seam of the hat to make a long tube.
Crochet:
Using a 2.5mm hook, I got a gauge of approx 7 stitches per inch.
Jacket body:
ch 15 Row 1: skip 1 ch, 1sc in each other chain (14 stitches) Row 2: ch 1 (this is the turning chain), 1sc in each stitch (14 stitches) repeat row 2 until body is 1.25 inches long. Decrease Row 1: ch1 (turning chain) 2 sc in next 2 stitches, 1 sc in next 2 stitches, 6 sc in next 6 stitches, 1 sc in Marion Crick 2010. This pattern may be used to make your own toy soldier ornaments or as many gifts as you like. You may not distribute this pattern and please don't use it to make toys to Sell. next 2 stitches, 2 sc in next 2 stitches (12 stitches) Row 2: 1 sc in each stitch (12 stitches) Row 3: ch1 (turning chain) 2 sc in next 2 stitches, 1 sc in next 2 stitches, 4 sc in next 4 stitches, 1 sc in next 2 stitches, 2 sc in next 2 stitches (10 stitches) Row 4: 1 sc in each stitch (10 stitches) Row 5: ch1 (turning chain) 2 sc in next 2 stitches, 1 sc in next 2 stitches, 2 sc in next 2 stitches, 1 sc in next 2 stitches, 2 sc in next 2 stitches (8 stitches)
Arms (make 2)
Ch 16 row 1: skip 1, 1sc in each chain (15 stitches)
Hat:
ch2 round 1: 5sc in 2nd chain from hook, slip stitch to join in round round 2: 2sc in each stitch (10 stitches) round 3: 1sc in each stitch repeat round 3 until hat is 1 inch tall.
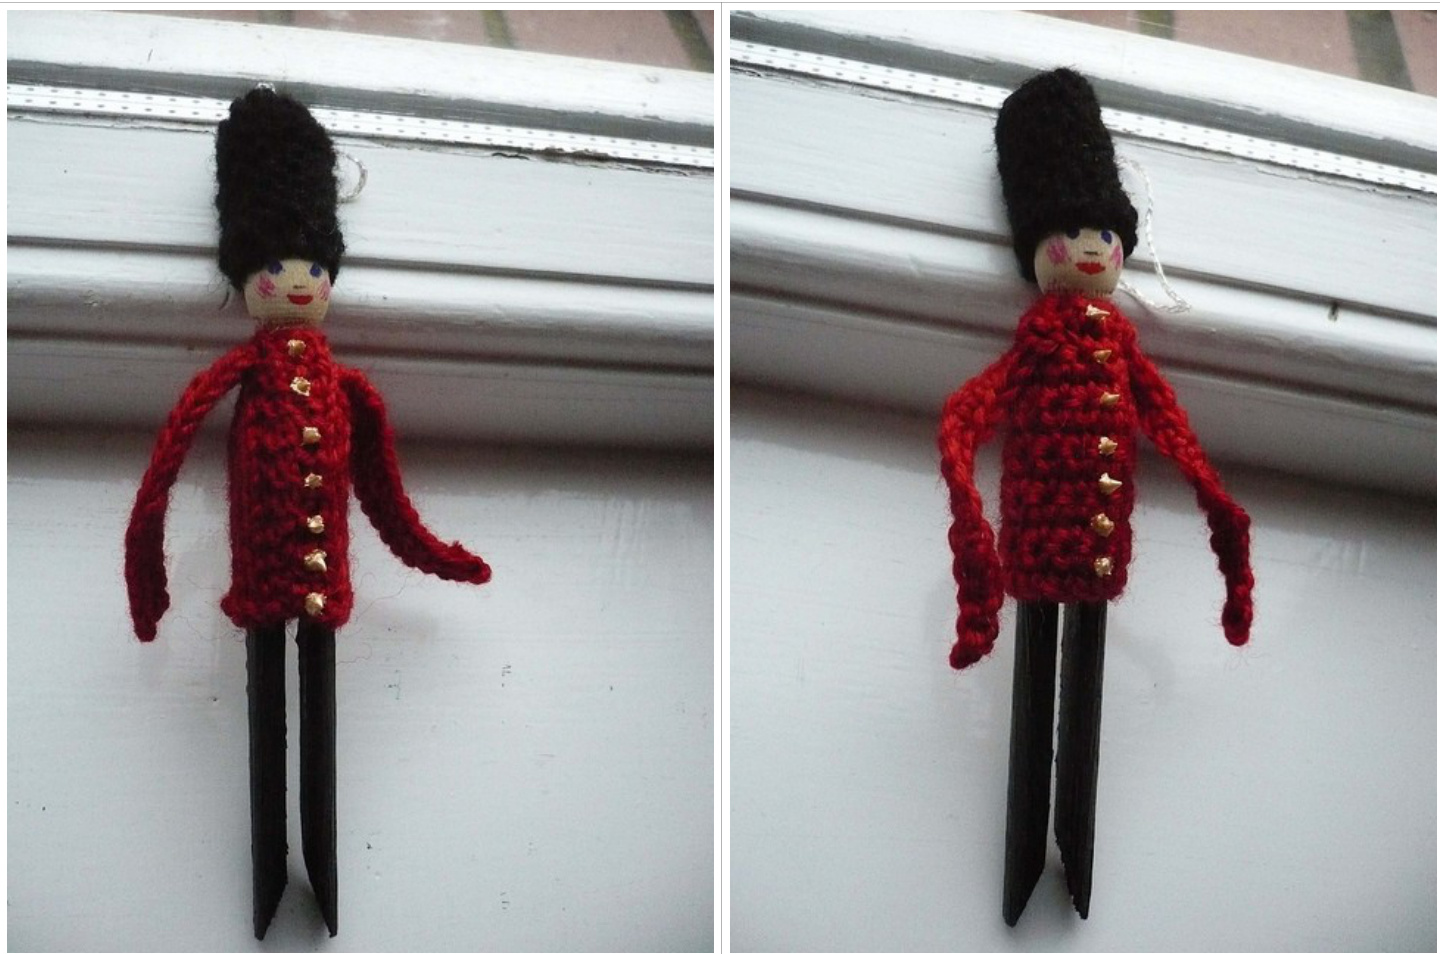
Putting the doll together.
1. Sew the arms of the jacket onto the jacket body. 2.Sew or glue the jacket onto the dolly peg with the front overlapping slightly. 3.Make a loop of glittery thread through the top of the hat - this is to hang the soldier from the Christmas tree. 4. Glue the hat onto the head of the dolly peg - you may want to tiltit slightly backwards so you can see the soldier's face. 5. Using puffy fabric paint, make gold buttons on the front of the jacket by placing small blobs of paint at regular intervals - allow to dry thoroughly. @ Marion Crick 2010. This pattern may be used to make your own toy soldier ornaments or as many gifts as you like. You may not distribute this pattern and please don't use it to make toys to Sell.


