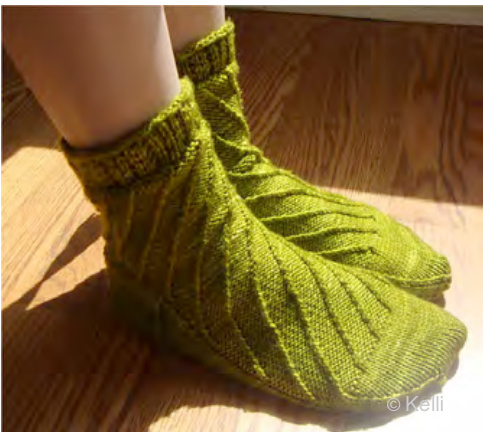
sakana
by JimiKnits
About The Pattern
Sakana'is theJapaneseword for Fish.This sockpatternwas named as such because of the fin-like cuffs and the iridescent colours and textures of the Koi. The cuff is made of a stretchy lace, while the rest of the sock features spiralling twisted stitches that swim in opposite directions. This pattern will assume that you already know how to make socks; how to turn a heel; where to do heel decreases and how to graft a toe etc. If not, don't despair! There are lots of free sock tutorials on: http://www.youtube.com and http://www.Ravelry.com Approximate shoe size: Women's medium (US 6-9 / Euro 38-41 / UK 6-8). Notes: It is a Top-down sock pattern. The cuff is an Eyelet Rib (see chart below), while the rest of the leg is a diagonal line formation. One sock is T2F (Twist 2 Front - also known as LEFT TWIST ) and the other sock is T2B (Twist 2 Back - also known as RIGHT TWisSTI) - both are also charted. The diagonal lines wil be slanting in opposite directions from each sock. The twists occur at every ODD round. The Twists are a Knit stitch / Purl Stitch crossover. ALL K sts in this pattern formation are KTBL (knit through back loop). On the EVEN rounds, just simply KTBL where Knit stitches appear and PURL the rest. A detailed explanation on how to do this is at the end of this document. The twisted stitches at the instep (top of the foot) simply start and finish at the left and right of the instep. The heel arch (underside) will just remain normal knit stitch.
Caution!
The twist stitch pattern is designed to spiral around the entire leg, so watch out for twists that go from end of one round to the beginning of the next round. This will affect your 'end of round' marker placement. Be aware of this and deal with it by shifting your marker over to the left or right by 1 or 2 purl stitches before you reach that end of round.
Materials
100g (3.5oz) Sock yarn (100% Merino or 75/25% Merino/Nylon) ■2.0mm - 2.50mm (US 0-1.5) Circular Needles. Note: DPNs may not be suitable for this pattern. Stitch markers Tapestry needle for grafting toe Gauge For guideline purposes, this gauge is based on the suggested yarn below: KnitPicks Stroll Tonal sock yarn: 100g 422m (462 yds), 75% Superwash Merino Wool, 25% Nylon. Gauge: 31 sts x 47 rows = 10cm (4") on 2.5mm (Us 1.5) needles. Everybody's gauge is different, so it is always best to do a swatch to check yourgauge!
Let's Get Started!
Cast on 64 sts. Place a marker to denote beginning of round. Join in the round, being careful not to twist.
Cuff
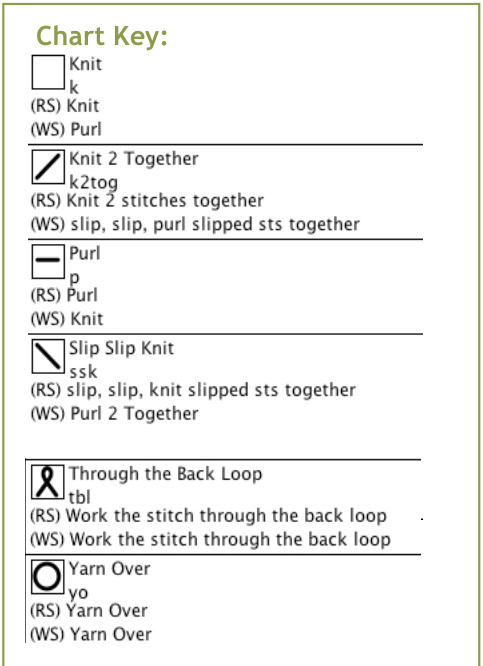
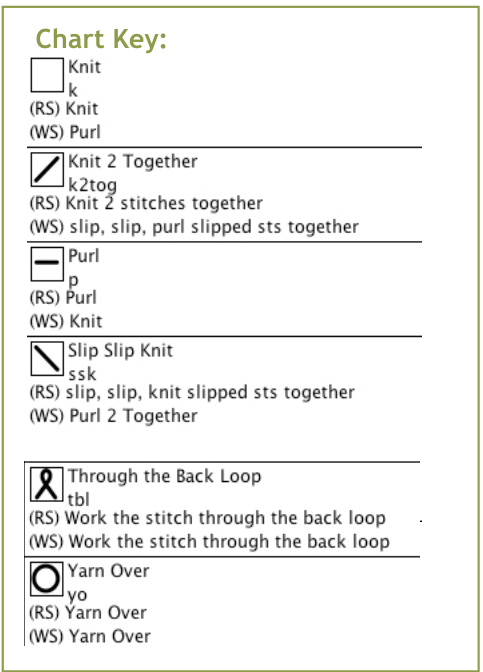
Set up row: as per chart below, for ONE row only. The charts below show the first 16 sts, - the rest is simply repeated. Written version: P1, k6, p1, k6, p1, k1, P1, k6, p1, k6, p1, k1; repeattoendofround. Eyelet Rib as per chart below for approx 12 rounds (or longer, if preferred). End on an EvEN rour Writtenversion: Round 1: P1, k1, yo, ssk, k2tog, yo, k1, p1, k1, yo, ssk, k2tog, yo, k1, p1, k1; repeat to end of round Round 2: P1, k6, p1, k6, p1, k1; repeat to end of round

Leg
: k1, kfb (knit front then back = 1 stitch increase), k31, kfb, k to end of round. Total no. of sts = 66 Work the set up round below, then work the Twisted Stitch patterns as per charts below until leg measures about 15cm (6 inches) from cast on edge (or desired length), ending on an ODD round.
Sock 1 chart: T2F - LEFT TWIST
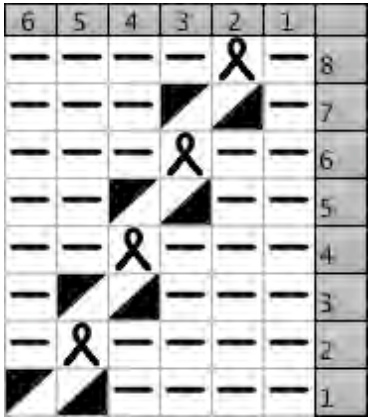
Sock 2 chart: T2B- RIGHT TWIST
Set up Round: K1tbl, P5, repeat to end of round. Set up Round: P5, K1tbl, repeat to end of round.
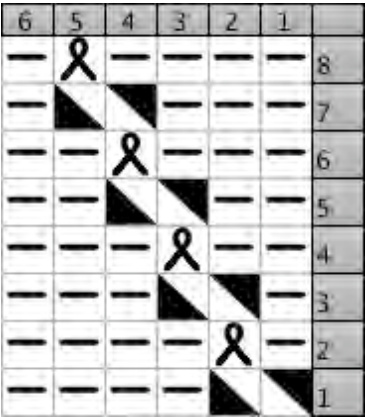
These charts indicate thefirst8rowsof pattern. From the gth row onwards, simply followthestitch positions to infinity!
Note: It is better to end on an ODD round in pattern before dividing for Heel. When you come to re-incorporating the heel flap with the rest of the sock, you don't need to worry about twisting stitches while doing allof that.
Heel flap
oy leaving 36 sts on hold for instep and working the next 30 sts back and forth for heel as follows: ■Row 1(right side): sl1, k1. Repeat until end of row 口Row 2: sl1, purl to end Repeat Rows 1 and 2 until heel flap measures 6.5cm (2.5 inches) or to desired length.
Heel Turn
Using short rows, turn heel as follows: ■Row 1(right side): sl1, k16, ssk, k1, turn ■Row 2: sl1, p5, p2tog, p1, turn ■Row 3: sl1, knit to one stitch before gap, ssk, k1, turn ■Row 4: sl1, purl to one stitch before gap, p2tog, p1, turn Repeat Rows 3 and 4 until 18 stitches remain.
Resume the Round
With right side facing, knit 9 sts. Place marker here to mark beginning of round. Knit the next 9 sts then pick up and knit 16 (or more) stitches from the left side of heel flap. Work chart pattern for the instep (EvEN round). Pick up and knit 16 (or more) stitches from the right side of the heel flap. Knit to end of round. The grand total of sts will be 86\*. \*Note: If the heelflap is longer than 6.5cm (2.5 inches), then pick up extra sts. The grand total of sts will be more, but this will mean that you will continue decreasing until there are 66 sts (or more, if you prefer a wider fit). As long as you have 36 sts at the instep (top of foot) to keep it in pattern, the rest is OK.
Decrease Heel
Decrease by 2 sts every alternate round until total number of stitches reaches 66 (or more, as above note) as follows: Round 1: Knit to 3 sts before instep pattern, k2tog, k1 (place a marker here). Work instep as per chart (ODD round) until 2 sts after instep pattern (place another marker here), k1, ssk, knit to end of round. Round 2: Knit up to instep pattern, work instep as per chart (EVEN round), knit to end of round. Note:Thepatterndiffersslightlyhereinthatinstead ofspirallingaround the entire foot, it stops left and right.This is achieved by introducing aKnit stitch every12rounds.Justmakesurethatyouhave5purl stsbetweeneachKstitch tokeepit inpattern.

Foot
Continue in pattern across 36 sts for the instep and stockinette for the heel arch, until foot measures 6cm (2 inches) from the toe edge (or desired length).
Toe Section
place marker - This will be your new beginning of round. K33, place marker, knit to end of round. Decrease toe section as follows: ■Round 1: [K1, ssk, k to 3 sts before marker, k2tog, k1] repeat to end of round. ■Round 2: Knit to end of round. Repeat these 2 steps until 22 sts remain. · Graft toe, weave in ends - That's it!!
HOW TO'S
Twisted Stitches - How I did it!
T2F - (left twist):
1) Slip the K stitch and the following P stitch onto the Right hand needle. 2) Insert Left hand needle into front loop of K stitch. 3) Pinch and hold both sts and pull free your Right hand needle. This will release both sts but the K st is still held on by the Left hand needle. 4) Quickly insert Right hand needle back into the free P st and put back onto the Left hand needle. 5)Purl, K1tbl. 6) Purl to the next K&P stitch pairing. 7) Repeat process until end of round.
T2B - (right twist):
1) Slip the P stitch and the following K stitch onto the Right hand needle. 2) Insert Left hand needle into back loop of P st (approach from behind both sts). 3) Pinch and hold both sts and pull free your Right hand needle. This will release both sts but the P st is still held on by the Left hand needle. 4) Quickly insert Right hand needle back into the free K st and put back onto the Left hand needle. 5) K1tbl, Purl. 6) Purl to the next P&K stitch pairing. 7) Repeat process until end of round.
Video Tutorials on YouTube:
RIGHT TWIST:http://youtu.be/te5MJ10KL8U LEFT TWIST: http://youtu.be/MqGISHX-GB0 GRAFT TOE (KITCHENER STITCH): http://youtu.be/KhQYq-6UCKI Thanks to: Collen, Kelli and Lillian fortest knitting this project forme and forgiving me permission to use their photos!
Abbreviations (in alphabetical order)
K = Knit K1tbl = Knit 1 through back loop K2TOG = Knit 2 sts together (1 stitch decrease) KFB = Knit through front then back of same stitch (1 stitch increase) P = Purl P2TOG = Purl 2 sts together (1 stitch decrease) PM = Place Marker Sl1 = Slip 1 stitch SSK = slip slip knit. Slip 2 sts knit-wise then k2tog through back loop (1 stitch decrease) T2F = Twist 2 Front (Left Twist) T2B = Twist 2 Back (Right Twist) YO = Yarn over (1 stitch increase)
★★★★★BONUSPATTERN!★★★★★
Sakana, The Beanie
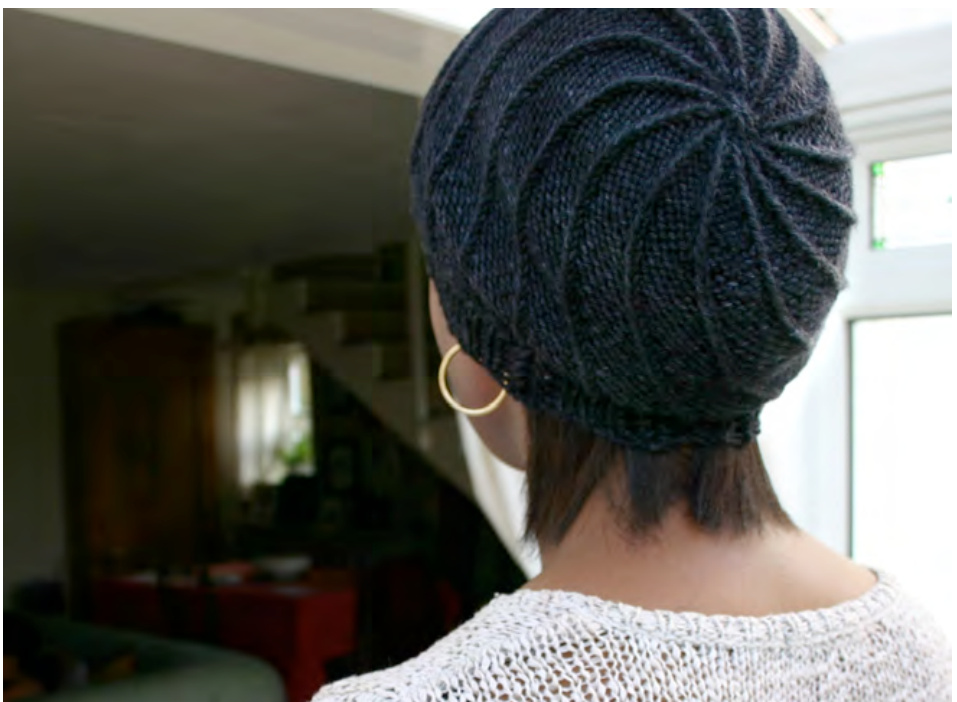
Sakana, The Beanie
by JimiKnits
About The Pattern
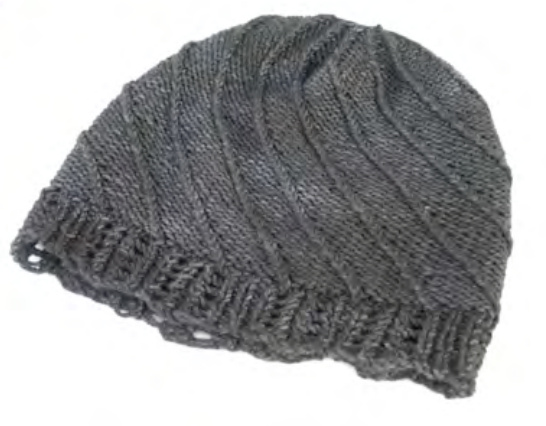
This beanie hat is based on my first ever sock pattern, Sakana. To me, I thought the pattern was so versatile; it could easily be turned into fingerless mitts, or even a skirt. And now of course, a hat! The brim is made of a stretchy lace, while the rest of the hat features the spiralling twisted stitches that swim upwards from right to left. This hat would suitaworstedweightorheavyDKyarn.
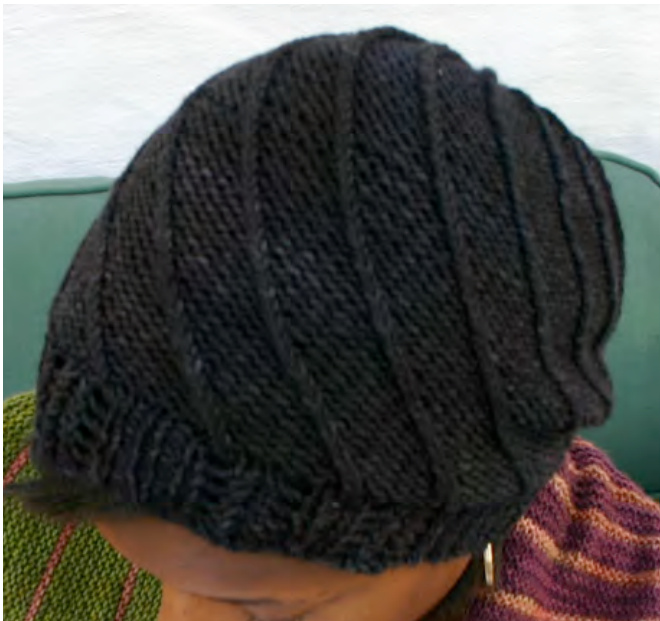
Notes: The brim is an Eyelet Rib (see chart below), while the rest of the hat is a diagonal line formation of T2F (Twist 2 Front - also known as LEFT TWIST ). The twists occur at every ODD round. The Twists are a Knit/Purl crossover. All K sts in this are KTBL (knit through back loop). On the EVEN rounds, just simply KTBL where Knit stitches appe A detailed explanation on how to do this is at the end of this document.
Caution!
The twist stitch pattern is designed to spiral around the entire hat, so watch out for twists that go from end of one round to the beginning of the next round. This will affect your 'end of round' marker placement. Be aware of this and deal with it by shifting your marker over to the left or right by 1 or 2 purl stitches before you reach that end of round.
Size
Approximate size: Women's medium 20"- 23" head circumference
Materials
100g (3.5oz) Heavy DK/Worsted weight yarn (100% Merino) ■4.0mm (US 6) Circular Needles ■4.5mm (Us 7) Circular Needles. Note: DPNs may not be suitable for this pattern. Stitch markers Tapestry needle for weaving in ends.
Gauge
For guideline purposes, this gauge is based on the suggested yarn below: MadelineTosh DK Twist: 100g 230m (250 yds), 100% Superwash Merino Wool. Gauge: 23 sts x 28 rows = 10cm (4") on 4.5mm (Us 7) needles. Everybody's gauge is different, so it is always best to do a swatch to check yourgauge!
Let's Get Started!
Using the smaller sized needle, cast on 80 sts. Place a marker to denote beginning of round. Join in the round, being careful not to twist.
Brim
Set up row: as per chart below, for ONE row only. The charts below show the first 16 sts, - the rest is simply repeated.

Written version: P1, k6, p1, k6, p1, k1; repeat to end of round. as per chart below until brim measures 3cm (1.5") long - approx 10 rounds. End on an EVEN rou Writtenversion: Round 1: P1, k1, yo, ssk, k2tog, yo, k1, p1, k1, yo, ssk, k2tog, yo, k1, p1, k1; repeat to end of round Round 2: P1, k6, p1, k6, p1, k1; repeat to end of round

Hat
Change to the larger sized needles. Increase Round: k1, kfb (knit front then back = 1 stitch increase), k8, [kfb, k9] repeat [] to end of round. Totalno.ofsts=90 Work the set up round below, then work the Twisted Stitch pattern as charted until hat measures about 20cm (8") from cast on edge. For a slouchier beanie, continue for a few more rows until desired length. End on an EVENround.
T2F-LEFT TWIST
Set up Round: K1tbl, P5, repeat to end of round.

The chart indicates the first 8 rows of pattern. From the gth row onwards, simply follow the stitchpositions to infinity!

Decreasing crown
From here on, there willbe no further twisting to be done. Decrease sts in line with the pattern formation, as follows: · 1) oDD round: [p to the next K st, ssk] repeat [] to end of round I2) EVEN round: p the p sts, ktbl the k sts. Repeat these 2 steps until 7 sts remain. Finish off by cutting off your working yarn, leaving about 15cm (6") of length. Thread the yarn onto a tapestry needle and thread it through the remaining 7 sts. Pullfirmly to close up the hole. Sew up to secure in place. Weave in ends. Blockifdesired.
HOW TO's
Twisted Stitches - How I did it!
T2F - (left twist):
1) Slip the K stitch and the following P stitch onto the Right hand needle. 2) Insert Left hand needle into front loop of K stitch. 3) Pinch and hold both sts and pull free your Right hand needle. This will release both sts but the K st is still held on by the Left hand needle. 4) Quickly insert Right hand needle back into the free P st and put back onto the Left hand needle. 5)Purl, K1tbl. 6) Purl to the next K&P stitch pairing. 7) Repeat process until end of round.
Video Tutorial on YouTube:
LEFT TWIST: http://youtu.be/MqGISHX-GBO
Abbreviations (in alphabetical order)
K =Knit K1tbl = Knit 1 through back loop K2TOG = Knit 2 sts together (1 stitch decrease) KFB = Knit through front then back of same stitch (1 stitch increase) P = Purl PM=PlaceMarker SSK = slip slip knit. Slip 2 sts knit-wise then k2tog through back loop (1 stitch decrease) T2F = Twist 2 Front (Left Twist) YO = Yarn over (1 stitch increase)