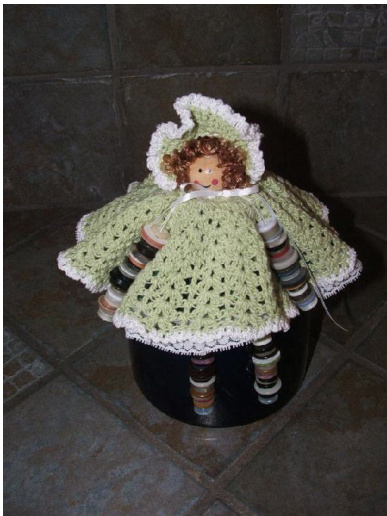
Green Button Doll Skill Level: Intermediate Supplies: Size 3 steel crochet hook, about 50 yds. # 10 (bedspread weight) cotton crochet, small amounts of white; size 10 cotton crochet for trim: 90 buttons, needle, thread, hot glue and gun, $25\mathrm{mm}$ wooden doll head, small amount white satin ribbon, small amount doll hair or yarn suitable for doll hair, thread spool. Optional: For underskirt: 24 inches ruffled lace, 24 inch $\textbf{X}2~\%$ inch fabric ribbon. Stitches Used: sc, hdc, dc,tr, dtr, front post dc, back post dc Directions Dress: Ch 15,join with sl st to form ring; ch1, sc inring; 39 sc in ring; join with sl st; do nt turn. 40sc Rnd. 1: ch 3, dc in same st; \*dc in next st; 2 dc in next\*, repeat around; join with sl st to top of beginning ch 3. 6Odc Rnd. 2: ch 3, skip next dc; $^{*}2\mathrm{dc}$ . ch 1, 2dc in next st (shell); skip next dc; dc in next de\*, repeat from asterisks; join with sl st to top of beginning ch 3. 15shells Rnd. 3 ch 4; dc in same st; \*shell in next shell; dc, ch1, dc in next dc (v stitch)\*, repeat from asterisks, join with sl st to $3^{\mathrm{rd}}$ ch of beginning ch 4. 15 shells, 15 v stitches Rnd. 4: sl st to ch 1 sp; ch 3, dc, ch1, 2 dc in same sp; \*shellin next shell; shell in next ch1 sp of v stitch\*, repeat from asterisks; join with sl st to top of beginning ch 3. 30shells Rnd. 5: sl st to ch1 sp; ch 3, dc, ch 1, 2 dc in same sp; skip 2 dc, \*dc in sp between shells; shell in next shell\*; repeat from asterisks; join with sl st to top of beginning ch 3. 30 shells,30 dc Rnd. 6: sl st to ch 1 sp; ch3, dc, ch1, 2 dc; dc in next dc; \*shell in next shell; dc in next dc; repeat from asterisks; join with sl st to top of beginning ch 3. 30 shells, 30 dc Rnds. 7, 8, 9, 10: repeat rnd. 6; fasten off. Rnd. 12: Attach white in any stitch, ch 3,\*sc, ch3 in next st\*: repeat from asterisks; join to $1^{\mathrm{st}}$ sc; fasten off. Bonnet: Ch 2, 8sc in $2^{\mathrm{nd}}$ ch from hook; do not join, mark beginning of rnd. with safety pin. Rnd. 1: 2 sc in each sc 16 sc Rnd. 2: sc in $1^{\mathrm{{st}}}$ sc, 2sc in next; epeat arou; jointobackloopfbeginng sc, 24sc Rnd. 3: ch 3; \*2dc in next dc; dc in next; repeat in next 18 st; ch 3, turn. 28 dc Rnd. 4: \*front post dc in next dc, back post dc in next\*; repeat from asterisks in each dc; ch 3; turn. 28 dc Rnds. 5: repeat rnd. 4. Rnd. 6: repeat rnd. 4; ch 1, turn. Rnd. 7: sc in each dc; ch 1; turn. 28 sc Rnd. 8: sc in back loop of each sc, ch 1; turn. 28 sc Rnd. 9: for hat brim: sc in $1^{\textrm{s t}}3$ sc; hdc in next 3 sc; dc in next 4 sc; 2 tr in next 3 sc; dtr in next 4 sc; 2tr in next 3 sc; dtr in next 4 sc; dc in next 4 sc; hdc in next 3 sc; sc in next 3 sc; fasten off. Rnd 10: Attach white in beginning sc; $^{*}\mathrm{ch}\,3$ , sc in next $\mathbf{s}\mathbf{c}^{*}$ ; repeat in each sc, fasten off. Rnd. 10: skip brim, insert hook in bottom, back of hat; 16 sc across the back evenly; ch 4; turn.16sc Rnd. 11: skip next sc; \*dc, ch1 in next sc; skip next sc\* repeat from asterisk; ch 1; turn. 7 ch 1 spaces Rnd. 12: sl st to $2^{\mathrm{nd}}$ ch1 sp; ch 3, 4din same sp; 5de in ext sp; reeat twice; fasten ff. 20 dc Rnd. 13: Attach white, ch 1, sc, ch 3, sc, ch 3 in same stitch ; \*sc in next st; ch 3, sc in same st, ch $3^{*}$ ; repeat from asterisk, fasten off. Lace ribbon, starting at $1^{\mathrm{\,st}}\,\mathrm{ch}\;1$ space, weave ribbon evenly across the top and ending at last ch 1 sp, leaving about 8 inch tails to tie a bow. Assembly: For all button dolls Sew lace to bottom edge; fold fabric in half lengthwise, right sides facing and stitch up center. Turn fabric to right side, baste across top and pullstitches to gather fabric to fit top sie of spool, evenly spacing ruffles. Glue in place. String 22 buttons, using heavy duty thread, insert needle into buttonhole until all buttons have been stung; then reverse the processby running needle through opposite buttonhole, leave about a 3 inch tail, tie knot about 1 inch above the buttons. (for hands and feet, a single button hole button can be used- string 21 buttons, then string the single button hole button; reverse the process by running the needle through the opposite button hole of the remaining 21 buttons), complete process as above. Repeat this process for both legs and both arms. Position leg on spool, place a dollop of glue to the leg string and then insert a button on top of string to secure it to the spool. Repeat for second leg. Place crocheted dress over top of spool, position evenly, glue in place. Position arms to the top of the spool, pushing excess thread into center hole, place a dollop of glue into center hole of spool to secure arms, hold arms in place until glue sets. Glue head to center, top of spool. Position hair to head, glue in place. If using yarn: Wrap yarn around a 2 inch cardboard about 40 times, tie with thread at top to secure, do not cut yarn; slide off cardboard and spread yarn out. Position hair to top of head and glue in place. Add hat, lightly glue in place. Embellishments canb addd, ncluding,but nt lmited to satinrose, pearls, costue jewelry, etc.


