lslandeRRy Coul
by Kate Mahoney
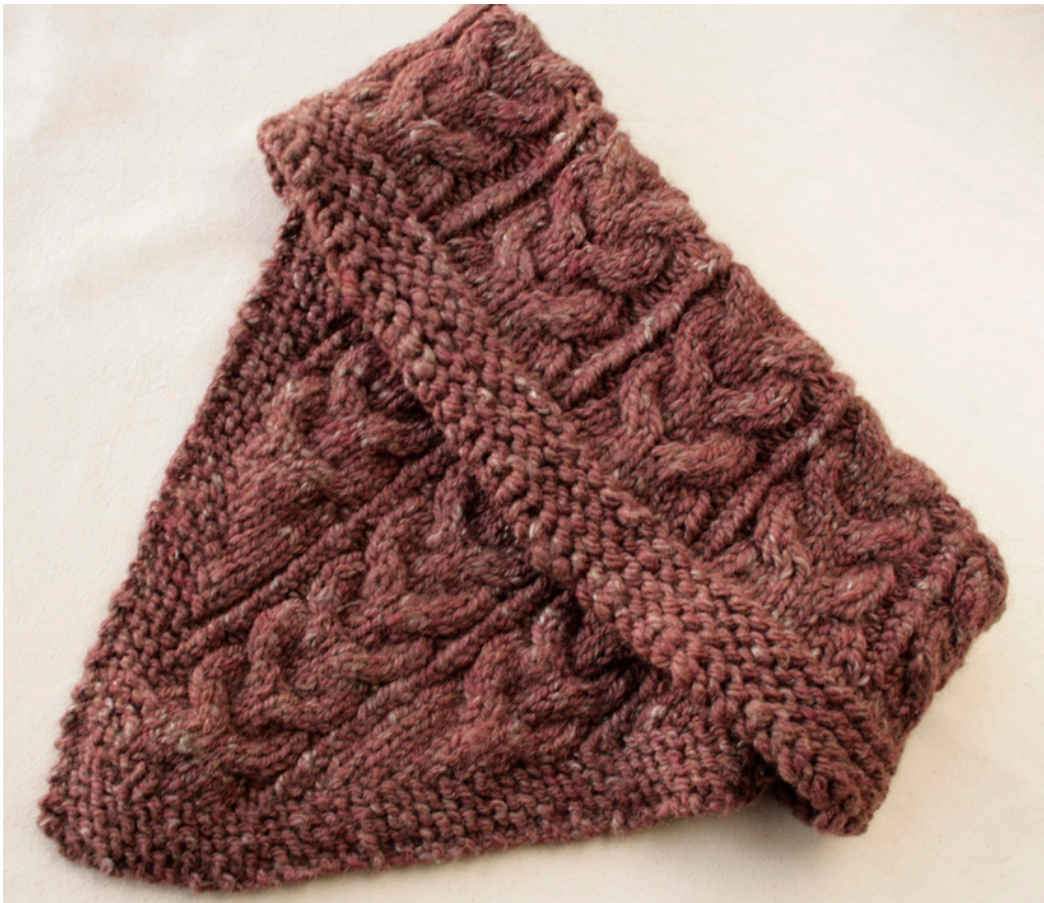
My mother's family lived in a dilapidated Georgian country house in County Antrim, Northern Ireland. I can just imagine how welcome a cozy cowl would have been to any of my great-aunts after the “experimental application of tarmacadam to the roof" had “proved unsuccessful". A bib-front cowl with two versions, one with cabled neck and one in stocking st with a cabled bib.
Materials:
150-200gr Chunky yarn, 16st x 22r = 10cm on 6mm needles. Pair of 6mm straight needles Set of 4 6mm needles, or a circular 6mm needle, 60mm length Featured yarn: see back cover for details Comparable Commercial Yarn: Naturally Vero
Abbreviations:
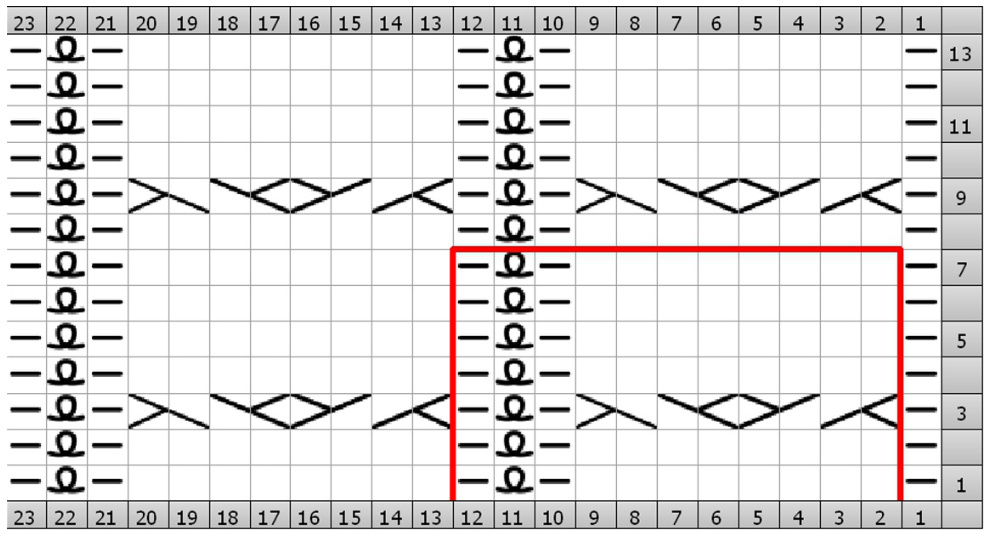
k: knit next stitch(es) p: purl next stitch(es) st st: stocking stitch (k every round on circular needles) g st: garter stitch (k1 round, purl 1 round on circular needles) st(s): stitch(es) kfb: knit into the front and back of the stitch, creating another stitch pfb: purl into the front and back of the stitch, creating another stitch kfbf: make 3 stitches from one by knitting into the front of the stitch, then the back, then the front again. c4b: cable 4 back: slip next two stitches onto a cable needle, and, holding to the back of the work, knit next two stitches, k2 st from the cable needle. c4f: cable 4 front: slip next two stitches onto a cable needle, and holding to the front of the work, knit next two stitches, k2 st from the cable needle. CO: Cast on patt: pattern
Instructions:
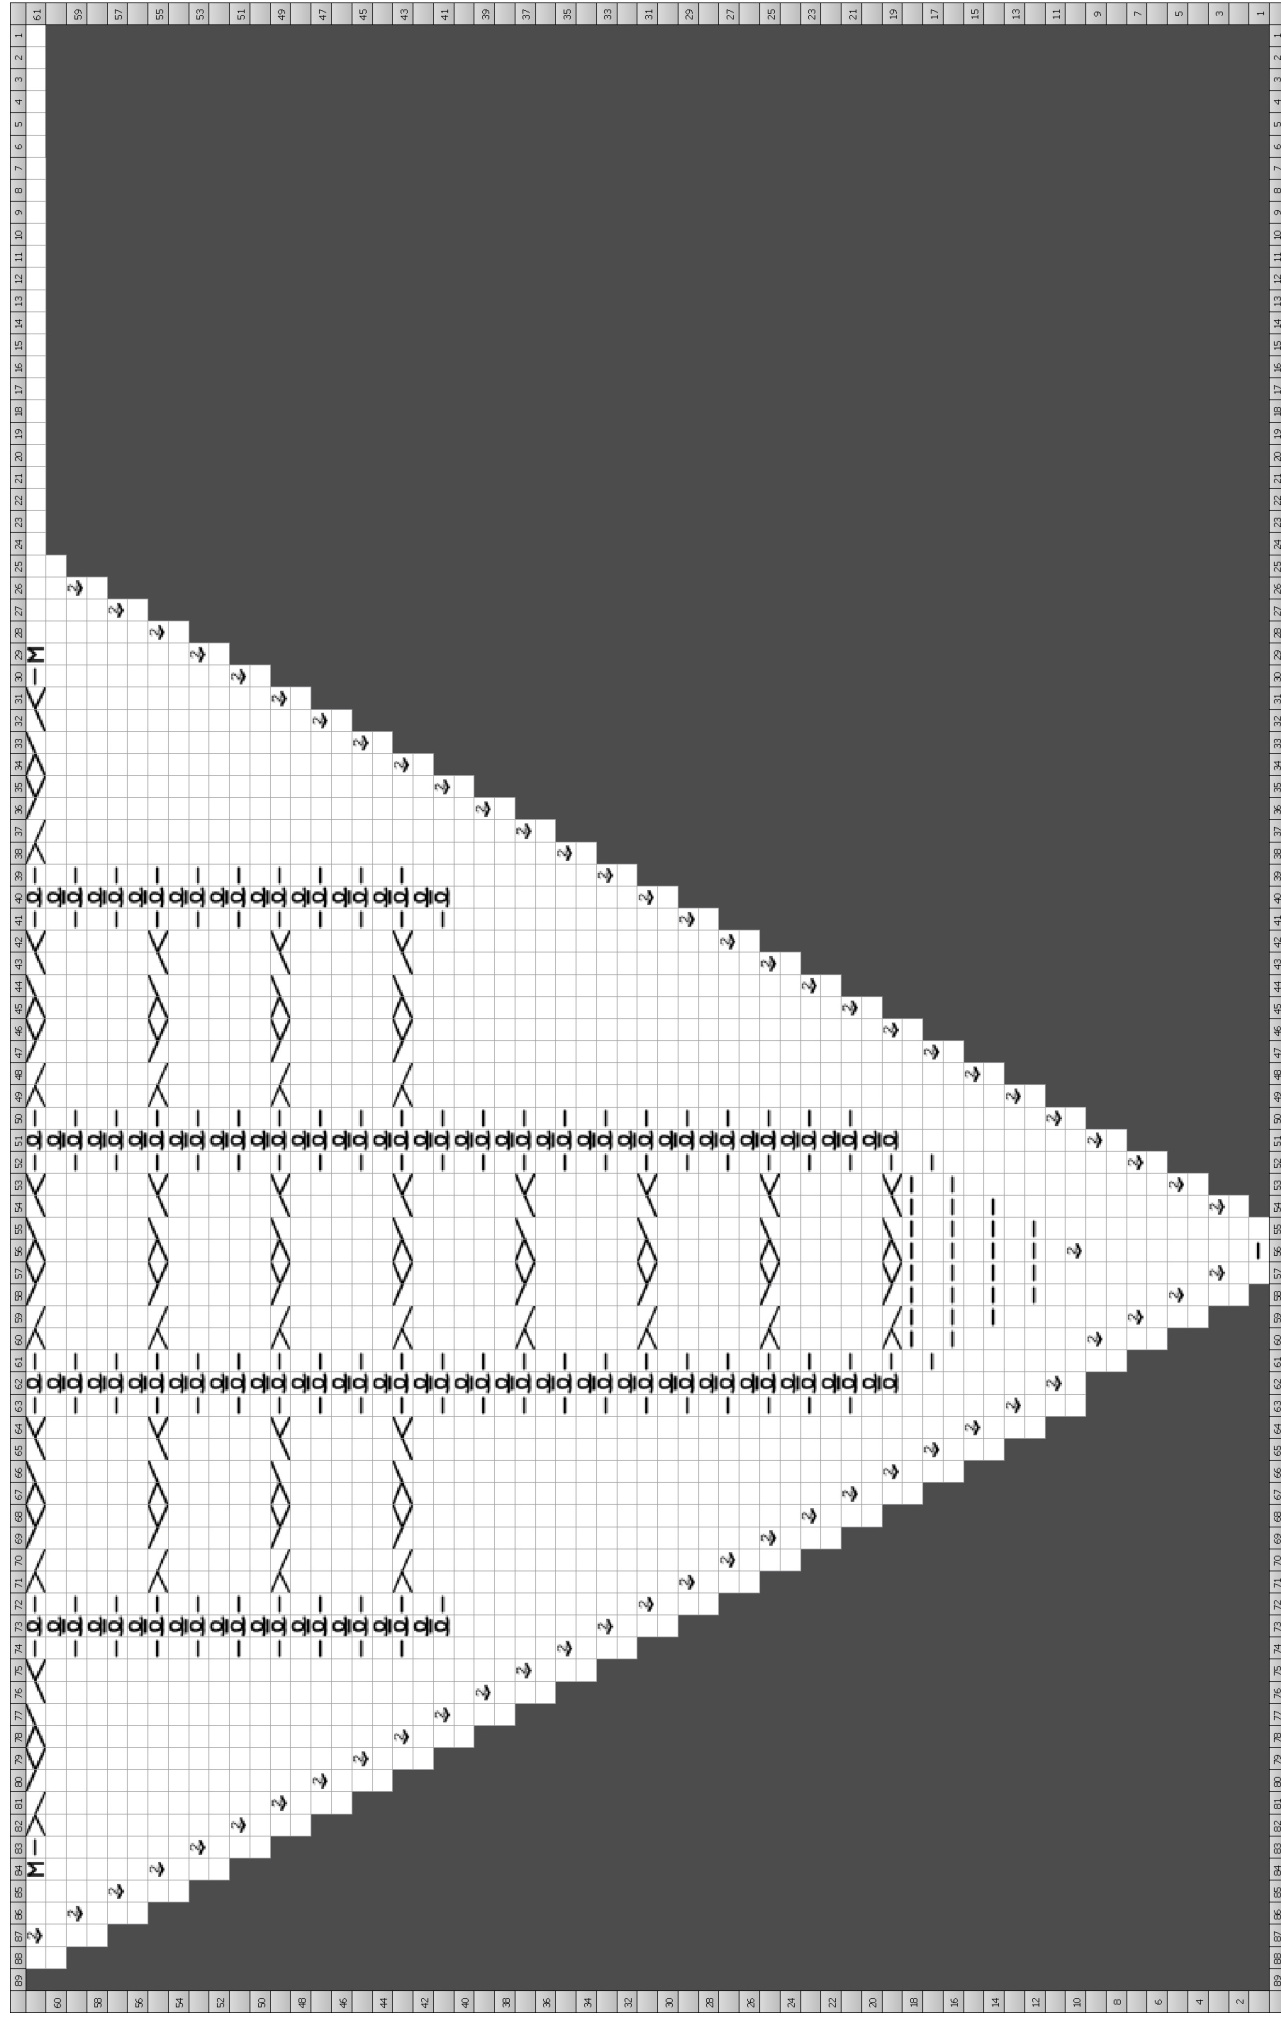
Using 6mm straight needles, make a slipknot or a magic circle, and put it on your left hand needle. Knit fbf (3 stitches) into the slipknot, turn and knit to end. Next row: \*Kfb, knit to last 2sts, kfb, k1, turn and knit back to end\*. Rep from \* to\* until you have 11 sts.
Establish pattern:
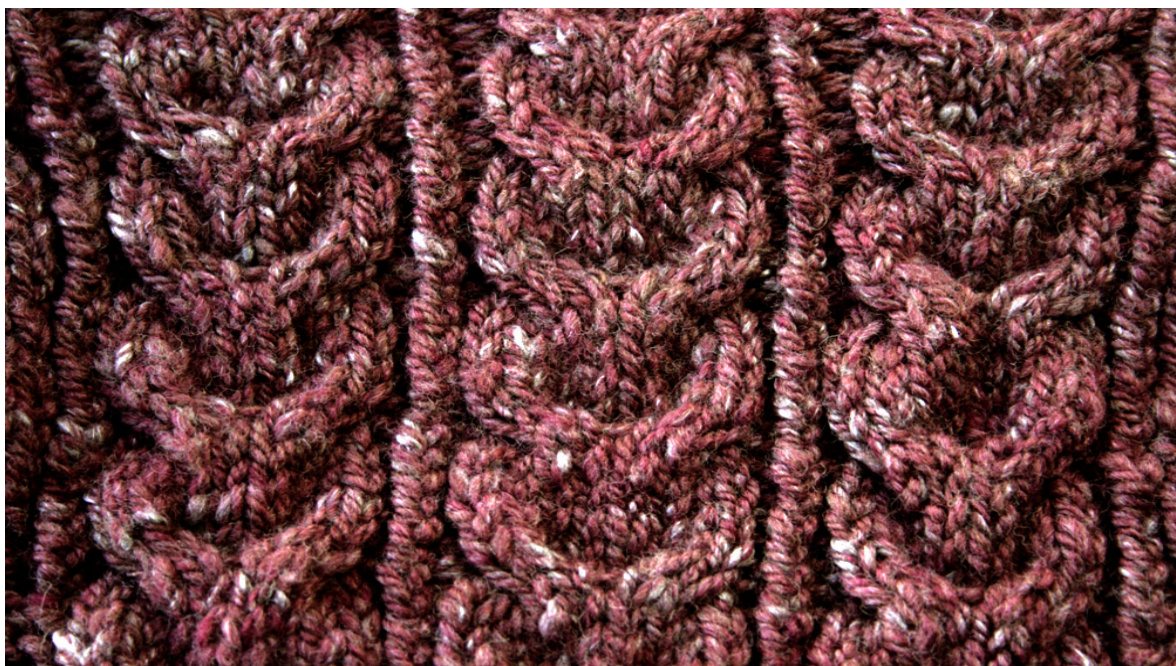
Row 1: kfb, k to last 2sts, kfb, k1 Row 2: k6, p1, k1 into centre st, k6 (increases to an even number of stitches between the borders, needed for the cable pattern) 14sts. Row3:asrow1 Row 4: k6, p4, k6 Continue in pattern as set, keeping increases at the edges and adding 2 sts to the stocking stitch central portion in every right siderow. you have 8 st st in the centre, begin cable pattern A (right side rov Row 1: kfb, k4, p1, k8, p1, k3, kfb, k1 Row 2: k7, p8, k7 Row 3: kfb, k4, k1tbl, p1, C4b, C4f, p1, k1tbl, k3, kfb, k1 Row 4: k6, p1tbl, k1, p8, k1, p1tbl, k6 Row 5: kfb, k4, p1, k1tbl, p1, k8, p1, k1tbl, p1, k3, kfb, k1 Row 6: k6, k1, p1tbl, k1, p8, k1, p1tbl, k1, k6 Continue as above, increasing 1st each end of every right side row and following cable pattern as set, while increasing the stocking stitch portion on either side of the p1, k1, p1, at each end of the cable section until you have completed 3 cable repeats. On Row 3 of the next cable repeat: kfb, k4, k1tbl, \*C4b, C4f, p1, k1tbl, p1,\* 2x, C4b, C4f, k1tbl, k3, kfb, k1. This brings in two more cable repeats. Next row: k6, p8,\*k1, p1tbl, k1, p8\* (2x), k 6 Continue in patt, working p1, k1tbl, p1 on either side of cable patt as stitches become available from increases, then continue to k added sts in st st until there are 8 st st each side of the 3-cable panel. 64sts. Next row: cast on and knit 24 sts, k5, PM, p1, C4b, C4f, cont. patt across cable panel as set, ending C4b, C4f, p1, k5 (5 cables established). 88 sts. Begin 2x2 rib: k2, p2 to M, pattern to the end of the cable section, including the final p1; PM.
Form collar:
Join into a round and continue on dp or circular needles. Continuing cable pattern as set, and working all cO sts in garter st, work 8 full rounds. On the last round, increase 8 st evenly over the g st section. 96 sts. Work short rows across the rib section, as follows: rib to 3 sts before the next marker, wrap and turn. Rib back to three sts before the marker, wrap and turn. Continue in this way, stopping an extra 3 sts before the marker until 8 short rows have been completed. Note that sometimes you will be working on the inside. This short row section makes the back neck dip down a little.\* Stop here for the advanced version and continue working from the instructions on the next page.
Easy version:
At the end of the last short row, continue in rounds as set to the end of the cable pattern repeat (picking up and working the short row wraps tog with the foll st on the first round) then work a further 25cm in rev st st across all stitches. On the final round, k together 3rd and 4th, then every foll 5th and 6th stitch for entire round. Work g st for 8 rounds and cast off loosely (see note at end of pattern). Block lightly. If you have yarn remaining, you may choose to continue until your yarn is finished. This will give your finished cowl a piled up' slouchy look when worn. Tip: for reverse stocking stitch, turn your cowl inside out so you can work in the opposite direction and knit every row rather than purling. Just wrap at the starting point to avoid a hole: slip last knitted stitch onto the l. h. needle, wrap and slip back onto the right needle before turning and continuing in st.st.
Advanced version:
Do not remove markers; you will be needing them soon! From \*, work 2 full rounds st.st. (picking up and working the short row wraps tog with the foll st on the first round). Turn the cowl inside out on the needles (this works better on circulars), slip last knitted stitch onto the l.h. needle, wrap and slip back onto the right needle and knit to first cable section marker.
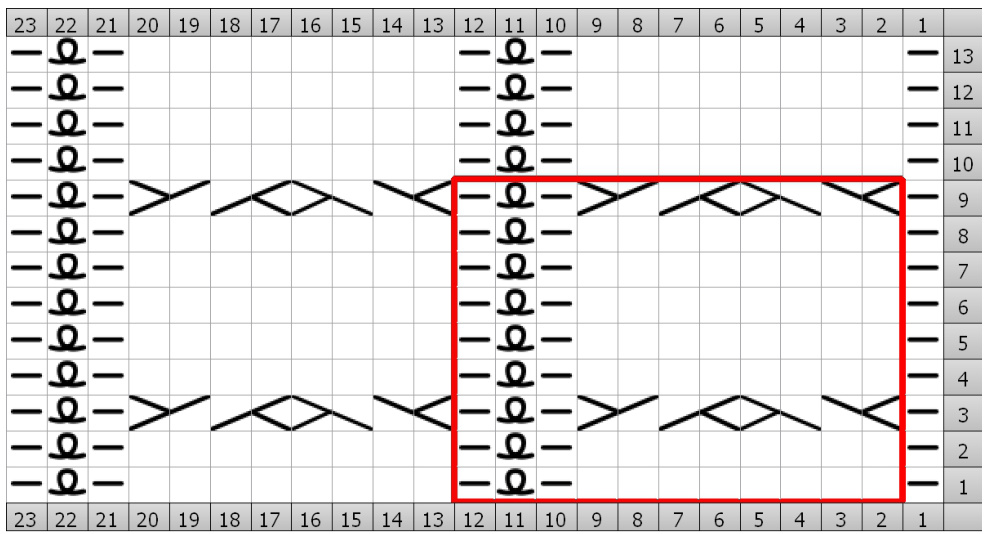
Cable pattern B:
Rnd 1, 2, 4, 5, 6: P1, \*k8, p1, k1b, p1,\* 4x, K8, p1. Work in k2, P2 rib to end of round. Rnd 3: P1, \*C4fr, C4b p1, k1b, p1,\* 4x, C4fr, C4b, p1. Rib to end of round. Note: the cables in this section of the cowl are turned in the reverse of the original cable pattern - this makes the cables match up when the top layer of the cowl is turned over. Work in rounds, in pattern as established, for 4-5 full pattern repeats, decreasing as follows on the last round: on each cable, patt to 1st before cable; ktog purl st and 1st cable st; k to last st of cable, ssk last st of cable with foll purl st. Repeat across cable panel. Now dec 9sts evenly across the rib panel by working 2 purl sts tog tbl. Work a further 8 rounds in g.st. Cast off loosely. I use the following cast-off method: k2tog, slip st just worked back onto the r.h. needle, k2tog, rep to end. Draw end through the last loop and pull through loosely. Use this end to chain st onto the first st for an undetectable join. Finishing: run in ends and block lightly with steam, paying particular attention to the centre point, and taking care not to flatten the cables.
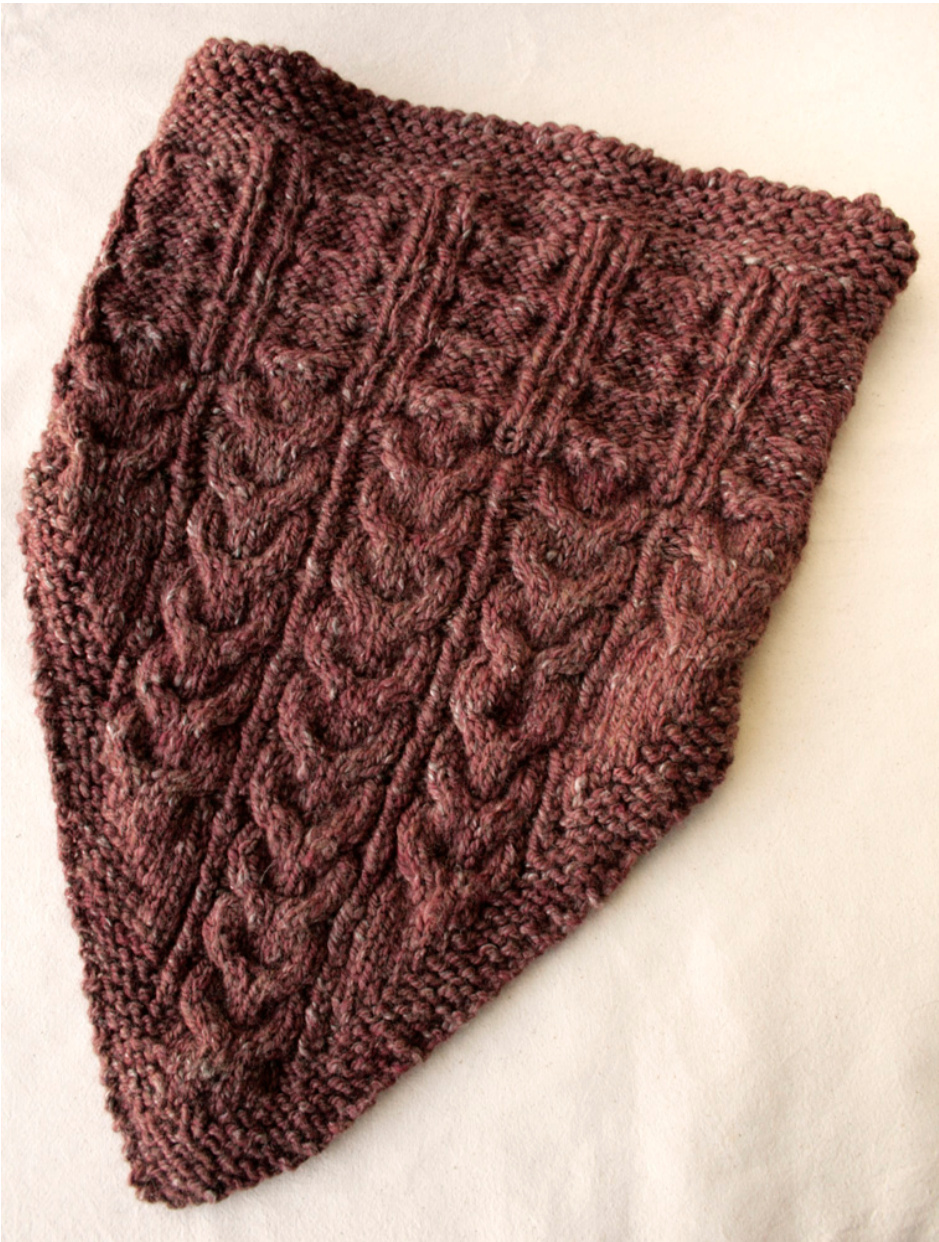
Completed advanced version, unfolded.
Thanks for purchasing my Islanderry Cowl pattern. I hope you enjoy wearing or gifting it! Featured yarn: Handspun by Kate Featured fibre: Haunui Handcraft Wool: 26/27 micron 'silky' line New Zealand Halfbred combed top from Heavenly Wools, hand-dyed and blended with 10% silver yak/silk fibre from Blue Barn Fibres Sample Knitted by Sarah-Lou
OCopyright Kate Mahoney 2015
This design may not be copied, reproduced or edited for resale. If you make an item from this pattern for sale, or you publish a photo or description of your completed project, acknowledge the pattern source in this way: From an original design by Kate Mahoney, www.heavenlywools.co.nz. Designs based on this pattern are subject to the same copyright terms. Old Church Press 573 Bush Rd RD1 Oxford New Zealand Design concept, text and images by Kate Mahoney. Copyright Kate Mahoney, 2015 All rights reserved. It is illegal to reproduce any part of this publication for sale. While all care has been taken to make sure these instructions are accurate, errors may have occurred. For clarification, email heavenlywools@gmail.com