San FrancisCO Organic Bag. Big dramatic entrance with this beautiful bag.
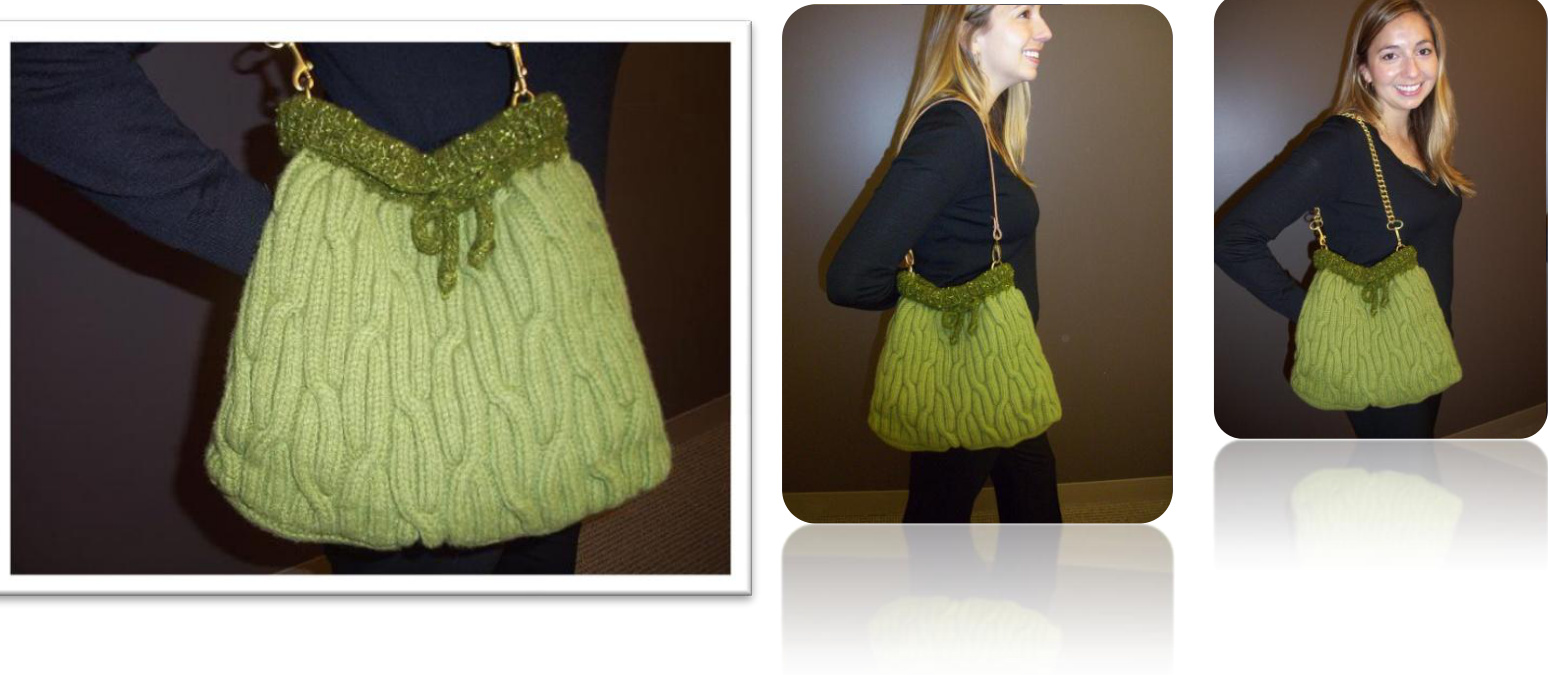
Created by Patty Thomas, San Francisco Knit Designer & Owner of Daisy Yarns of San Francisco for individual use (not to be copied or published without permission, www.daisyyarns.com), July-2011. Photos show leather strap and chain strap options. Materials: 500 yards of O-Wool Classic Organic Merino Wool Yarn and 70 yards of Tilli Tomas' Flurries Beaded Wool, Size US 8 Circular Needles that are 24 inches, cable needles, Size US 8 Double Pointed Needles to knit iCord, Yarn Needle, 2 O-Rings or D-Rings, 2 Swivel Snaps, 1 Purse Chain about 20 inches or leather handbag strap, Large Magnetic Snaps that are sew able for inside of bag, Stitch Markers, Row Counter and i% Yard of Pre-Washed Cotton lining (you pre-wash this). Everything is available @ www.daisyyarns.com, except the bag lining. I suggest http: / /www.fabricworm.com/organicfabric.html Level: Intermediate (requires ability to pick up stitches, cabling, yarn over's, & knitting iCords) Finished Size: 15 inches front and half of side panels x 10 in length Definitions: \*\* A set of repeated instructions YO = Yarn Over K= Knit P = Purl K2tog = Knit 2 stitches together as 1 stitch Sl = Slip Stitch P2tog = Purl 2 stitches together as 1 stitch Garter Stitch = Knit all sides Cables = are detailed fully in the instructions. This pattern was designed specifically for use with O-Wool Classic organic merino wool and Tilli Tomas' Flurries beaded wool. If you choose other yarns to work with the results will not be exactly the same (for some persons this is ok).
Bag Bottom (Make 2 pieces!):
Using O-Wool Classic Organic Merino Wool cast On 64 stitches and knit in garter stitch for 4 inches. Bind off. · Start the 2nd bag bottom and proceed in the same above method and bind off. Compare the 2 bag bottoms to make sure they are equal in size. Note: These 2 pieces will be assembled later. You must reinforce the bag bottom, with the secondpiece.
Bag Cabled Body:
Using O-Wool Classic Organic Merino Wool and circular needles, pick up 192 stitches in total around one of the bag bottom pieces (32 at short end + 64 front panel + 32 short end + 64 back panel = 192). Note: The cabled pattern below is done in sets of 16 (12 sets to be exact). You are advised to use stitch markers for every set of 16 stitches in a different color from the start of round1.
SET UP ROUND
· You will knit one round in knit stitch and then join the round. Make sure you use a stitch marker to define where the beginning of this bag is. From this point on you are knitting in the round. Now start by using the numbered rounds below: Rounds 1-9: \*P2, K2\* Round 10: P2, \*sl 4 stitches on cable needle and leave at Front of work, K2, slip the 2 Purl stitches from the cable needle to left needle and Purl them, Knit the last 2 stitches from the cable needle, (P2, K2) twice\* Rounds 11-19: \*P2,K2\* Round 20: \*(P2, K2) twice, P2, slip 4 stitches on cable needle and leave at Back of work, K2, slip the 2 purl from the cable needle to the left needle and purl them, K the last 2 stitches from the cable needle. Repeat above 20 Rounds 2 MORE times. DO NOT BIND OFF.
Bag Ribbed Neck:
Using Flurries Beaded Wool and continuing your stitches from the circular needles. Two very important notes: # 1 - Keep the beginning of round one stitch marker on your needle. #2 - Make sure you tie a knot at the beginning and end of knitting with the beaded wool to prevent the beautiful glass beads from falling off. Rounds A: \*P2 tog, K2 tog\* Round B: \*P1, K1, P1, YO, K1\* (note: This creates eyelet openings to later insert your iCord) Rounds C: \*P1, K1. P1, drop Yarn Over, K1 Round D: \*P1, K1\* repeat this round for 4 inches. Bind off in pattern. (You should have a small ball of yarn left over, hopefully 8 yards. Do not worry if you don't have 8 yards, it is not tragedy, you can use the OWool Classic Organic Merino Wool for the iCord)
iCord for Insertion around Ribbed Neck:
Using “either” the Tilli Tomas Flurries Beaded Wood Or O-Wool Classic Organic Merino Wool and two double pointed needles cast on 3 stitches. Knit through the back loop and slide stitches to the other end of the double pointed needle. Yes, you will need to pull the yarn tighter to ensure a nice round cord. Knit this until it is 36 inches, bind off. ·Feed iCord through eyelet opening in the neck of the bag. Upon completion you will tie knots at both ends of the iCords.
Ring Tabs (Make 2):
Cast on 6 stitches using the O-Wool Classic yarn & knit for 2 inches in garter stitch. Make another one for a total of two.
Bag Assembly before Felting:
Ok you have already inserted the iCord around the neck of the bag and now you need to turn bag inside out and attach the 2nd bag bottom to the 1st bottom of the bag. Make sure your stitching does not show on the outside of the bag. This extra bottom ensures the bag is not too floppy and has substance.
ting (makes the bag and all pieces 25% less in size)
Place bag and ring tabs (2) in laundry bag for delicates, then machine wash in hot water and dry in warm dryer. It looks so beautiful, I know it seems scary to put this in the washing machine. Trust me if you used the O-Wool Yarn and the Tilli Tomas Yarn you are safe, plus it comes out of the dryer so soft you would swear it was cashmere.
Bag Assembly after Felting
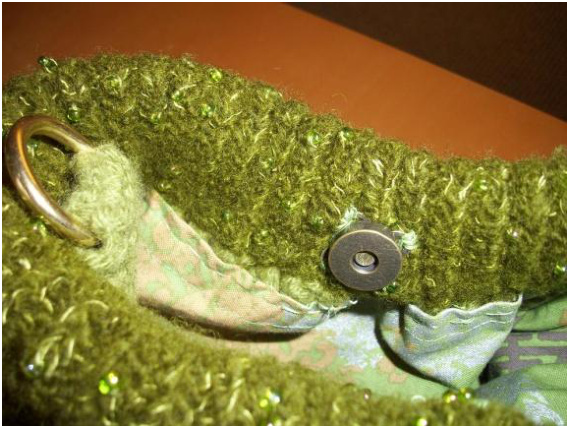
Fold top of ribbed neck down to just above the iCord insertion area. DO NOT HIDE the iCord as it is very beautiful. Place a stitch underneath the fold on both sides of the bag to ensure the fold does not flop while you walk. · Sew inside of the center neck area of the bag a large magnetic snap (there are 2 pieces to the snap - male/female) using a sewing needle and thread. Attach the felted ring tabs just below ribbed area of inside of bag, along with an O Ring or D-Ring, 1 on each side. First stitch this with O-Wool yarn and yarn needle onto the inside cabled area. I would then use a needle and thread to stitch again on the sides of the tab on the bag neck. See photo detail below.
· Attach your swivel snaps onto each end of chain or leather strap. Special Note: I used a chain for this bag, as it wears better than a knitted handle. However, not shown is a 6 stitch iCord you could easily knit for desired length. Do not close ends of iCord, pin a safety pin to a long piece of folded bias tape and work it through the iCord. You will need to felt this too, but with the bias tape in the middle of the strap it won't stretch. Now you can close ends of. I would still use the Swivel Snaps and O-Rings to give the bag a high end look. Sew up the side seams of the cotton lining with right sides touching, press top raw edges under. Drop inside bag and hand stitch to the bag using a sewing needle and thread. Note: I highly advise at the top of the bag lining to sew largest stitch on machine to pull gathering and fit evenly in bag. You will pull these stitches out after hand stitching lining into bag permanently. If you do not sew or have a sewing machine. I recommend you take your fabric to your local dry cleaner and have them sew up the bag lining.


