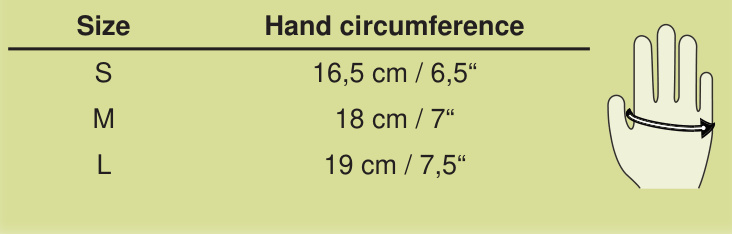
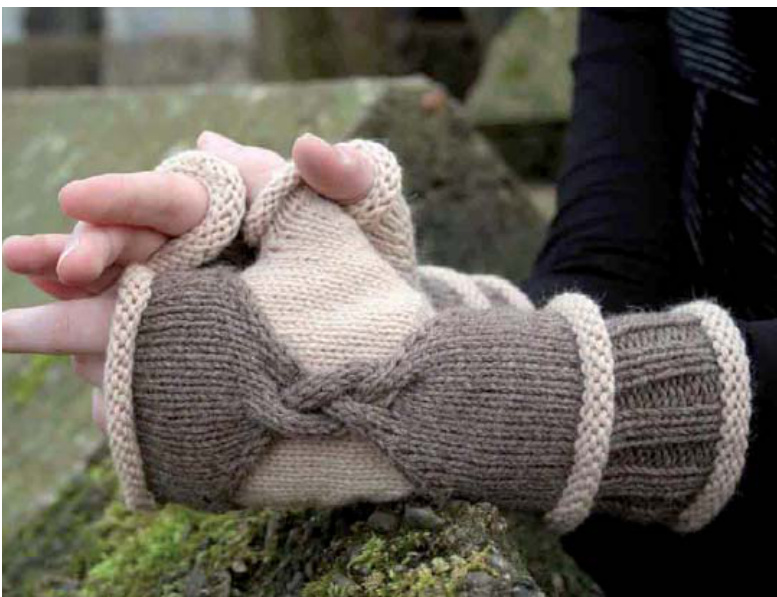
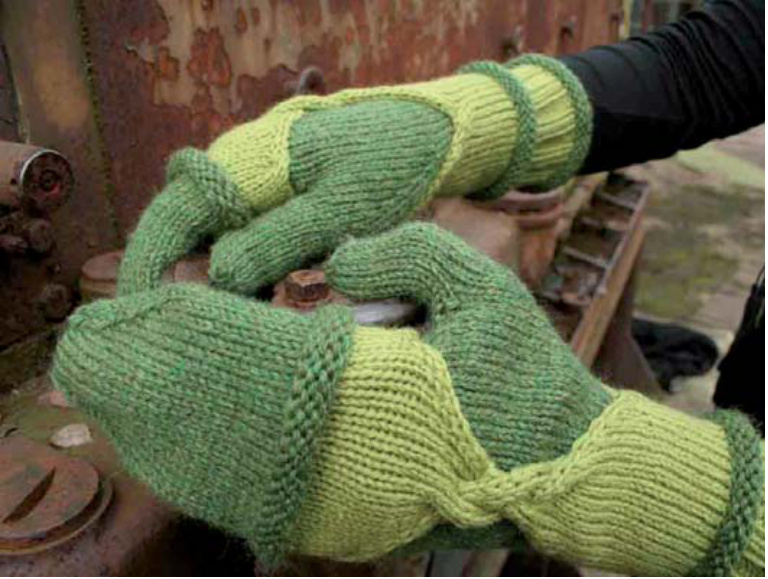
CHiMera
by Julia Mueller I love layered clothing and the idea of wearing fingerless mitts over mittens for decoration as well as warmth really spoke to me. But it felt too complicated. When I leave the house in the morning, I'm not in for heavy thinking about the best mitten combination. So I came upwithsomething that looks likeyou combined twopieces,but is actuallyonepiece.Convenient towear,straight forward to knit, but still looking unique in the end.You don't always need a glove full of cables,sometimes even a few are enough to work as a centerpoint that givesyourhands justsome extra attention. Choose between a full mitten and a fingerless version, which you don't have to do from the start. You can just jump in and decide once you have nearly finished the fingerless version. If you want to, bind off, or go for the mitten version.
Materials:
1 skein Cascade Yarns Cascade 220 [ $100\%$ Peruvian Highland Wool; 220yd/201m per 100g skein]; fingerless version: #8013 Walnut, mitten version: #2429 Ireland [MC] 1 skein Cascade Yarns Cascade 220; fingerless version: #8021 Wheat; mitten version: #8914 Granny Smith [CC] $4\:\mathsf{m m}$ (US 6) circular needle (or size to get the given gauge) long enough for magic loop (32 or 40 inch) Sewing needle and thread Cable needle Tapestryneedle 22 stitches and 32 rows on10 cm/ 4"in stockinette stitch. Take time to swatch because getting the correct gauge is essential for well-fitting gloves! Gauge:
Notes and Abbreviations:
C4F: Slip next 2 sts to cable needle (or spare double-pointed needle)and hold to front of work; $\mathsf{k}2$ from left needle, ${\sf k}{\sf2}$ from cableneedle. C8B: Slip next 4 sts to cable needle (or spare double-pointed needle) and hold to back of work; k4, k4 from cable needle. C8F: Slip next 4 sts to cable needle (or spare double-pointed needle)andhold tofrontofwork;k4,k4fromcableneedle. Only break yarn if pattern calls for it! MC will be used to create the inside, whereas CC is going to be the outside layer of the gloves. These gloves are knit using the ,magic loop" method, however you can use double pointed needles or two circular needles if you prefer. Just be aware that the instructions refer to N1 (needle 1) and N2 (needle 2). Where stitch counts vary depending on the size, the following format is used: S [M, L]. READ THE WHOLE PATTERN BEFORE YOU START KNITTING!
PATTERN
Cast on 36 [40, 44] sts in MC using the long tail cast-on. Join ends in order to knit in the round being careful not to twist your sts. Purl 6 rounds. Break yarn. Fold your knitted piece so the cast-on edge is touching your sts on the needles, purl side facing out. Join CC and k2tog one st on your needle with one st from the cast-on edge. Repeat until you reach theend of theround. Using CC, knit 15 [16, 17] rounds in k2, p2 ribbing. Move CC yarn to the back of the work so that it will travel on the following MC rounds up on the inside of the cuff. Join MC, knit one round, purl 5 rounds. Form piping by inserting your right needle tip on the inside of the cuff into the loop/st of the CC st 6 rounds below.Put it on the left needleandk2togwiththenextMCstontheleftneedleusingMC, leaving them on the needle, then knitting them again with CC. Repeat with the next st from below and the next MC st from the left needle, until you reach the end of the round. This way you will havedoubled thestcount. Move CC yarn to front so it will stay to the outside of the tube you are going to create using MC. Using MC, knit the MC st, slip the next CC st onto waste yarn or a spare circular needle which you will hold in front of your work. Repeat until you've separated the sts so the MC sts are on your working needle in the back and the CC sts are on hold in front of the work, each color having 36 [40, 44] sts.
Inside layer (MC only)
Resume knitting in stockinette st for 18 [19, 20] rounds.
Right hand version:
Knit 20 [22, 24] sts, m1, pm, k2, pm, m1, k to end of round. Knit tworounds. On the next round, increase one st before the first marker and one st after the second marker, followed by 2 stockinette rounds. Continue, until you've increased a total of 12 [14, 16] sts, ending with 2 plain stockinette rounds. Total 48 [54, 60] sts. Knit 21 [23, 25] sts, then transfer the next 12 [14, 16] sts to waste yarn. Cast on 2 sts using the backward loop method, k to end of round. Knit two rounds in stockinette. Knit 19 [21, 23], ssk, k2, k2tog, k to end of round. Total 36 [40, 44]sts. Knit 9[10, 11] rounds in stockinette. Put sts on waste yarn and tuck into cuff of mitten.
Left hand version:
Knit 14 [16, 18] sts, m1, pm, k2, pm, m1, kto end. Knit two rounds. On the next round, increase one st before the first marker and one st after the second marker, followed by 2 stockinette rounds. Continue, until you've increased 12 [14, 16] sts, ending with 2 stockinetterounds. Knit 15 [17, 19] sts, then transfer the next 12 [14, 16] sts to waste yarn. Cast on 2 sts using the backward loop method, k to end of round. Knit two rounds in stockinette. Knit 13 [15, 17], ssk, k2, k2tog, k to end of round. Knit 9 [10, 11] rounds in stockinette. Put sts on waste yarn and tuck into cuff of mitten.
# Outside layer (CC only)
Transfer the CC sts back on your needle and knit in stockinette for 14 rounds. K2 sts, then slip these to the end of the round (shifting the beginning of the round 2 sts to the left). K 14 [16, 18], C4F, k 14 [16, 18], C4F but don't knit the two sts from the cable needle. Slip them unworked on needle 1, thus shifting the beginning of the round 2 sts to the right. Back of hand: For the right hand mitten, knit the back of hand FiRST then continue on to the palm section. Transfer sts not in use to waste yarn. For the left hand mitten, work the PALM section BEFORE the Back of hand section. Then put the remaining palm sts from hold back on your working needle and join CC. Knit 18 [20, 22] sts, turn, and purl back 18 [20, 22] sts. In tne next section, purl all even rows. Row 1: K1, pm, ssk, k 12 [14, 16], k2tog, pm, k1, Row 2: purl Go on, decreasing one st (ssk) after the first marker and one st right before the second marker (k2tog), until you have 12 sts left on your needle. Purl back, taking out the stitch markers. Cable part: Row 1: C8F, k4 Row 2: purl all sts Row 3: knit all sts Row 4: purl all sts Row 5:k4,C8B Row 6: purl all sts Row 7: knit all sts Row 8: purl all sts Repeat row 1-6 once again. On the next row k2, pm, m1, k8, m1, pm, k2 Purl back. Go on, increasing one st after the first marker and one st before the second marker every other row, always purling on the wrong side rows, until you have 18 [20, 22] sts on your needle ending after a right side row. Don't purl back! Only for the right hand mitten: Break yarn. Palm: For the right hand mitten, be sure to knit the BACK of HAND section FIRST. Then put the remaining palm sts from hold back on your working needle and join CC. Knit this section FIRST for the LEFT hand glove then go back and do the Back of hand section afterwards. Transfer stitches not in use to waste yarn. Knit 18 [20, 22] sts, turn, and purl back 18 [20, 22] sts. In the next section, purl all even rows. Row 1: K1, pm, ssk, k 12 [14, 16], k2tog, pm, k1, Row 2: purl Go on, decreasing one st (ssk) after the first marker and one st right before the second marker (k2tog), until you have 14 sts left on your needle. Purl back. Knit one row, then purl back. Repeat 7 more times (16 rows to

On the next row k2, pm, m1, k10, m1, pm, k2. Purl back. Go on, increasing one st after the first marker and one st before the second marker every other row, always purling on the wrong side rows, until you have 18 [20, 22] sts on your needle. Don't purlback! Only for the left hand mitten: Break yarn.
# Upper hand:
Resume knitting in the round by transferring the remaining half of the sts back to the needle. On the first round, k2 sts, then slip these to the end of the round (shifting the beginning of the round 2 sts to the left). Before closing the round make sure that the MC yarn is running outside the outer tube. K 14 [16, 18], C4F, k 14 [16, 18], C4F but don't knit the two sts from the cable needle. Shift stitches at the end of needle 1 so that there are 18 [20,22] stitches on needle 1 and needle 2. Knit 6 [7, 8] rounds in plain stockinette. BreakCC. Align the MC sts which were on hold so that they line up with your outer tube of CC sts. Using MC, knit one CC st together with one MC st (k2tog), by slipping the first MC st on your left needle and knitting it together with the first CC st. Continue until you have formed one layer of 36 [40, 44] sts. Purl 5 rounds in MC.
For the fingerless version:
Form Bind-off-piping by inserting your right needle tip on the inside of the tube in the head of the MC colored st 5 rounds below (that was the k2tog-round. Be careful only to use the MC colored st and not to grab the CC st with it!). Put it on the left needle and k2tog with the next st on the left needle using MC. Repeat withthesecond st.Nowpassthefirstworked stover the second st. Repeat knitting together one st from the left needle with one st from below, then passing the st on the right needle over. This way you will form a tube and bind off all at the same time.Break yarn. If this doesn't work for you: Bind off purlwise, fold the edge so that the cast-off edge is touching the MC colored sts 5 rounds below (on the inside) and stitch it down.
For the mitten version:
Form piping by inserting your right needle tip on the inside of the tube in the head of the MC colored st 5 rounds below (that was the k2tog-round. Be careful only to use the MC st and not to grab the CC st with it!). Put it on the left needle and k2tog with the next st on the left needle using MC. Repeat until the end of round. Go on knitting in plain stockinette in MC until the mitten reaches the tip of your pinky when worn. Then work one decrease round as follows: K1, pm, ssk, k 12[14, 16], k2tog, pm, k2, pm, ssk, k12 [14, 16], k2tog, k1. Knit one round plain. Repeat the last two rounds, decreasing one st (ssk) after the first marker, one st right before the second marker (k2tog), one st after the third marker (ssk) and one st before the fourth marker (k2tog), until 16 sts remain. Break yarn and graft both sides together.
# Thumb (both versions, MC only):
Transfer the 12 [14, 16] sts back to your needles. The beginning of the round is placed 3 sts to the left of the cast-on gap. Using MC, $\mathsf{k}\,\9$ [11, 13] sts, pick up one st from the gap, pick up 2 sts from the cast-on edge, pick up one st from the gap, k3. On the next round, k 8 [10, 12], ssk, k2, k2tog, k2. For the fingerless version: Knit 3[4, 5] rounds. Purl 4 rounds. Form Bind-off-piping by inserting your right needle tip on the insideof thetubeintheheadof theMCcoloredst 4roundsbelow. Put it on the left needle and k2tog with the next st on the left needle using MC. Repeat with the second st. Now pass the first worked st over the second st. Repeat knitting together one st from the left needle with one st from below, then passing the st on the right needle over. This way you will form a tube and bind off all at the same time. Break yarn. If this doesn't work for you: Bind off purlwise, fold the edge so that the cast-off edge is touching the MC colored sts 5 rounds below (on the inside) and stitch it down.
For the mitten version:
Go on knitting in the round until the finger is $3\;\mathsf{m m}$ shorterthan your thumb when wearing the mitten. Work k2tog to the end of the round. Break the yarn and thread it through the remaining sts twice. Pull tight and weave all ends.
# FINISHING
Finish by weaving in all ends. Block so that the ribbing on the cuff is stretched to the same width as the stockinette part above.
Thanks to my excellent testknitters and proofreaders Waltraud, Cheri, Kate , Ingrid and Debby!


