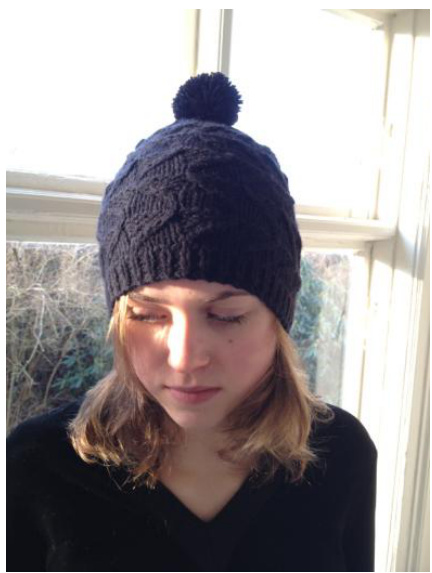
Advanced Beanie
by Gralina Frie This is a fun knit, requiring a bit of effort, but not too much. Just enough to keep your interest throughout the project! You'll quickly get the hang of those nice zigzag travelling stitches without a cable needle, which speeds up the work of the pattern. I definitely liked that! With or without Pompom - it's up to you Materials: Visjogarn from Ostergotlands Ullspinneri: 0.75 skeins = 75g = 230m (245 yards) - yarn held double. Or the same amount of Sport/5ply yarn, doubled. Eco Ullfrom Marks & Kattens: 1.5 skeins 75g = 160m (135 yards) or about the same amount of any other Aran or Worsted/10ply yarn. I recommend you to pick a yarn that gives you a firm drape at this gauge, rather than a loose drape. Needles: Circular 40cm/16" US 7- 4.5mm and US 9 - 5.5mm needles (or/and DPN's) or size needed to obtain gauge.Tapestryneedle. Gauge: 16 sts to 10 cm/ 4" on size US 9 - 5.5mm needles over stockinette sts. 17 sts over pattern sts, but the material is quite stretchy so don't worry about the size. I have a 58cm/23" head and the hat fits me well. Size: Teen - Adult (fits head size 55-60cm). Finished measurements: Circumference 50 cm/19%" (unstretched) and length 23cm/ 9",
Abbreviations:
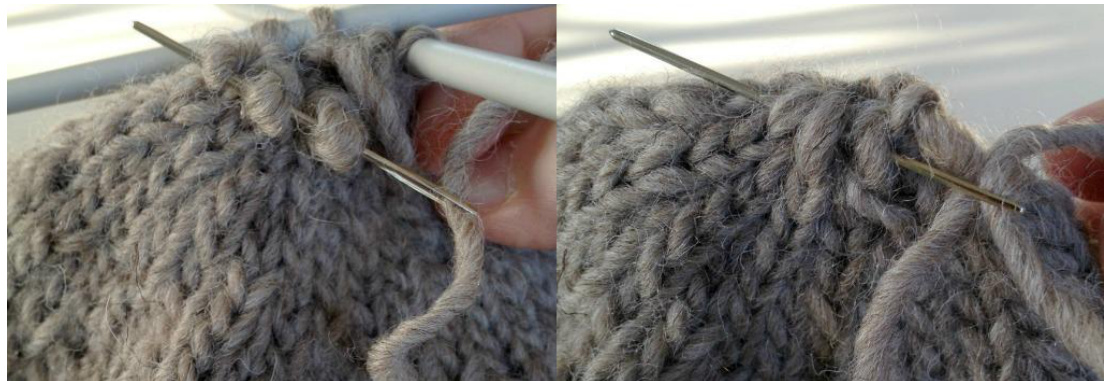
k=knit, p=purl, st(s)=stitch(es), k2tog=knit 2 together, \*\*=repeat instructions between the \* across the round C1B = slip next 1 st onto cable needle, hold to back of work, k1, then p1 from cable needle. C1F = slip next 1 st onto cable needle, hold in front of work, p1, then k1 from cable needle. Or use the method for cable-knitting-without-a-cable-needle shown on the separate PDF or/and for ex. explained in this video:http://www.youtube.com/watch?v=-6DB6WhAKvY
Getting started:
Cast on 84 sts using a Us 7 - 4.5mm circular needle, join stitches without twisting and place marker so you know the beginning of your round. Work 1x1 rib for 6 rounds. Change to Us 9 - 5.5mm needles and knit 2 rounds. Continue to work in pattern like this: Pattern 1 (round 1-5) Round 1: \*k4, C1B\* repeat from \* Round 2: \*k3, C1B, p1\* Round 3: \*k2, C1B, p2\* Round 4: \*k1, C1B, p3\* Round 5: \*C1B, p4\* Knit 3 rounds even. Pattern 2 (round 1-5) Round 1: \*C1F, k4\* repeat from\* Round 2: \*p1, C1F, k3\* Round 3: \*p2, C1F, k2\* Round 4: \*p3, C1F, k1\* Round 5: \*p4, C1F\* Knit 3 rounds even. Work pattern 1 and 2 again as established, with 3 knitted rounds between them. Piece measures about 17 cm/6%" from CO edge.
Decrease rounds within pattern 1:
Round 1: \*k2tog, k2, C1B \* repeat from \* 14 sts decreased = 70 sts Round 2: \*k2, C1B, p1\* Round 3: \*k1, C1B, p2\* Round 4: \*C1B, p3\* You might want to change to US 9 - 5.5mm DPN's or use the Magic Loop method from now on:
Decrease rounds even:
Round 5: \*k2tog, k3\* 14 sts decreased = 56 sts Round 6-8: work even Round 9: \*k2tog, k2\* 14 sts decreased = 42 sts Round 10-12: work even Round 13: \*k2tog, k1\* 14sts decreased =28sts Round 14-16: work even Round 17: \*k2tog\* 14 sts decreased = 14 sts Round 18: work even Round 19: \*k2tog\* 7sts decreased =7 sts Cut the yarn and thread the end through the 7 live remaining stitches twice and pull taut.
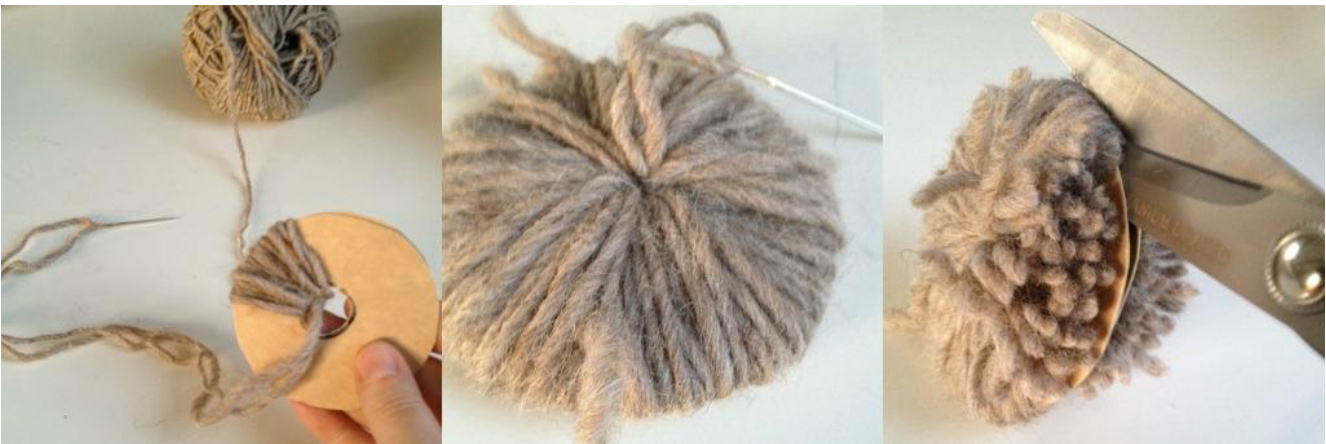
Pattern and photos are @ Gralina Frie. Finishing: Weave in the ends. Block gently. If you want the hat more windproof, cut a piece of fleece or wind stopper in the same measurements as the circumference of your head + little ease and as high up as you want it to be and attach it on the inside, about 1 or 2 rounds from CO edge. Pompom: (numbers in brackets correspond to pictures from left to right) Using cardboard, cut out two equal circles (6-7cm/2%-3" wide). Make a 2cm/ %" hole in the middle of both circles. Using working yarn and a tapestry needle, sew evenly around both circles until you hardly can jab your needle through the hole (1+2). Carefully cut the yarn sides open, along the paper circle edging (3).
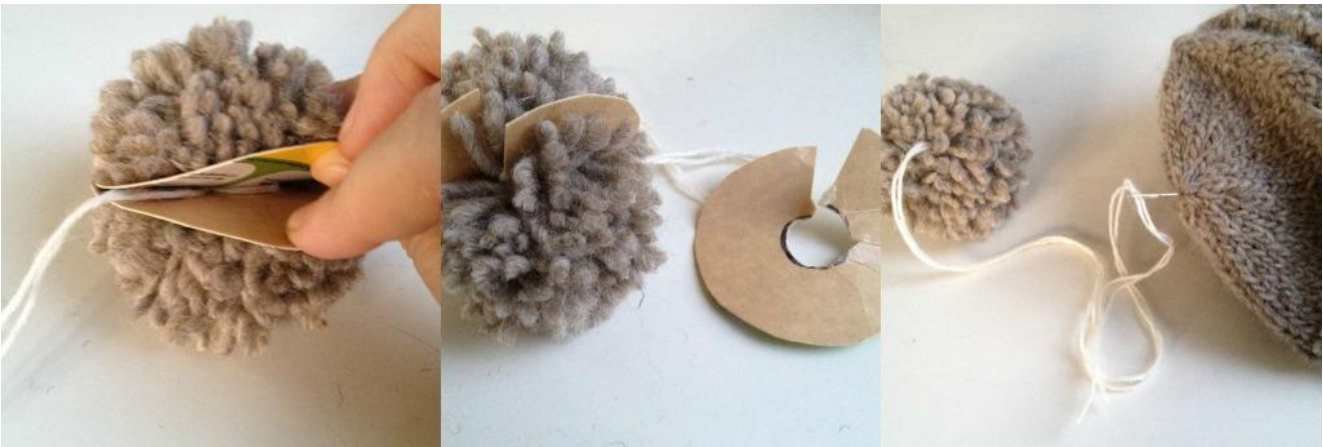
Use some strong scrap yarn or strong sewing thread and pullit in between the circles, pull taut and make at least two tight knots, leaving long tails (4). Cut or tear the paper circles on one side, carefully wring them apart from another (5). Trim your pompom and attach it tightly to your beanie, using the tails (6). Weave in the ends.
Good luck and don't hesitate to contact me if you have any issues with the pattern!