Crawley Caterpillar

Copyright @ Ann Franklin 2011 All rights reserved. This pattern is protected by copyright & may only be used for noncommercial purposes.
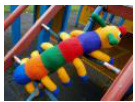
Crawley Caterpillar
Crawley is a colourful and cheerful caterpillar that young children can use to learn basic colours and, because it has ten legs, to count. However, the caterpillar can be made in any colour combination - or just one colour if preferred. It is therefore an ideal 'stash buster' pattern. TENSlON: 26 stitches and 36 rows to 10cm?; however, tension is not vital to this project, s0 long as the stitches are close enough together to avoid the stuffing showing through the finished toy. FINISHED MEASUREMENTS: Overall length about 50-53 cmS
MATERIALS:
Originally knitted in Hayfield Bonus DK 100g 100% acrylic yarn Length 280m However, any DK yarn may be substituted as available. 30g of DK yarn in Colour A [blue] (Hayfield Bonus DK in Royal, shade 979, used) 15g of DK yarn in Colour B [orange] (Hayfield Bonus DK in Bright Orange, shade 981, used) 15g of DK yarn in Colour C [green] (Hayfield Bonus DK in Emerald, shade 916, used) 15g of DK yarn in Colour D [red] (Hayfield Bonus DK in Signal Red, shade 977, used) 60g of DK yarn in Colour E [purple] (Hayfield Bonus DK in Purple, shade 840, used) 60g of DK yarn in Colour F [yellow] (Hayfield Bonus DK in Bright Lemon, shade 819, used) 5g of DK yarn in Colour G [white] (Hayfield Bonus DK in White, shade 961, used) 5g of DK yarn in Colour H [black] (Hayfield Bonus DK in Black, shade 965, used) 200g of toy stuffing 3.25mm knitting needles
ABBREVIATIONS:
Beg: Beginning St(s): Stitch(es) St st: Stocking stitch: 1 row knit, 1 row purl. Unless otherwise instructed, always begin stocking stitch with a knit row. K: Knit P: Purl Kfb: Increase by knitting into both the front and back of the next stitch K2 tog: Knit the next 2 sts together Alt: Alternative B&T: (break & thread): Break the yarn and thread the tail onto a tapestry needle. Thread the yarn through the stitches on the knitting needle, slide the stitches off the needle and pull the tail up to tighten the stitches into a circle.
W&T (wrap and turn):
On a knit row: Work to where it says W&T in the pattern. Bring the yarn to the front of the work and slip the next stitch onto the right hand needle. Take the yarn around this stitch to the back of the work; then slip the stitch back onto the left hand needle. Turn. The yarn will be at the front of the work, ready for a purl stitch and the yarn is wrapped around the slipped stitch of the previousrow. On a purl row: Work to where it says W&T in the pattern. Take the yarn to the back of the work and slip the next stitch onto the right hand needle. Take the yarn around this stitch to the front of the work, then slip the stitch back onto the left hand needle. Turn. The yarn will be at the back of the work, ready for a knit stitch and the yarn is wrapped around the slipped stitch of the previous row. W&T produces a small bar (wrap) at the base of the stitch which was wrapped. To avoid the 'wrap' showing on the right side of the fabric, pick up the wrap and knit or purl it (as appropriate) together with the wrapped stitch as you knit or purl the row above the wrap. Copyright Ann Franklin 2011 All rights reserved. This pattern is protected by copyright & may only be used for noncommercial purposes.

Crawley Caterpillar
Body: Beginning at the tail end; Using 3.25mm needles and Colour A [blue], cast on 6 sts. Row 1: (Kfb) to the end of the row (12 sts) Row 2 & every alt row: Purl Row 3: (K1, kfb) to the end of the row (18 sts) Row 5: (K2, kfb) to the end of the row (24 sts) Row 7: (K3, kfb) to the end of the row (30 sts) Row 9: (K4, kfb) to the end of the row (36 sts) Row 11: (K5, kfb) to the end of the row (42 sts) Row 13: (K6, kfb) to the end of the row (48 sts) Row 15: (K7, kfb) to the end of the row (54 sts) Row 17: (K8, kfb) to the end of the row (60 sts) Beg purl, st st 7 rows Row 25: (K8, K2tog) to the end of the row (54 sts) Row 26 & every alt row: Purl Row 27: (K7, K2 tog) to the end of the row (48 sts) Row 29: (K6, K2 tog) to the end of the row (42 sts) Row 31: (K5, K2 tog) to the end of the row (36 sts) Row 33: (K4, K2 tog) to the end of the row (30 sts) Row 34: Purl Break off Colour A [blue] and join in Colour B [orange]. Repeat row Break off Colour B [orange] & join in Colour C [green]. Repeat row: Break off Colour C [green] & join in Colour D [red]. Repeat rows 9 . Break off Colour D [red] & join in Colour E [purple]. Repeat rows 9 Break off Colour E [purple] & join in Colour F [yellow] for head.
Head:
Row 1: (K4, kfb) to the end of the row (36 sts) Row 2 & every alt row: Purl Row 3: (K5, kfb) to the end of the row (42 sts) Row 5: (K6, kfb) to the end of the row (48 sts) Row 7: (K7, kfb) to the end of the row (54 sts) Row 9: (K8, kfb) to the end of the row (60 sts) Row 11: (K9, kfb) to the end of the row (66 sts) Beg purl, st st 7 rows Row 19: (K9, K2 tog) to the end of the row (60 sts) Row 20 & every alt row: Purl Row 21: (K8, K2 tog) to the end of the row (54 sts) Row 23: (K7, K2 tog) to the end of the row (48 sts) Row 25: (K6, K2 tog) to the end of the row (42 sts) Row 27: (K5, K2 tog) to the end of the row (36 sts) Row 29: (K4, K2 tog) to the end of the row (30 sts) Row 30: (P2 tog, P3) to the end of the row (24 sts) Row 31: (K2, K2 tog) to the end of the row (18 sts) Row 32: Purl Break off Colour F [yellow] & join in Colour D [red] for the nose. Row 33: (K2, kfb) to the end of the row (24 sts) Row 34: Purl Row 35: (K3, kfb) to the end of the row (30 sts) Beg purl, st st 3 rows Row 39: (K3, K2 tog) to the end of the row (24 sts) Row 40: Purl Row 41: (K2, K2 tog) to the end of the row (18 sts) Row 42: Purl Row 43: (K1, K2 tog) to the end of the row (12 sts) Row 44: Purl Row 45: (K2 tog) to the end of the row (6 sts) B&T Legs: (Make 10 the same) Using 3.25mm needles and Colour A [blue], cast on 6 sts for foot Row 1: (Kfb) to the end of the row (12 sts) Row 2 & every alt row: Purl Row 3: (K1, kfb) to the end of the row (18 sts) Row 5: (K2, kfb) to the end of the row (24 sts) Row 7: (K3, kfb) to the end of the row (30 sts) Beg purl, st st 5 rows Row 13: K1, (K2tog) to last st, K1 (16 sts) Purl 1 row Break off Colour A [blue] & join in Colour F [yellow]. Beginning with a knit row, st st 12 rows Row 27: K13, W&T Row 28: P10, W&T Row 29: K8, W&T Row 30: P6, W&T Row 31: K4, W&T Row 32: P2, W&T Row 33: Knit to the end of the row, kniting wraps together with wrapped si Row 34: Purl, purling wraps together with wrapped sts Beginning knit, st st 10 rows. Cast off loosely. Antennae: (Make 2) Using 3.25mm needles & Colour C [green], cast on 10 sts St st 16 rows Row 17: (Kfb) to the end of the row (20 sts) Beg purl, st st 3 rows Row 21: K2tog to the end of the row (10 sts) B&T Copyright @ Ann Franklin 2011 All rights reserved. This pattern is protected by copyright & may only be used for noncommercial purposes. Eyes: (Make two of each) Eyeball: Using 3.25mm needles & Colour G [white], cast on 12 sts Purl 1 row Row 2: (K2 tog) to the end of the row (6 sts) B&T Pupil: Using 3.25mm needles & Colour H, cast on 8sts Knit 1 row B&T
To make up:
Body: Turn the body inside out and sew the main seam together, leaving a small gap in the middle of the body to allow turning / stuffing. Turn right side out and stuff the body quite firmly, but taking care not to over stuff (the toy should be cuddly, not stiff). Close the gap in the body. Take a short piece of matching yarn and wrap it around the crease between the yellow of the head and the red end piece, pulling it up tightly to make a nose. Fasten off carefully, hiding the yarn ends by drawing them through the stuffed portions of the toy in a number of directions beforecutting theyarn end off. Legs: Fold each leg in half lengthwise and sew the side seams together. Turn to the right side and stuff. Sew the legs to the side of the caterpillar body, having one leg on each side of each body portion. Hide the yarn ends as given for body portion. Antennae: On the inside, sew the seam of the antennae, taking care to match the increase row. Turn and stuff firmly. Sew to the top of the caterpillar's head. Eyes: Close the side seams of the eyeball and pupil to create small circles of knitted fabric. Sew a pupil onto each eyeball, placing the pupil off centre. Sew an eye to each side of the caterpillar's nose, pinning them first until you are happy with the placement. Sew the eyes onto the head with yarn first, then repeat using sewing thread in matching colours to ensure that the eyes are firmly fixed. Mouth: Use glass headed pins mark the position for a smiling mouth under the nose. Using red yarn and back stitch follow the line of pins to embroider the mouth. Once you have worked one row of back stitch, sew again along the same line to cover any gaps / ensure a neat finish. NB it is very important to check that all of the smaller parts of the toy are very firmly sewn on. It is also important to check the toy from time to time to make sure that all the parts remain securelyattached. Any questions about this pattern? Please don't hesitate to contact me at annfranklin@live.co.uk Copyright @ Ann Franklin 2011 All rights reserved. This pattern is protected by copyright & may only be used for noncommercial purposes.


