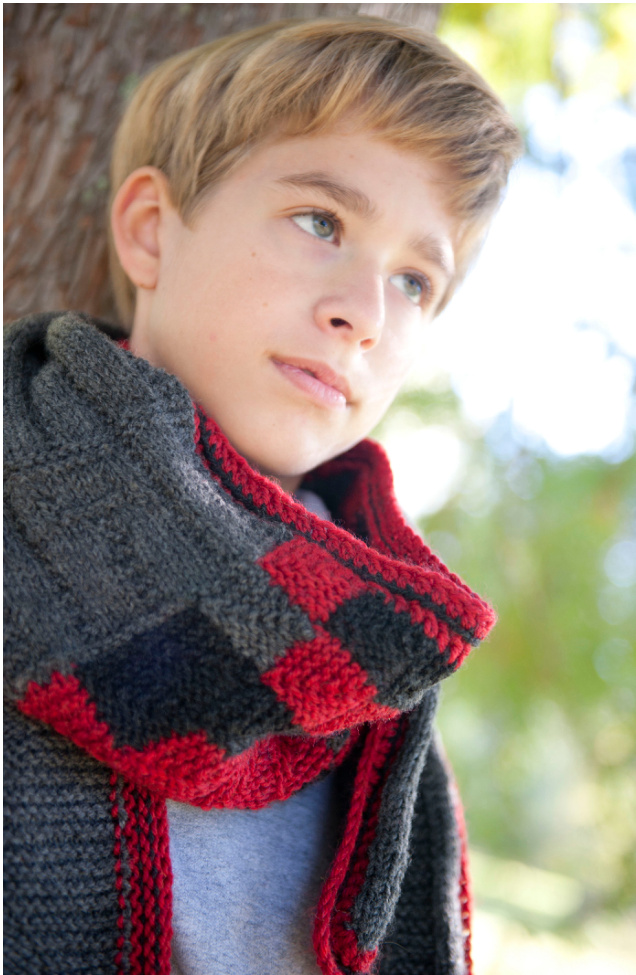
Secret Passage Scarf
Designed by Ruth Roland
On the floor was a mosaic of a three-headed dragon wrought in red and black tiles. Something niggled at Tyrion for a moment. Then it came to him. . .. "We are below the Tower of the Hand." —A Storm of Swords by George R. R. Martin This luxuriously long scarf is suitable for men and women. It is modeled on the secret passage that runs under the Red Keep: a ladder followed by a gate which leads to a (section of a) mosaic tile floor, then another ladder, and finally a low tunnel. The colorful border (offered in crochet and knit versions) ties it all together. FINISHEDMEASUREMENTS Width: 8"(21.5cm) Length: 73" (203cm)
MATERIALS
Yarn @ Worsted weight Cascade Yarns 220 Superwash (100% Superwash Wool; 100g/3.5oz, 220 yd/200m) · MC: 900 Charcoal - 2 balls ·A:1922 Christmas Heather Crochet Border - 1 ball Knit Border - 2 balls ·B: 1913 Jet - 1 ball
Needles and Hooks
· US Size 7 (4.5 mm) knitting needles or size to obtain gauge ● size G6 crochet hook (for Crochet Border) · size J10 crochet hook (optional, to work sl st rnd in Crochet Border) · US Size 7 circular needles with cables totaling at least 70"/178cm-for example, two 36", or a 24" and a 47" (for Knit Border)
Notions
· 4 stitch markers · yarn needle
GAUGE
18 sts and 27 rows = 4"/10cm in Stockinette Stitch 18 sts and 36 rows = 4"/10cm in Garter Stitch 1 garter stitch module = 1"/4cm square (see Techniques) Wash and dry according to yarn label instructions before checking gauge.
ABBREVIATIONS
ch: chain dc: double crochet k: knit m: marker MC: Main Color yarn p: purl pm: place marker RS: Right Side sk: skip sk2p (slip, k2tog, pass): Slip next stitch knitwise, knit the next two stitches together as if they were one stitch, pass slipped stitch over -- 2 sts decreased. st(s): stitch(es) tbl: through back leg yo (yarnover): Wrap yarn around needle from front to back - 1 st increased.
TECHNIQUES Garter Stitch Modules
Swatch: With the first color, cast on 13 sts. Row 1 (WS): K1-tbl, k4, sk2p, k5 — 11 sts. Rows 2, 4, 6, 8, & 10: Knit. Row 3: K4, sk2p, k4 —- 9sts. Row 5: K3, sk2p, k3 7 sts. Row 7: K2, sk2p, k2 — 5 sts. Row 9: K1, sk2p, k1— 3 sts. Row 11: Sk2p — 1 st. For subsequent blocks pick up and knit 6 stitches down the RS of the previous block and cast on 6 sts — 13 sts (including 1 st from Row 12). Work Rows 1-12 as for the first block. First Row of Modules: For the first block, with A, cast on 7 stitches to right needle, then knit 6 from the left-hand needle. Work Rows 1-12 as for the swatch, using the chart as a guide to color choice and reading from right to left. For the second block, pick up and knit 6 stitches down the RS left-hand side of the first block, then knit 6 from the left-hand needle. Continue in this manner through the fifth block. For the fifth and last block of the row, work Row 12 in the color of that block. Break yarn and pull tail through. Second Row of Modules: Work the rightmost block first (#6). Cast on 6 sts, pick up and knit 1 st from the cast-on row of the first block, then 6 sts across its top. Work Rows 1-12 as for the swatch. For the second block, pick up and knit 6 stitchesdown theRS left-hand side of the first block, then knit 6 from the left-hand needle. Continue in this manner through the fifth block. Complete the fifth block as for the First Row. Subsequent Rows of Modules: Work as for the Second Row.
Scarf Instructions
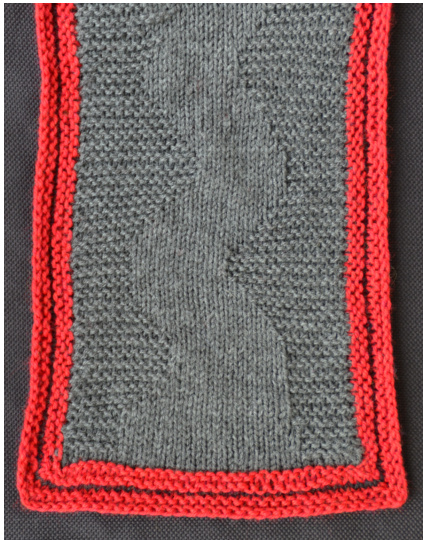
With MC, cast on 30 stitches. Ladder #1 Row 1 (WS): P4, k4, p14, k4, p4. Row 2: Knit. Rep Rows 1 & 2 twice more (for a total of 3 times). \*Rep Rows 1 & 2 another 6 times. Row 19 (Next Row): P4, k4, p14, k4, p4. Row 20: Knit. Rep Rows 19 & 20 twice more (for a total of 3 times). Rep from \* another 4 times (for a total of 5 garter stitch rungs). Rep Rows 1 & 2 another 9 times. Gate Row 1 (wS): P1, k28, p1. Row 2: Knit. Row 3: P1, k3, p4, [k2, p4] three times, k3, p1. Row 4: Knit. Rep Rows 3 & 4 another 17 times (for a total of 18 times). Rep Rows 1 & 2 twice more. Row 43 (Next Row): P1, k3, p4, k2, p2, k1, p4, k1, p2, k2, p4, k3, p1. Row 44: Knit. Rep Rows 43 and 44 once more (for a total of 2 times). Row 47 (Next Row): P1, k3, p4, k2, p2, k6, p2, k2, p4, k3, p1. Row 48: Knit. Row 49: P1, k3, p4, [k2, p4] three times, k3, p1. Row 50: Knit. Rep Rows 49 & 50 another 5 times (for a total of 6 times). Rep Rows 1 & 2 once more.
Mosaic
Work Garter Stitch Modules (see Techniques, above) following the chart on page 4 for color. Work all rows from right to left.
Ladder #2
With MC, with RS facing, pick up and knit 30 sts along top edge of modules. Row 1 (wS): K7, p3, k10, p3, k7. Row 2: Knit. Rep Rows 1 & 2 once more (for a total of 2 times). \*Rep Rows 1 & 2 another 4 times. Row 13 (Next Row): K7, p16, k7. Row 14: Knit. Rep Rows 13 & 14 once more (for a total of 2 times). Repeat from \* another 6 times (for a total of 7 stockinette stitch rungs). Rep Rows 1 & 2 another 6 times.
ruth@waterbearmusic.com
Tunnel Row 1 (wS): K10, p10, k10. Row 2: Knit. Rep Rows 1 & 2 once more (for a total of 2 t Row 5 (Next Row): K11, p10, k9. Row 6 and all even-numbered rows: Knit. Row 7: K12, p10, k8. Rows 9, 11, & 13: K13, p10, k7. Row 15: K12, p10, k8. Row 17: K11, p10, k9. Row 19: K10, p10, k10. Row 21: K9, p10, k11. Row 23: K8, p10, k12. Rows 25, 27, & 29: K7, p10, k13. Row 31: K8, p10, k12. Row 33: K9, p10, k11. Row 35: K10, p10, k10. Row 37: K11, p10, k9. Row 39: K12, p10, k8. Rows 41, 43, & 45: K13, p10, k7. Row 47: K12, p11, k7. Row 49: K11, p12, k7. Row 51: K10, p12, k8. Row 53: K9, p12, k9. Row 55: K8, p12, k10. Rows 57, 59, & 61: K7, p12, k11. Row 63: K7, p13, k10. Row 65: K7, p14, k9. Row 67: K8, p14, k8. Row 69: K7, p16, k7. Rows 71, 73, & 75: K6, p18, k6. Row 76: Knit. Bind off. Choose either the Crochet Border or the Knit Border.
Crochet Border
Rnd 1: With smaller crochet hook and A, beginning at the start of a long side with RS facing, \*dc in every other row of MC to mosaic section, dc in 5 sts of every Garter Stitch Module, dc in every other row of MC to corner, pm, 3 dc in next stitch, (sk next st, dc in each of next 2 sts) 9 times, sk next st, pm, 3 dc in next st; rep from \* once more. Do not cut A. Rnd 2: With larger crochet hook (if using) and B, loosely slip stitch into the front leg of each dc, stretching the border occasionally to make sure it remains elastic. Cut B. Rnd 3: With smaller crochet hook and A, ch 3, \*dc-tbl in next st and each following st to m, dc-tbl in next st, 3 dc in next st; rep from \* 3 more times (for a total of 4 times), end rnd with ch 1. Cut A, pull tail through ch and thread on yarn needle. Take tail around 3rd ch of the ch 3 from the beginning of Rnd 3 and back down into last dc. Wrap tail around 2nd ch and into dc from Rnd 1 to make the ch 3 resemble a dc.
Knit Border
Beginning at the start of a long side with RS facing and A, \*pick up and knit 88 sts over MC to modules (1 stitch every other row), then pick up and knit 65 sts over module section (5 sts per module), then pick up and knit 88 sts over MC to corner (1 stitch every other row), pm, pick up and knit 30 sts along short edge (1 stitch for every stitch), pm; rep from \* once more — 542 sts.
Tunnel (with Knit Border) Rnd 1: With A, \*p to m, (p1, yo, p1) into corner st; rep from \* 3 more times (to end) — 8 sts increased, 550 sts. Rnd 2: Knit. Rnd 3: \*P to m, (p1, yo, p1) into center corner st; rep from \* 3 more times (to end) — 8 sts increased, 558 sts. Rnd 4: With B, knit. Cut B. Rnds 5 & 6: With A, knit. Rnd 7: \*P to m, (p1, yo, p1) into center corner st; rep from \* 3 more times (to end) — 8 sts increased, 566 sts. Rnd 8: Knit. Bind off in purl.
Finishing
Weave in all ends. Block, pinning corners and sides if desired to help scarf lie flat.
ruth@waterbearmusic.com
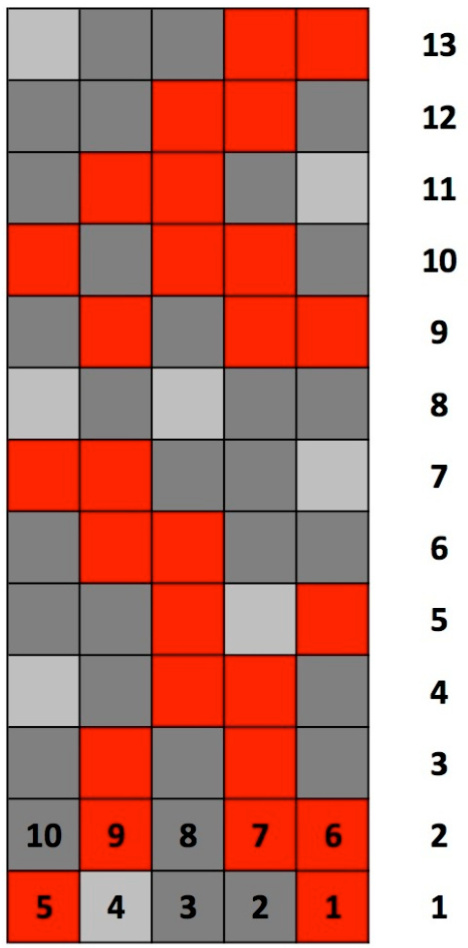
Mosaic Chart Website: Kangath Knits http://kangathknits.weebly.com Tech Editor: Rebecca Kinsley Photographer: Melissa Foshée Model: Quaid Foshée Thanks to Cascade Yarns for yarn support!


