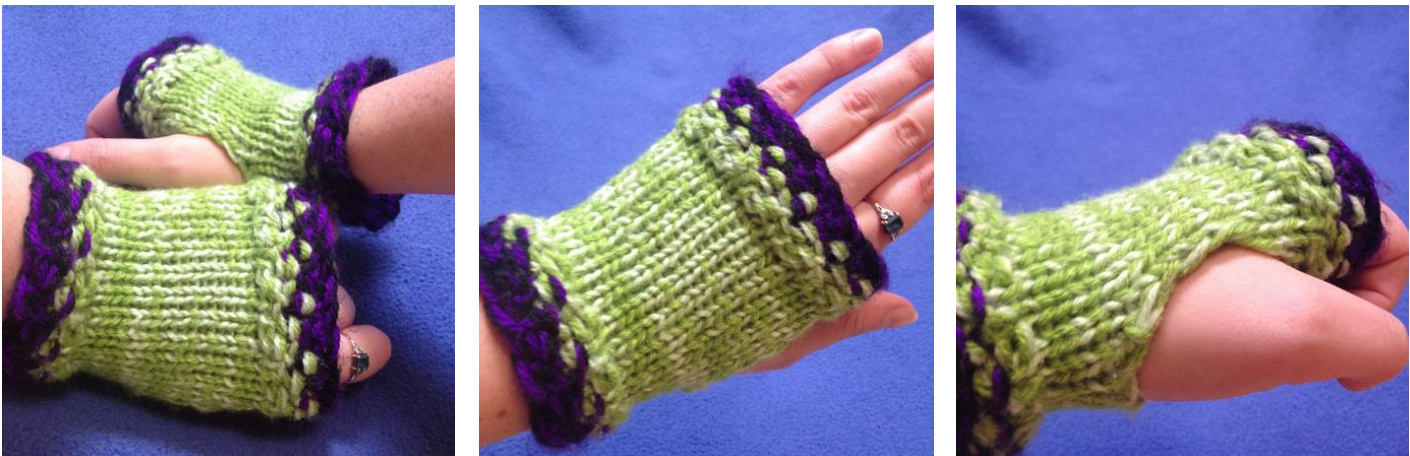
Elphaba Glovelettes
Words and photography by Zoe MacLean. This pattern is licensed under a Creative Commons Attribution-ShareAlike 4.0 International License. Which means you are free to share, adapt or convert the pattern, and you are allowed to use this pattern to make items to sell, as long as you attribute the original pattern to me and share it under a similar license.
If you have any questions about this pattern,please feel free to contact me on Facebook (facebook.com/ZoeMacLean) or via email (zoe@veryzoe.com).
You will need:
8ply or DK weight wool in four colours: black, purple, bright green, pale gree A 24 peg round loom with a gauge similar to the KK looms (5/8") · A crochet hook or needle (to weave in ends), scissors and loom tool · A way to count rows (such as a row counter, or a notebook and pen) Knowledge required: E-wrapcaston Purl stitch (p) U-wrap knit stitch (k) Half-stitch (HS) Super stretchy bind-off (http://loomknittinghelp.com/looms/rlr/bindoff/sewn.html) (All of these can be found on Youtube, don't be afraid to learn something new!)
Notes:
In this pattern we hold two strands of wool as one while working. The black and purple (colour A) go together for the border and the two greens (colour B) go together for the middle. When working on the border, pull the purl stitches really nice and snug, but don't pull the uwrap knit stitches. This helps keep the bubbly bits even. All knit stitches in this pattern are u-wrap stitches, except for the cast-on row. On row 16, keep the loop on peg 1 looser than normal, to make opening it up easier. I like the thumbhole to be quite large, but if you want it to be a bit smaller, add two (or four) rows of knitting in after row 16 and remove rows 17-18 (or 17-20) from the pattern. This will make the thumbhole smaller without shortening the glovelettes.
Pattern
Last-on using tne e-wrap metnoa witn tne piack ana purpie yarn (coiour A). vrap eacn peg once only. R1. (A) \*p1, k1, repeat from \* to end R2. (A) \*p1, k1, repeat from \* to end R3. (A) \*k1, p1, repeat from \* to end Drop colour A down, attach colour B and work row 4 R4. (B) \*k1, p1, repeat from \* to end Drop colour B down, work with colour A for row 5 R5. (A) \*p1, k1, repeat from \* to end Drop colour A down and cut, leaving a tail, work with colour B for rows 6-31 R6. (B) \*p1, k1, repeat from \* to end R7. (B) \*k1, p1, repeat from \* to end R8. (B) \*k1, p1, repeat from \* to end R9-16. (B) knit all Open up the thumbhole. Move the loop from peg 1 to peg 2 and knit over. Move the loop from peg 24 to peg 23 and knit over. The next seven rows are worked as a flat panel. Your working yarn should be coming from peg 23, and the first row goes in the reverse direction to that which you've been working on. R17. (B) Knit pegs 22-3, HS peg 2 R18. (B) Knit pegs 3-22, HS peg 23 R19. (B) Knit pegs 22-3, HS peg 2 R20. (B) Knit pegs 3-22, HS peg 23 R21. (B) Knit pegs 22-3, HS peg 2 R22. (B) Knit pegs 3-22, HS peg 23 R23. (B) Knit pegs 22-2, HS peg 1 (this will add a loop to peg 1, there will be no loop to knit over) R24. (B) Knit pegs 2-23 To add the loop back to peg 24, bring the working yarn across the front of the peg, like you would for a flat knit stitch, but when you work peg 1 on the next row, pull back a little on the working yarn, so that the tension on peg 24 is more like a u-knit stitch than a flat knit stitch. Now we continue working in the round, in the same direction as you started the project R25-28. (B) knit all R29. (B) \*k1, p1, repeat from \* to end R30. (B) \*k1, p1, repeat from \* to end R31. (B) \*p1, k1, repeat from \* to end Drop colour B down, attach colour A and work row 32 R32. (A) \*p1, k1, repeat from \* to end Drop colour A down, work with colour B for row 33 R33. (B) \*k1, p1, repeat from \* to end Drop colour B down and cut, leaving a tail, work with colour A for rows 34-36 R34. (A) \*k1, p1, repeat from \* to end R35. (A) \*p1, k1, repeat from \* to end R36. (A) \*p1, k1, repeat from \* to end Bind off using the super stretchy bind off method.


