Little Deer Purse or Candy Cane holder
Use this pattern for personal use only, never for retail or commercial purposes, Thank you. Pattern design by: Brenda SoLis
Materials
G crochet hook Worsted weight yarn in tan, white, red, brown, black Felt in black, white, green Felt glue or glue gun Tapestry needle Fiberfill stuffing Stitch marker
Terms used:
Sc = single crochet Ch = chain 2sctog = single crochet decrease over two stitches st = stitches sl st = slip stitch F.O. = fasten off Facebook: www.facebook.com/FairyMeadowDesigns Email: fairymeadowdesigns@gmail.com

Head (make 2)
With tan yarn, starting at the bottom of the head 1: Ch 7 sc in 2nd ch from hook and across, ch 1 Turn (6sc) 2: 2sc in first st, 1 sc in next 4sc, 2sc in last sc, ch1 Turn (8sc) 3: 2sc in first sc, 1sc in next 6sc, 2sc in last sc, ch 1 Turn (10sc) 4: 2sc in first sc, 1sc in next 8sc, 2sc in last sc, ch 1 Turn (12sc) 5: 2sc in first sc, 1sc in next 10sc, 2sc in last sc, ch 1 Turn (14sc) 6: 2sc in first sc, 1sc in next 12sc, 2sc in last sc, ch 1 Turn (16sc) 7: 2sc in first sc, 1sc in next 14sc, 2sc in last sc, ch 1 Turn (18sc) 8: 2sc in first sc, 1sc in next 16sc, 2sc in last sc, ch 1 Turn (20sc) 9: 2sc in first sc, 1sc in next 18sc, 2sc in last sc, ch 1 Turn (22sc) 10-17) 1sc across, ch 1 Turn 18) 2sctog, 1sc in next 18sc, 2sctog, ch 1 Turn (20sc) 19) 2sctog, 1sc in next 16sc, 2sctog, ch 1 Turn (18sc) 20) 2sctog, 1sc in next 14sc, 2sctog, ch 1 Turn (16sc) 21) 2sctog, 1sc in next 12sc, 2sctog, ch 1 Turn (14sc) 22) 2sctog, 1sc in next 10sc, 2sctog, ch 1 Turn (12sc) 23) 2sctog, 1sc in next 8sc, 2sctog, ch 1 Turn (10sc) F. O. this is th
Red spot
1) ch 3 sc in 2nd ch from hook and on last ch, ch1 Turn (2sc) 2) 2sc in next 2sc, ch 1 Turn (4sc) 3-6) 1sc across, ch1 Turn 7) 2sc in first sc, 1sc in next 2sc, 2sc in last sc, ch 1 Turn (6sc) 8) 2sc in first sc, 1sc in next 4sc, 2sc in last sc, ch 1 Turn (8sc) 9) 2sc in first sc, 1sc in next 6sc, 2sc in last sc, ch 1 Turn (10sc) 10) 2sc in first sc, 1sc in next 8sc, 2sc in last sc, ch 1 Turn (12sc) 11) 2sc in first sc, 1sc in next 10sc, 2sc in last sc, ch 1 Turn (14sc) 12) 2sc in first sc, 1sc in next 12sc, 2sc in last sc, ch 1 Turn (16sc) 13) 2sctog, 1sc in next 12sc, 2sctog, ch1 Turn (14sc) 14) 2sctog, 1sc in next 10sc, 2sctog, ch1 Turn (12sc) 15) 2sctog, 1sc in next 8, 2sctog, ch1 Turn (10sc) F.O. leave long tail for sewing
Mouth
With off white yarn Row 1: ch 2, 1sc in 2nd ch from hook Row 2: 2sc in each sc around Row 3: \*1sc in next sc, 2sc in next sc\* around (18sc) Sl st in next st F.O. Ears (make 2) Row 1: ch 2, 1sc in 2nd ch from hook, ch1 turn Row 2: 2sc in next sc, ch1 turn (2sc) Row 3: 2sc in next 2sc, ch1 turn (4sc) Row 4: 2sc in next sc, 1sc in next 2sc, 2sc in next sc, ch1 turn (6sc) Row 5-8: sc in each sc across, ch1 turn Row 9: 2sctog, 1sc in next 2sc, 2sctog, ch1 turn (4sc) Row 10: 2sctog, twice (2sc) F.O. leave long tail for sewing Weave in ends Antlers (make 2) With brown yarn Start with long tail for sewing 1: ch 4, sc in 2nd ch and across (3sc) ch 1 turn 2-4: sc across ch1 turn 5: Ch 5, sc in 2nd ch from hook and across (7sc) CH 3 Turn 6: slst in first 2sc (1sc, 1hdc, 1dc in next sc) slst in next 2sc (1sc, 1hdc, 1dc, in next sc) sc in last sc F.O. weave in ends
Strap
CH 70 or more depending on how long you want the strap to be.
Finishing
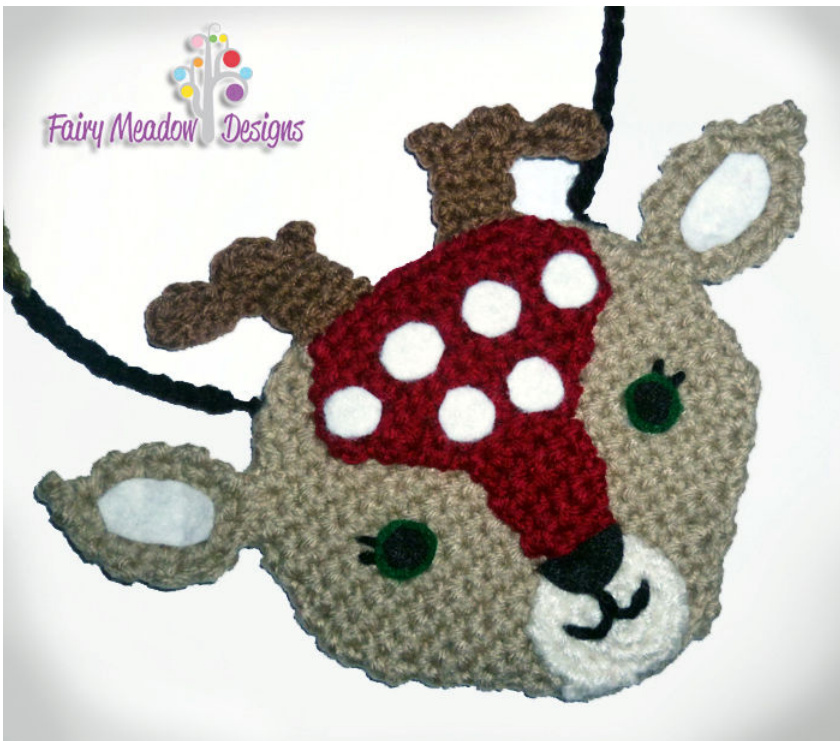
(Follow the photos to guide you) Block your work if needed before you start since you will use glue. With the long tail from the red spot thread it into the tapestry needle, Line up the red spot to the top of face. Start to sew matching the single crochet along the top, pin the bottom of the red spot down and keep sewing around the entire piece. Place the mouth at the bottom of the red spot, and sew in place. With white felt cut some small circles and arrange them around the top of the red spot and glue them down with felt glue. With green felt cut two circles for the eyes, and glue them on the side of the face with felt glue. With black felt cut two smaller circles for the inside of the eyes, and glue them in the midle of the green circles with felt glue. With black felt cut half a circle big enough for the nose and glue it down with felt glue. With black yarn thread it into the tapestry needle and embroider the mouth and the eyes lashes. With white yarn cut an oval shape small enough to fit in the middle of the ears and glue it down with felt glue. Line up the ears on the side of the face starting on row 16 and sew them in place, pinch them in the middle to give it some form. Line up the antlers on top of the face about one inch in between them and sew them down. Aligned the back of the face with the front. Whipstitch around beginning, just above the ear, and ending on the Other side. Attach the strap on either side and you are done. This pattern has not been tested. This work is licensed under the Creative Commons Attribution-Noncommercial-No Derivative Works 2.5 License. To view a copy of this license, visit http://creativecommons.org/licenses/by-nc-nd/2.5/ or send a letter to Creative Commons, 543 Howard Street, 5th Floor, San Francisco, California, 94105, USA.


