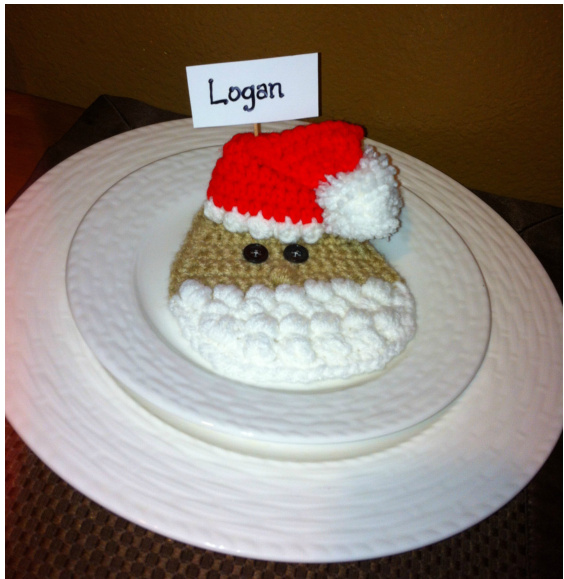
Santa Claus 3-D Appliqué
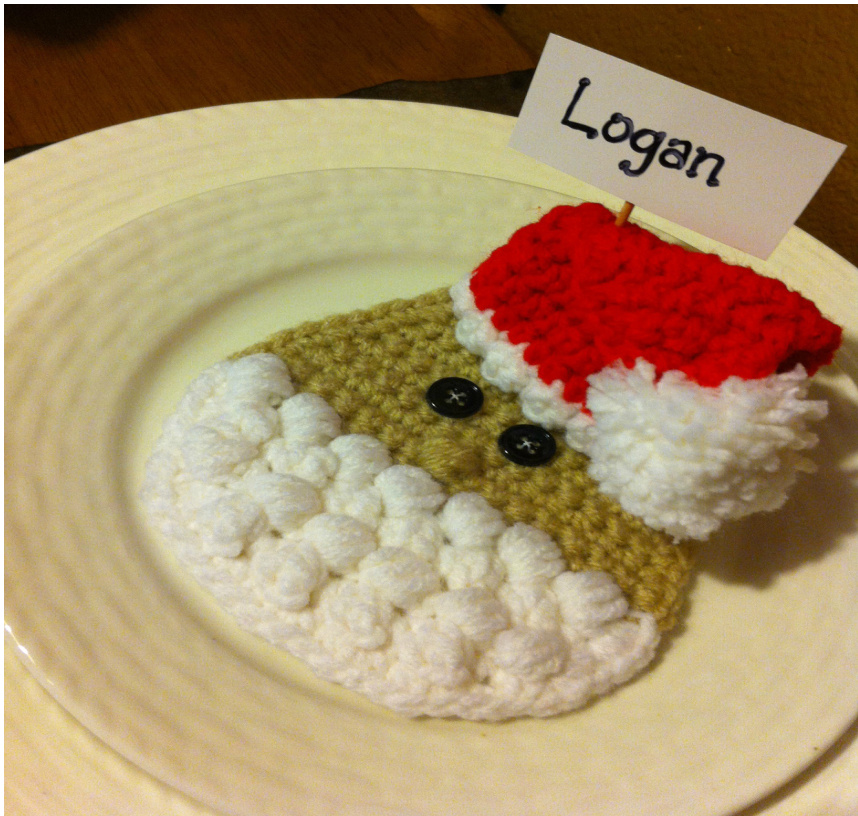

Materials H-8/ 5.00mm hook Worsted Weight yarn - I used Red Heart Super Saver in Buff, White, and Hot Red (less than 1oz of each color) Yarn needle for weaving ends Buttons, sewing needle, and thread (or other material) for eyes Very small amount of stuffing, optional Skill Level Beginner/ Intermediate Measurements Finished Santa measures about 5" X 5" Gauge 4sc and 4 rows = 1"
Abbreviations:
blo: back loop only ch: chain dc: double crochet flo: front loop only hdc: half double crochet hdc2tog: half double crochet 2 together/ decrease pop st: popcorn stitch, see notes below pf st: puff stitch, see notes below rnd: round rs: right side sC: single crochet sc2tog: single crochet 2 together/ decrease sk: skip st(s): stitch(es) sl st: slip stitch wk: work ws: wrong side yo: yarn over (#): indicates # of sts you should have at the end of that row/ rnd
Special Stitches Used:
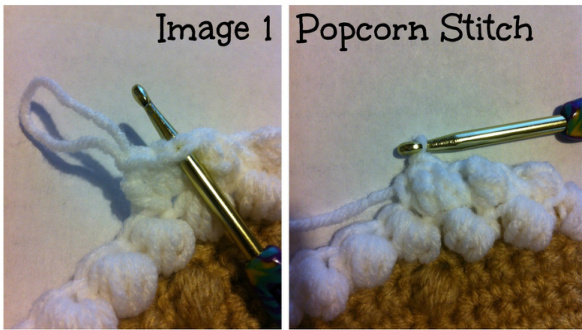
Popcorn Stitch (pop st) : complete 3 hdc in the same st indicated, pull up a loose-loop from last hdc and remove hook from wk completely; place hook in the top loop of the 1st hdc completed for the st, then replace the loop from the 3rd hdc completed (2 loops on hook); pull loop from 3rd hdc through 1st hdc, and pull all slack taut; do NOT ch1 to close Puff Stitch (pf st): yo and insert hook into specified st, pull up a loop (3 loops on hook); repeat 3 more times, until there are 9 loops on hook; yo and pull thru all loops; do NOT ch1 to close will “puff" to ws of wk To change colors in this pattern: finish the specified stitch up to the last step (last yo, etc), but instead of yo'ing with the same color, drop it and pick up the new color, and pull through the last step of the stitch. Then, continue on your work with the new color. This produces the “cleanest" color-changes.
Face
Using Buff, ch 12 Row 1: sc in 2nd ch from hook and each ch across; ch1, turn (11) Row 2-3: sc in each st across; ch1, turn (11) Row 4: 2sc in 1st st; sc in next 9 sts; 2sc in last st; ch1, turn (13) Row 5-6: sc in each st across; ch1, turn (13) Row 7: 2sc in 1st st; sc in next 11 sts; 2sc in last st; ch1, turn (15) Row 8-9: sc in each st across; ch1, turn (15) Row 10: sc in next 7 sts; pf st in next st; sc in next 7 sts; ch1, turn (15) Row 11: sc in each st across, changing to White in last st; do NOT fasten off Buff. Rather, let it hang on ws of work, and you will pick it back up later in the border. Ch1, turn (15)
Beard
Row 12: (sc in next st, pf st in next st) repeat across, sc in last st; ch1, turn (15) (7 puffs) Row 13: sl st in 1st st; (pop st in next st, sc in next st) repeat across, sl st; sk last st; ch1, turn (15) (6 pops) Row 14: sk sl st; (pf st in next st, sc in next st) repeat across, sk last sl st; ch1, turn (13) (6 puffs) Row 15: sc2tog; (pop st in next st, sc in next st) repeat across, sc2tog in last 2 sts (11) (4 pops)
Border
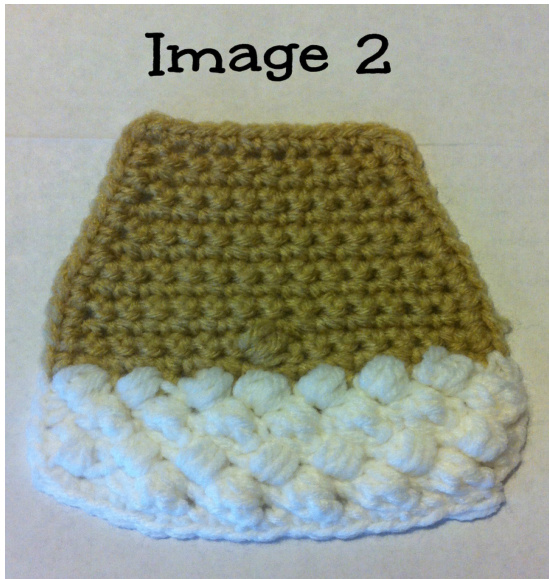
Turn work a quarter-turn to the right. Ch1, with rs still facing, 2sc in the ends of each pop st/ puff st White row. When you reach the end of the Beard section, fasten off White and change to Buff in the last sc by picking up the Buff tail that you did not fasten off. Sc in each st around Face section, working 2sc in each top corner to prevent curling. When you come back to the White Beard section again, change to White in last sc of Buff, fasten off Buff, and continue the border in White by working 2sc in the ends of each pop st/ puff st White row. Across the very bottom of the Beard, work 2sc in each pop st, and 1sc in each sc. See Image 2 - your applique up to this point: a Face and Beard with a pf st nose.
3D Hat
With rs facing, attach White with a sl st in the flo of the very top of the face. Row 1: sc in each st across, 10 scs; ch 15, and attach ch with a sl st to 1st of Row to form a loop, being careful not to twist the loop when attaching; the loop should be on the front side of your work, as this will become the front of Santa's hat band (11sc and ch15)
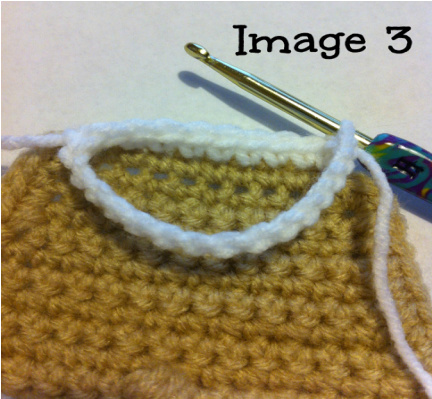
(See Image 3)
You will now switch to working in Rounds-Without-Joining. Use a st marker to keep track of rounds if necessary. Rnd 1: ch 1; working back across the ch15 you just completed, (sc in next ch, pop st in next ch) repeat across; sc in last loop of ch15 and in each sc across back of hat; change to Hot Red in last sc (25) (7 pops) Fasten off White, leaving a long tail, about 18" long. Rnd 2: hdc in each sc and pop st of the front of hat, and in each sc of the back of hat (25) Rnd 3: hdc in next 15 sts; hdc2tog; hdc in next 6 sts; hdc2tog; (23) Rnd 4: hdc in next 8 sts; hdc2tog; hdc in next 4 sts; hdc2tog; hdc in next 3 sts; hdc2tog; hdc in last 2 sts (20) Rnd 5: hdc in next 2 sts; hdc2tog; hdc in next 3 sts; hdc2tog; hdc in next 3 sts; hdc2tog; hdc in next 4 sts; hdc2tog over last 2sts (16)
Mover-stitches: hdc in next 4 sts to move to the correct placefor thefollowingRow.
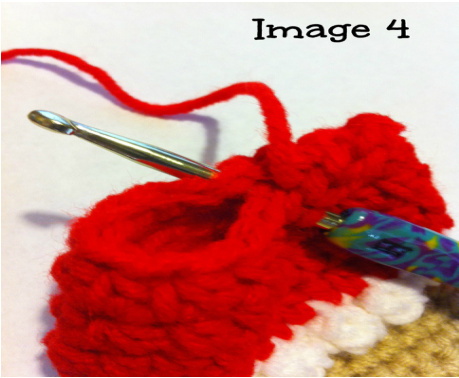
You will now switch back to working in Back-and-Forth Rows. Fold the hat flat, and work the next row through both thicknesses, stitching the hat shut. (It can be tricky to find all 16 sts from Rnd 5 when closing up a tube so abruptly to 8 sts, so pay close attention.)
(See Image 4)
Row 6: hdc in next 8 sts; ch1, turn (8)
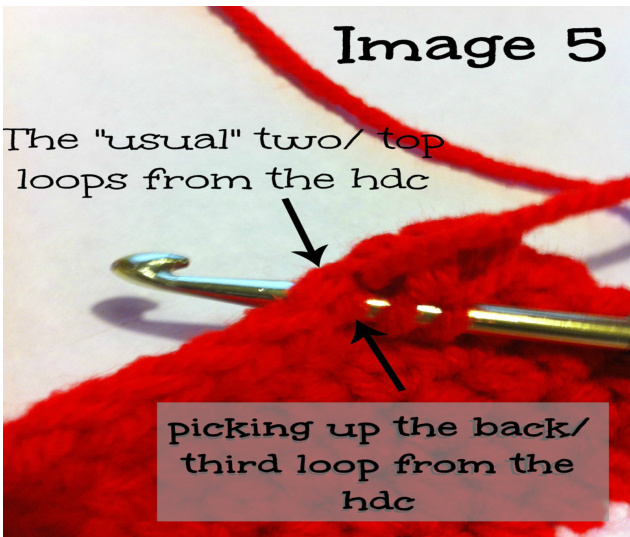
The back-side of the hdc stitch has an extra loop, which creates a ridge-line across your work. What you should do for the remainder of the hat, is to pick up that 3rd loop of the back of the hdc stitches, so that you do not get that ridge across the back. (See Image 5) Row 7: hdc across; ch1, turn (8) Row 8: hdc2tog; hdc in next 4 sts; hdc2tog; ch1, turn (6) Row 9: sc in next 3 sts; hdc in next 3 sts; ch1, turn (6) Row 10: hdc2tog; hdc in next st; sc in next st; sc2tog in next st; ch1, turn (4) Row 11: hdc2tog; sc2tog (2) Fasten off Hot Red, leaving a long tail for attaching PomPom. Using the long White tail from the hat band, stitch the front of the hat in place on the face of the applique, bringing it far enough down the face that the hat will stand up and be hollow in the center. You can use the stuffing here if you like, to ensure that the hat stands up. (See main pattern photos.)
PomPom
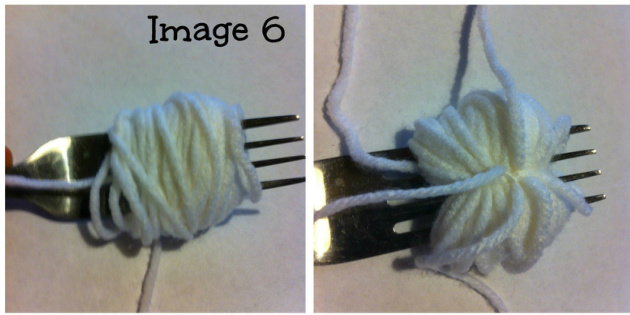
To create a teeny-tiny PomPom, I use a regular table fork. Wrap White around the tines of the fork, keeping in mind that the more wraps, the fuller the PomPom will be. When you have wrapped as many times as you care to, take a 12" length of white and tie around the center of the wrapped fork tines. Tie as tight as you can, and wrap around to the back and tie again. Slide the wrapped yarn off the tines, and cut through all loops. The ends will fluff out, creating your teeny-tiny PomPom. Trim ends even all around. Use the Hot Red tail from the hat to attach PomPom with a secure knot.
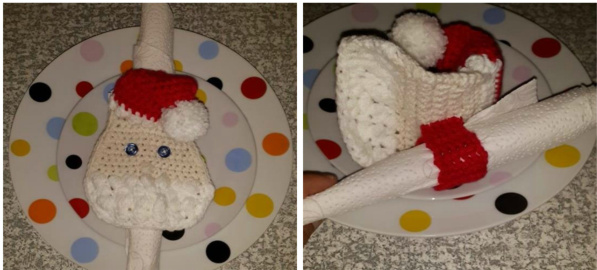
Sew buttons to the face for eyes - if you choose, you can stitch them on with black yarn, use beads, or even black puff paint if you wish. You can also choose to make a ring (or tie strands of yarn) and attach to the back of the applique, making it a napkin ring - thank you to testers for this idea! This pattern was created and written by Kimberlie Goodnough of ShopKimberlie. You may sell anything you make from this pattern - it is your creation! But you may not sell share, or distribute this pattern in any way, in whole or in par, even if you obtained it for fre. You must link back to the original pattern to share it with anyone. You may not use any of the photos I have included in this pattern to advertise or sell your items. You must take your own photos, of your own projects. I would appreciate a link back to my shop or this pattern anytime you sell items online. Thank you for purchasing a ShopKimberlie pattern! Happy hooking! This pattern has been tested to ensure accuracy; if you DO notice any corrections, please feel free to contact me at taurusduck@yahoo.com.


