Cloudburst Shawi
Original design TuesdayFortnite Version3,Oct2011
Notions
8mm Hook
Chunky/ 10ply weight yarn I used King Cole Big Value Chunky (167yds per 100g ball) 2 balls / 334 Yards Optional: stitch markers Note: this is what I used. You could use any weight yarn and hook, though I recommend going up at least 2 sizes to get drape. Stitches Used
Back Story
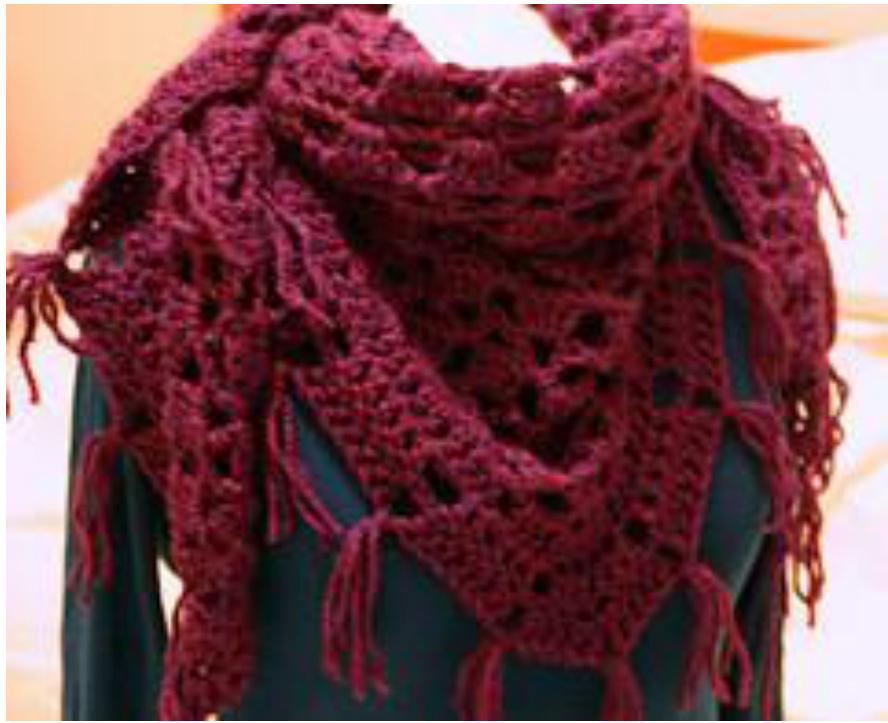
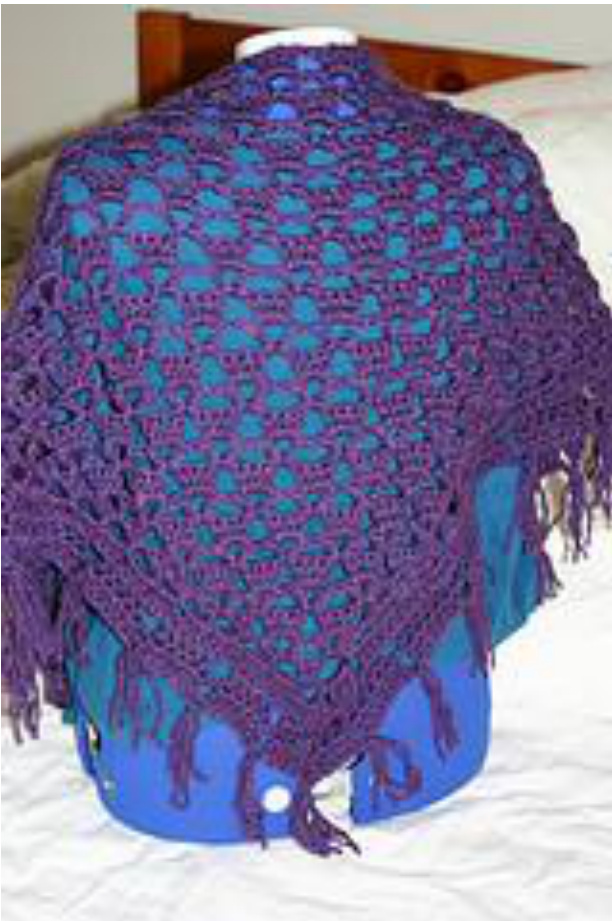
Inspired by a shawl seen on the UK high street this is a super fast make of an open work autumnal shawl. Designed to be worn as a shawl, or as a scarf rolled into a sausage and worn bandana style with the point in front. I made mine in a gorgeous 100% acrylic deep purple tweed that contained flecks of the colours I associate with storm clouds full of heavy rain and ice crystals, hence the name.
Chain (Ch)
Double Crochet (DC) Working time: 4 hours (approx., including fringing) Gauge: not important Final measurements: 62inches x 24 inches (excluding fringe):
How to Follow this pattern
Points and guidance This pattern is for a triangular 'Danish' shawl - where the top is longer than the length. The shawlis worked in two parts, but without breaking the yarn. You will work the body of the shawl from the point up, and then the border is added. Finally the tassels are added for a finishing touch. tten instructions along with a hand drawn chart for the body and the border. ed to be able to crochet chain and Double crochet (US terms used throughou This is not a difficult pattern, but you do need to pay attention for the increase rows. The repeating pattern doesn't start until ROW 7! So please pay extra attention to the first 6 rows or you end up with a strong curving top edge rather than a slight curve.
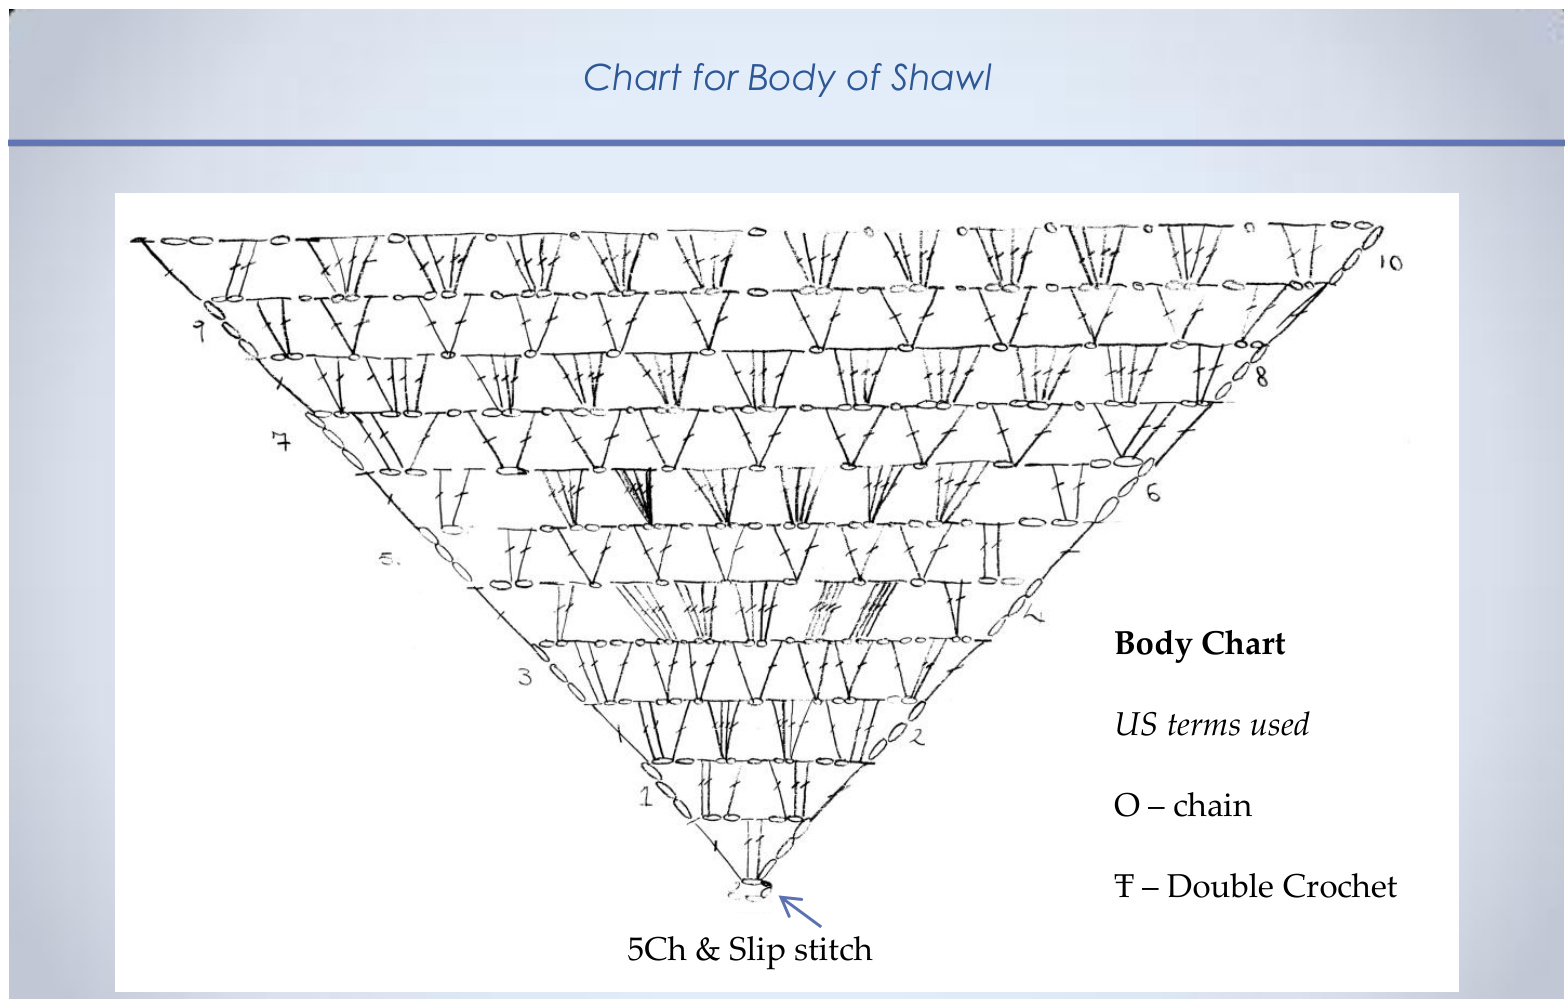
Body of the Shawl
Worked from point up
Special Stitches/Abbreviations
Ch - Chain DC -Double Crochet V stitch - DC, 2Ch, DC Cluster Stitch - 4DC into the 2chain space at the top of a V stitch Starting Point: Chain 5 and join into a circle with a slip stitch. I don't recommend using magic circle here as you are going to use this circle later on in the border. Chain4 and 2DC into the circle. Chain 2 and DC into the circle. Turn work after every row. Row 1: [Chain 5 (to act as first DC and 1ch space), 2DC, 2Chain, 1DC] into first Chain space. 1 Ch. [1DC, 2Ch, 2DC, 2Ch, 1DC] into next 2 Ch space. Row 2(increase row): [Ch5, 2DC, Ch2, 1DC] into 1st chain space. 1Ch. 4DC (Cluster) into next 2 chain space. 1Ch. Cluster into next 2 chain space. 1Ch. [1DC, 2Ch, 2DC, 2Ch, 1DC] into last chain space. Row 3(increase row): [Ch5, 2DC, 2Ch, 1DC] into 1st chain space. \*1Ch. [1DC, 2Ch, 1DC] (V stitch) into next chain space\*\*. Repeat \* to \*\* to last Chain space. Chain 1, [1DC, 2Ch, 2DC, 2Ch, 1DC] into last chain space. Row 4: [Ch5, 2DC] into first chain space, \*1 Ch, Cluster into next V stitch (or 2 chain space)\* - repeat from \* to \* across row till last chain space, (total of 5 clusters), 1 chain, [2DC, 2Ch, 1DC] into last chain space. Row 5: [Ch5, 2DC] into first chain space, \*1Ch, V stitch into next chain space\*\*, repeat from \* to \*\* till last Chain space (total of 6 V stitches), 1 chain, [2DC, 2Ch, 1DC] into last chain space Row 6: [Ch5, 2DC] into first chain space, \*1Ch, Cluster stitch into next V stitch (or 2 chain space)\*\*, repeat from \* to \*\* till last Chain space (total of 6 Cluster stitches), 1 chain, [2DC, 2Ch, 1DC] into last chain space. Row 7 (increase row and start of pattern repeat): [Ch5, 2DC, Ch2, 1DC] into first chain space, \*1Ch, V stitch into next chain space\*\*, repeat from \* to \*\* till last Chain space (total of 7 V stitches), 1 chain, [1DC, 2Ch, 2DC, 2Ch, 1DC] into last chain space. Row 8: [Ch5, 2DC] into first chain space, \*1Ch, Cluster stitch into next V stitch (or 2chain space)\*, repeat from \* to \*\* till last Chain space (total of 9 cluster stitches), 1 chain, [2DC, 2Ch, 1DC] into last chain space. Row 9: [Ch5, 2DC] into first chain space, \*1Ch, V stitch into next chain space\*\*, repeat from \* to \*\* till last Chain space (total of 10 V stitches), 1 chain, [2DC, 2Ch, 1DC] into last chain space Row 10: [Ch5, 2DC] into first chain space, \*1Ch, Cluster stitch into next V stitch (or 2 chain space)\*\*, repeat from \* to \*\* till last Chain space (total of 10 Cluster stitches), 1 chain, [2DC, 2Ch, 1DC] into last chain space. Repeat from Row 7 ending with a Row 8 when you have 25 Cluster stitches
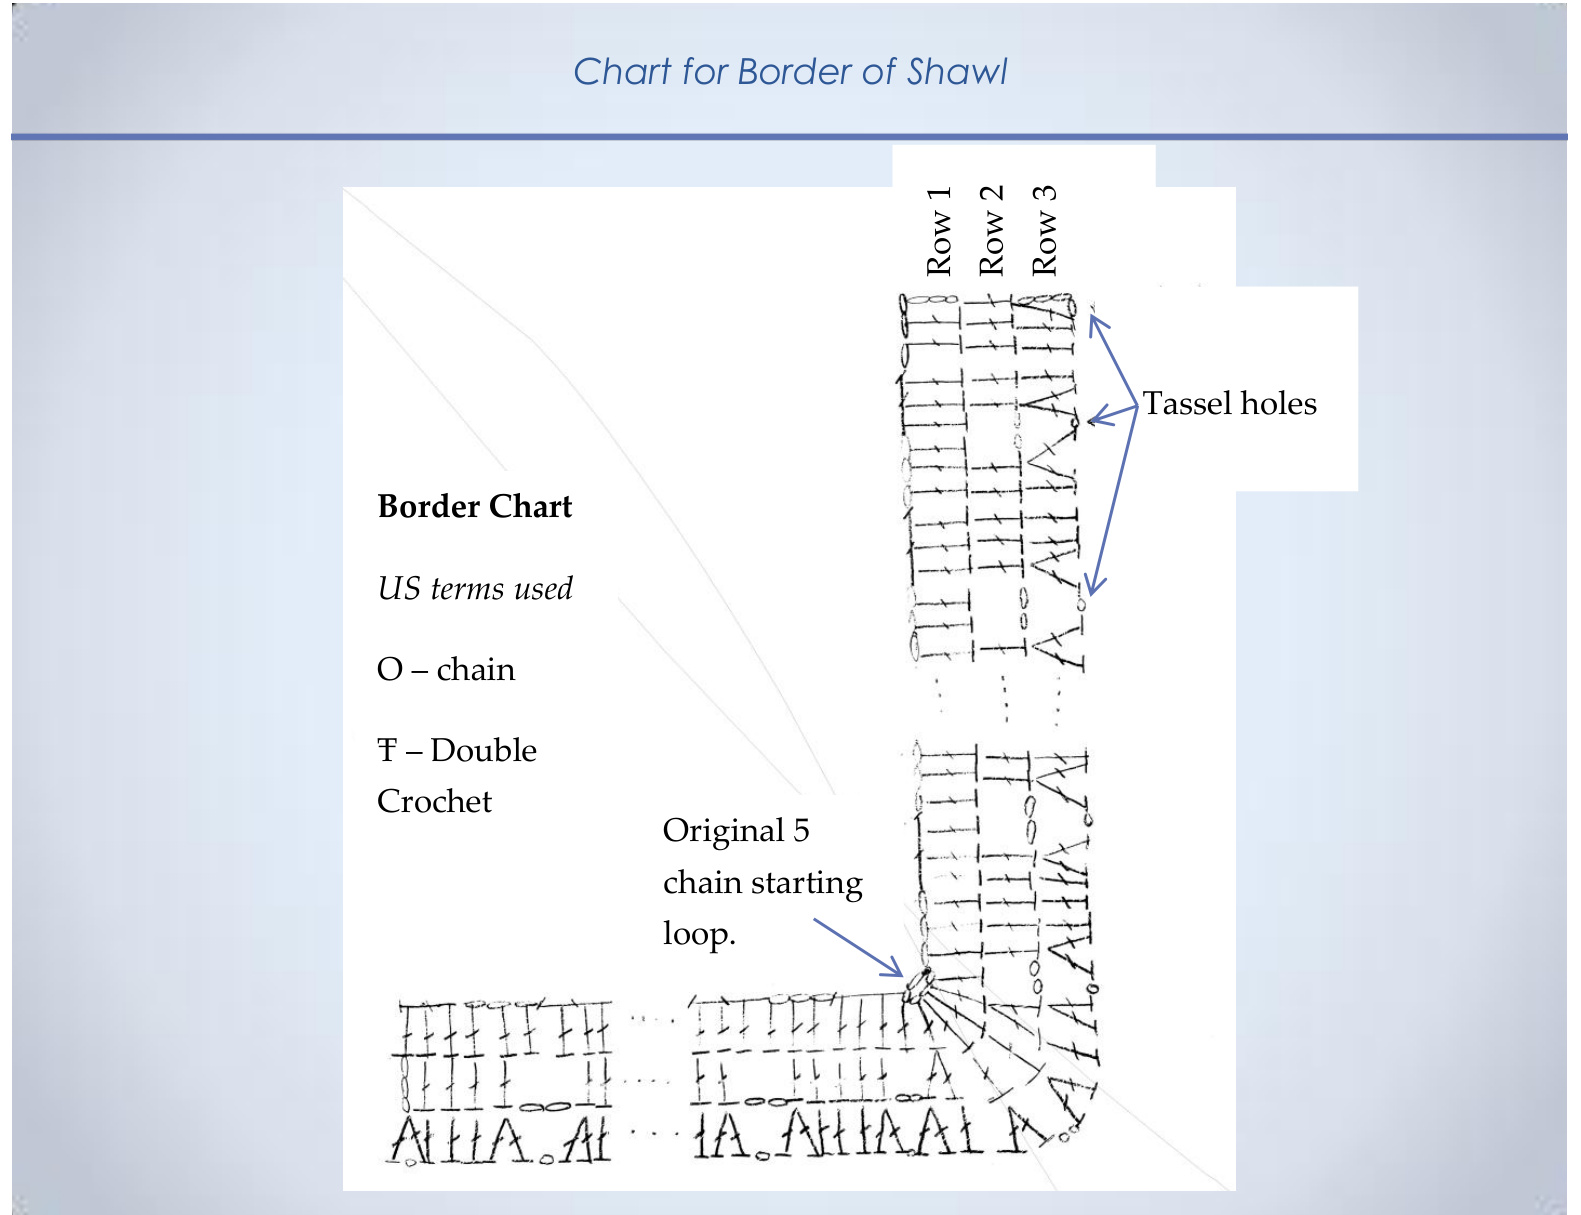
Shawl Border
Worked from Edge to Edge
Special Stitches/Abbreviations
Ch - Chain DC - Double Crochet Row 1: Chain 3 and then 3DC into each DC or 3Ch along the edge. When you get to the original Chain circle, insert 6DC then 3DC into each DC or 3Ch along the other edge. Row 2: Chain 3 (to act as 1st DC) and then 4DC into next 4DC. \*Ch2, Skip 2DC, 5DC into next 5DC\*\* repeat until you come to the 'corner of the point of the shawl (the 6DC into the original Chain Circle) Note: the 5th of the 5DC will be into the last 3DC of the previous row (I hope that makes sense) 2Ch, Skip 1DC, 2DC into the 2nd of the 6DC, 1DC into next DC, 1DC into next DC, 2DC into next DC, Chain 2 and skip the last of the 6DC (6DC in total) DC into the top of the 1st of the 3DC of the row below and then 4 more DC into the next 4DC, \*Ch2, Skip 2DC, 5DC into the next 5DC\*\* repeat to end Row 3: Chain 4 (to act as 1st DC and 1Ch space). DC into the same very first DC. 3DC into the next 3DC, 2DC into the last of the 5DC of the previous row. Chain 1. Skip the 2 Chain of previous row. \*2DC into the 1st DC, 3DC into next 3DC, 2DC into the 5th DC, Chain 1, Skip 2Ch \*\* repeat from \* to \*\* until you get to the 'point 2DC into the first DC, 1DC into next DC, 2DC into the next DC, chain 2, 2DC into next DC, 1DC into next DC, 2DC into the last DC, Chain 1 Skip the 2Ch gap and then follow the patern up the other side -2DC into first DC, 3DC into next 3DC, 2DC into last DC, Chain 1, Skip 2Ch gap until the last group Into the very last stitch, where you are expecting to do 2DC, do 1DC, Ch1, 1DC Fasten off.
Shawl Fringing and Finishing
Optional I used the remaining yarn I had and wrapped it around an unopened bill envelope. If you want a longer fringe you could use a DVD case (either around or top-to-bottom). Wrap the yarn around the object without pulling too tight (try to be fairly relaxed about this) and then cut along one edge. I had enough yarn to give me 4 strands at each corner (using the 1Ch space at the top corners and 2Ch space at the point), and 3 strands along the edges. Unfortunately this is a case of just guessing and fudging until it works! Level your ends and loop them over your finger. Feed your crochet hook through the tassel hole (the 1ch space in Row 3) and pick up the yarn around your finger. Pull through the hole. Take hold of this loop and use the hook to pass the ends of the yarn through this loop. Pull the ends to secure. Trim ends if you Wish. Block lightly if desired to extend the top edge. Pre-blocked measurements: 50 inches x 22 inches - Blocked Measurements: 62.5 inches by 24 inches
Copyright and Thanks
With thanks to my patient testers: MNG, AubergineStar and Bookworm-mar. Without them this pattern would not be as half as readable. AubergineStar used a 7mm hook and 10ply yarn. Pre-blocked measurement 104 x 40cm Bookworm-mar used a 5mm hook and 8ply (DK yarn). Finished measurements 127 x 48cm (50" x 19) (Bookworm-mar also made some lovely modifications- check out her projectpage) Mng used a 6mm hook and 302yds of 10ply yarn. Pre-blocked measurement 116 x 50cm (46” × 19.5") This is a free pattern, feel free to do as many as you wish, if you want to sell the Finished Object go ahead. If you use the pattern please give credit where credit is due. I'd love to hear about your finished shawls, and any issues or questions you have about this pattern.


