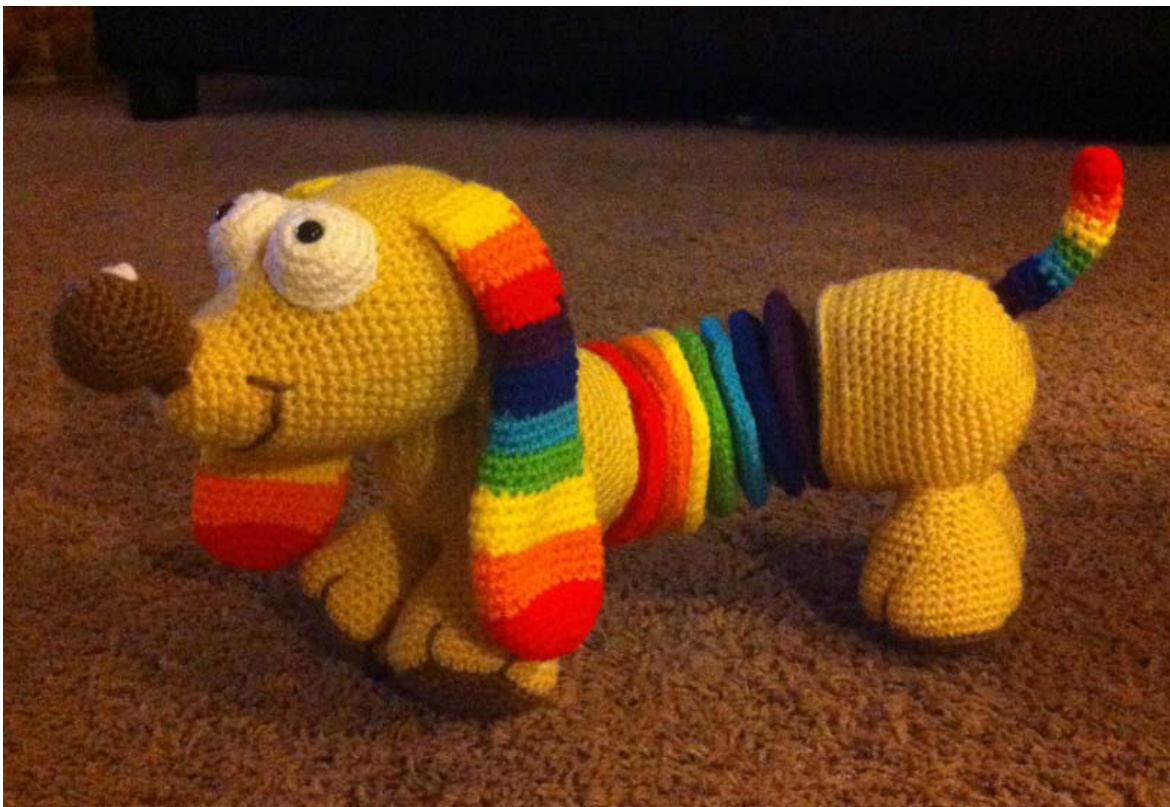
Rainbow Slinky Dog
Materials F/5 - 3.75mm hook Worsted Weight yarn - (I used all Red Heart Super Saver) Yarn needle for weaving ends Plastic Canvas - enough for (9) 3"-circles (1) pair of safety eyes; I used 9mm Polyester toy stuffing, or other stuffing material Skill Level Beginner/ Intermediate This pattern is very simple, but long enough to seem intimidating. You can do it if you don't give up! :)
Gauge
Gauge is not critical to this project. You just want to ensure that you are creating tight enough stitches so that stuffing Won't show through. However, since I am a perfectionist: 8sc and 9rows =2" Measurements 19" long and 9" tall Abbreviations: blo: back loop only ch(s): chain(s) sc: single crochet invdec: invisible decrease; see note sk: skip st(s): stitch(es) sl st('ing): slip stitch(ing) (#): indicates the number of sts you should have at the end of that row / rnd
Notes:
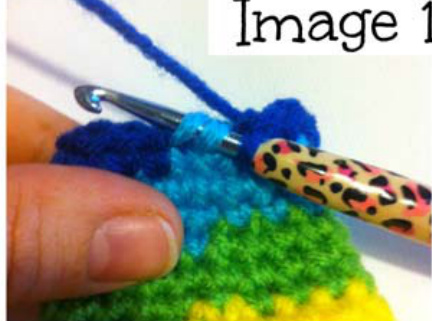
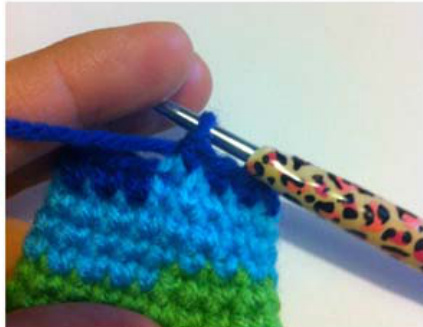
Invisible decrease:
Invisible decrease: this stitch can be used to take the place of a regular "decrease", or "sc2tog". It creates a virtually \*invisible decrease\*, rather than the bump that is made by a sc2tog. It is commonly abbreviated into the following steps: insert hook into front loops only of next 2 stitches, yarn over, pull through 2 loops on hook, yarn over, pull through final 2 loops on hook - counts as 1 single crochet. You just took 2 sts, and decreased them into one. See Image 1, below.
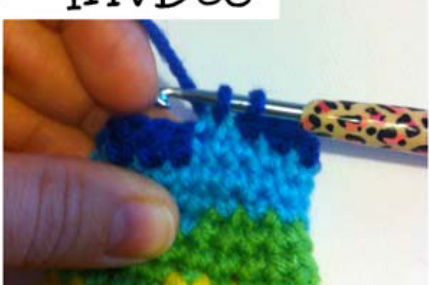
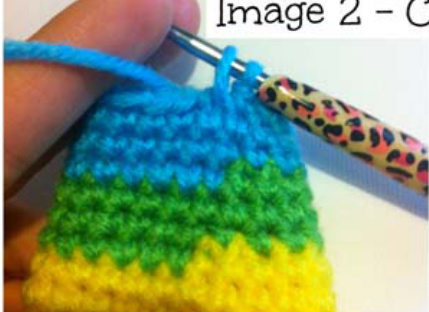
Color Changes:
The cleanest method for changing to a new color of yarn is as follows: Work all the way up to the last step of the stitch in the old color. For a sc, that is to insert hook in the specified stitch, yarn over, and pull up a loop (two loops on hook). Then drop the old color, yarn over with the new color, and pull the new color through both loops on your hook. You complete half of the sc in the old color, and half of the sc in the new color. See Image 2, below.
My best tip on amigurumi:
You want to stuff pieces as full as possible, as crochet stitches will relax over time. Overstuffing each piece now, will avoid a mis-shapen toy later. When you think you can't fit any more stuffing in - put in a bit more. ;)
Attaching pieces:
Sarah Horrocks from The Whole Knit & Caboodle has a great video showing how to use the Mattress Stitch/ Ladder Stitch to attach amigurumi pieces. This is THE best, most invisible way of sewing pieces onto an ami project, and I highly recommend watching her tutorial. http://thewholeknitandcaboodle.com/?s=mattress&submit=Go
Image 1 - InvDec
Inserthookintofronttwo loops only ofnext two stitches
Yarn over. pull through tuwo loops: yarn over. pull through final two loops
Counts as 1 sc. Youjusttooktwosts.and decreasedthemintoone.
Image 2 - Color Change

Insert hookin the specified stitch. yarn over.and pull up a loop (two loops on hook).
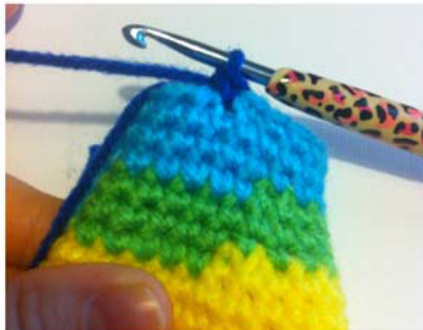
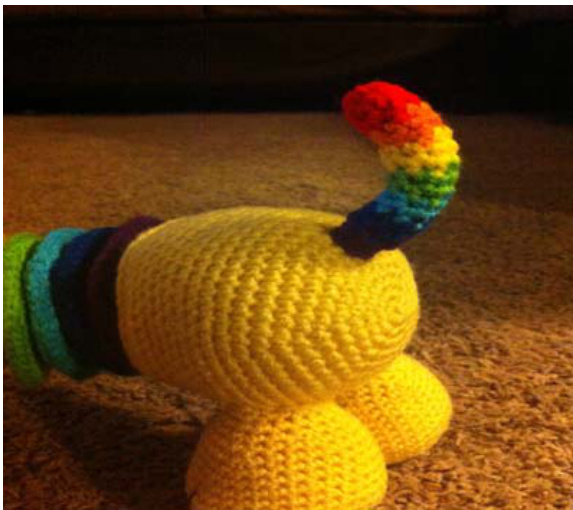
Drop the old color.yarn over with thenew color,andpull thenew color throughbothloopson hook. You complete half of the sc intheoldcolor.ahdhalfof thescinthehewcolor. Head - make 1 Using Cornmeal, ch 2 Rnd 1: 6 sc in 2nd ch from hook (6); tighten to close if necessary Rnd 2: 2 sc in each sc around (12) Rnd 3: sc in 1st st; 2 sc in next st; (sc in next st; 2 sc in next st); rpt O around (18) Rnd 4: sc in 1st 2 sts; 2 sc in next st; (sc in next 2 sts; 2 sc in next st); rpt O around (24) Rnd 5: sc in 1st 3 sts; 2 sc in next st; (sc in next 3 sts; 2 sc in next st); rpt 0 around (30) Rnd 6: sc in 1st 4 sts; 2 sc in next st; (sc in next 4 sts; 2 sc in next st); rpt 0 around (36) Rnd 7: sc in 1st 5 sts; 2 sc in next st; (sc in next 5 sts; 2 sc in next st); rpt O around (42) Rnd 8: sc in 1st 6 sts; 2 sc in next st; (sc in next 6 sts; 2 sc in next st); rpt 0 around (48) Rnd 9: sc even around (48) Rnd 10: sc in 1st 7 sts; 2 sc in next st; (sc in next 7 sts; 2 sc in next st); rpt 0 around (54) Rnds 11-16: sc even around (54) : in 1st 7sts; inv-dec over next 2 scs; (sc in next 7 sts; inv-dec over next 2 scs); rf 0 around (48) Rnds 18-20: sc even around (48) Rnd 21: sc in 1st 6sts; inv-dec over next 2 scs; (sc in next 6 sts; inv-dec over next 2 scs); rpt 0 around (42) Rnds 22-23: sc even around (42) Rnd 24: sc in 1st 5sts; inv-dec over next 2 scs; (sc in next 5 sts; inv-dec over next 2 scs ; rpt 0 around (36) Rnds 25-26: sc even around (36) Rnd 27: sc in 1st 4sts; inv-dec over next 2 scs; (sc in next 4 sts; inv-dec over next 2 scs); rpt 0 around (30) Rnds 28-29: sc even around (30) Rnd 30: sc in 1st 3sts; inv-dec over next 2 scs; (sc in next 3 sts; inv-dec over next 2 scs); rpt 0 around (24) Rnds 31-32: sc even around (24) Begin stuffing head. Rnd 33: sc in 1st 2sts; inv-dec over next 2 scs; (sc in next 2 sts; inv-dec over next 2 scs); rpt 0 around (18) Rnds 34-35: sc even around (18) Rnd 36: sc in 1st st; inv-dec over next 2 scs; (sc in next st; inv-dec over next 2 scs); rpt 0) around (12) Finish stuffing head. Rnd 37: inv-dec over first 2 scs; (inv-dec over next 2 scs); rpt O around (6) Rnd 38: sc even around (6) Fasten of, leaving long tail, and tighten to close. Thread tail onto yarn needle and weave end under several stitches securely. Nose - make 1 Using Cafe Latte, ch 2 Rnd 1: 6 sc in 2nd ch from hook (6); tighten to close if necessary Rnd 2: 2 sc in each sc around (12) Rnd 3: sc in 1st st; 2 sc in next st; (sc in next st; 2 sc in next st); rpt O around (18) Rnd 4: sc in 1st 2 sts; 2 sc in next st; (sc in next 2 sts; 2 sc in next st); rpt 0 around (24) Rnds 5-9: sc even around (24) Rnd 10: sc in 1st 2sts; inv-dec over next 2 scs; (sc in next 2 sts; inv-dec over next 2 scs); rpt 0 around (18) Rnd 11: sc even around (18) Rnd 12: sc in 1st st; inv-dec over next 2 scs; (sc in next st; inv-dec over next 2 scs); rpt 0) around (12) Fasten of, leaving long tail (24"). Use a very small amount of White, stitch a little highlight onto the top of the Nose. Stuff Nose and thread the tail onto yarn needle. Use the tail to stitch. the Nose onto the Head. The top edge of the Nose should line up with Rnd 5 of the Head; the bottom edge of the Nose should line up with Rnd 2 of the Head. Embroider mouth with same tail, around Rnd 8 or Rnd 9 of the Head. Weave end under several stitches securely, and fasten off. Eyes - make 2 Using White, ch 2 Rnd 1: 6 sc in 2nd ch from hook (6); do not tighten. (I like to work the next 4-6 stitches over the starting tail, and it can then be pulled tight, the same as a Magic Ring.) Rnd 2: 2 sc in each sc around (12) Place post of safety eye into the open hole in the center of the crochet eye, and pull the starting end to tighten the circle, as much as you can. Fasten the washer to the back of the safety eye.See Image 3, below. Rnd 3: sc in 1st st; 2 sc in next st; (sc in next st; 2 sc in next st); rpt O around (1: Rnds 4-5: sc even around (18) Fasten off, leaving long tail. Thread tail onto yarn needle and use the tail to attach each Eye to the Head. The lower edge of each Eye should line up with Rnd 11 of the Head, and the Eyes should be almost touching each other above the Nose. Use photo as a guide. Stuff each Eye lightly before completing the attachment.
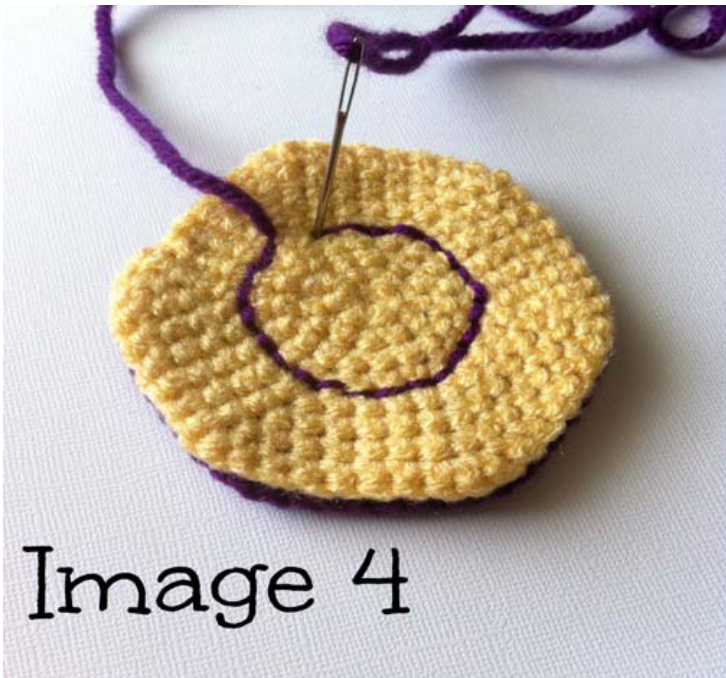
Slinky Segments - make 2 pieces for each Segment color, 16 pieces total Make 7 Segments, in your chosen Slinky color(s). I used: Cherry, Pumpkin, Bright Yellow, Spring Green, Turqua, Royal, & Dark Orchid. Also make 2 more pieces in your body color (Cornmeal) Using chosen color, ch 2 Rnd 1: 6 sc in 2nd ch from hook (6); tighten to close if necessary Rnd 2: 2 sc in each sc around (12) Rnd 3: sc in 1st st; 2 sc in next st; (sc in next st; 2 sc in next st); rpt O around (18) Rnd 4: sc in 1st 2 sts; 2 sc in next st; (sc in next 2 sts; 2 sc in next st); rpt 0 around (24) Rnd 5: sc in 1st 3 sts; 2 sc in next st; (sc in next 3 sts; 2 sc in next st); rpt 0 around (30) Rnd 6: sc in 1st 4 sts; 2 sc in next st; (sc in next 4 sts; 2 sc in next st); rpt 0 around (36) Rnd 7: sc in 1st 5 sts; 2 sc in next st; (sc in next 5 sts; 2 sc in next st); rpt 0 around (42) Rnd 8: sc in 1st 6 sts; 2 sc in next st; (sc in next 6 sts; 2 sc in next st); rpt 0 around (48) Fasten off after each piece, and weave in ends. This will make it easier when you are assembling the Slinky Segments. Before you move on to the next step, use one Slinky Segment piece as a template for cutting out the plastic canvas circles to fit into each pocke of the Slinky Segment - cut the plastic slightly smaller than the crochet Slinky Segment circle itself. You'll need 9 circles of plastic canvas. You'll be sewing the Slinky Segments together in an odd way - which will make sense at the end, I promise! ;) You want to stitch the center of each circle to the center of it's partner-circle, (stitch completely around Row 3 or 4) with right sides facing each other. Use a yarn color that coordinates, and stitch together with the yarn needle. See Image 4, below. If you are doing the same colors as the pattern photos, you want this order: Cornmeal circle attached to Cherry circle Cherry circle attached to Pumpkin circle Pumpkin circle attached to Bright Yellow circle Bright Yellow Circle attached to Spring Green circle Spring Green circle attached to Turqua circle Turqua circle attached to Royal circle Royal circle attached to Dark Orchid circle Dark Orchid circle attached to Cornmeal circle
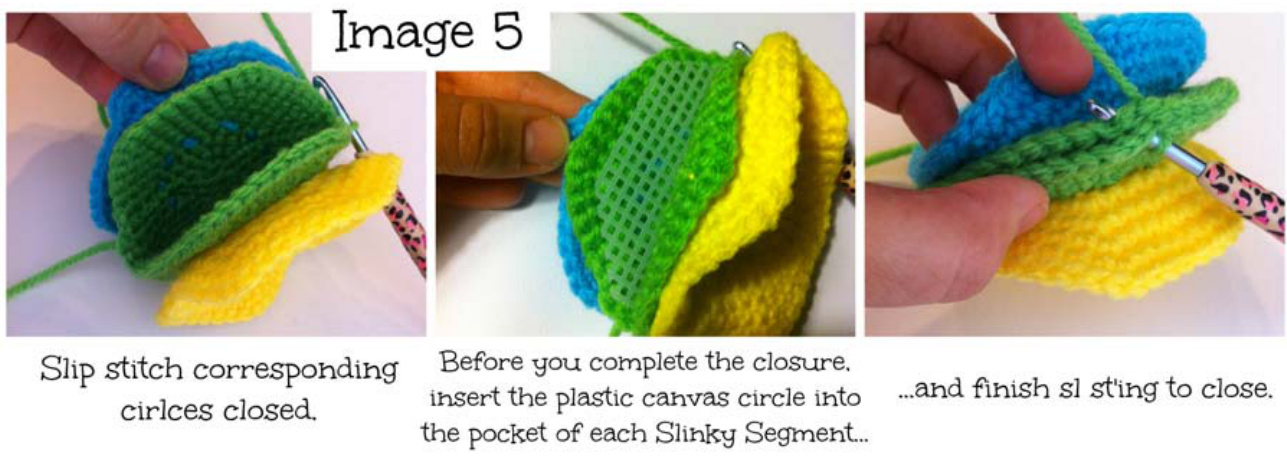
Once all circles are sewn to their contrasting-colored mates with the right sides facing each other, you will THEN be attaching the matching-colored mates to each other with the wrong sides facing each other, by slip stitching them closed with their corresponding yarn color. Before you complete the closure, insert the plastic canvas circle into the pocket of each Slinky Segment, and finish sl st'ing to close. Weave end under several stitches securely, and fasten off.
See Image 5 below.
The Cormeal circles will be on the ends, waiting to be attached to the body, and there will be a rainbow-colored Slinky between them. I know that sounds confusing just reading it, and maybe even with the photos, but I know it will make sense once you get going. See Image 6, below.

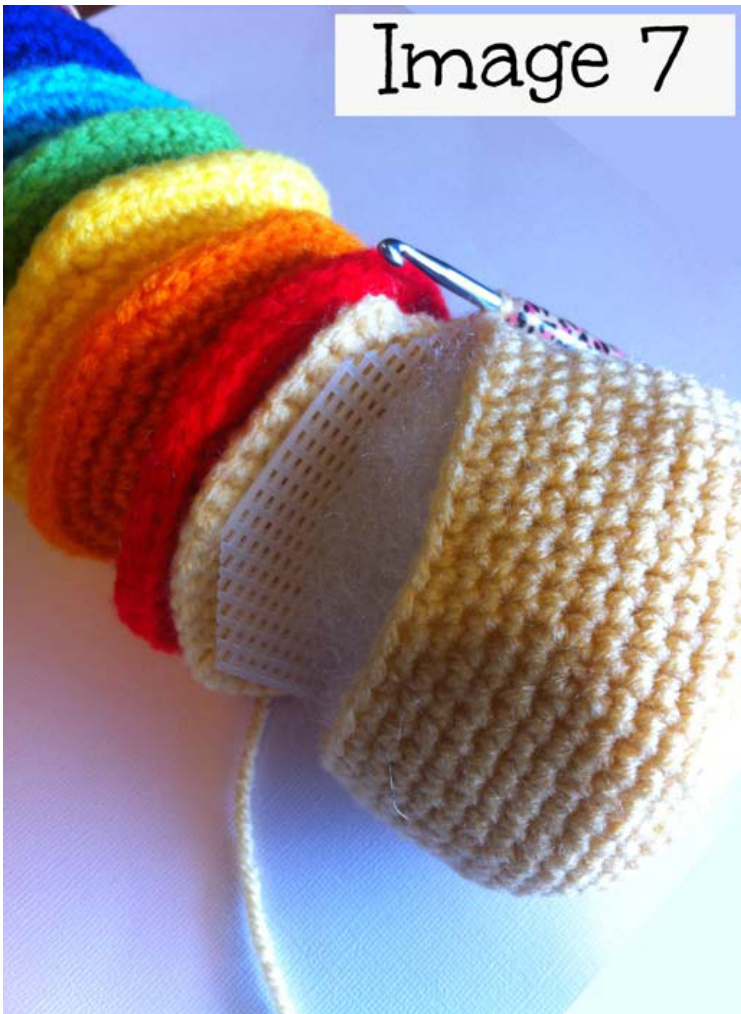
Body - make 2 Using Cornmeal, ch 2 Rnd 1: 6 sc in 2nd ch from hook (6); tighten to close if necessary Rnd 2: 2 sc in each sc around (12) Rnd 3: sc in 1st st; 2 sc in next st; (sc in next st; 2 sc in next st); rpt O around (18) Rnd 4: sc in 1st 2 sts; 2 sc in next st; (sc in next 2 sts; 2 sc in next st); rpt O around (24) Rnd 5: sc in 1st 3 sts; 2 sc in next st; (sc in next 3 sts; 2 sc in next st); rpt 0 around (30) Rnd 6: sc in 1st 4 sts; 2 sc in next st; (sc in next 4 sts; 2 sc in next st); rpt 0 around (36) Rnd 7: sc in 1st 5 sts; 2 sc in next st; (sc in next 5 sts; 2 sc in next st); rpt O around (42) Rnd 8: sc in 1st 6 sts; 2 sc in next st; (sc in next 6 sts; 2 sc in next st); rpt 0 around (48) Rnd 9: sc in 1st 7 sts; 2 sc in next st; (sc in next 7 sts; 2 sc in next st); rpt 0 around (54) Rnds 10-14: sc even around (54) Rnd 15: sc in 1st 7sts; inv-dec over next 2 scs; (sc in next 7 sts; inv-dec over next 2 scs); rpt 0 around (48) Rnds 16-20: sc even around (48) Do not fasten off after completing each Body section. Stuff the Body section, hold one Cornmeal Slinky Segment piece against the Body section, and begin sl st'ing to close. Before you complete the closure, insert another plastic canvas circle between the Slinky Segment circle, and the stuffing of the Body. Complete the sl st'ing around to close the Body, inserting more stuffing on the correct side of the plastic canvas, as needed. (You don't want any stuffing to be between the plastic canvas circle and the Slinky Segment circle - all the stuffing should stay in the Body section.) See Image 7, below. Repeat with other Body section and Cornmeal Slinky Segment piece. Weave ends under several stitches securely, and fasten off. Attach Head to Body so that Rnd 10 of the Head meets up with Rnd 10 of the Body. Make sure to stitch a large connection-area between the two pieces, so that the Head is secure, and not floppy.
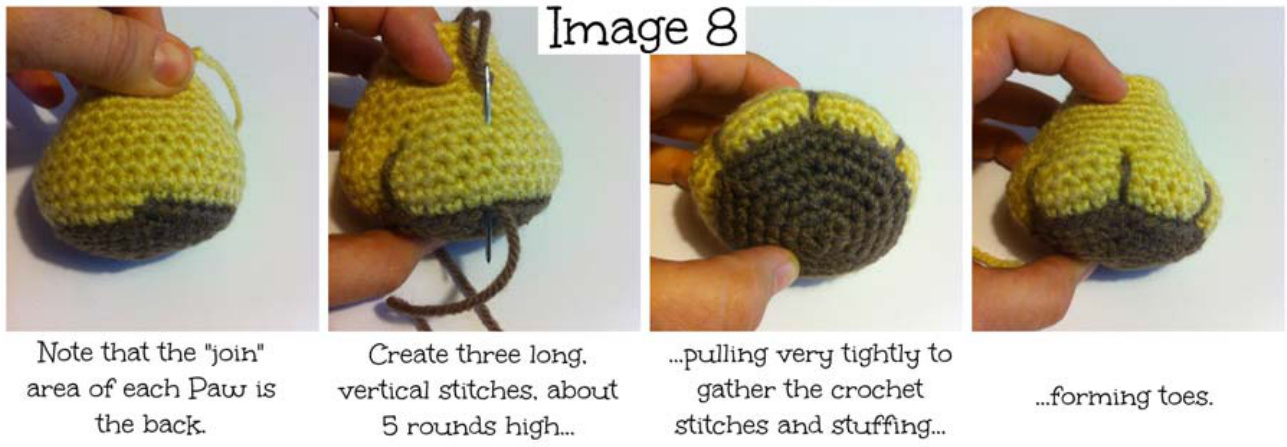
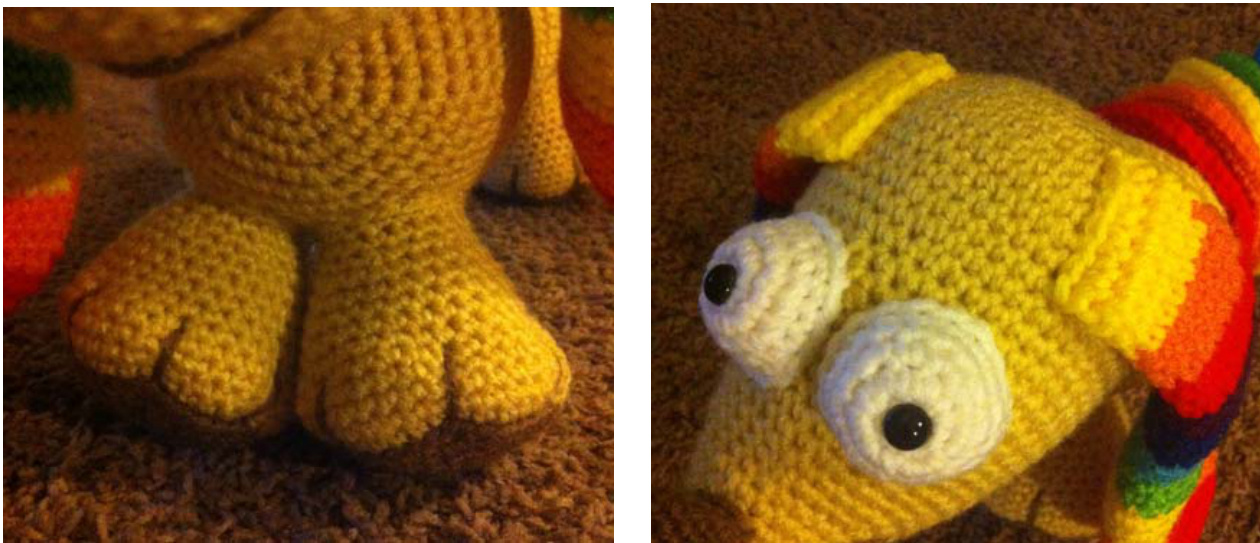
Paws -make 4 Using Cafe Latte, ch 2 Rnd 1: 6 sc in 2nd ch from hook (6); tighten to close if necessary Rnd 2: 2 sc in each sc around (12) Rnd 3: sc in 1st st; 2 sc in next st; (sc in next st; 2 sc in next st); rpt O around (18) Rnd 4: sc in 1st 2 sts; 2 sc in next st; (sc in next 2 sts; 2 sc in next st); rpt O around (24) Rnd 5: sc in 1st 3 sts; 2 sc in next st; (sc in next 3 sts; 2 sc in next st); rpt 0 around (30) Rnd 6: sc in 1st 4 sts; 2 sc in next st; (sc in next 4 sts; 2 sc in next st); rpt 0 around (36) Change to Cornmeal Rnd 11: sc in next 10 sts; inv-dec over next 2 scs; sc in next 12 sts; inv-dec over next 2 scs; sc in next 10 sts (34) Rnd 12: sc in next 9 sts; inv-dec over next 2 scs; sc in next 12 sts; inv-dec over next 2 scs; sc in next 9 sts (32) Rnd 13: sc in next 8 sts; inv-dec over next 2 scs; sc in next 12 sts; inv-dec over next 2 scs; sc in next 8 sts (30) Rnd 14: sc in next 7 sts; inv-dec over next 2 scs; sc in next 12 sts; inv-dec over next 2 scs; sc in next 7 sts (28) Rnd 15: sc in next 6 sts; inv-dec over next 2 scs; sc in next 12 sts; inv-dec over next 2 scs; sc in next 6 sts (26) Rnd 16: sc in next 6 sts; inv-dec over next 2 scs; sc in next 10 sts; inv-dec over next 2 scs; sc in next 6 sts (24) Rnd 17: sc in 1st 2sts; inv-dec over next 2 scs; (sc in next 2 sts; inv-dec over next 2 scs ); rpt 0 around (18) Rnds 18-19: sc even around (18) Add more stuffing if you can. Fasten of, leaving long tail. Using Cafe Latte, thread a length onto yarn needle and attach to the the area of Rnd 6 or 7, where the two colors meet. Note that the "join" area of each Paw is the back, and the decreases form the shaping on the front of the Paw. Create three long, vertical stitches, about 5 rounds high, pulling very tightly to gather the crochet stitches and stuffing, forming toes. See Image 8, below.
Thread tail onto yarn needle and use the tail to attach the Paw to the Body. The forward edge of each Paw should line up with Rnd 8 on the front body piece, and Rnd 16 on the back Body piece. Make sure the Paws touch each other under the Body, and use the tail to make a few stitches securing the front two Paws to each other, and the back two Paws to each other. This will make the Slinky Dog a little more sturdy, and allow him to stand on his own. Weave end under several stitches securely, and fasten off.
Ears - make 2 Using Cherry, ch 2 \*Make sure you work over each new yarn end as you change colors and crochet the ears; it 1 be too narrow to weave the ends in when you are done.\* Rnd 1: 6 sc in 2nd ch from hook (6); tighten to close if necessary Rnd 2: 2 sc in each sc around (12) Rnd 3: sc in 1st st; 2 sc in next st; (sc in next st; 2 sc in next st); rpt O around (18) Rnd 4: sc even around (18) Rnd 5: sc in 1st 2 sts; 2 sc in next st; (sc in next 2 sts; 2 sc in next st); rpt O around (24) Rnd 6: sc even around (24) Change to Pumpkin Rnds 7-10: sc even around (24) - Change to Bright Yellow Rnd 11: \*sc in 1st 10 sts; inv-dec over next 2 scs\*; rpt from \* to \* once more (22) Rnds 12-14: sc even around (22) - Change to Spring Green Rnd 15: \*sc in 1st 9 sts; inv-dec over next 2 scs\*; rpt from \* to \* once more (20) Rnds 16-17: sc even around (20) - Change to Turqua Rnd 18: \*sc in 1st 8 sts; inv-dec over next 2 scs\*; rpt from \* to \* once more (18) Rnds 19-20: sc even around (18) - Change to Royal Rnd 21: \*sc in 1st 7 sts; inv-dec over next 2 scs\*; rpt from \* to \* once more (16) Rnds 22-23: sc even around (16) - Change to Dark Orchid Rnd 24: \*sc in 1st 6 sts; inv-dec over next 2 scs\*; rpt from \* to \* once more [14) Rnds 25-26: sc even around (14) - Change to Cherry Rnds 27-29: sc even around (14) - Change to Pumpkin Rnds 30-32: sc even around (14) - Change to Bright Yellow Rnds 33-35: sc even around (14) Fold flat and sc through both thicknesses, both sides of top of Ear, creating a seam and closing the top. (7sc) (Ear remains unstuffed.) Fasten off, leaving long tail. Thread tail onto yarn needle and use the long tail to attach th Ear onto the Head. The forward-edge of each Ear should line up with Rnd 23 of the Head which is about 2-3 Rnds of space from the Eyes. The Ears should lie about even with the center of the Eyes, alined with the safety eye. Weave end under several stitches securely, and fasten off
Tail - make 1
Using Cherry, ch 2 \*Make sure you work over each new yarn end as you change colors and crochet the ears; it will be too narrow to weave the ends in when you are done.\* Rnd 1: 8 sc in 2nd ch from hook (8); tighten to close if necessary Rnds 2-3: sc even around (8) - Change to Pumpkin Rnds 4-5: sc even around (8) - Change to Bright Yellow Rnds 6-7: sc even around (8) - Change to Spring Green Rnds 8-9: sc even around (8) - Change to Turqua Rnds 10-11: sc even around (8) - Change to Royal Rnds 12-13: sc even around (8) - Change to Dark Orchid Rnds 14-15: sc even around (8) Fasten off, leaving long yarn tail. With all the yarn ends from color changes, its not really necessary to use stuffing in the Tail; just use the ends to stuff. Thread yarn tail onto yarn needle and use to attach the Tail onto the Body. Tail should line up with Rnd 7-8 of Body. Weave end under several stitches securely, and fasten off.
This pattern was adapted by Kimberlie Goodnough of ShopKimberlie. I translated it from a free blog-link pattern, which was written in Russian by Elena Belova. I made many of my own changes, but the original pattern has been linked below. I am not making any claim that this is my pattern design, simply that I translated it to English, made my own design changes, and also offer it free, like the designer did. http: //knitted-style.blogspot.ru/2013/07/vazanaya-taksa-ot-eleni-belovoy.html You may sell anything you make from this pattern - it is your creation! You may not use any of the photos I have included in this pattern to advertise or sell your items -- you must take your own photos, of your own projects. I would appreciate a link back to my shop anytime you sell items online. Linking back to the original post by Elena Belova would also be a fantastic idea! Happy hooking! This pattern has been extensively tested to ensure accuracy; if you DO notice any corrections, please feel free to contact me at www.facebook.com/ShopKimberlie or taurusduck@yahoo.com ShopKimberlie patterns can be found at www.ravelry.com/designers/kimberlie-goodnough www.ShopKimberlie.etsy.com http://www.craftsy.com/user/490928/pattern-store


