Parul: A 3-Skein Scarf Pattern
Skill Level: Easy
Finished Size:
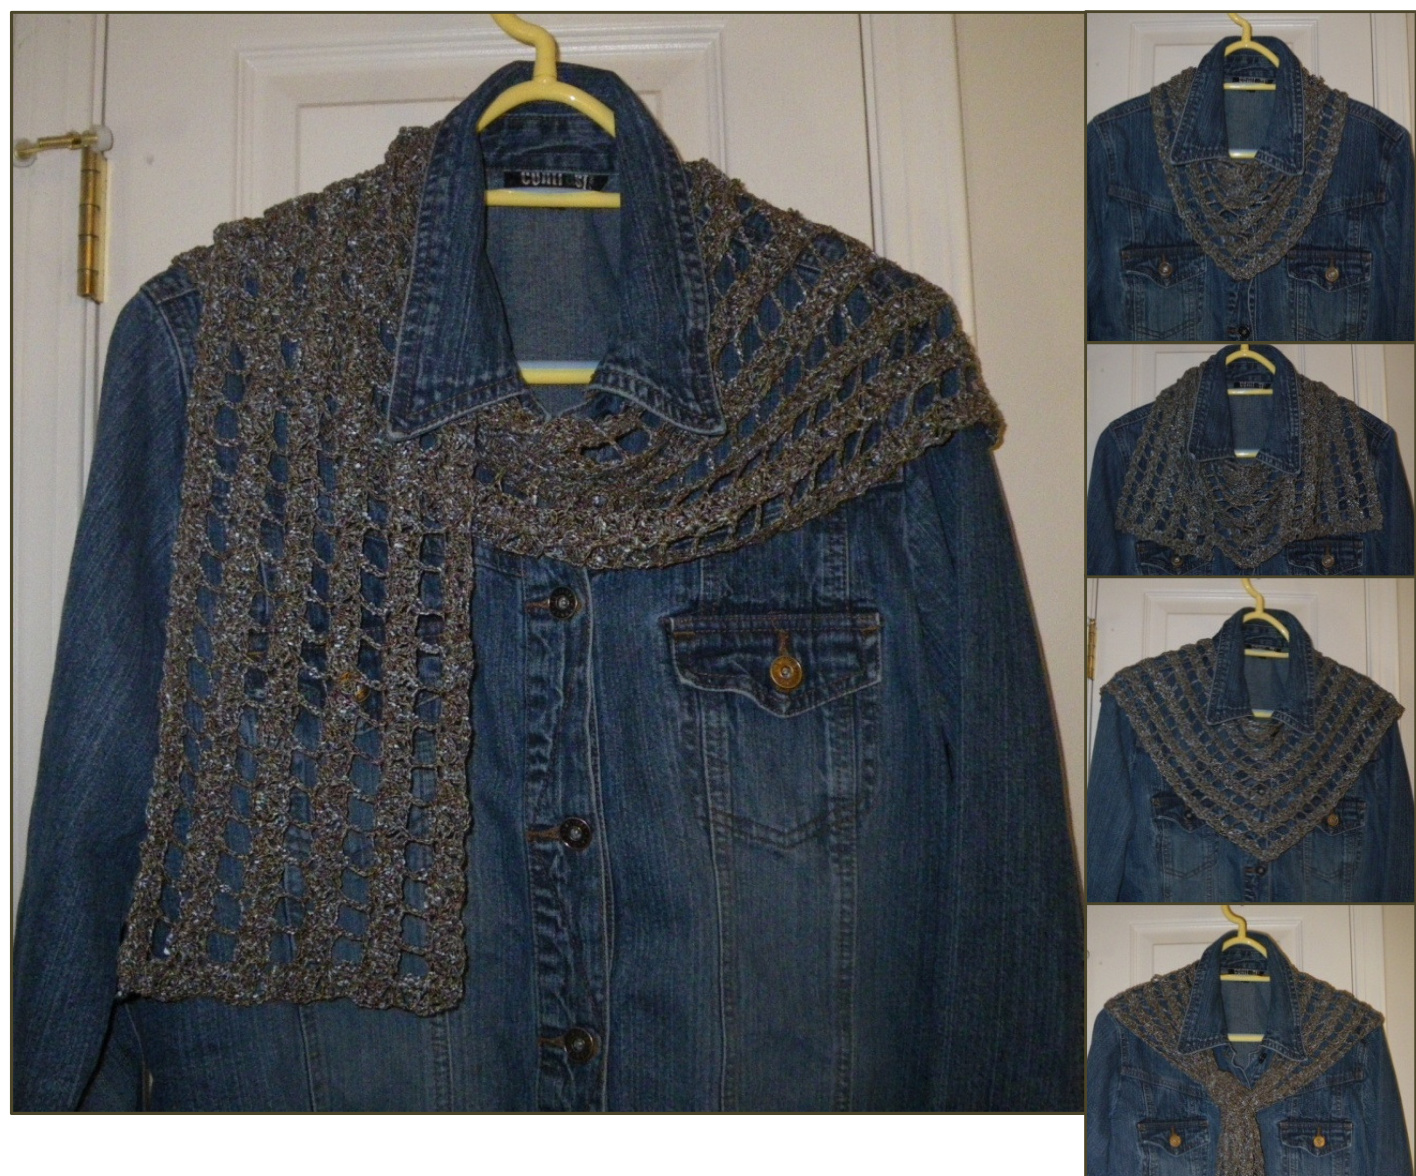
Varies depending on yarn, hook size, and gauge. The sample shown on this page was made with three skeins of Berroco Seduce and a $4.0\;\mathrm{mm}$ hook (approximately size F or G), and is shown with a Plus size 14 (US) denim jacket for reference / scale. It blocked to $6.5^{\circ}$ wide and $36^{\circ}$ long from the center point to each end.
Materials:
·3 skeins ( $\mathrm{50g}$ each) of any yarn with 80 - 150 yards per skein (light DK to worsted weight) Crochet hook sized appropriately for the yarn chosen (if hook size is not given on yarn ball band, use the knitting needle size in millimetres as a place to start) · Removable stitch markers (2) ●Calculator (you will need to make some simple calculations, including subtraction and division) Gauge: Not crucial - match the hook to the yarn for a gauge with nice drape.
Notes / General Information:
This pattern was written using the American names for crochet stitches. If you're used to using the European terminology, you will need to make the following changes: strike out sc and replace with dc, strike out dc and replace with tc, and strike out tc and replace with dtc. This scarf grows outward at a sharp angle, so the very first and very last stitch on each row needs to be taller than the rest of the stitches. To that end, the turning chain at the beginning of each row is four chains long, and the last stitch is a triple crochet. This may seem counter-intuitive, but much swatching and experimentation confirmed it was necessary. ·When the instructions for a row get complex and / or long, they have been broken down into smaller segments and identified by a letter for ease of reading, rather than left in complex paragraph form. The Parul scarf is made in sections. A Base Triangle roughly determines how far each skein of yarn will go for you, with your hook choice and gauge. Each scarf end is made by working from the center of the Base Triangle up and outward. The scarf ends are then finished with a set of rows that get progressively shorter, finishing with a tidy square.
Adapting the Pattern to Your Yarn:
· Your finished scarf will differ in width and length depending on the amount of yarn you have per skein. This pattern was written for use with three skeins of yarn, but each of those three skeins should be the same (don't mix and match, or the math will not work out and your scarf will not be symmetrical). Some simple calculations done part way through will give you the information you need to make your scarf without any ripping back due to yarn shortage.
Abbreviations:
cn cnain SC single crochet dc double crochet tc triple (or treble) crochet sp space
Special Stitches / Terms:
ShellStitch (shel): 2 dc, ch 1, 2 dc Allof the stitches that comprise the shell are worked into either a single ch or sc.
Base Triangle Instructions:
Row 1: Ch 5, make shellin $5^{\mathrm{th}}$ ch from hook, ch 1, tc in same ch in which you just made the shell. Row 2: Ch 4, turn. Make shell in tc. Sc in ch-1 sp in center of shell. Make shell in next ch. Tc in the same stitch in which you made the last shell. Row 3: Ch 4, turn. Make shell in tc. Sc in ch-1 sp in center of $1^{\mathrm{st}}$ shell. Ch 5, sc in ch-1 sp in center of next shell. Make shell in next ch (after last shell). Te in the same stitch in which you made the last shell. Row 4: Ch 4, turn. Make shellin tc. Sc in ch-1 sp in center of $1^{\mathrm{st}}$ shell. Ch5, sc in ch-5 sp, ch5, sc in ch-1 spin center of next shell. Make shell in next ch (after last shell). Tc in the same stitch in which you made the last shell. Row 5: Ch 4, turn. Make shell in tc. Sc in ch-1 sp in center of $1^{\mathrm{st}}$ shell. Ch 5, sc in $1^{\mathrm{st}}$ ch-5 sp, make shell in next sc, sc in next ch-5 sp, ch 5, sc in ch-1 sp in center of next shell. Make shell in next ch (after last shell). Tc in the same stitch in which you made the last shell. Row 6: Work steps (a) through (d), once each, in sequence. (a) Ch 4, turn, make shell intc, sc in ch-1 sp in center of $1^{\mathrm{st}}$ shell. (b) Ch 5, sc in next ch-5 sp, make shellin next sc, sc in ch-1 sp in center of next shell. (C) Make shell in next sc, sc in next ch-5 sp, ch 5, sc in ch-1 sp in center of next shell. (d) Make shell in next ch (after last shell), tc in the same stitch in which you made the last shell. Row 7: Work steps (a) through (e), once each, in sequence. (a) Ch 4, turn, make shell in tc, sc in ch-1 sp in center of Ist shell. (b) Ch 5, sc in next ch-5 sp, make shell in next sc, sc in ch-1 sp in center of next shell. (c) Ch 5, sc in ch-1 sp in center of next shell. (d) Make shell in next sc, sc in next ch-5 sp, ch 5, sc in ch-1 sp in center of next shell. (e) Make shell in next ch (after last shell),tc in the same stitch in which you made the last shell. Row 8: Work steps (a) through (e), once each, in sequence. (a) Ch 4, turn, make shell in tc, sc in ch-1 sp in center of Ist shell. (b) Ch 5, sc in next ch-5 sp, make shell in next sc, sc in ch-1 sp in center of next shell. (c) Ch 5, sc in next ch-5 sp, ch 5, sc in ch-1 sp in center of next shell. (d) Make shell in next sc, sc in next ch-5 sp, ch 5, sc in ch-1 sp in center of next shell. (e) Make shell in next ch (after last shell), tc in the same stitch in which you made the last shell. Row 9: Work steps (a) through (e), once each, in sequence. (a) Ch 4, turn, make shell in tc, sc in ch-1 sp in center of Ist shell. (b) Ch 5, sc in next ch-5 sp, make shell in next sc, sc in ch-1 sp in center of next shell. (c) Ch 5, sc in next ch-5 sp, make shell in next sc, sc in next ch-5 sp, ch 5, sc in ch-1 sp in center of next shell. (d) Make shell in next sc, sc in next ch-5 sp, ch 5, sc in ch-1 sp in center of next shell. (e) Make shell in next ch (after last shell), tc in the same stitch in which you made the last shell. Row 10: Work step (a) 1 time, step (b) 2 times, step (c) 2 times, then step (d) 1 time. (a) Ch 4, turn, make shell in tc, sc in ch-1 sp in center of Ist shell. (b) Ch 5, sc in next ch-5 sp, make shellin next sc, sc in ch-1 sp in center of next shell. (c) Make shell in next sc, sc in next ch-5 sp, ch 5, sc in ch-1 sp in center of next shell. (d) Make shell in next ch (after last shell), tc in the same stitch in which you made the last shell. Row 11: Work step (a) 1 time, step (b) 2 times, step (c) 1 time, step (d) 2 times, then step (e) 1 time. (a) Ch 4, turn, make shell in tc, sc in ch-1 sp in center of 1st shell. (b) Ch 5, sc in next ch-5 sp, make shell in next sc, sc in ch-1 sp in center of next shell. (c) Ch 5, sc in ch-1 sp in center of next shell. (d) Make shellin next sc, sc in next ch-5 sp, ch 5, sc in ch-1 sp in center of next shell. (e) Make shell in next ch (after last shell),tc in the same stitch in which you made the last shell. Row 12: Work step (a) 1 time, step (b)2 times, step (c) 1 time, step (d) 2times, then step (e) 1 time. (a) Ch 4, turn, make shell in tc, sc in ch-1 sp in center of Ist shell. (b) Ch 5, sc in next ch-5 sp, make shell in next sc, sc in ch-1 sp in center of next shell. (c) Ch 5, sc in next ch-5 sp, ch 5, sc in ch-1 sp in center of next shell. (d) Make shell in next sc, sc in next ch-5 sp, ch 5, sc in ch-1 sp in center of next shell. (e) Make shell in next ch (after last shell), tc in the same stitch in which you made the last shell. Row 13: Work step (a) 1 time, step (b) 2 times, step (c) 1 time, step (d) 2 times, then step (e) 1 time. (a) Ch 4, turn, make shell in tc, sc in ch-1 sp in center of Ist shell. (b) Ch 5, sc in next ch-5 sp, make shell in next sc, sc in ch-1 sp in center of next shell. (c) Ch 5, sc in next ch-5 sp, make shell in next sc, sc in next ch-5 sp, ch 5, sc in ch-1 sp in center of next shell. (d) Make shellin next sc, sc in next ch-5 sp, ch 5, sc in ch-1 sp in center of next shell. (e) Make shell in next ch (after last shell), tc in the same stitch in which you made the last shell. Row 14: Same as Row 10, except this time work (a) 1 time, (b) 3 times, (c) 3 times, and (d) 1 time. Row 15: Same as Row 11, except this time work (a) 1 time, (b) 3 times, (c) 1 time, (d) 3 times, and (e) 1 time. Row 16: Same as Row 12, except this time work (a) 1 time, (b) 3 times, (c) 1 time, (d) 3 times, and (e) 1 time. Row 17: Same as Row 13, except this time work (a) 1 time, (b) 3 times, (c) 1 time, (d) 3 times, and (e) 1 time. Continue on in this pattern (refer to Rows 14 through 17 to clarify the established pattern), increasing the number of times you work the repeatable steps (shown in bold green letters) by one more every time you finish another four rows. Continue in this manner until you've finished your first skein of yarn, stopping at the end of the last row (it doesn't matter what row number you're finishing with) that you can complete (don't work a partial row!). Finish off your yarn. For the next section, you'll be using the second skein of yarn. Making a few notations and doing a bit of simple math at this point will ensure you can work the scarf ends without having to rip back due to running short on the scarf end points. ·Note which row of the Repeat Rows was the last one worked (10, 11, 12 or 13): A: · Count the number of shells worked in the last row, and write it here: B: If the number of shells in the last row is odd, place a stitch marker in the center shell. Then count the number of shells on the last row between the marked shell and the very edge, add 1, and write it down: C: Note: Remember to count the outermost / edge shell! If the number of shells in the last row is even, place a stitch marker in the two center shells. Divide the number from B by 2, and write it down in space D: D: Note: You will have either a C or a D value, not both! Count and write down the total number of shells worked in the entire Base Triangle section: E: Find your C or $\mathrm{D}$ value in the table below and write down the number next to it: F:
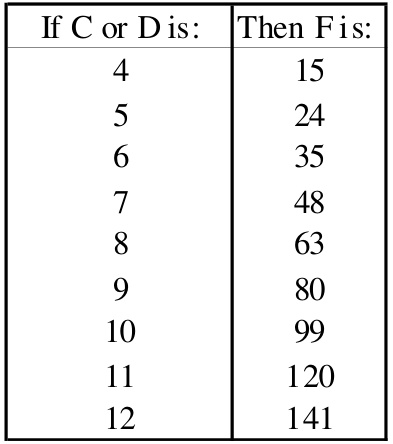
● Calculate E minus F, and write it down in space G: G: Calculate G divided by the value in C or D. Ignoring any decimal value, write down the answer in space H: H: If H was an even number, subtract 1 and write it down in space I. If H was an odd number, write it down in space I: I: Take the value from C or D (whichever you have), subtract 1 from that value, and write down the answer in space J: J: Subtract 1 from J, and write it down in space K: K:
Scarf End Instructions:
Start your new skein of yarn by making a slip stitch through the ch-1 sp in the center of the left-most of the marked shells (or, if you had an odd number of shells on the last row of the Base Triangle, in the only marked shell), and chaining one. Your yarn and hook are now in the correct place to begin working the Scarf End Rows. Scarf End Repeat Row 1: Sc in ch-1 sp in center of shell. Work make shellin next sc, sc in next ch-5 sp,. ch 5, sc in ch-1 sp in center of next shell] J times (orange text for ease of reference). Make shell in next ch (after last shell). Tc in the same stitch in which you made the last shell. Scarf End Repeat Row 2: Ch 4, turn. Make shell in tc. Sc in ch-1 sp in center of $1^{\mathrm{{st}}}$ shell. Work [ ch 5, sc in next ch-5 sp, make shell in next sc, sc in ch-1 sp in center of next shell J J times. Ch 3, turn. Continue to work Scarf End Repeat Rows 1 and 2 until you have made a total of I rows with this skein of yarn. Your last row willhave been a Scarf End Repeat Row 1. You're now ready to move on to the End Point Repeat Rows. The first time you work End Point Repeat Rows 1 and 2, work step (b) of both rows K times, then repeat the same two rows, working step (b) K - 1 times, then K - 2 times, and so on, until you're working step (b) only one time on eachrow. End Point Repeat Row 1: Work step (a) 1 time, step (b) as set out above in blue, then step (c) 1 time. (a) Ch 3, turn. Sc in ch-1 sp in center of shell, make shell in next sc, sc in next ch-5 sp. (b) Make shell in next sc, sc in ch-1 sp in center of shell, ch 5, sc in next ch-5 sp. (c) Make shell in next sc, sc in ch-1 sp in center of last shell. End Point Repeat Row 2: Work step (a) 1 time, step (b) as set out above in blue, then step (c) 1 time. (a) Ch 3, turn. Sc in ch-1 sp in center of shell. (b) Make shell in next sc, sc in next ch-5 sp, ch 5, sc in ch-1 sp in center of next shell. (c) Make shell in next sc, sc in ch-1 sp in center of last shell. Now you're ready to move on and finish with this scarf end with the Final Rows. Final Row 1: Ch 3, turn. Sc in ch-1 sp in center of shell make shell in next sc, sc in next ch-5 sp, make shell in next sc, sc in ch-1 sp in center of last shell. Final Row 2: Ch3,turn. Se in ch-1 sp in center of shell. Make shellin next sc, sc in ch-1 sp in center of shell. Final Row 3: Ch 3, turn. Sc in ch-1 sp in center of shell. Finish off. Turn the scarf so that the side with the finished scarf end is to the right. If your Base Triangle only had one shell with a stitch marker in it, start your third skein of yarn by making a slip stitch through the chain one space in the center of themarked shell(yes, in the same space as where you started the other scarf end), and chaining one. f you had two shels with stitch markers in them, start your third skein of yarn by making a slip stitch through the chain one space in the center of the left-most marked shell, and chaining one. Your yarn and hook are now in the correct place to begin working the Scarf End Rows. Repeat everything set out in the Scarf End Instructions, until you complete the second scarf end by finishing off your yarn after Final Row 3.
Finishing:
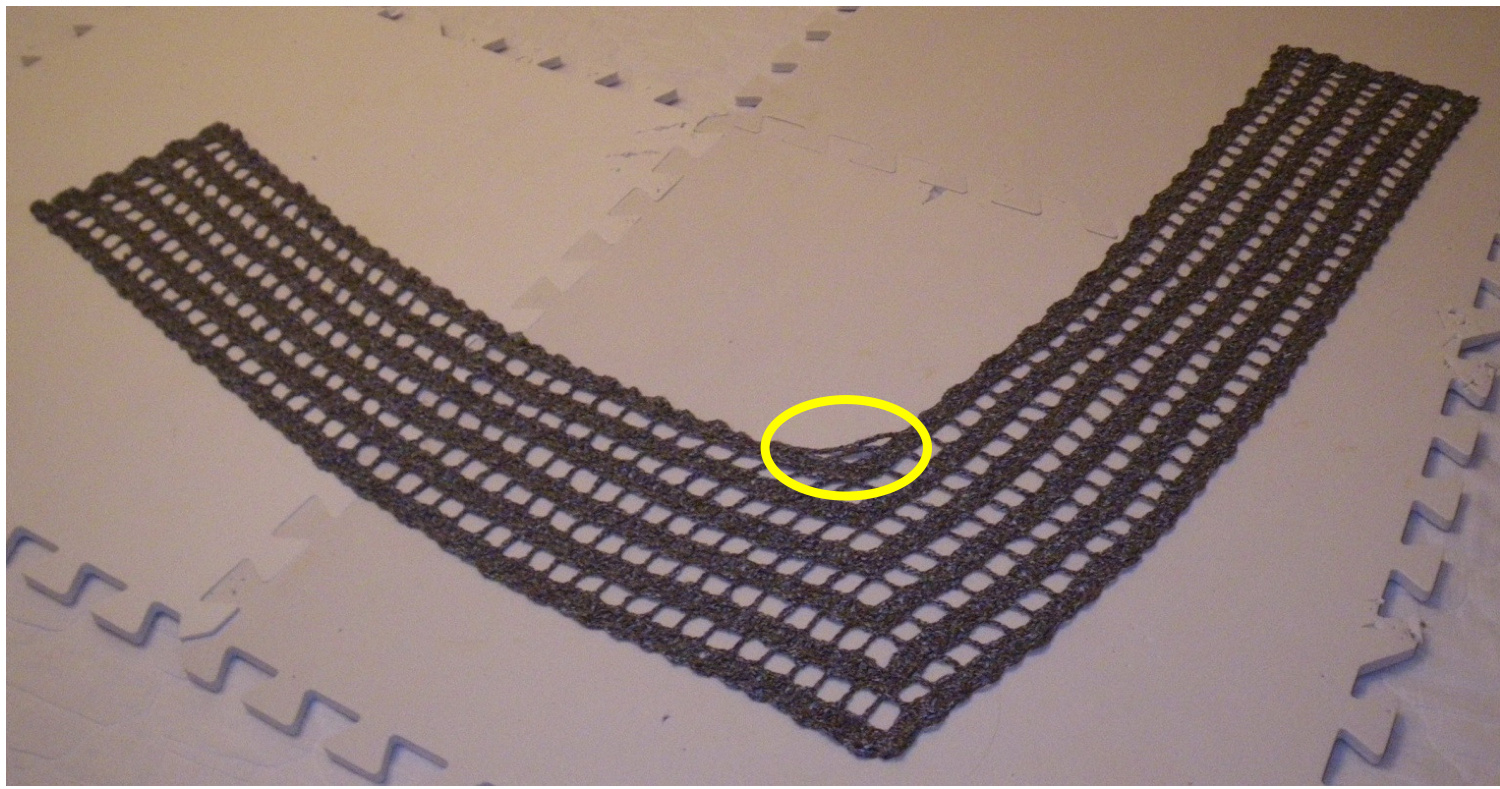
Weave in ends. If using a slippery yarn silk, rayon, soy or bamboo, weave in at least 4” before trimming ends, as this type of yarn may slide free over time. Wash the finished scarf according to the manufacturer's directions. Washing serves two purposes at this point: it removes skin oils and debris that may have landed on the fibres during crocheting, and provides a clean damp state in which to block the scarf into shape. Gently press out most of the water, and roll the washed (still wet) scarf in a clean towel to remove a little more water, and to support the scarf while transporting it to a suitable surface for blocking. Lay the damp scarf out on a clean dry surface in which you can place pins. Foam pads or a clean sheet or towel on top of a mattress or carpeted area will work well, so long as the scarf can be left alone until dry. Gently tug the scarf into the desired shape and dimensions, and pin into place. You might find blocking wires to be helpful. The sample scarf measured $36^{\circ}$ from the center bottom tip to each scarf end, and $6.5^{\circ}$ wide along the scarf ends. Refer to the photograph on the next page for a guide of how to shape the scarf for drying. ·. Allow to dry fully. Unpin and enjoy!
A Few Final Notes:
When you finished your scarf, you may have noticed a little cluster of chains in between the left and right scarf ends. You can see them easily in the photograph of the original sample scarf, circled in yellow. The Base Triangle part of that scarf ended after a Repeat Row 12. If you finished the Base Triangle after Repeat Row 11 you'll only have one chain section. Or, if you finished after Repeat Row 10 or 13, you won't have any small chain sections in that location. As the intent of this pattern set-up was maximizing the use of the yarn, stopping on Repeat Row 10 to avoid the little chains in the center would have left enough yarn to work Repeat Rows 11 and 12, and would have been wasteful! Plus, I thought the little chains were a nice design feature, so left them in. ;-) If you get them too, enjoy them. If not, know that you're still making the best possible use of your yarn.
This patern would be easy to adapt to make a shawl or wrap. Have some fun with it! I'd like to give a great big Thank You! to my wonderful Test Crocheters from Ravelry,ladyfemme and fmlcrochet. You both did a terrific job, and I hope you get a lot of enjoyment from your finished scarves. Another great big Thank You! goes out to my Tech Editor and good friend, knittingalchemy. Learning together with you has been a blast.


