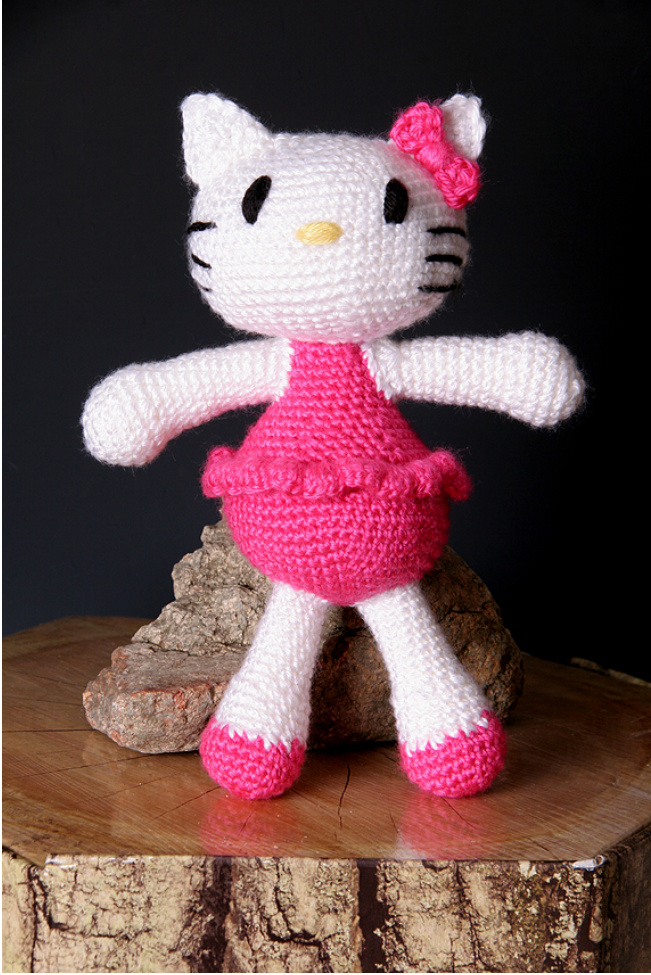
Itty Bitty Kitty Amigurumi Doll
This is in Intermediate-Advanced level pattern written in US Crochet terms.
Materials Needed:
Size 3.0 mm Crochet Hook Weight Yarn in White, Dress Color of Choice, Small amounts of Yellow & Black Tapestry Needle Scissors
Stitch Legend:
Ch - Chain Mgc Rng - Magic Ring SC - Single Crochet HDC - Half Double Crochet DC - Double Crochet Trbl - Treble Crochet SC2Tog - Single Crochet Decrease (Insert your hook into one Stitch, pull up a loop, insert your hook into the next Stitch, pull up a loop, Yarn over & pullthrough all 3 loops on the hook to decrease down 1 stitch.) St - Stitch Sts - Stitches Sl St - Slip Stitch \* - Repeat instructions between \*'s Gauge: 6 stitches per inch, 6 rows per inch. Finished Measurements: 10" tall White Yarn Working in a Spiral use a St Marker to mark the end of each Rou1 NOTE: The Head is an Odd shape & it is not a circle or an oval. It will look sort of like a “Bean" when completed but it will shape up to more of an oval once you stuff your piece. The head is the most challenging part of the project because of the shape. Please pay special attention to the decrease rounds in Rounds 17-21 & count your stitches after each round. Round 1: Start with a Mgc Rng, 7 SC into the ring, pull yarn tail to close & continue working in a spiral to the next round (7sSC) Round 2: 2 SC into each St around (14 SC) Round 3: \*1 SC into the next St, 2 SC into the next St, \*Repeat around (21 SC) ound 4: \*1 SC into the next 2 Sts, 2 SC into the next St, \*Repeat around (28 SC) ound 5: \*3 SC into the next St, 1 SC into the next 6 Sts, \*Repeat around (36 SC) nd 6: \*1 SC into the next 16 St, 2 SC into the next 2 Sts, \*Repeat around (40 SC nd 7: \*1 SC into the next 16 Sts, 2 SC into the next 4 Sts, \*Repeat around (48 S( Round 8: \*1 SC into the next 6 Sts, 2 SC into the next St, \*Repeat around ending with 6 individual SC at the end of the round. (54 SC) Rounds 9 - 16: 1 SC into the next St, 1 SC into each St around (54 SC) Round 17: 1 SC into each of the next 3 Sts, SC2Tog, 1 SC into each of the next 8 Sts, SC2Tog, 1 SC into each of the next 4 Sts, SC2Tog, 1 SC into the next 4 Sts, SC2Tog, 1 SC into each of the next 8 Sts, SC2Tog, 1 SC into each of the next 4 Sts, SC2Tog, 1 SC into the next 11 Sts (48 SC) Round 18: 1 SC into the next 2 Sts, SC2Tog, 1 SC into each of the next 8 Sts, SC2Tog, 1 SC into the next 3 Sts, SC2Tog, 1 SC into the next 2 Sts, SC2Tog, 1 SC into the next 3 Sts, SC2Tog, 1 SC into each of the next 8 Sts, SC2Tog, 1 SC into the next 3 Sts, SC2Tog, 1 SC into the next 2 Sts, SC2Tog, 1 SC into the next St (40 SC) Round 19: 1 SC, SC2Tog, 1 SC into each of the next 8 Sts, SC2Tog, 1 SC into the next 2 Sts, SC2Tog, SC2Tog, 1 SC into the next 2 Sts, SC2Tog, 1 SC into each of the next 8 Sts, SC2Tog, 1 SC into the next 2 Sts, SC2Tog, SC2Tog, 1 SC into the nextSt (32SC) Round 20: SC2Tog, 1 SC into the next 8 Sts, SC2Tog, 1 SC, SC2Tog, 1 SC, SC2Tog, 1 SC into the next 8 Sts, SC2Tog, 1 SC, SC2Tog, 1 SC,(26 SC) Round 21: SC2Tog, 1 SC into the next 5 Sts, SC2Tog 4 times, 1 SC into the next 5 Sts, SC2Tog 3 Times, S1 St to the 1"t SC to join (18 SC), Ch 1 & fasten off leaving a long tail to sew with.
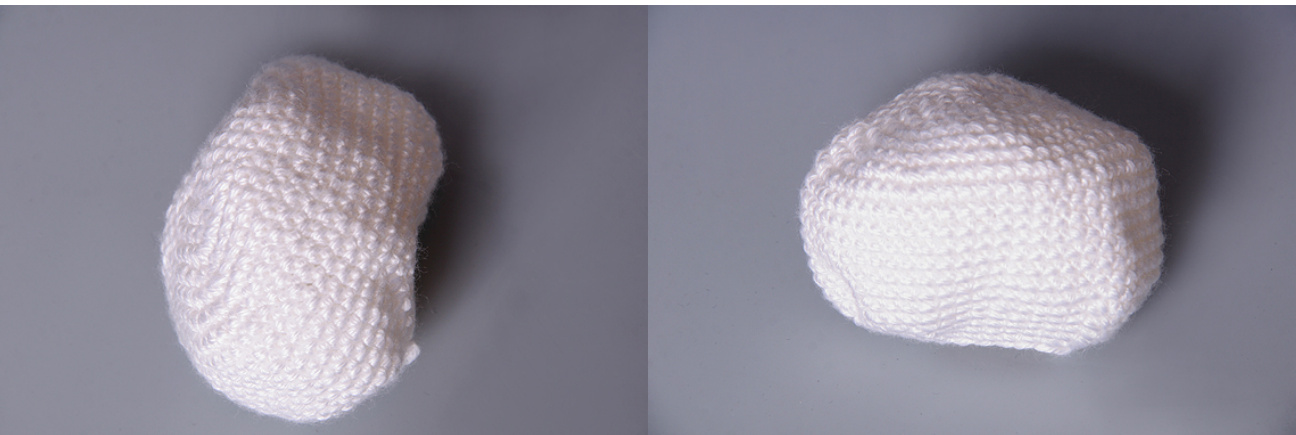
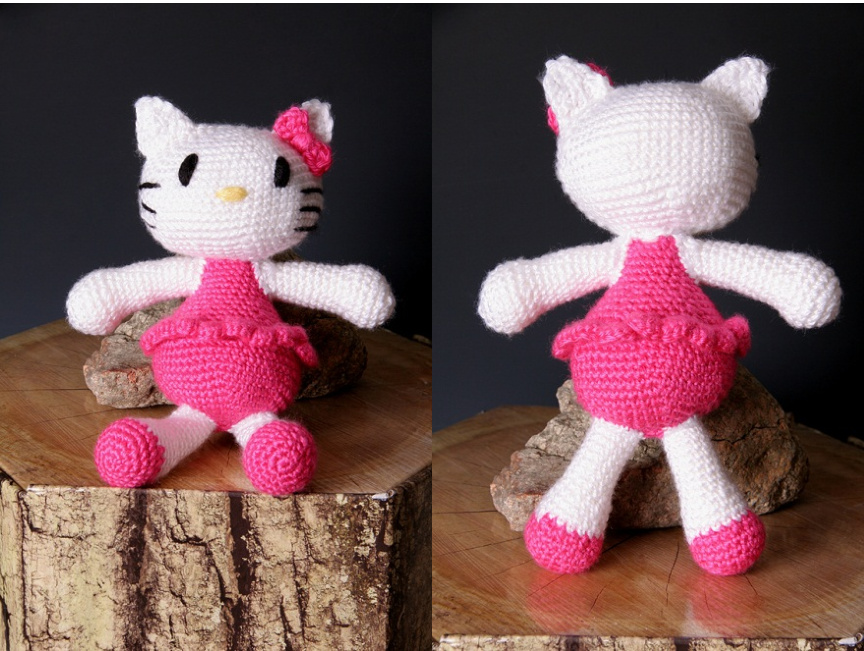
Above are pictures of the head before it is stuffed. You can see the “Bean" shape I mentioned in the note at the beginning of the Head's instructions. EARS (Make 2) - With White Yarn Row 1: Ch 6, SC into the 2"d Ch from the hook & into each Ch across (5 SC) Row 2: Ch 1 & turn, SC2Tog, 1 SC into the next 3 Sts (4 SC) Row 3: Ch 1 & turn, SC2Tog, 1 SC into the next 2 Sts (3 SC) Row 4: Ch 1 & turn, SC2Tog, 1 SC into the next St (2 SC) Row 5: Ch 1 & turn, SC2Tog (1 SC), Ch 1 & SC down the side of the ear into the next 4 Sts, Ch 1 & Fasten off leaving a long enough tail to sew the ear to the head later. the starting ends using the tapestry needle & leave the finishing ends for sewing. Fold the head in half width wise & find the center of the head where the Mgc Rng started. Count 4 rounds out from the center & attach the ears one on each side using top stitching to secure the ears to the head. Weave in your remaining ends & pull yarn inside the head & clip excess. Turn the Head so the inside is showing where the Mgc Rng started & using the tapestry needle weave in the end around the Mgc Rng to secure & cut excess yarn.
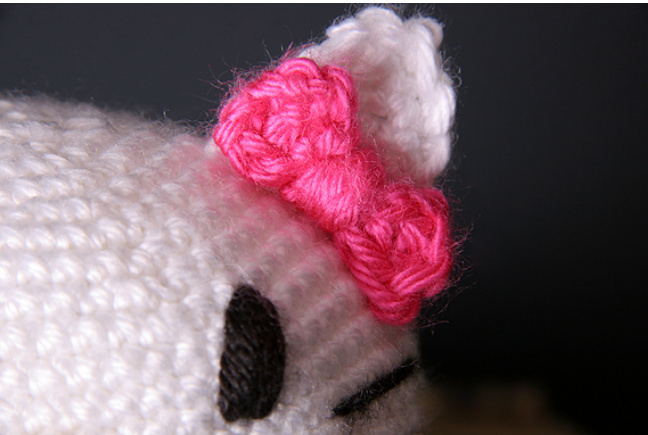
BOW - With Dress Color
Working in a Round, Ch 11, 1 Trbl into the 6th Ch from the hook, 1 DC into the next St, 1 HDC into each of the next 2 Sts, 1 DC into the next St, 1 Trbl into the last St, Sl St into the same space as the last Trbl, Sl St into each of the next 2 Sts, In the center insert your hook into both the top & bottom stitches & Sl St together, Ch 1 & fasten off. Cut yarn & leave a long tail. Wrap yarn around center of bow 6-8 times. Attach Tapestry needle to end of tail & make a knot in the back of the bow to secure wraps. Weave your needle through the back side of the bow to connect the stitches for extra shaping. Sew to the Kitty Cat head just below the right ear. Weave ends in & secure side of head.
EYES & WHISKERS - With Black Yarn
Working from inside the head out, using the Tapestry Needle, Embroider Eyes using vertical stitches in the 8" Round of the head (4 rounds down from the Bow placement on the Ear), make your stitches about 4 Rounds high. Wrap yarn from back to front 6-8 times. Count over 9 Sts & embroider the second Eye. At the bottom of the second Eye & one round below, count over 3 Sts & embroider the 1"t whisker using a long stitch going over to the side of the head in a straight line. Embroider the next whisker 2 rounds down & & one St shorter than the 1'", embroider the last whisker on that side 2 Rounds below that & the same length as the 1st whisker. Secure yarn & come across to the other side & mimic the same thing for the 3 whiskers on the opposite side. Fasten off & weave in the yarn ends to secure.
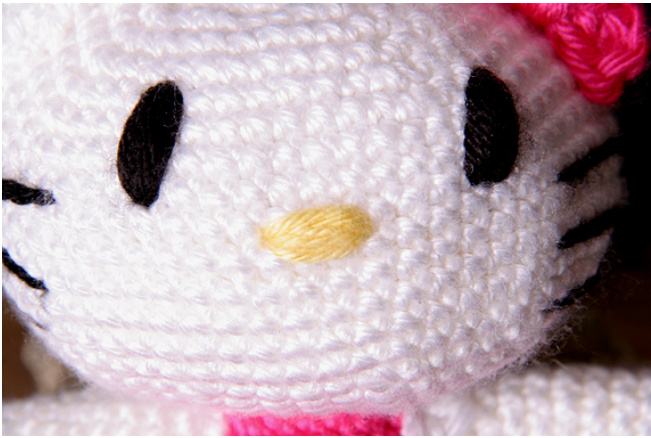
NOSE - With Yellow Yarn Using the Tapestry Needle, centered between the Eyes 2 Rounds below the eyes, work a series of horizontal stitches 4 Sts wide. Wrap the yarn from back to front 6-8 times & secure inside the head & weave in the ends to secure. olor Working in a Spiral use a St Marker to mark the beginning of each Rounc Round 2: 2 SC into the same St & into each St around (12 SC) Round 3: \*1 SC into the next St, 2 SC into the next St, \*Repeat around (18 SC) ound 4: \*1 SC into the next 2 Sts, 2 SC into the next St, \*Repeat around (24 SC) Round 5: \*1 SC into each of the next 3 Sts, 2 SC into the next St, \*Repeat around (30 SC) Round 6: \*1 SC into each of the next 4 Sts, 2 SC into the next St, \*Repeat around (36 SC) Round 7: \*1 SC into each of the next 5 Sts, 2 SC into the next St, \*Repeat around (42 SC) Round 8: \*1 SC into each of the next 6 Sts, 2 SC into the next St, \*Repeat around (48 SC) Round 9: \*1 SC into each of the next 7 Sts, 2 SC into the next St, \*Repeat around (54 SC) Rounds 10 - 12: 1 SC into each St around (54 SC) Round 13: \*1 SC into the next 7 Sts, SC2Tog, \*Repeat around (48 SC) Round 14: \*1 SC into the next 6 Sts, SC2Tog, \*Repeat around (42 SC) Round 15: WORKING INTO THE FRONT LOOPS ONLY, Ch 2, \*5 DC into the next St, Sl St into the next St, \*Repeat around End by S1 St into the St at the beginning Ch 2, S1 St into the BACK LOOP of the 1st St on Round 14 (100 DC) This round will be the Skirt on the bottom of your dress. Round 16: WORKING INTO THE BACK LOOPS ONLY OF ROUND 14, 1 SC into each St around (42 SC) (Begin Stuffing your piece here.) Round 17: Working in both loops of the St, \*1 SC into each of the next 5 Sts, SC2Tog, \*Repeat around (36 SC) Round 18: \*1 SC into each of the next 4 Sts, SC2Tog, \*Repeat around (30 SC) Round 19: 1 SC into each St around (30 SC) Round 20: \*1 SC into the next 3 Sts, SC2Tog, \*Repeat around (24 SC) Rounds 21 - 25: 1 SC into each St around (24 SC) Round 26: \*1 SC into the next 2 Sts, SC2Tog, \* Repeat around (18 SC) Round 27: 1 SC into each St around (18 SC) Round 28: 1 SC into each St around, Sl St into the 1st SC, Ch 1 & Fasten Off. Finish stuffing your Torso & stuf the Head with Polyfil. Using an easing method, sew the Torso & Head together using the long yarn tail you left when you completed the Head. You want to make sure to stitch around it a couple of times because during play it will be a stress point & you do not want it to come unsewn during play. Yarn Working in a Spiral use a St Marker to mark the beginning of each Rounc 1: Start with a Mgc Rng & work 6 SC into the Ring, pullyarn tail to close (6 SC) Round 2: 2 SC into each St around (12 SC) Round 3: \*1 SC into the next St, 2 SC into the next St, \*Repeat around (18 SC) Rounds 4 - 6: 1 SC into each St around (18 SC) Round 7: \*1 SC into the next St, SC2Tog\* Repeat around (12 SC) 0 each St around (12 SC) Begin Stuffing after Round 12 & continue working Rounds 13 -18: 1 SC into each St around (12 SC) Round 19: 3 DC into the 1t St, 1 HDC into the next St (This willbe the Shoulder of the arm), 1 SC into the next 9 Sts, 1 HDC into the last St, SI St into the 1\* DC to join, Ch 1 & Fasten Off leaving a long tail for sewing. Finish stuffing your piecehere.(15 Sts) Align the shoulders just under the neck & using the tapestry needle; sew the arms to the body at an angle. Be sure to reinforce your stitches because the limbs & head will be played with. ES (Make 2) - With Dress Color Yarn to start & then switching to White Yarn Working in a Spiral use a St Marker to mark the beginning of each Round 1: Start with a Mgc Rng & work 6 SC into the Ring, pullyarn tail to close (6 SC) Round 2: 2 SC into each St around (12 SC) Round 3: \*1 SC into the next St, 2 SC into the next St, \*Repeat around (18 SC) ound 4: \*1 SC into the next 2 Sts, 2 SC into the next St, \*Repeat around (24 SC) Rounds 5 - 6: 1 SC into each St around (24 SC) Round 7: 1 SC into the next 2 Sts, SC2Tog, 1 SC into the next 2 Sts, SC2Tog, in the last step of the St change to white yarn, 1 SC into the next 2 Sts, SC2Tog, 1 SC into the next 2 Sts, SC2TOG, in last step of the St change to dress color, 1 SC into the next 2 Sts, SC2TOG, 1 SC into the next 2 Sts, SC2TOG, in last step of the St change to white and finish off dress color (18 SC)This round will be the front of the shoe where the 6 White SC drop down in between the dress color. Rounds 8 - 10: 1 SC into each St around (18 SC) Round 11: \*1 SC into the next St, SC2Tog\* Repeat around (12 SC) Begin Stuffing your piece here. Rounds 12 - 19: 1 SC into each St around (12 SC) Round 20: 1 SC into each St around (12 SC), SISt into the 1 SC, Ch1 &Fasten Off leaving a long tail for sewing.Finish stuffing your piece here. Using the tapestry needle & the yarn tail from the legs, attach the legs on the bottom of the Torso, one on either side of the center starting point from the Mgc Rng. Make sure you sew it on securely & reinforce the stitching so that it will handle play. Weave in all your ends & clip excess yarns.
① Copyright Michelle R. Kovach 2012. All rights reserved. This is my original pattern. Do Not Copy, Modify, Reproduce, Sell or Claim as your own. You may sellitems made from this pattern, but please Do NOT claim it as your own unique design. Please refer back to me as the original designer for any items you may sell. http://www.facebook.com/ThePerfectKnotCrochet


