WEST BAY COWL
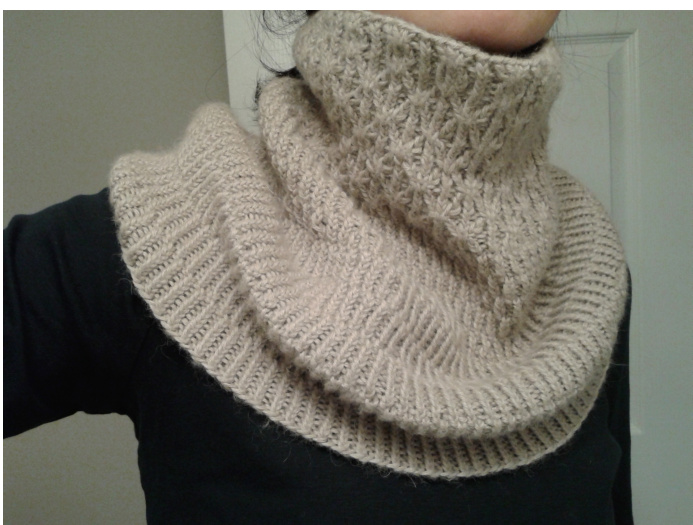
by Winnie Seko The design is inspired by the breathtaking East Cliff which towers over the West Bay in Dorset, England. It can be worn loosely as a cowl or stretched over to keep the shoulders warm.
Materials
6 30g balls of 100% Baby Alpaca (107m) 4.5mm 6ocm circular needles 4.5mm 4ocm circular needles (or 4 double pointed needes) 2 cable needles stitch marker tapestry needle Finished measurements neck edge: 44cm round unstretched shoulder hem 8ocm round unstretched height: 32cm Gauge 24 stitches and 30 rows = 10cm/4" in twisted rib stitch using 4.5mm needles
Abbreviations
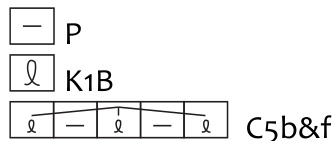
k = knit p =purl st(s)= stitch(es) sl = slip rep = repeat rnd(s) = round(s) k1B = knit one through back of loop k2tog = knit two together psso = pass slip stitch over dec 2 = sl first stitch knitwise, K2tog, pss0 C5f&b = cable 5 front and back sl the first cable needle through the first and third st on the left needle, leaving them at front on the needle, then sl the second cable needle through the backs of the second and fourth sts and leave at back of work. Sl off all 4 st at once (2 st on front cable needle and 2 st at back). K1B from the left needle and p1 from back cable needle. Then rotate front cable needle 180 degrees counter clockwise and K1B the first st on it. P1 from back cable needle and k1B the remaining st on the front cable needle. [adapted for the twisted rib from Holli Yeoh's method for a 5 st cable in fisherman's rib. A detailed tutorial is available on her website. Just replace the k1 by a kib.]
Instructions
This cowl is knitted in rnds from bottom up using descending staggered 1 X 1 twisted rib stitch columns. The twisted ribs are then smocked to give a design to the neck part and to control the amount of stretch. I made mine in the following sequence: 2 sets of 8-rnd columns 2 sets of 7-rnd columns 2 sets of 6-rnd columns 2 sets of 5-rnd columns 3 sets of 4-rnd columns followed by 8 repeats of smocking. There is a decrease rnd in the third rnd of the first set of 5-rnd columns. [In hindsight, perhaps it would look better if I have had done the decrease in the first rnd of this set of 5-rnd columns]. This design can be adapted into any yarn gauge. You can add to the width or the height and you can play with the way the columns are staggered and the way they descend. When adding sts, make sure it is a multiple of 8 in order to keep the smock pattern. With the long circular needle, cast on 192 sts. Join for working in the rnd, making sure the sts are not twisted. Place a marker on this first loop. Move the marker up each rnd to keep track of where to start and end each rnd. Change to the shorter circular needle or double pointed needles when necessary.
The descending staggers
Rnd 1-8: \*K1b, P1; rep from \* to end of rnd (8 rnds) Rnd 9-16: \*P1, K1b; rep from \* to end of rnd (8 rnds) Rnd 17-23: \*K1b, P1; rep from \* to end of rnd (7 rnds) Rnd 24-30: \*P1, K1b; rep from \* to end of rnd (7rnds) Rnd 31-36: \*K1b, P1; rep from \* to end of rnd (6 rnds) Rnd 37-42: \*P1, K1b; rep from \* to end of rnd (6 rnds) Rnd 43-44: \*K1b, P1; rep from \* to end of rnd (2 rnds) Rnd 45: [decrease 48 sts] K1b, p1, \*dec 2, p1, k1b, p1, k1b, p1; repeat \* until 3 stitches remain before end of rnd, then p1, kib, p1. (144 sts) Rnd 46-47: \*K1b, p1; rep from \* to end of rnd (2 rnds) Rnd 48-52: \*P1, k1b; repeat from \* until end of rnd (5 rnds) Rnd 53-56: \*K1b, p1; repeat from \* until end of rnd (4 rnds) Rnd 57-6o: \*P1, k1b; repeat from \* until end of rnd (4 rnds) Rnd 61-64: \*K1b, p1; repeat from \* until end of rnd (4 rnds) The cowl should now measure about 21cm.
The smocking rounds
When doing the smocks, there will be rnds where the cable would need to borrow a st (or a few sts) from the end of the previous rnd. Don't worry about this too much. Since it is worked in rnds, as long as you keep the pattern, you will be fine. Just take note of where each rnd begins (e.g. with the help of a marker) so that you know where to end the rnd. This will be important when you are ready to start binding off. Rnd 1: \*P1, k1b; repeat from \* until end of rnd Rnd 2: as rnd 1 Rnd 3: as rnd 1 Rnd 4: \*P1, k1b, p1, C5f&b; repeat from \* until end of rnd Rnd 5: \*P1, k1b; repeat from \* until end of rnd Rnd 6: as rnd 5 Rnd 7: as rnd 5 Rnd 8: Borrowing the last kib st of the previous rnd, \*C5f&b, p1, kib, p1, rep from \* to end of rnd (just before the first C5f&b of that rnd) Repeat Rnd 1-8 4 times, until the smocking part measures 11cm (32cm for the entire piece) or the desired length. Next rnd: bind off loosely in any method you like. I did the simple sl st bind off. Weave in looseends.
Chart
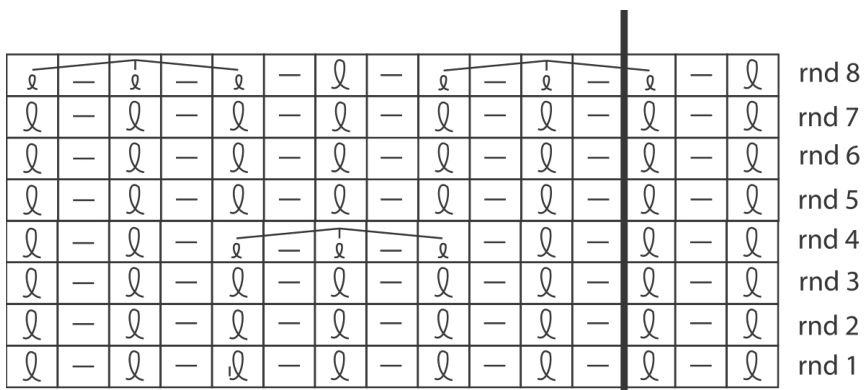
——| beginning of round