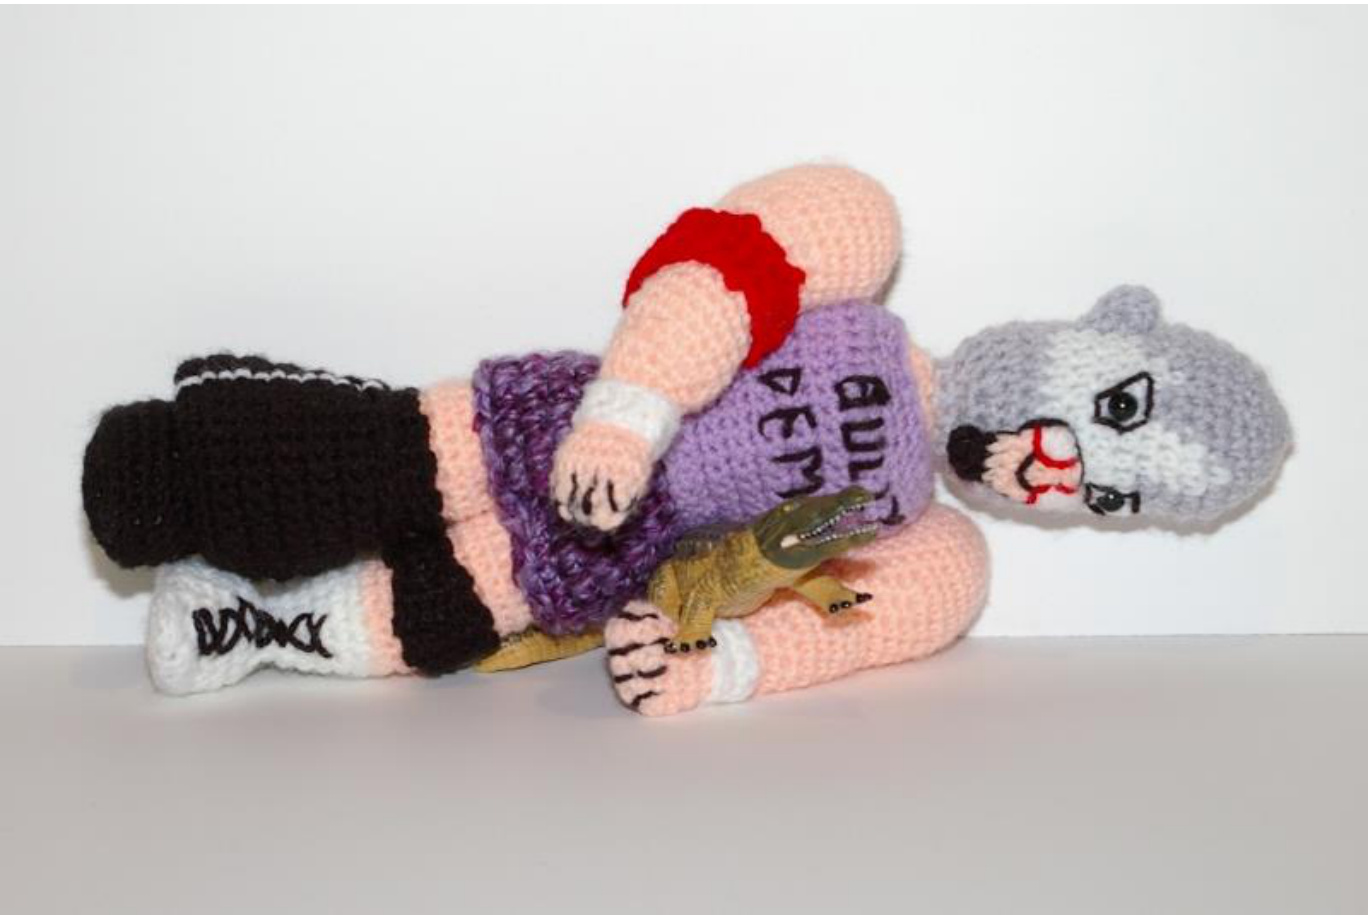
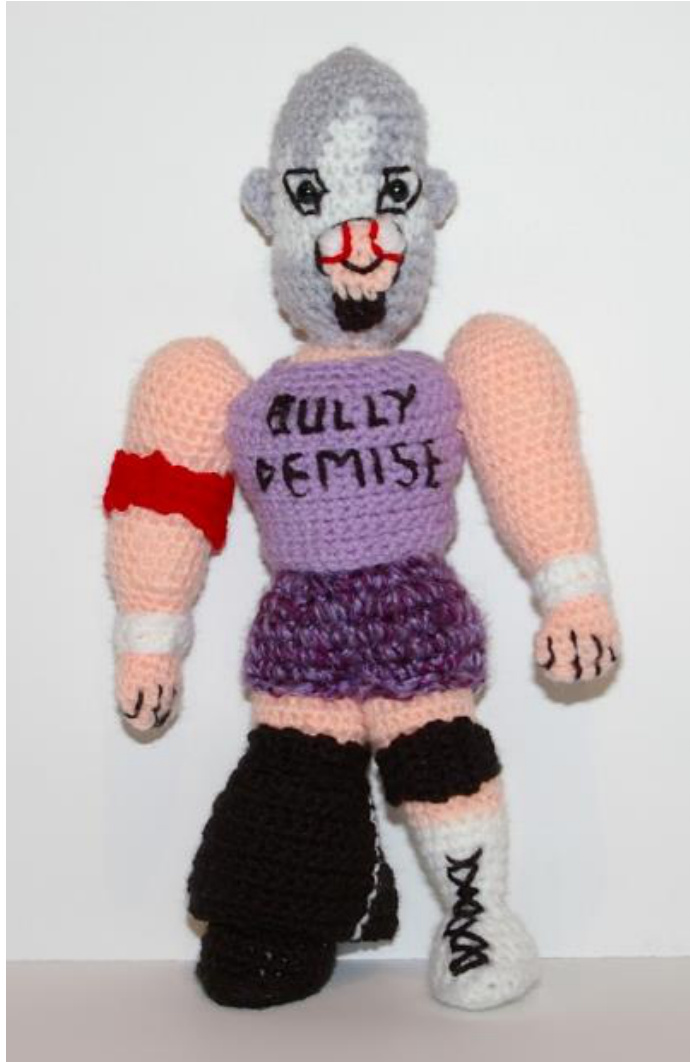
Bully Demise
Hook Size: US G / 4.00 mm
Yarn Colors:
Size 4 Worsted Weight Yarn is recommended, although I used some Size 3 from my scrap yarn collection so your results may vary.
Additional Materials:
-Stuffing -1 pair 9mm Safety Eyes -Yarn needle
Stitch Guide:
CH = CHain SC = Single Crochet HDC = Half Double Crochet St = Stitch SI St = Slip Stitch BLO = Back Loop Only Inc = Increase (Two SC in same Stitch) Dec = Decrease F/O = Fasten Off
Backstitching: lf you are unfamiliar with the backstitch, here is a short tutorial: http://www.wikihow.com/Backstitch
Body:
Round 1: With flesh toned yarn, CH 11. Round 2: Rotate your work. On other side of the row, SC 7, Inc in next st, SC 3 in next st (12) (24 total) F/O, leaving long tail for sewing. Stuff, but do not close the body. \*\*Please note: I used a bulky Size 5 variegated yarn for Bully's shorts, so it is possible that you might need additional rounds to make them long enough to hold the legs. Adjust accordingly.\*\*
Arms (Make 2):
Round 1: With flesh toned yarn, 6 SC in Magic Ring. Leave a long tail for sewing if possible. Round 2: Inc around (12) Rounds 21 & 22: SC in each st around (12)
\*\*Stuff the arm.\*\*
Round 23: (SC x 2, dec) x 3 (9) Round 24: SC in each st around (9) F/O, leaving a tail for sewing. Lightly stuff the area below the wrist. Make sure that it remains mostly flat to resemble a hand. Sew the end closed using a whip stitch. Using black yarn, embroider the finger lines onto the hand with a back stitch.
Left Leq:
Round 1: With white yarn, CH 6. Round 2: Starting from 2nd CH from hook, SC 4. SC x3 in last CH. (7) Round 3: Rotate your work. On other side of the row, SC 3. SC x 3 in next CH. (6) Round 4: SC 5, SC x 3 in next CH. (8) = (15 total around) Round 5: SC around (15) Round 6: SC 12, inc x 3 at oval end / "toe" (18)
\*\*Place a piece of cardboard about the same size as the sole of
\*\*This step will create the crease for the back of Bully's knee. Ifit is not aligned properly with the direction of the foot, adjust where you place the stitches.\*
Round 23: SI St in each SI St, SC in each SC around (18) Rounds 24 & 25: SC in each st around (18) Round 26: (SC x 2, Inc) x 6 (24) Round 27: SC in each st around (24) Round 28: (SC x 2, Dec) x 6 (18) Round 29: SC in each st around (18) \*\*Stuff the leg.\*\* Round 30: (SC x 1, Dec) x 6 (12) Round 31: Dec around (6) F/O, round out leg with more stuffing if necessary, and sew hole shut. Weave inends.
Right Leg:
Round 1: With black yarn, CH 9. Starting from 2"d CH from hook, SC 7. SC 3 in last st. (10) Round 2: Rotate your work. On other side of the row, SC 6. SC 3 in next CH. (9) Round 3: SC in each st around (19) Round 4: SC 3 in next st, SC 9, SC 3 in next st, SC 9 (24) Round 5: SC in each st around (24) Round 6: SC in each st around, BLO (24) Round 7: SC in each st around (24) \*\*Place a piece of cardboard about the same size as the sole of the boot inside.\*\* Round 8: SC in each st around (24) Round 9: (SC x 2, Dec) x6 (18) Round 10: (SC × 1, Dec) x6 (12) Round 11: (SC ×2, Dec) x4 (9) Round 12: Switch to flesh toned yarn. Inc around (18) Round 13: SC in each st around (18) Round 14: (SC x2, Inc) x6 (24) Round 15: (SC x 3, Inc) x 6 (30) Rounds 16 & 17: SC in each st around (30) Round 18: (SC x3, Dec) x6 (24) Round 19: SC in each st around (24) Round 20: (SC x2, Dec) x6 (18)
Round 21: SI St 2, SC 10, SI St 6 (18) \*\*This step will create the crease for the back of Bully's knee. If it is not aligned properly with the direction of the foot, adjust where the stitches go.\*\*
Round 22: SI St in each SI St, SC in each SC around (18) Rounds 23 & 24: SC in each st around (18) Round 25: (SC x 2, Inc) x 6 (24) Round 26: SC in each st around (24) Round 27: (SC x 2, Dec) x 6 (18) Round 28: SC in each st around (18) \*\*Stuff the leg.\*\* Round 29: (SC x 1, Dec) x 6 (12) Round 30: Dec around (6) F/O, round out leg with more stuffing if necessary, and sew hole shut. Weave in ends.
Right Pant Leg:
Row 1: CH 25. Starting from 2nd CH from hook, SC 24 (24) Row 2: CH, turn, Inc, SC 22, Inc (26) Row 3: CH, turn, Inc, SC 24, Inc (28) Row 4: CH, turn, Inc, SC 26, Inc (30) Row 5: CH, turn, Inc, SC 28, Inc (32) Row 6: CH, turn, Inc, SC 30, Inc (34) Rows 7 - 11: CH, turn, SC 34 Row 12: CH, turn, Inc, SC 32, Inc (36) F/O. Leave a long tail for sewing.
Knee and Eibow Pads (Make 2 Black, 1 Red):
Row 1: CH 3. Starting from 2"d CH from hook, SC 2 Rows 2 & 3: CH, turn, SC 2 Row 4: CH, turn, SC 2, Inc (3) Rows 5 & 6: CH, turn, SC Row 7: CH, turn, SC 2, Inc (4) Row 8: CH, turn, SC 3, Inc (5) Rows 9 - 11: CH, turn, SC 5 Row 12: CH, turn, SC 3, Dec (4) Row 13: CH, turn, SC 2, Dec (3) Rows 14 & 15: CH, turn, SC 3 (3) Row 16: CH, turn, SC, Dec (2) Rows 17 & 18: CH, turn, SC 2 F/O. Leave a long tail for sewing.
Wrist Bands:
Row 1: With white yarn, CH 11. Starting from 2nd CH from hook, SC 10. Row 2: CH, turn, SC 10. F/O. Leave long tail for sewing.
Bully Demise's Custom Shirt:
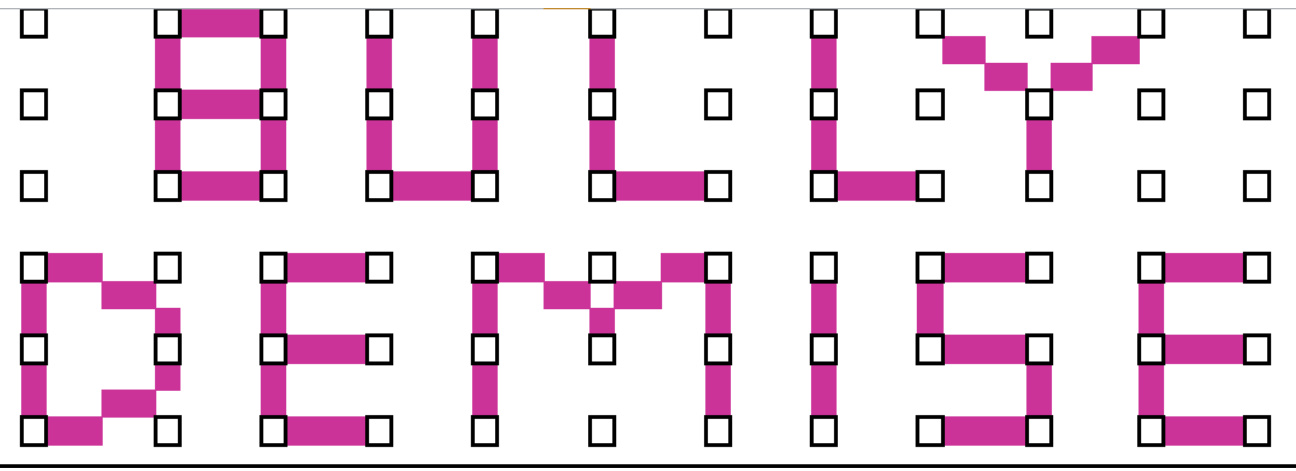
Round 1: With mauve yarn, CH 25. Join ends with Round 2: SC in each st around (25) Round 3: (SC x 3 + Inc) x 5, SC 5 (30) Round 4: (SC x 4 + Inc) x 6 (36) Round 5: (SC + Inc) x 18 (54) Round 6: SC in each st around (54) Round 7: (SC x 4 + Dec) x 8, 3 SC, 2 Dec (45) Rounds 8 - 12: SC in each st around (45) Round 13: (SC x 4 + Dec) x 7, Inc x 2, SC 1 (40) Round 14: (SC x 4 + Dec) x 5, 10 SC (35) Round 15: SC in each st around (35) Round 16: (SC x 6 + Dec) x 3, SC 7, Dec x 2 (30) Rounds 17 - 21: SC in each st around (30) SI St in next st. F/O, weave in ends. Try the shirt on Bully to see where you would like the lettering to be. Once you know where you're starting, remove shirt and, using a backstitch, embroider the letters with black yarn as shown below. Each letter is two stitches high and one stitch wide (with the exception of Y and M), with one stitch space between.
Head:
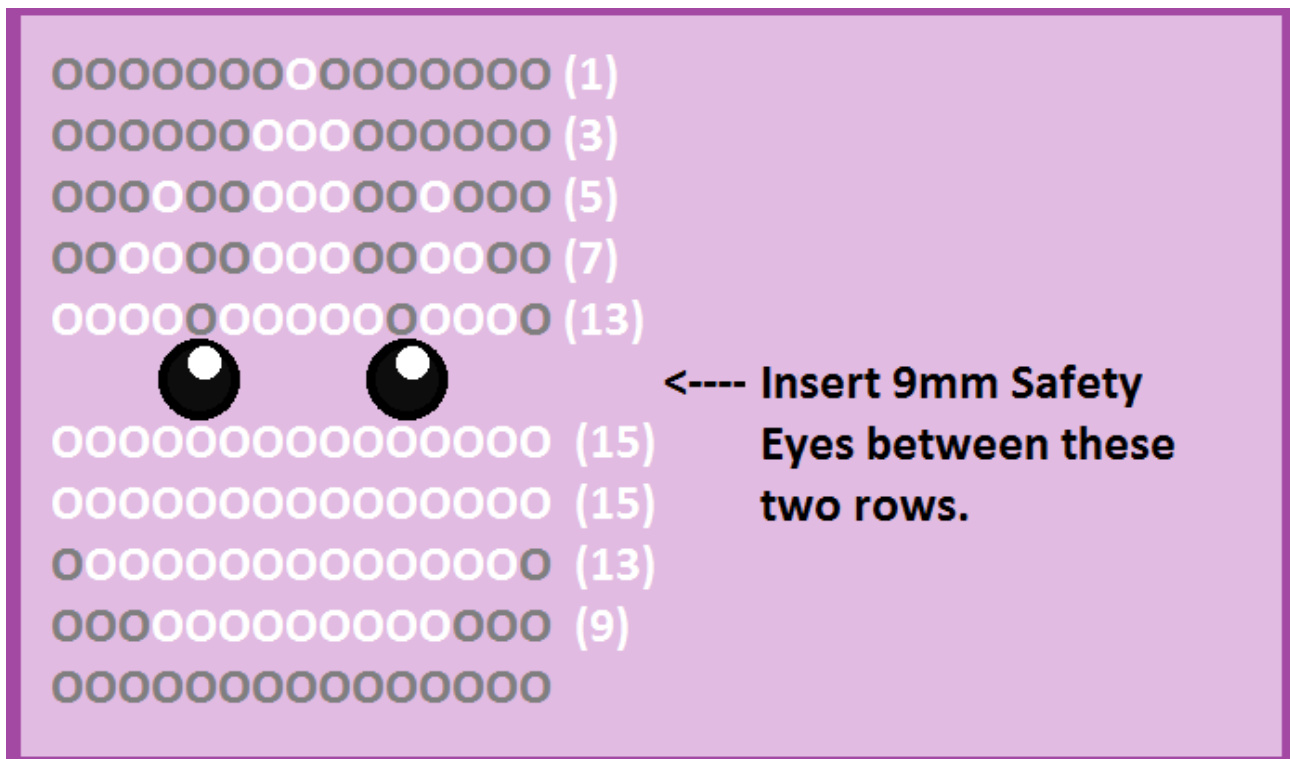
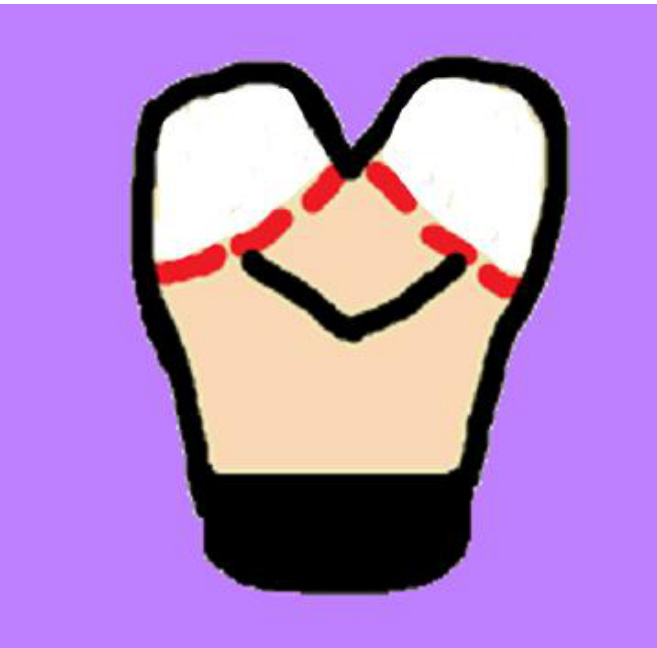
Round 1: With gray yarn, SC 6 in Magic Ring. Round 2: Inc in each st around (12) Round 3: (SC x 1, Inc) x 6 (18) Round 4: (SC x 2, Inc) x 6 (24) Round 5: SC in each st around (24) Rounds 6 - 15: SC in each st around (24) \*\* Starting from round 6, you will need to alternate between white and gray yarn to create the design on Bully's mask. This step is completely optional if you don't feel like doing the extra work, but the pattern for the mask design is below. The number of white stitches per round are listed next to each row in the diagram. Make sure to add the safety eyes where indicated.\*\*
Round 16: (SC x 2, Dec) x 6 (18) Round 17: (SC x 1, Dec) x 6 (12) Round 18: Dec in each st around (6) F/O, leaving a long tail for sewing. DO NOT sew head shut yet.
Ears (Make 2):
With gray yarn, SC 5 in Magic Ring. Pulltight into a half circle shape. F/O, leaving a tail for sewing. Weave in other end.
Face/Chin:
Row 1: With black yarn, CH 4. Starting from 2nd CH from hook, SC 3. Row 2: CH, turn, SC 3. Row 3: Switch to flesh tone yarn. SC 3. Row 4: CH, turn, SC, Inc, SC (4) Row 5: CH, turn, SC, Inc, SC (5) Row 7: CH, turn, SC, HDC, SI St, SI St, HDC, SC (6) F/O. Weave in ends.
Assembly:
Using White, red, and black yarn, sew the face/chin to the head by embroidering the pattern in the below diagram. Sew white in the top corners, sew red to border the white, and sew with black to secure the bottom of the chin. Sew a black border around the entire piece as detail, and then sew on the mouth. Bully Demise's expression is completely up to you!
sewn on the mouth, sew the mask's eye hole shapes around the safety eyes.
Sew the ears to either side of Bully Demise's head. \*\*Once you are finished with Bully's head details, take all the tail ends from your embroidery yarn and sewn on pieces and tie them all together in a big knot. Tuck the knot inside the head and sew closed.\*\* To attach the elbow pad, knee pads and wrist bands, wrap each one around its designated limb. Sew the ends together, and then stitch all the way around to attach it to the arm or leg. Bully's shirt on him and pin his arms to his sides, then sew them to the body Sew the ends of the right pant leg piece together to form a tube shape. After you have attached the knee pads, slip the pant leg onto the right knee. Sew all around the knee to attach. Back stitch with white yarn up each side to make the stripes. If you like, you can sew black laces onto the left leg boot. Insert the legs into the bottom part of the body, but only until the very tops of the thighs are hidden and the legs look proportionate (which is a relative term in Bully's case, I suppose). Pin the legs in place and sew all the way around. Make sure to stitch through the centre and back a couple of times to give the appearance of shorts.
Sew the head to the top of the body. Now, Bully Demise is ready to dominate the wrestling circuit!
Disclaimers and Other Stuff:
This is the first crochet pattern I've designed, so if you discover any discrepancies, if I have omitted anything by mistake, or if you have questions, please do not hesitate to contact me via Ravelry (ApricotLove) or Tumblr (apricotandalligator). I don't own Wrestling Revolution or Bully Demise, nor do I claim to. Bully Demise is just a silly project I did for my own entertainment, and I made up a pattern in case someone else wanted to take a shot at making one too. Please note that this pattern is slightly different from the original prototype (the chest is bulkier than the original) so your end result may vary in looks - but itll still be Bully Demise! This pattern is free to any and all and should not be sold for any reason. All I ask is that you send me photos of your new friends once you've made them! @ Have fun with it!