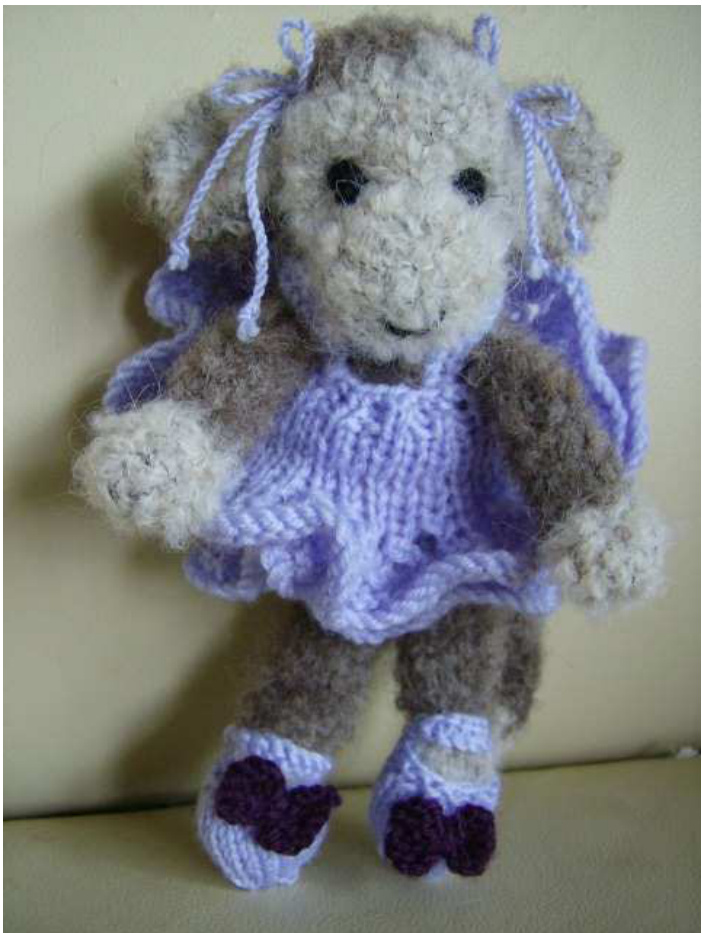
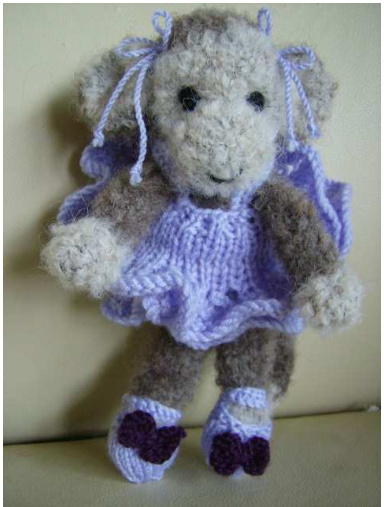
Mindy's Baby Monkey
The majority of my customers are elderly and struggle with small print. For this reason my patterns are large print, well spaced out and run into many pages. If your eyes are sharper and you would like a condensed version on fewer pages, email me and I will send you a pdf of much smaller print to save your ink costs. A really useful way to work is to place your current page inside a rigid plastic file folder and cross out on the plastic, each line completed using a child's washable felt tip pen (easily erased with a damp tissue). That way you can lay the pattern down beside you and still follow it easily. You can also write notes on the plastic and then erase them. Materials : 10 gms Sirdar 'Nomad' (or other boucle DK yarn) (preferably both pale & Dark shades) 10-15 gms of soft DK yarn for dress etc. 3 x 2.75mm straight needles 1 pr 3.00mm straight needles 3mm D.P's (for I-cords) tapestry needle sharp small scissors Polyester fibrefill Abbreviations: CO - Cast on K - Knit P- Pearl Kfb - knit into front & back of next stitch Pfb - pearl into front & back of next stitch K2tg. Knit two stitches together to make 1 P2tg. Pearl two stitches together to make 1 St or sts - stitch or stitches St-st - stocking stitch (1 row K, 1 row p) Garter stitch - every row knit \*...\* repeat stitches/rows between asterisks Yo - make a stitch by bringing yarn around right needle from back to front. BO - Bind off/cast off SI - slip 1 sitch Psso - pass slip stitch over Garter - every row knit Skpo - slip 1, knit 1, pass slip stitch over Sk2po - slip 1-knit 2 together-pass slipped stitch over SPPO - Slip 1, purls 1, pass slip st over B & T - break yarn, thread thru stitches and draw up tightly Inc 1 - inc by knitting into front and back of stitch. M1 - make 1 by picking up and knitting the horizontal yarn between the stitch you just knitted and the next stitch. K2tgtbl - Knit 2 together through back of loops. C4B : Slip next 2 sts onto a cable needle and hold to the back of your work. Knit the next 2 sts on your left needle. Now knit the 2 sts on your cable needle. (crosses to right) C4F : Slip next 2 sts onto cable needle and hold to front of your work. Knit next 2 sts on your left needle then knit the 2 sts on your cable needle. (Crosses to the left). To make an I-cord: You need double pointed needles (no 'knob' on the end) Knit the first row, don't turn needles, instead slide the sts to the other end of the needle and with the same side facing you, knit the next row. Continue in this way knitting with right side facing you, sliding the sts along on every row. Bring your yarn firmly across the back of the work. This way you will produce a sort of tube. As you work give a little tug on your work to keep a good smooth shape. Make your cord as long as you want it for your design and then B & T. To make a twisted Cord : Cut a length of yarn twice as long as desired finished length, fold in half. Holding the cut ends together, insert your finger into the loop end and keep twisting until your yarn is very tightly twisted. Bring the two ends together and let them self-twist into a cord. Secure by tying the end. Alternatively, cut a length of yarn twice as long as desired finished length, make a slip knot in one end and slide onto a door handle, hold the other end of the length and twist around clockwise until it is very tightly twisted and then bring this end up to the door handle end and allow the cord to self twist. It may help if, as it self twists, you run your thumb and forefinger down the twisting length to smooth it out and see if you have achieved an adequate twist. When you attach your twisted cords and are happy with the length you can knot the ends again and cut to right length. BABY MONKEY :

Head : Make 1 piece (starts at neck, ends at top of head). Using 3mm needles and paler face colour, cast on 6sts 1. P 2. Inc in every st (12) 3-17 st-st 15 rows Insert a lifeline (i.e. thread a yarn into a tapestry needle and with ws facing thread thru every stitch on your needle leaving at least 6'" tails hanging down at either side). 18. \*K1, Inc 1,\* rpt to end (28) 19. P 20. \*K2, Inc 1,\* rpt to end 21. P 22-25 st-st 4 rows 26-30 st-st working colours from chart :
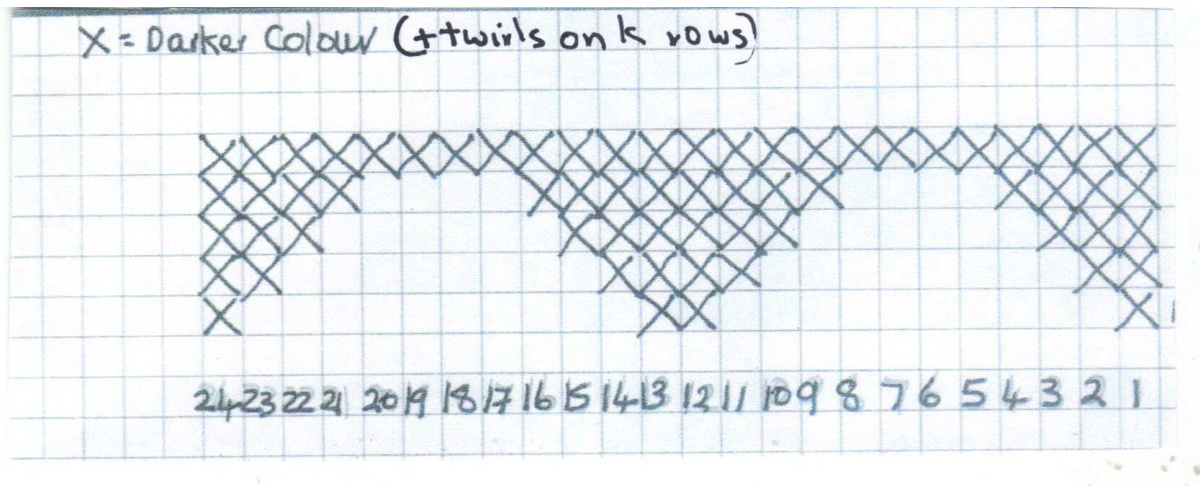
continuing in darker colour only, st-st 7 rows \*K2, K2tg\* rpt to end (18) p a row \*K1, K2tg\* rpt to end (12) K2tg to end B&T. When you seam the head make sure your lifeline ends are on the outside. After stuffing, draw these two lifeline ends very tight to form muzzle, tie them and bury ends inside. If necessary put a couple of stitches in the side of the muzzle to catch it down to the face.
BODY: Make 1 piece
Cast on 13 sts 1. Inc kntwse in every st. (26) 2-22 Beginning P, st-st 21 rows 23. K5, (K2tg) x3, K4, (K2tg) x3, K5 24. Purl a row 25. K2tg, rpt to end B&T. FEET/LEGS : Make 2 alike Cast on 7 sts in foot colour. 1. Inc in every st (14) 7. K2, K2tg × 5, K2 Change to leg colour st-st until 9cm long B/T. Gather and draw tight the cast on edge. You will need a tiny blob of stuffing in the foot to round it out. ARMS : Make 2 alike Cast on 6 sts in hand colour 1. Inc in every st to end (12) 2-4 st-st 3 rows Change to arm colour St-st 8 until 8 cm long B& T. Use a little ball of stuffing to round out the hands before seaming. EARS : Make 2 alike Using 3mm needles and OuTER ear colour, cast on 8 sts 6. Now use inner ear colour, (K1, K2tg, K2) rpt to end 7-11 Beg P, st-st 5 rows 12. K2tg to end B& T. Gather cast on edge of ear, sew row ends together, tuck pale inner ear piece inside the darker outer ear piece and turn right side out to leave a little cup shape to sew on. TAIL : (optional) Make a dark, 4 st, I-cord, ending it with the last two rows in Paler colour and ending it K1, K2tg, K1, B/T BABY MONKEY DRESS :
Using DK in your chosen BOTTOM FRILL colour and 2.75 mm needles Cast on 132 sts \* Knit 2 rows and then Work pattern as follows : 1. skpo, yo, k2tg, k3, skpo, yo, k2tg (repeatto end) 2.Purl 3. skpo, yo, k2tg, kl, skpo, yo, k2tg (repeatto end) 4. Purl 5. skpo, yo, sk2po, yo, k2tg, (repeat to end) 7. skpo, K1, K2tg (repeat to end)\*\* st-st 8 rows. Set this piece aside while you make the top frill. Using your top frill colour work as for the bottom frill from \* to \*\* then: Purl a row With right sides facing, lay your needle with the TOP frill on top of the needle holding your BotToM frill and with a 3rd needle you are going to graft them together by knitting across (i.e. put your rt needle thru the first stitch of each needle and knit them together as if they were one stitch). St-st 6 rows Work 2 rows of K1, P1, rib Cast off. Straps (to be crossed at back) Make 2 alike Cast on 25sts Cast off all. BABY mONKEY SHOES : (can be sewn on or can be Removeable - your choice). Using shoe colour, cast on 9 sts Inc in every st. (18) St-st 7 rows K2, K2tg × 7, K2 Knit a row Cast off to last stitch and then use this last stitch to cast on another 9 sts. Cast off all. Gather cast on edge, seam row ends and stitch strap down to other side of shoe. SHOE BOwS : Make 2 alike Cast on 6 sts Knit 8 rows Cast off leaving a long enough tail to thread down to middle, wrap tightly around to form bow shape and stitch on to shoe. I have made 2 tiny twisted cord ribbons for her head. I hope you have had a lot of fun with your monkey and that you have been able to make subtle choices and changes to put your own creative stamp on her. I hope that you have learned something new on this journey which you can carry forward in your knitting. I know that many of you knit to raise money for many good causes (and making a little money to supplement your pension Is a good cause!) so you have my permission and my blessings to display, donate, fundraise or sell for profit any products from this design. Only the pattern itself is my copyright and may not be reproduced in any form. I proof read over and over and test knit, but still the typos slip thru and I do apologise most sincerely in advance. Please don't hesitate to email me for any assistance or clarification : Abigail : 4organicsolutions@sky.com I can usually get back to you within 24 hours and anyway I just love hearing from you all even when there isn't a problem.


