Recoveristas Angels
Advisory crochet levels

There is definitely a bit of fiddling involved with this one. Suitable for people who like high-precision micro projects; not so suitable for people who want to toss that kind of thing out the window. Once you get the hang of them, you can knock these candle holder sleeves out in under an hour. Like I said: if you don't tolerate fussy projects well, this one will probably cost you your good mood. On the other hand, the project is so small that it's over before you know it. This pattern is suitable for intermediate to advanced crocheters. All'special' stitches are explained in the pattern.
Introduction
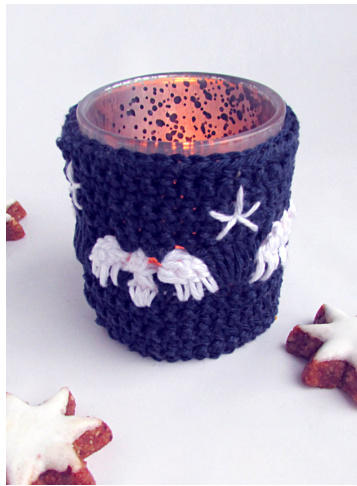
Hey there! This is a pattern for a candle holder 'sleeve' with a motif of angels. It is built up in rows with a lot of chains in them, which is why I've dubbed the technique 'chain-sculpting'. The method is a little unorthodox - like everything that comes from my brain:) - but I'll try to explain as logically and non-intimidatingly as possible. A cute, fast project with a lot of bang for your buck! If you want to sell finished items based on this pattern, I'm okay with that. I do kindly ask that you let me know - and of course you get extra brownie points for a pattern credit or link back! Contact me at rinske @recoverista.com. I am a fledgling crochet designer. If you enjoy this pattern and want to do me a huge favor, consider spreading the word, liking my patterns on Ravelry or visiting my site Recoverista. Thank you so much for taking an interest and have fun! Love, Rinske
Materialsneeded
Make in a sports weight: · One skein of Wibra Nova 5 ply in a dark color, or any other cottony sports weight yarn (110m / 50gr) One skein of Wibra Nova 5 ply in a light color, or any other cottony sports weight yarn (110m / 50gr) a 3.5mm or E sized hook · scissors (a tapestry needle) Make in a worsted weight: · One skein of a synthetic worsted weight yarn in a dark color (Red Heart Supersaver for example). · One skein of a synthetic worsted weight yarn in a light color. ·A 4mm or G sized hook ·scissors · (a tapestry needle) You won't need the whole skein(s), not by far! You can probably make ten candle sleeves with one skein:). This is also a good project to use up scrap yarn.
Gauge
Sports weight: +/- 19 stitches to 10cm (4inches). Finished product will fit around a drinking glasssize cylinder (candle holder, small jar, etc). Worsted weight: +/- 15 stitches to 10cm (4inches). Finished product will fit around a drinking glasssize cylinder (candle holder, small jar, etc).
Abbreviations
This pattern uses US terminology. sc = single crochet dc=doublecrochet tr = treble crochet ch = chain sS = slip stitch st = stitch C1 = color 1 C2 = color 2 [.] = repeated instruction, over multiple stitches or across a whole round, for example.
Start
GENERAL PATTERN NOTES
What we're going to do is build up the angels in four separate 'building blocks', on a foundation of turned sc rows (joined into rounds). The building blocks are: angel 'feet'/bottom of body (C2) → ANGEL ROW 1; space between the wings and body (C1) → ANGEL ROW 2; angel body (C2) → ANGEL ROW 3; angel wings and head (C2) → ANGEL ROw 4. Each building block only uses a few, specified stitches from the sc rounds. To get from those few stitches to the next few, we use a chain as a 'bridge'. Later, we cover the spaces around the angels, covering all those bridges. So you never use the chains to work into; they're only there to carry the yarn across the round so you can put the building blocks in their appropriate places. Eventually, each angel will span 9 stitches, with a free stitch in between. This means the total repeat of the pattern covers 10 stitches. The reason you work with 29 and 39 stitches in this project, and not 30/40, is that we work in joined rows and the joining space will count as a stitch later. Of course, you could use the angel motif for a multitude of projects. You could: not join rounds but just work in turned rows for a flat project (in that case work in multiples of 10); make a much wider project, for example 80 stitches, and work more, in this case 8, angels; stack angel layers - maybe even jumping them back and forth - to create a beautiful structure on a larger item like a baby blanket. Have fun, go wild, make angels:)
Foundation rows
You'll be working in turned rows of sc. Every odd-numbered row you'll be facing the inside of your work; every even-numbered rowyou'll face the outside.
WORSTED WEIGHT
To start: Chain 29, join ch with ss.
ROW 1 (C1)
Sc in each chain, facing the inside of your work, and join your round with a ss. You should have 29 st. Ch, turn.
ROW 2 (C1)
Sc in each stitch, facing the outside of your work, and join your round with a ss. You should have 29 st. Ch, turn.
ROW 3 (C1)
Sc in each stitch and join your round with a ss. You should have 29 st. Ch, turn. ROW4(C1) Sc 4; ch 1 and skip 1 st; repeat 2x [ 9 sc | ch 1 and skip 1 ]; sc 4. You have 3 skipped stitches total
SPORTS WEIGHT
To start: Chain 39, join ch with ss. ROW 1 (C1) Sc in each chain and join your round with a ss. You should have 39 st. Ch, turn. ROW 2 (C1) c in each stitch and join your round with a ss. You should have 39 st. Ch, turn ROW3(C1) Sc in each stitch and join your round with a ss. You should have 39 st. Ch, turn.
Repeat [ROW 2| ROW 3]
ROW 6 (C1) Sc 4; ch 1 and skip 1 st; repeat 3x [9 sc | ch 1 and skip 1 ]; sc 4. You have 4 skipped stitches total.
Angel part
For the angel part you do exactly the same thing with both yarn weights, except that with the 39 st count you'll make 4 angels; with the 29 st count you'll make 3. For the angel part you'll work each row facing the outside of your work, so no turning. To start, change colors. CHANGING COLORS
1) When you finish your round, go back into the first sc of the round. 2) Slip stitch to join the round as usual.
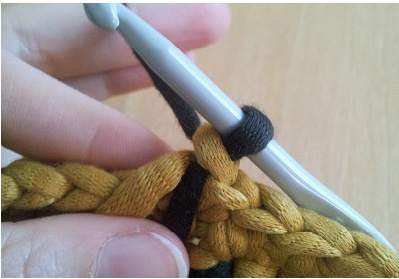
3) Instead of chaining C1, pick up C2 and pull up a loop. This will serve as your ch. Now work in the same st and then every other st of the round as normal. Btw in this case, you can't work over your starting C2 yarn tail because of all the chains. Don't sweat it, I'll tell you where to work it in later:).
ANGEL ROW 1 (C2)
Ch 4, then go to the st you skipped in row 4/6, and put 3 sc into it. Repeat 2/3 (worsted/sports) x [ ch 9 I put 3 sc in skipped st ]. Ch 5. Join into starting C2 ch. Change colors.
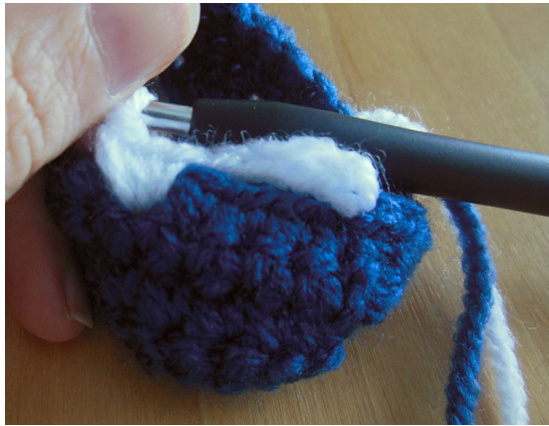
ANGEL ROW 2 (C1)
Ch 3, then go to st 4 of foundation row 4 (row 6 for sports weight) and do 1 sc. Ch 3. Go to st 6 of foundation row 4/6 and do 1 sc. Repeat 2/3 times: [ ch 7 | 1 sc | ch 3 | 1 sc ]. Ch 4. Join into starting C2 ch. Change colors.
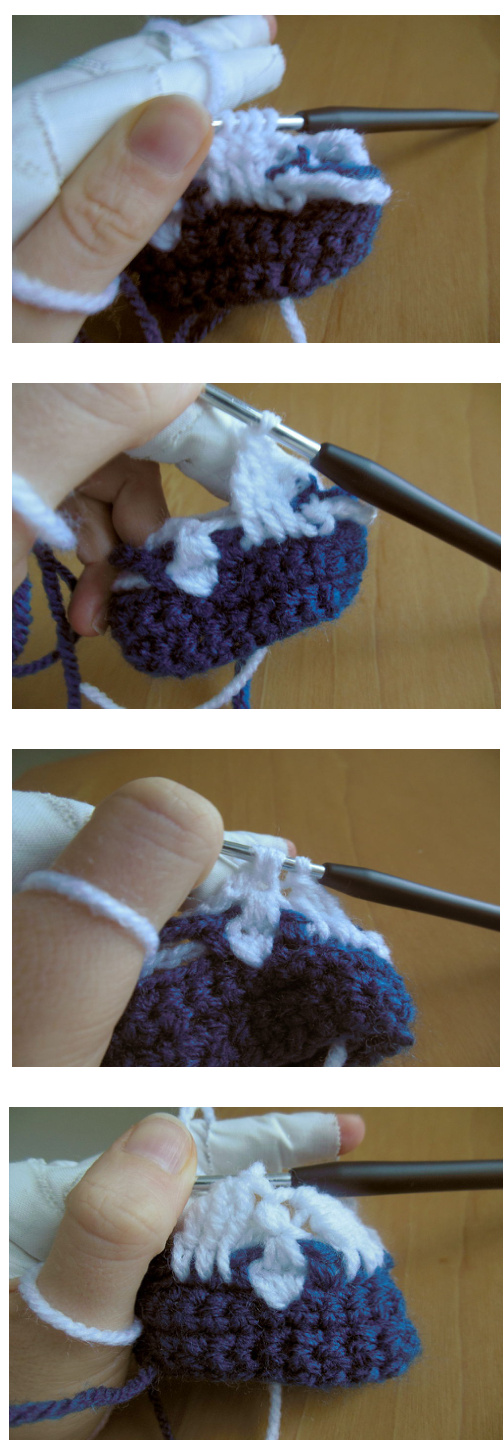
ANGEL ROW ONE AND TWO
Angel row 1. In each skipped stitch of round 4/6, you put 3 sc. Bridge the spaces in between the skipped stitcheswithchains. NB. It doesn't really matter how many you chain in between, because you won't use these chains as working stitches. They're just bridges between each round's 'building blocks'. Later you'll work over them, obscuring them from view. The only important thing is to make them long enough not to hamper the stretch of your project, but short enough so that they won't get too sloppy to hide.
REcovErista bresh ideas for crochet
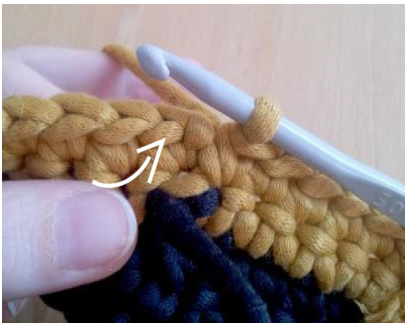
Angel row 2. This picture shows which stitches to go into. Be sure to push the 3 sc of the previous row aside to make sure you're going into the right stitches. If you want to double check, you should count seven stitches between each set of sc I ch3 I sc.
ANGEL ROW 3 (C2)
Ch 4. Go into the first sc of angel row 1. Pull up a loop. Go into the next sc of angel row 1, pull up a loop. Go into the last sc of angel row 1, pull up a loop. You have 4 loops on your hook. Pull up the loops a little bit, so you elongate the stitch. Then pull through all 4 loops to finish. Ch 9. Repeat this process 2/3 times and end with 5 ch. Join with a ss in the first C2 ch and chain 1. You've now finished the angels' bodies.
ANGEL ROW THREE
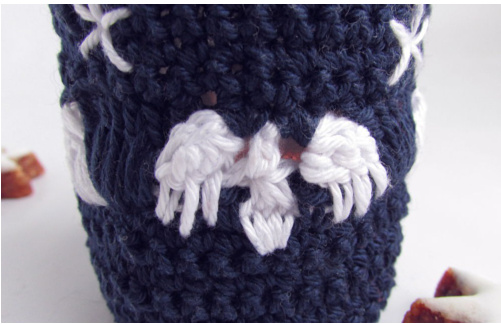
ANGEL ROW 4 (C2)
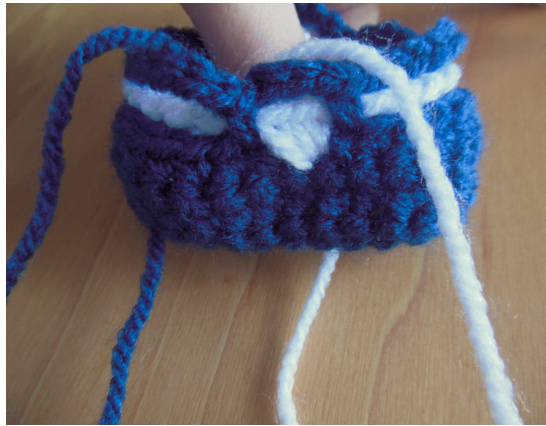
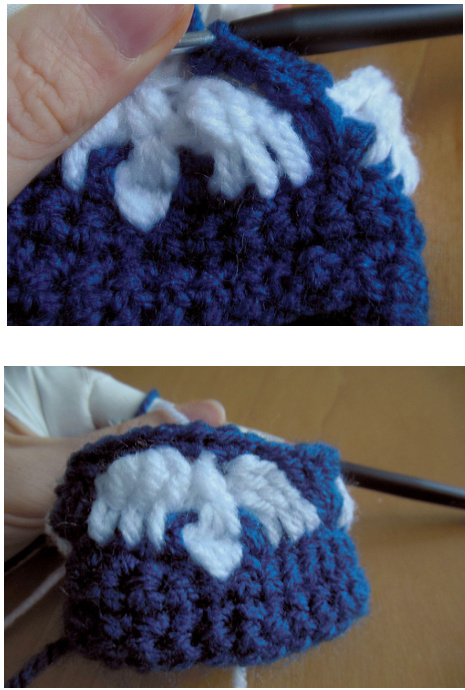
In this round you'll be making the wings and heads of the angels. To start: For the right wing of the angel (to the viewer), work in stitch 1-2-3 of foundation row 4/row 6 for sports weight (see picture), forming 'the wing stitch' explained below. Then you'll work in the stitch on top of the body (angel row 3), forming the head. Finally you'll work the second wing into st 7-8-9 of foundation row 4/6. Chain 6, skip a stitch. Repeat 2/3 x [ make wing-head-wing, chain 6, skip st ] and finish with 5 ch. Join with a ss into the first C2 ch. Change colors.
WINGS AND HEAD
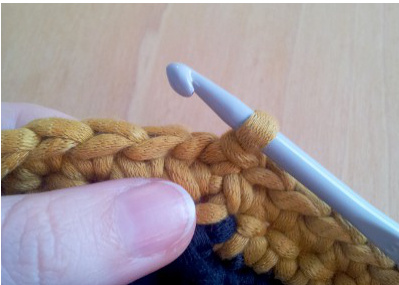
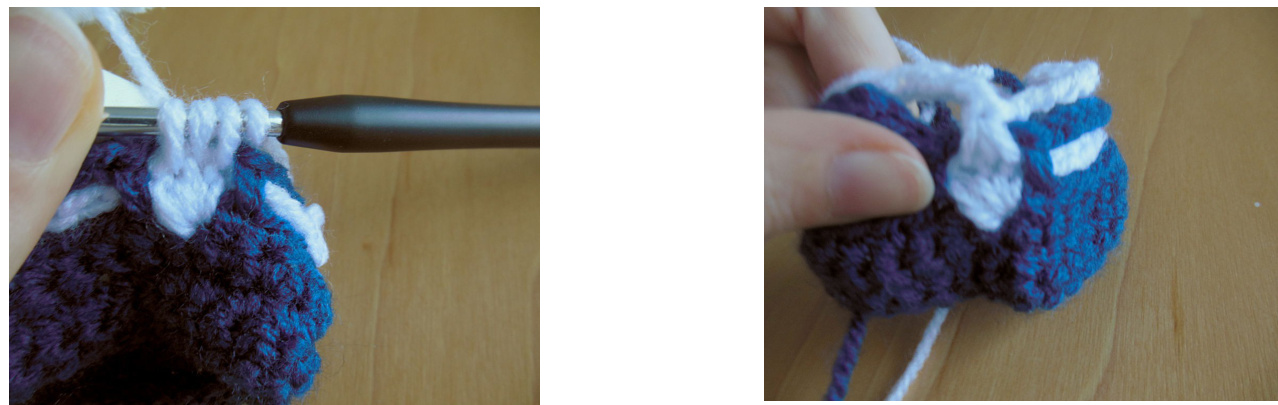
Apologies for the terrible pictures. As you can see I'd injured my hand, so I got impatient:).
REcovErista bresh ideas for crochet
Wing stitch phase 1. You work in stitch 1, 2 and 3 of foundation row 4 (or row 6 for the sports weight). Yarn over twice, go into stitch 1 and pull up a loop. Yarn over, pull through 2, yarn over, pull through 2: you have 2 loops on your hook. Repeat for the next 2 stitches. You end up with 3 unfinished tr stitches, and 4 loops on your hook. Wing stitch phase 2. Note that in this picture, you can see the placement of the wing even better. Basically it goes 'wing in C2, sc st in C1 (you made that stitch in angel row 2), body in C2'. To complete the wing, first yarn over and pull through 2. Then yarn over again and pull through the final 3 loops on your hook. In other words, the'wing stitch' is an adapted 'treble crochet three together' stitch. For the head, go into the stitch you made in angel row 3 (the 'body'). Pull up a loop. Yarn over, go into the same stitch and pull up another loop. You have 4 loops on your hook. Yarn over and pull through all 4 loops to finish the stitch. Basically, the head is a slim version of a puff stitch. Now make a second wing in the same fashion, on the other side of the 'body'. You are working in st 7, 8 and 9 of foundation row 4 (or row 6 for the sports weight). Ch 6, skip st 10 of foundation row 4/6, and start on the right wing of the next angel. After you finish this row you should have 3/4 completed angels. General note: if you don't want the C2 chains showing underneath the wings, wiggle the C1 chain of angel row 2 over them and to the front.
ANGEL ROW 5 (C1)
In this row you'llfinish sculpting the angels by crocheting over all the chains and filling up the spaces in between the angels. Note: crochet over your C2 tails in this round so you can just cut them off later. To start, yarn over and go into the joining space underneath the starts of all those angel rows. Put 2 dc and a tr into that space. Now go into the space between the right wing and the head of the angel (underneath the stitch!) and do 2 sc. Go into the space between head and right wing and do 2 sc. Now go into stitch 10 of foundation row 4 (row 6 for sports weight). This should be the skipped stitch between each left wing of one angel and the right wing of the next. Into that stitch, work 1 tr, 4 dc, 1tr. Repeat this sequence 2/3 times. Once you're back at the joining space, put 1 tr and 2 dc into it and join the round with a ss. Ch, turn work around.
Here you see the first 2 dc and 1 tr in the joining space (for the other angels you'll put those stitches into the unused stitchesof foundationrow 4/6(stitch10,20 (,30)) between the wings. The function of those stitches is to fill the triangular gap between the angels. They are sort of like a shell stitch, except that the sides of the'shell' are tr and the 4 st in the middle aredc. The 'shells' in between the wings, combined with the sc stitches between head and wings, fill up the space around the angels and help their shapes to come out.
Finishing touches
Finish by repeating row 1-4 (or 1-6 for sports weight). Start with a row of 29/39 sc facing the inside of your work, join, ch, turn, etc. After joining the last round with a ss, cut yarn and knot off. If you like, you can go wild and add embroidered stars, a different colored border on top and bottom, and so on. The world is your oyster! I made the candle holder in the pictures for my neighbour who doesn't like too much fuss, so I kept it simple. Enjoy and a very merry Christmas/Hanukkah/holiday to you from Recoverista! <3