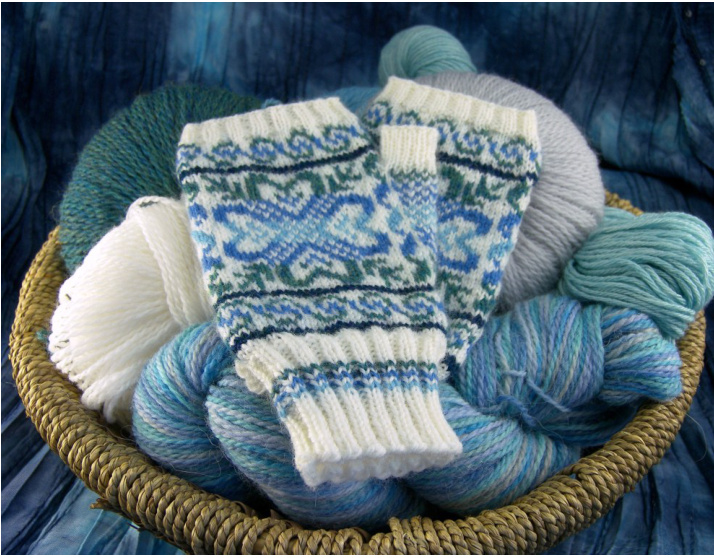
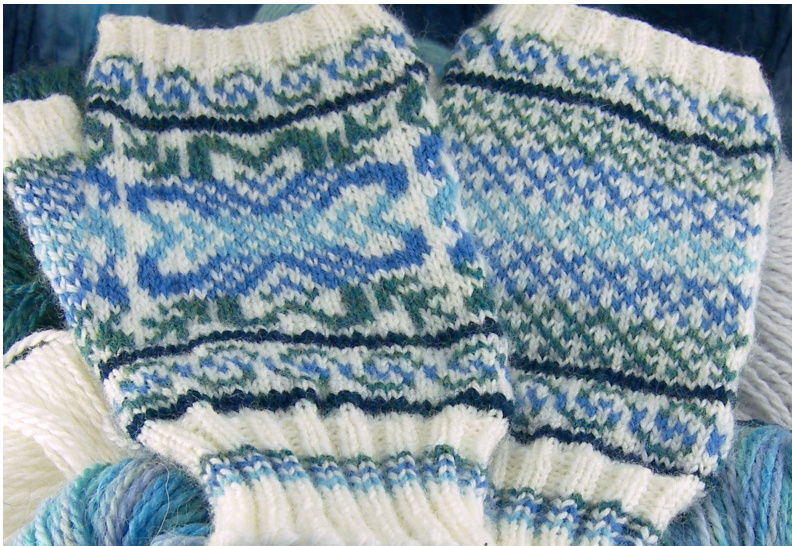
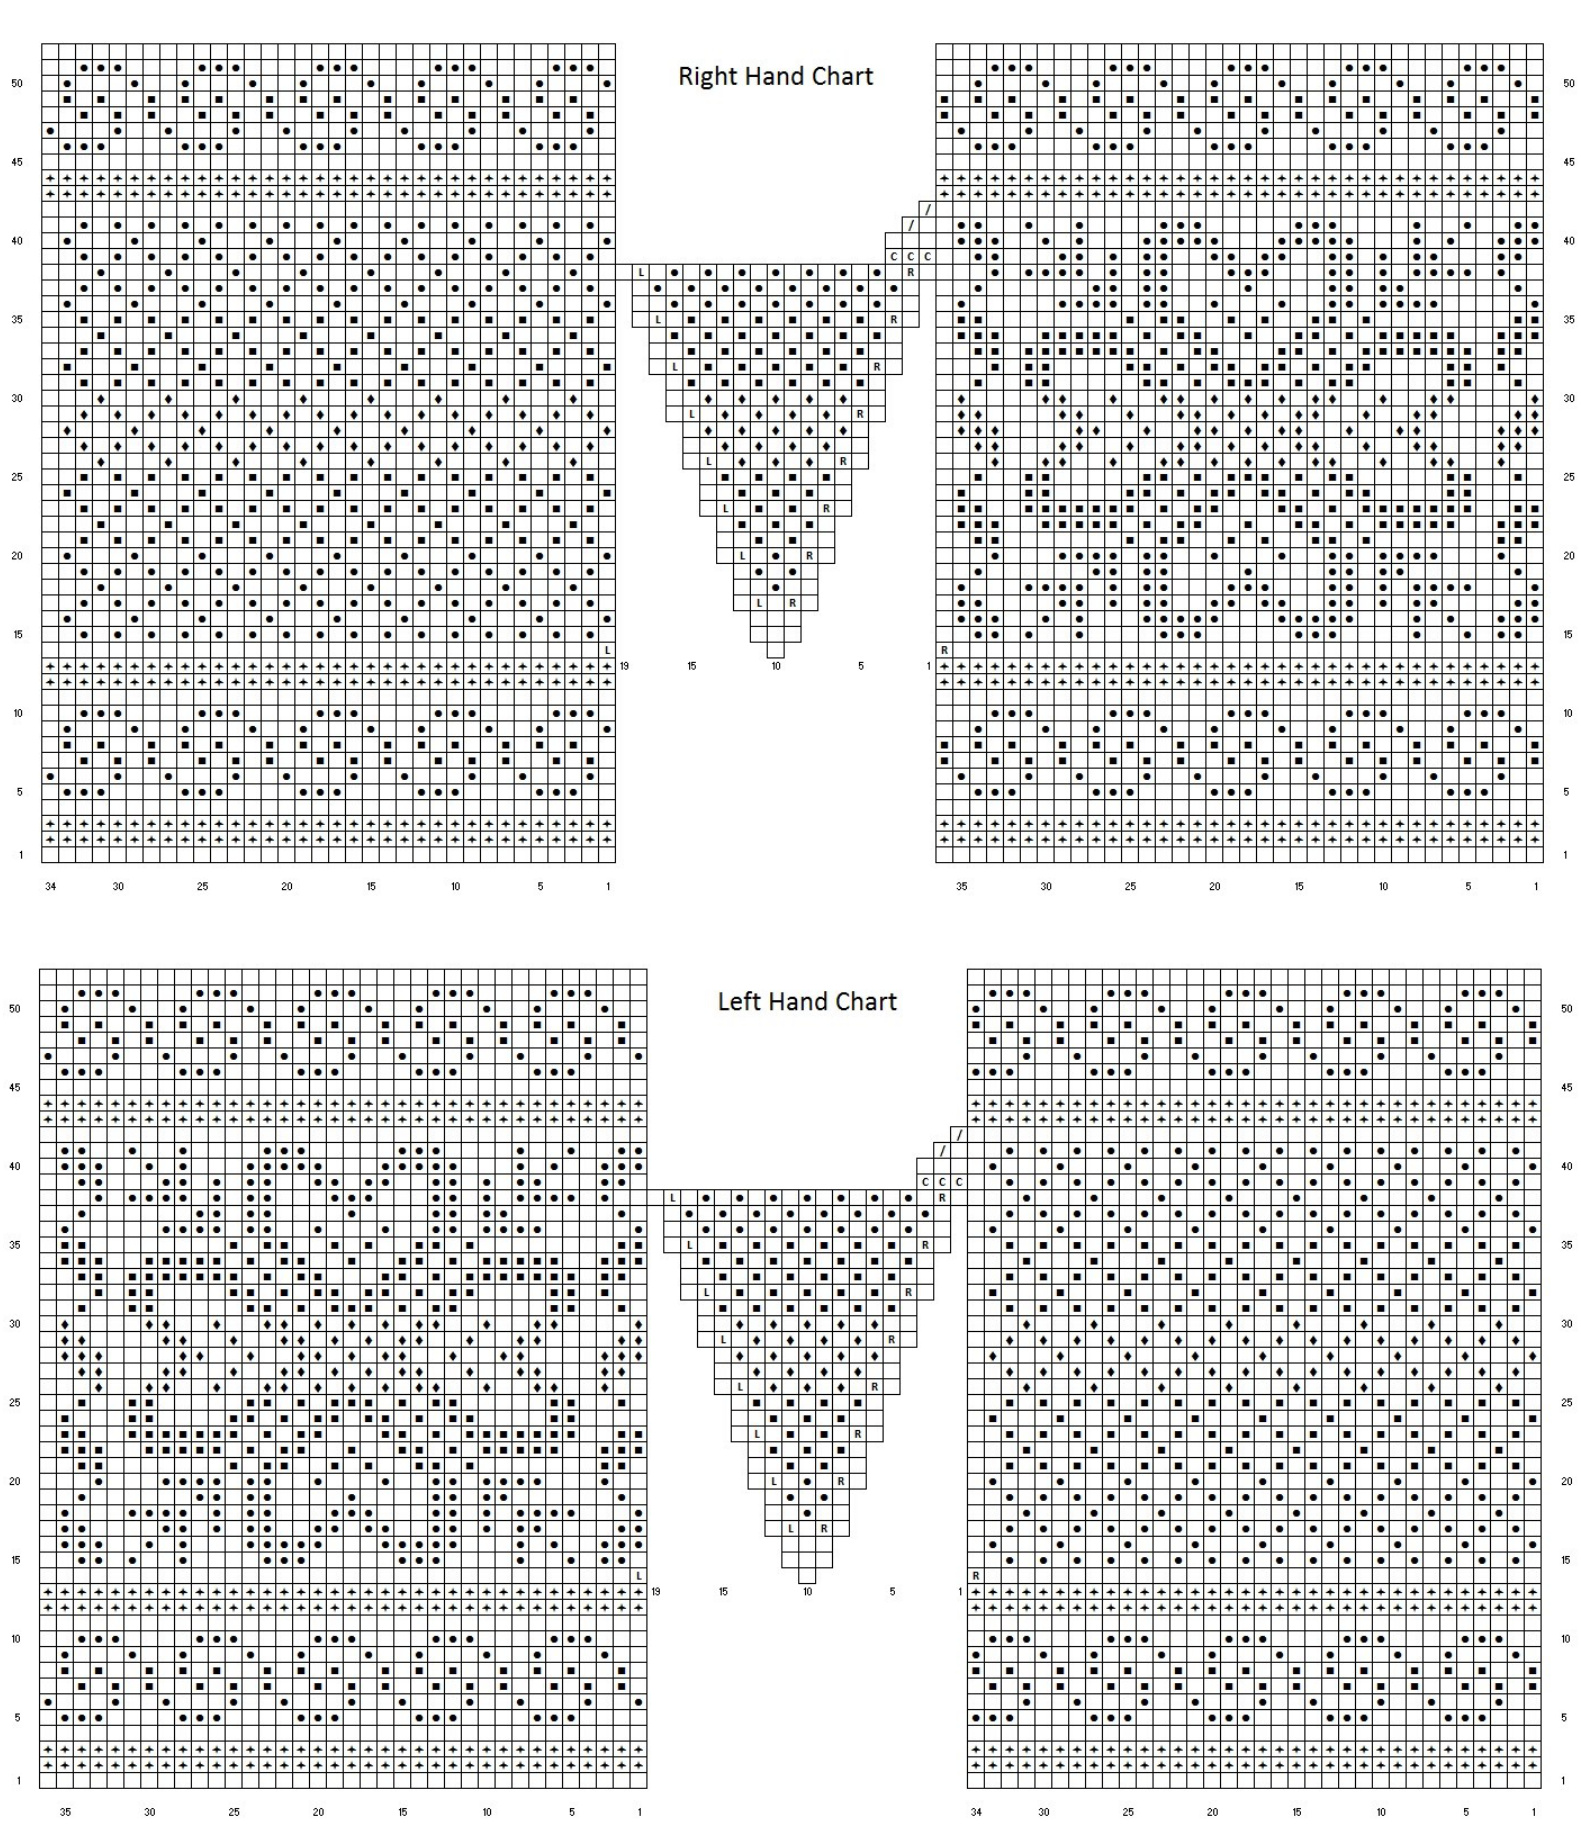
Wintergreen Gloves
designed by Cailyn Meyer dailyskein.wordpress.com · Finished Size: Hand circumference, 7"'; Length, 7" · Needle Size: Size 0 (2.00mm) DPNs, or size needed to obtain gauge · Gauge: 38 sts x 26 rows = 4" in two-color stockinette · Yarn: Knit Picks Palette (100% wool) 1 ball each (231yd/50g): White, Sky, Pool, Tidepool Heather, Marine Heather · Extras: 12" smooth waste yarn, tapestry These cute fingerless gloves are inspired by traditional Selbu mittens. The construction differs from the historical mittens and uses a thumb gusset on the side of the hand instead of a gusset on the palm, but the motifs are all taken from traditional patterns. There are separate mirrored charts for the right and left glove for easier knitting (no reading from left to right while knitting right to left!)
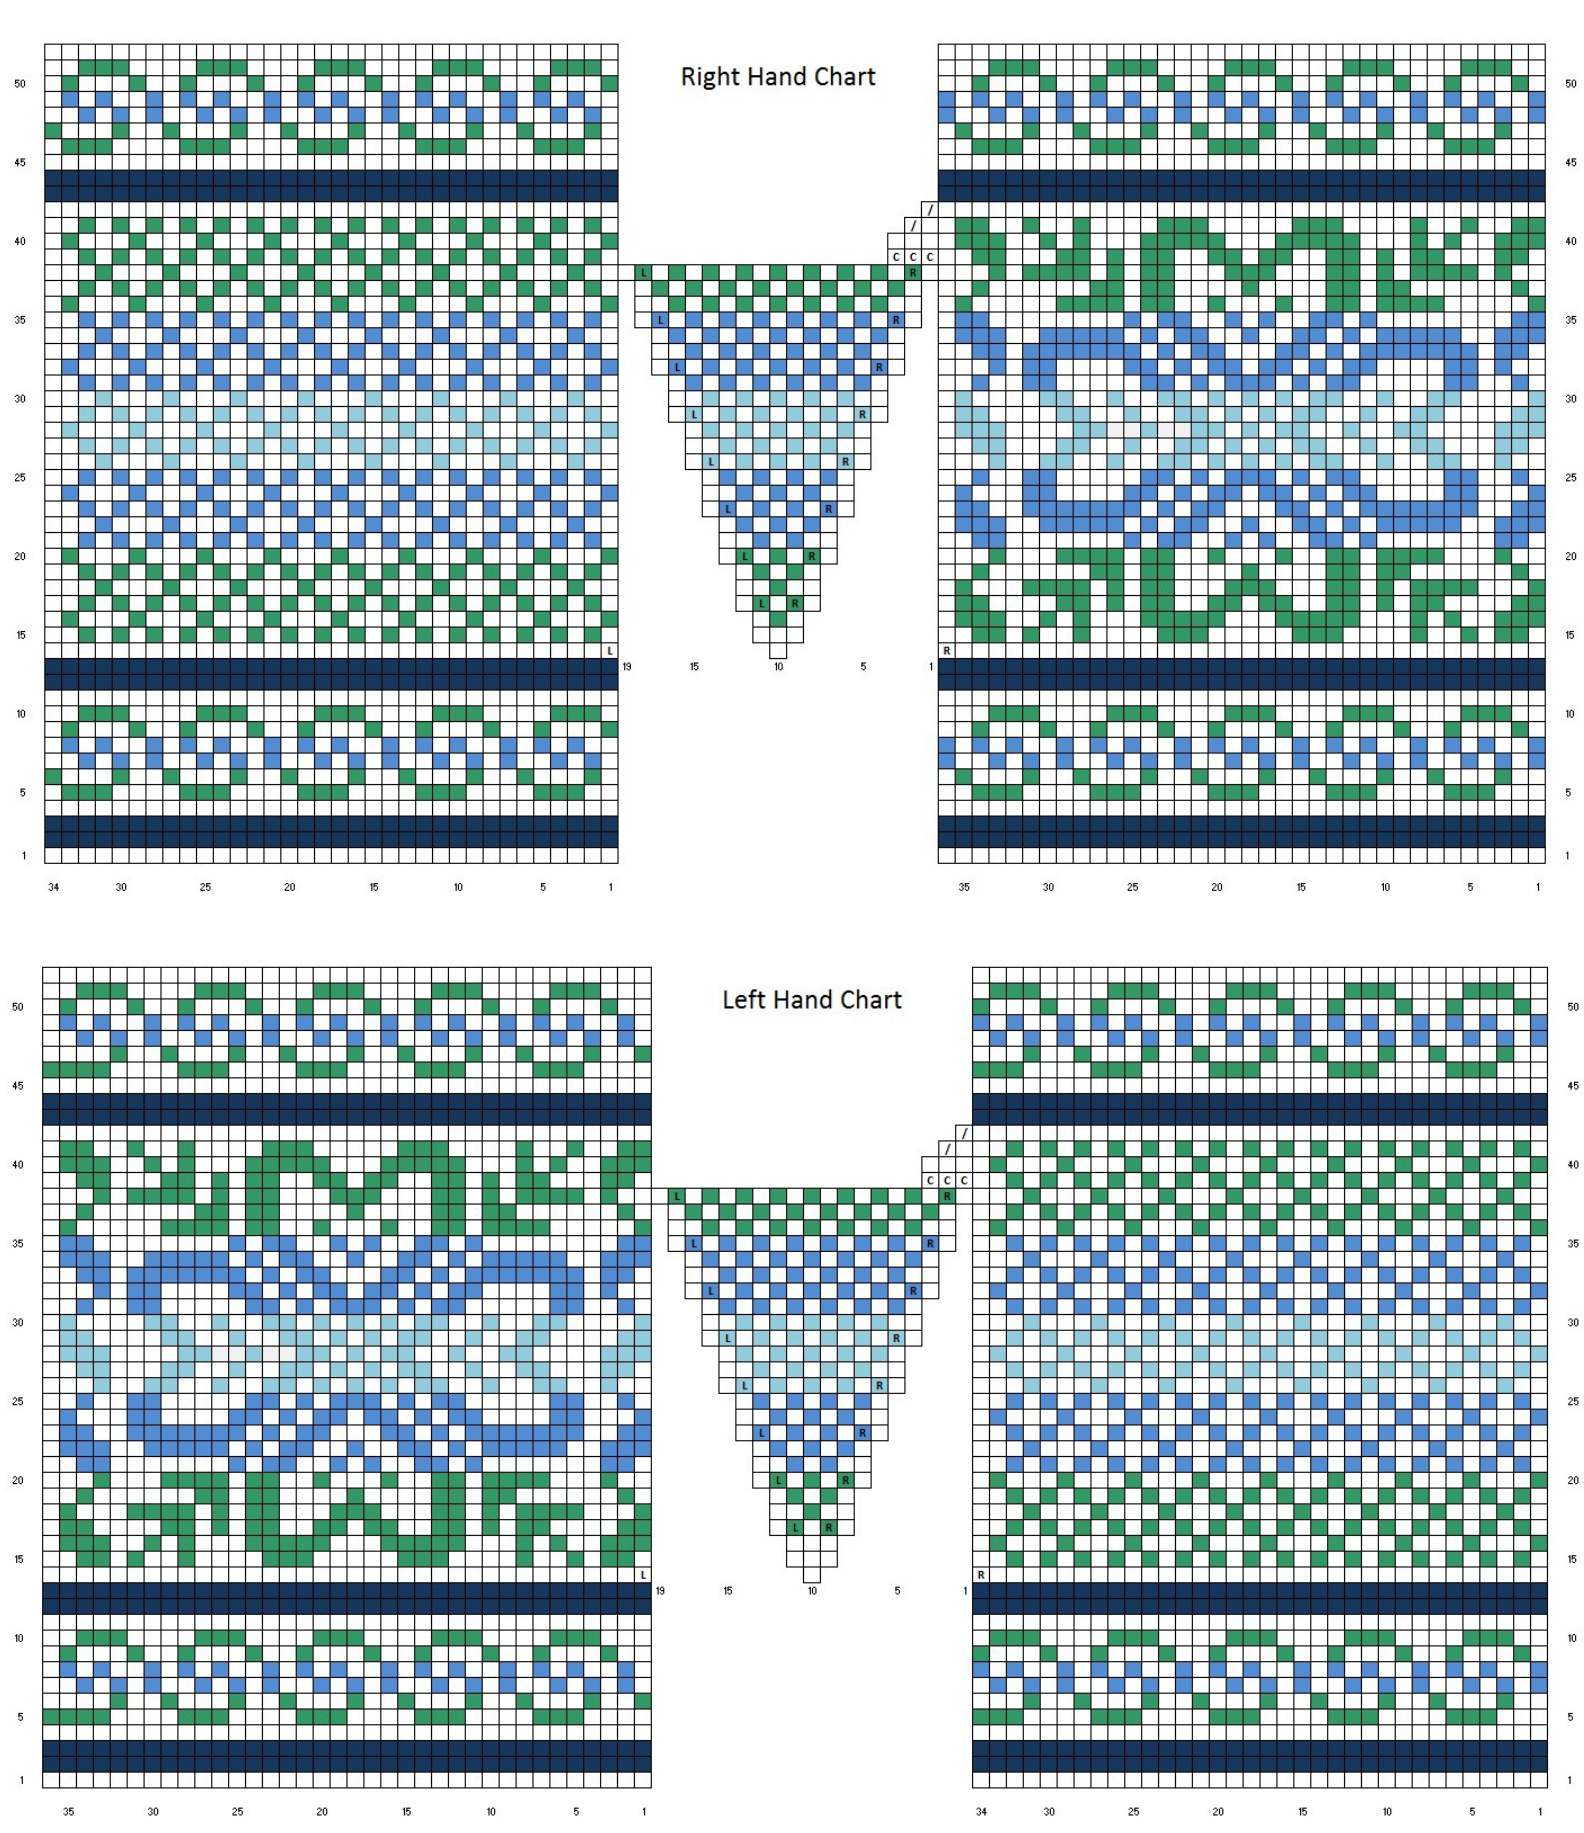
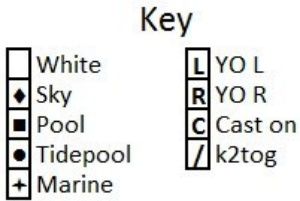
Color charts are on page 3 and symbol charts are on page 4. To make finishing less painful, weave in ends as you go by twisting/wrapping the last yarn for 10-15 sts on the new row. Try joining the new color 10- 15 sts early (the row before it appears on the chart) and carry it along, twisting/wrapping it every other st. This helps eliminate holes at the sides. The increases for the thumb gusset are written as yarn overs which are knit twisted on the next round. Standard Make 1 increases can be substituted; the yarn over method can prevent puckering or tension problems from lifting the strands from below. It is recommend to mark the increases for the thumb with two stitch markers: place the first one before the first YO and the second one after the second YO on the first increase row. Slip the markers every round after this; it will make it easier to know which stitches to put on the scrap yarn when the gusset is finished. can be knitted from the charts alone between the ribbing sections, but instructions have been written for rows with increases, decreases, or other things that need attention. If there are no written instructions for a row, follow the chart until the next written row.
Special Stitches
YO R: Bring yarn to the front by going over the top of the right needle and return to the back under the needle. On the next round, knit into the front of the yarn over. YO L: Bring yarn to the front by going under the right needle and return to the back over the top of the needle. On the next round, knit into the back of the yarn over. Cuff (Work the same for both gloves) In White, CO 60 sts. Join in the round, being careful not to twist. Round 1: \*K2, p2\* to the end of the round. Repeat Round 1 until cuff measures 1 inch. In Sky, \*k2, p2\* to the end of the round. In White, \*k2, p2\* to the end of the round. In Pool, \*k2, p2\* to the end of the round. In White, \*k2, p2\* to the end of the round. In Tidepool Heather, \*k2, p2\* to the end of the round. In White, \*k2, p2\* to the end of the round. Repeat last round until cuff measures 2" from cast on.
Hand
Increase Round: K3, m1 \*k6, m1\* 9 times, k3. 70 sts Work Right Hand Chart [Left Hand Chart] for 38 rounds, changing colors where indicated on chart and increasing stitches where indicated. It is helpful to place a stitch marker before the first increase and after the second increase to mark the thumb stitches. Next Round: Work round 39 of chart for 36 [34] sts, slip all 19 thumb stitches to scrap yarn, CO 3 stitches in White using the backwards loop method over the gap. Continue round 39 of chart. 73 sts Continue working chart until round 52 is completed, decreasing where indicated. Top Ribbing (Work the same for both gloves) Round 53 (not shown on chart): K3, \*k2tog, k5\* 9 times, k2tog, k2. 60 sts Ribbing: \*K2, p2\* to the end of the round. Repeat Ribbing until ribbing measures 1/2 inch. Cast off loosely, cut yarn and weave in ends. Thumb (Work the same for both gloves) Return 19 thumb sts to needles, removing waste yarn. Join White at the beginning of the thumb on the back of the hand. Knit across all thumb sts, working YOs as before. Pick up 5 sts across the gap (1 in each of the cast on stitches and 1 in either “corner"). 24 sts Round 1: K18, k2tog, k3, k2tog (joining the first and last st of the round). 22 sts Round 2: \*K1, p1\* to the end of the round. Repeat Round 2 until thumb ribbing measures 3/". Cast off loosely, cut yarn and weave in ends.
This work by Cailyn Meyer is licensed under a Creative Commons Attribution BYNCSA -Noncommercial-Share Alike 3.0 United States License. September 2009.
O?@ This work by Cailyn Meyer is licensed under a Creative Commons Attribution EYNCSH -Noncommercial-Share Alike 3.0 United States License. September 2009.


