An original shetlandtrader design $\circledcirc$ 2008 Gudrun Johnston
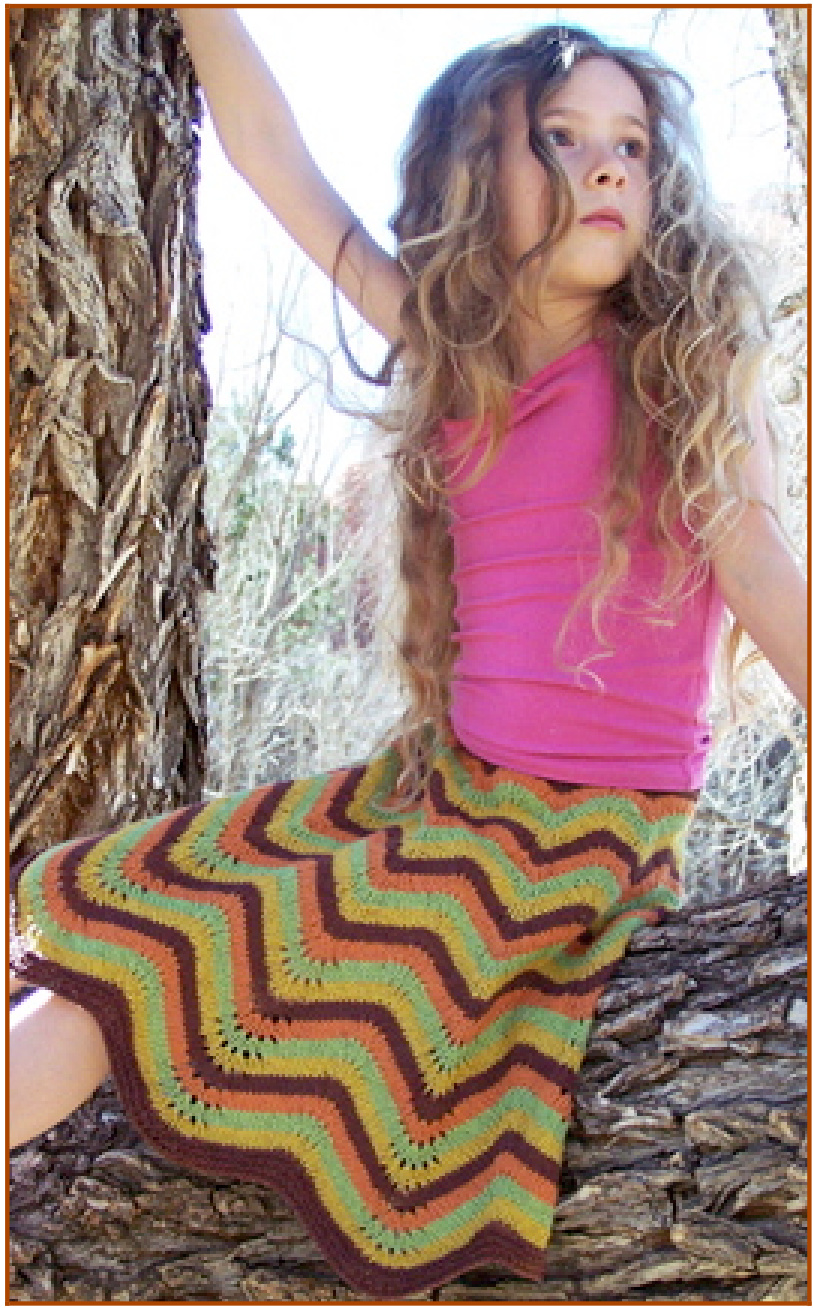
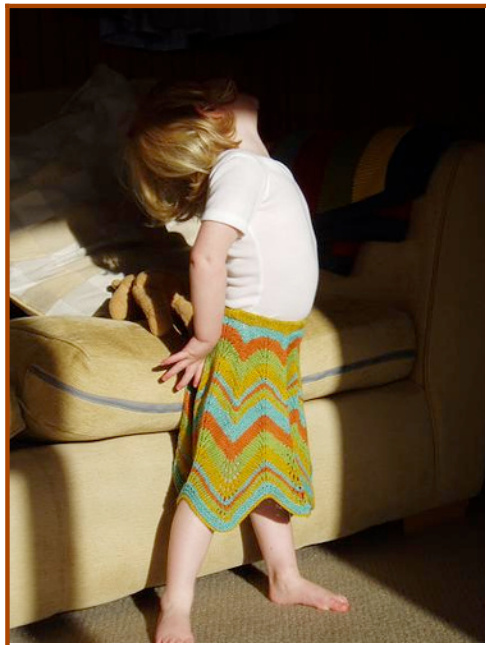
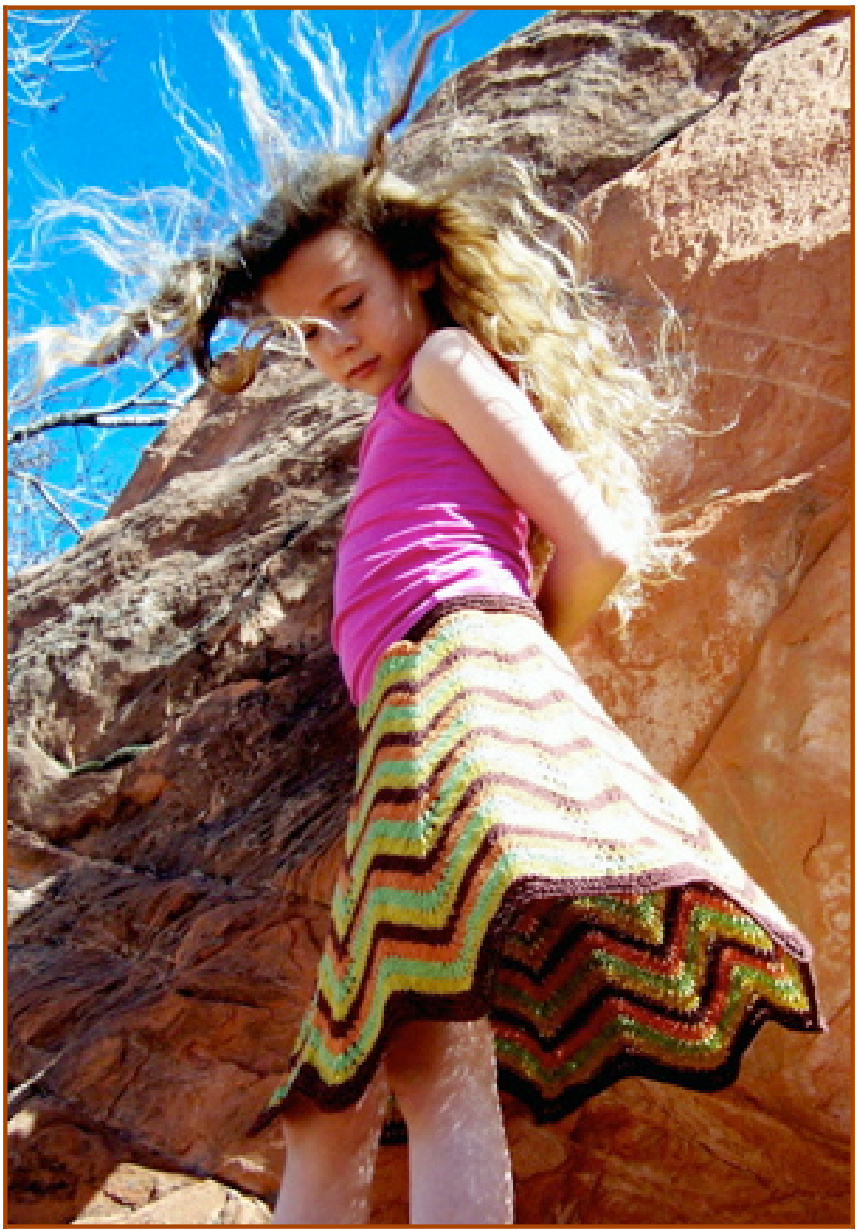
I recently came across this wonderful hemp-blend yarn and immediately loved how it felt and looked. It comes in a great range of beautiful colors, it's machine washable, durable, affordable and great to work with. I originally designed this skirt with my eight-year-old daughter in mind, wanting it to be a little more grown up and hip but at the same time non-fussy and fun. However, this skirt looks great on adults too! The hemp yarn is a perfect material for the hotter days and with the yarn-overs on the bottom half of the skirt some extra ventilation is provided. With a simple elasticized waist and free-flowing form, this skirt is suitable for all sorts of summery occasions. This is a relatively easy piece to knit. The waistband is worked first, encasing the elastic, and then continuing to work in the round from the waist down in a scallop-shaping pattern with increases on some of the scallop-shaping rounds. To make the skirt less revealing, I kept the yarn-over holes for the bottom half of the skirt. Because the skirt is worked in the round it allows you to try the skirt on at any point simply by slipping the stitches onto some waste yarn. Pick your own colors and stripe sequence and you have a one of a kind skirt that everyone will want! Yardage for the skirt in a solid color has also been provided below.
Size:
Child 8[10, 12, Womens S, M, L] (shown in child size 8 above and womens size small below) For working the skirt in smaller sizes(for 2,4 and 6 years) see notes at end of pattern-these notes are meant to work in conjunction with thispattern
Finished Measurements:
Length: 16[18.5, 20.5, 26, 26, 26] inches at longest point Waist: 21.5[22.5, 24, 27, 32, 37] inches before elastic insertion Note: Because waist is elasticized, the skirt will fit waist sizes 23.5[24.5, 26, 28.5, 33.5, 38.5] inches. For the women's sizes, this is a low waist (not true waist) measurement, so that the skirt sits a little lower, around the top of the hips. If you would prefer to wear the skirt at the waist, choose a size closer to your true waist measurement.
Materials:
\* Elsebeth Lavold Hempathy $[34\%$ Hemp, $41\%$ Cotton, $25\%$ Modal; 153 yd/140m per 50g skein] Colors are given for Child[Adult]. [MC] #02[09]; 2 [2, 2, 3, 3, 4] skeins [CC 1] #015[016]; 1[2, 2,2, 2, 3] skeins [CC 2] #017[06]; 1[2, 2, 2, 2, 3] skeins \*[CC 3] #010[04]; 1[2, 2, 2, 3, 3] skeins Note: If working the skirt in a solid color, you will need 4[6, 7, 8, 9, 10] skeins. \* 1 32- or 40-inch US #5/3.75mm circular needle (This is optional if knitting the child's skirt, but recommended if knitting the adult skirt; there will be more stitches then will comfortably fit on the 24-inch needle.) \* Crochet hook, approx. size D/3 / 3.25mm (optional) Row counter \* 9[10, 10, 11, 13, 15] stitch markers (be sure one is different from the others) + 21.5[22.5, 24, 27, 32, 37] inches waistband elastic, 0.5 inch wide \* Sewing needle and thread \* Tapestry needle
Gauge:
26 sts/25 rows $=4$ inches in stockinette stitch on US #4/3.5mm needle 24 sts/26 rows $=4$ inches in stockinette stitch on US #5/3.75mm needle $=4$
Abbreviations:
BO-bind off CO-cast on CC-contrast color inc-increase k-knit k2tog-knit two stitches together as one M1L-make one left (see technical notes) M1R-make one right (see technical notes) MC-main color PM-Place marker p-purl rnd-round sts-stitches WS-wrong side \*-starting point of repeat
Technical Notes
As written, the waistband elastic is enclosed in the casing while the skirt is being knit. If you prefer to insert the elastic after the skirt is complete, in order to adjust the length of the elastic, work the first 5 rows of the waistband casing back and forth before joining to work in the round. This will form an opening through which the elastic may be inserted during finishing, then the opening may be sewn shut. M1L: Insert left needle from front to back under the horizontal strand which lies between the st just worked, and the next st. Knit into the back of this loop. M1R: Insert left needle from back to front under the horizontal strand which lies between the st just worked, and the next st. Knit into the front of this loop. Stripe Pattern Work 4 rounds in CC1. Work 4 rounds in CC2. Work 4 rounds in CC3. Work 4 rounds in MC. Repeat these 16 rounds for Stripe Pattern.
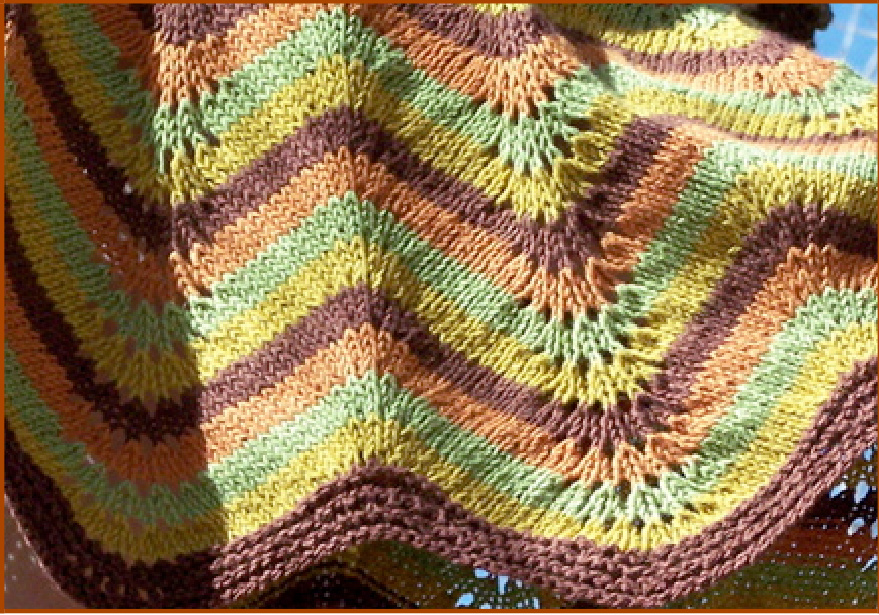
Chart:
Pattern:
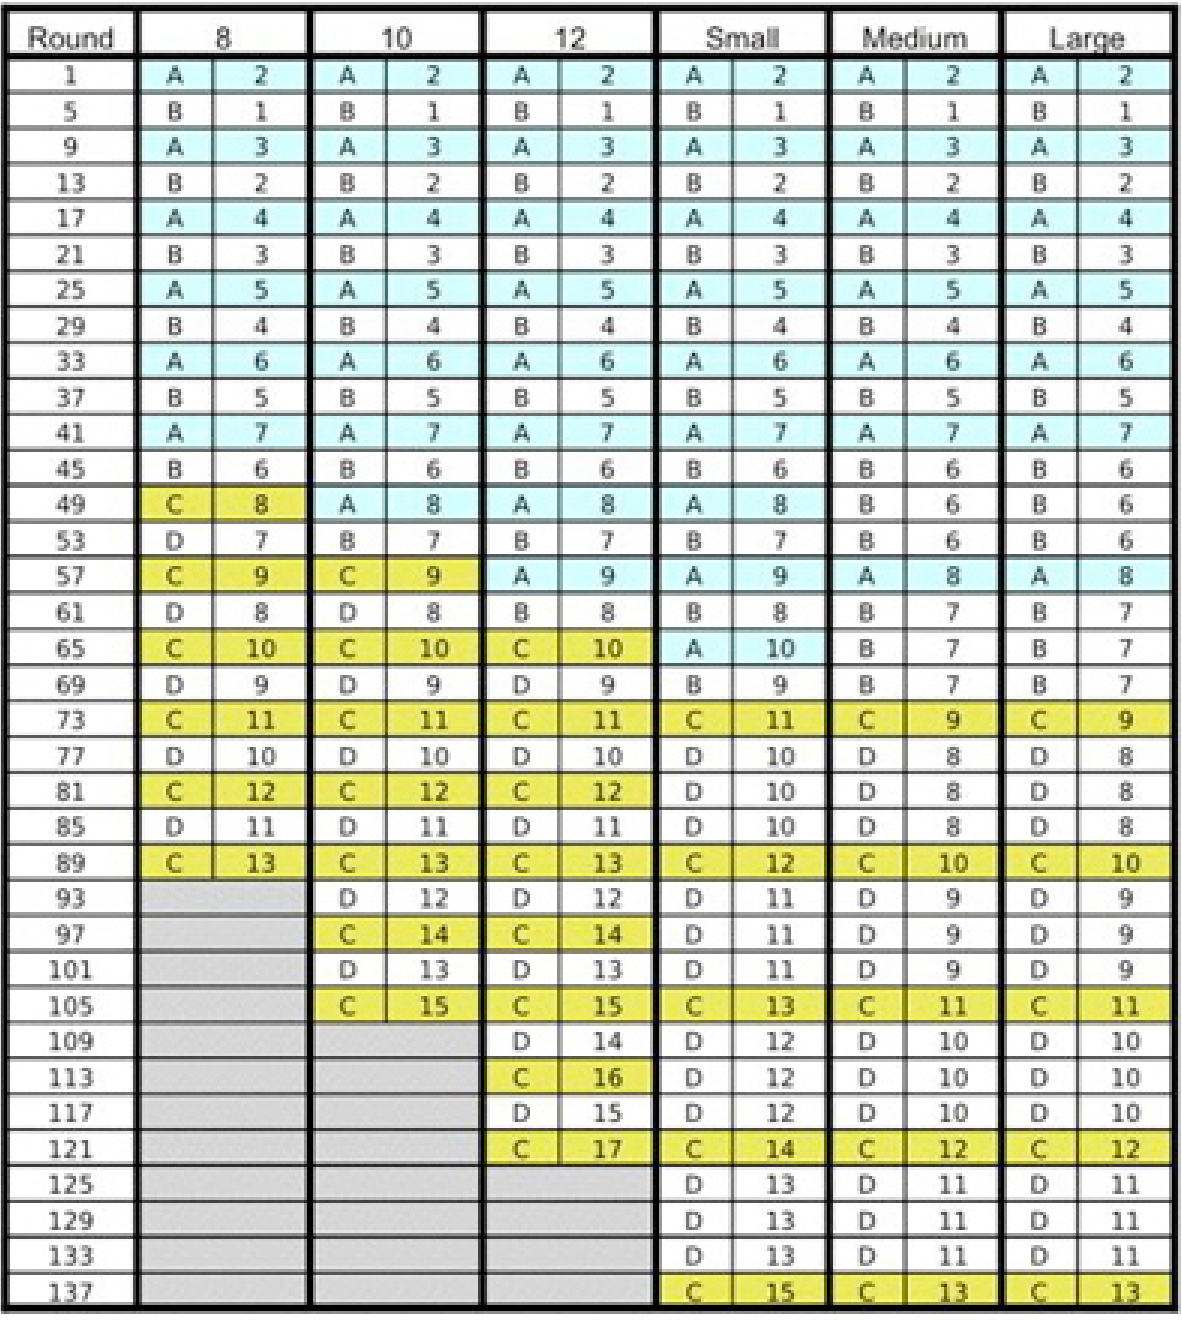
Waistband Cut a piece of waistband elastic 21.5[22.5, 24, 27, 32, 37] inches long. Overlap ends by 0.5 inch, ensuring that elastic is not twisted. Sew ends securely together. Using MC and US #4/3.5mm needle, loosely CO 153[170, 170, 187, 221, 255] sts. Note: It is important to Co loosely; sts will be picked up from the CO edge when the waistband Joining Round is worked. Place marker and join to begin working in the round, being careful not to twist. Use a marker that is different from the others, to indicate beginning of round. P 10 rounds. Hold ring of elastic against Ws of work, just below sts on needle. Fold work in half to WS around elastic, so that CO edge is directly behind sts on needle. Join casing as follows: Joining Round: \*Insert tip of left needle into first CO st, k2tog (st from needle worked together with CO st); repeat from \* to end of round. Note: As you approach the end of the Joining Round, it may appear that there is excess elastic. This is because the needle is shorter than the length of the waistband; with a little bit of feeding and stretching, the elastic will fit. Skirt Set-up Round: Using US #5/3.75mm needle, [k17, place marker] to end. Including end-of-round marker, 9[10, 10, 11, i3, 15] markers in place. Break MC and join CC1. From this point, begin working from the chart, following the Stripe Pattern. All rounds not listed in the chart should be knit. The left-hand column of the chart gives the number of the round being worked. In the column for the size you are working, the letter at left indicates which Pattern Round should be worked on that round, and the number at right gives the value for N in the Pattern Round directions. Pattern Round A: \*[K1, M1L] 3 times, kN, [k2tog] 4 times, kN, [M1R, k1] twice, M1R; repeat from \* to end. Pattern Round B: \*[K1, M1L] 3 times, kN, [k2tog] 6 times, kN, [M1R, k1] twice, M1R; repeat from \* to end. Pattern Round C: \*[K1, yo] 3 times, kN, [k2tog] 4 times, kN, [yo, k1] twice, yo; repeat from \* to end. Pattern Round D: \*[K1, yo] 3 times, kN, [k2tog] 6 times, kN, [yo, k1] twice, yo; repeat from \* to end. For example, Round 1 is the same for all sizes: work Pattern Round $\mathsf{A},$ using 2 as the value for N. So, for Round 1, the directions would read: \*[K1, M1L] 3 times, k2, [k2tog] 4 times, k2, [M1R, k1] twice, M1R; repeat from \* to end. Every fourth round is listed in the chart. These are the rounds in which the scallop pattern is shaped. They are also the rounds in which the colors in the Stripe Pattern are changed. Pattern Rounds A and C are increase rounds. To make the chart easier to read, these rounds are highlighted. When all rounds of the chart have been worked, you will have just started a stripe using CC3. Complete this 4-round stripe and break CC3. There are 369[450, 490, 495, 533, 615] sts: 41[45, 49, 45, 41, 41] sts between each pair of markers. Continue as follows, using MC: Work Round D; value of N is 12[14, 16, 14, 12, 12]. P 1 round. K 1 round. P 1 round. Work Round D as above. P 1 round. K 1 round. BO all sts purlwise.
Finishing:
Weave in ends. Machine-wash skirt using mild detergent and warm water. Lay skirt flat, stretching and molding to shape; pay particular attention to scalloped edge. Allow skirt to dry thoroughly. If desired, work 2 crochet chains approx. 4 inches in length. Form chains into loops and sew to inside of waistband, to use as hanging loops.
Contact
I am available to answer any questions with regards to this pattern. Please email any queries to gudruncjohnston@yahoo.com
Child Sizes $^{2,}$ 4 and 6 for Hip in Hemp Skirt
Finished Measurements:
Length: approx 12 [13.5,15] inches Waist: to fit waist 20 [21,22]
Materials:
\* Elsebeth Lavold Hempathy $[34\%$ Hemp, $41\%$ Cotton, $25\%$ Modal; 153 yd/140m per 50g skein] Colors are given for Child[Adult]. [MC] #02[09]; 1,[2,2] skeins [CC 1] #015[016]; 1[1,1] skeins \*[CC 2] #017[06]; 1[1,1] skeins \*[CC 3] #010[04]; 1[1,1] skeins Note: If working the skirt in a solid color, you will need 3 [4,4] 18[19,20] inches waistband elastic, 0.5 inch wide \* 8[ 8,9] markers \* All other materials as for pattern above
Stripe Pattern (for sizes 2and 4 only):
Work 3 rounds in CC1. Work 3 rounds in CC2. Work 3 rounds in CC3. Work 3 rounds in MC. Repeat these 12 rounds for Stripe Pattern. Changes to make to Table/chart (for sizes 2 and 4 only) In the table part the column with the rounds numbered will need to be changed as for these two smallest sizes only 2 rnds of knitting is done between each scallop shaping round (as opposed to 3). So the column showing the rounds should read from top 1,4,7,10,13,16,19,22,25,28,31,34,37,40,43,46,49,52,55,58,61 (this will be last round of table for size 2) 64,67,70,73 (this will be the last round of table for size 4) For size 6 follow table/chart for size 8 (after initial set up round) but stop at rnd 81.
Pattern:
Waistband
Cut a piece of waistband elastic 18 [19,20] inches long. Overlap ends by 0.5 inch, ensuring that elastic is not twisted. Sew ends securely together. Using MC and US #4/3.5mm needle, lo0sely CO 130 [136,143] Set-up Round: Using US #5/3.75mm needle Size 2: increase 6 stitches evenly around and at the same time place a marker every 17 stitches Size 4: [k17, place marker] to end. Size 6: increase 10 stitches evenly around and at the same time place a marker every 17 stitches Including end-of-round marker, 8[8,9] markers in place. (You should be able to continue following the pattern as above at this point except that for sizes 2and 4 only you will need to remember to work only 2 rnds between each scallop shaping pattern. The reason for this is that with the wee sizes the skirt needs slightly more frequent increasing for good drape). When all rounds of the chart have been worked, you will have just started a stripe using CC3. Complete this 3 [3,4]-round stripe and break CC3. There are 312[ 344, 351]sts: 39[43, 39] sts between each pair of markers. Continue as follows, using MC: Work Round D; value of N is 11[ 13,11]. P 1 round. K 1 round. P 1 round. Work Round D as above. P 1 round. K 1 round. BO all sts purlwise.