Solid Socks Mystery KaL June/July 2013
Yarn: Fingering Weight (lused Blue Moon Fiber Arts Socks that Rock) 100g - 360 yards Needles: US 1.5 (2.5mm) Notions: 2 stitch markers Gauge: 8 spi / 11 rpi Sizing: 56(64, 72) stitches = Women's Small (Med/Large)
A note about needles: You can use DPNs or circulars. If you are using DPNs please keep in mind they should be long enough to fit 42-54 stitches (using a set of 5 needles). Magic Loopers - you might consider using a length up from what you normally use. 1 magic loop on a 32" and was able to use it, but I should have used a 40" for comfort. You crazy 2- at-a-time knitters - you're going to have a lot of stitches to start out. If I were you, I'd start each sock separately and when you're done clue 1, you can put the pair together and go to town. 2 circ users - you should be fine if you use at least a 24" length for each needle. A note about the cast-on: It has to be a cast-on that will yield a loose edge. We aren't looking for a stretchy or rigid cast-on. We're looking for flop. You'll hate me while you're knitting that first row, but trust me, it's worth using the recommended cast-on. If you are unsure how to do this cast-on, a video can be found here: http:/ /www.youtube.com/watch?v=4PdY-Jw-xWo
Clue 1: The Cuff
Using the e-loop (aka thumb method) cast-on, cast on 168 (192, 216) stitches. DO NOT JOIN YET Row 1: Knit Row 2: Purl At end of row 2, it is time to start working in the round. Rounds 3 -10: Purl Round 11: \*p3tog - repeat from \* to end of round. 56(64, 72) remain Round 12: Purl Designer's note: If you are working in a variegated or striping yarn, you may not be able to see the diamond brocade pattern. This section could be worked in plain stockinette instead in order to let your yarn be the star ofthesesocks!
Clue 2: The Leg
Round 1: \*p4, k1, p3\* repeat from \* to end of round Round 2: \*p3, k1, p1, k1, p2\* repeat from \* to end of round Round 3: \*p2, k1, p3, k1, p1\* repeat from \* to end of round Round 4: \*p1, k1, p5, k1\* repeat from \* to end of round Round 5: \*k1, p7\* repeat from \* to end of round Round 6: Repeat round 4 Round 7: Repeat round 3 Round 8: Repeat round 2 Repeat these 8 rows 3 times, or until leg is approximately 2 inches long, measuring from first row of diamond brocade pattern. Proceed to ribbing. Ribbing: \*K1 P1\* repeat to end of round.
the ribbing is slightly shorter in length than the diamond brocade portion of the le
Clue 3: The Heel
Row 1: \*sl1, k1; repeat from \* over 28(32,36) stitches. Turn. (The remaining stitches are your instep stitches and will remain unworked for now.) Row 2: sl1, p27 (31,35) turn. Repeat the last 2 rows 13 (15,17) more times. \*Designer's note: The heel should be approximately 2” (give or take a %" depending on the size you're making) - we want a shorter heel flap to help the cuff sit lower on the foot in classic Bobbi Socks style. If you are uncomfortable with the height of the heel flap and wish to lengthen it, go for it. Any extra stitches needing to be decreased away will be taken care of by the double gusset decreases.
Turn heel:
Row 1: sl1, k 15 (19,23) ssk, k1, turn. Row 2: sl1, p5 (9,13) p2tog, p1, turn. Row 3: sl1, knit within 1 st of the gap, ssk, k1, turn. Row 4: sl1, purl to within one st of the gap, p2tog, p1, turn. Repeat rows 3 and 4 until all heel sts are worked. 20(24,28) heel stitches
Gusset:
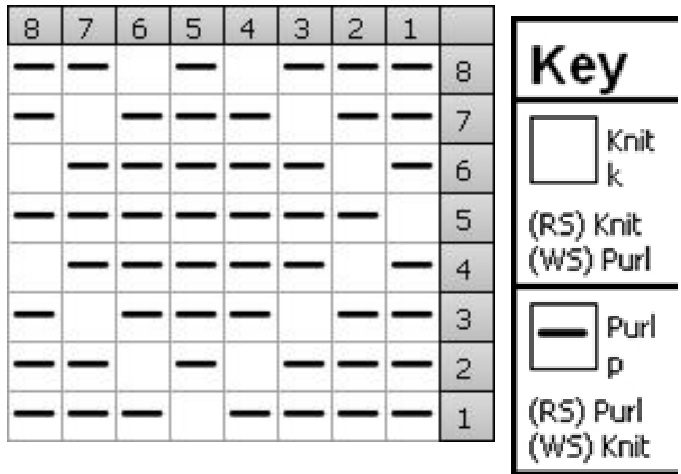
Place a marker (PM), pick up 14(16,18) stitches along side of heel flap (more if needed), PM and work across instep stitches in pattern according to foot chart, M1, PM, pick up 14(16,18) stitches along side of heel flap (more if needed) PM. The 3rd marker placed is the new beginning of the round. Instep stitch count: 29, 33, 37 Note: You may adjust your needles accordingly here depending on the style in which you are knitting (DPNs, Magic Loop, 2 circulars). The markers along either side of the heel (1st and 4th markers placed) will mark where your gusset decreases go. The markers on either side of the instep (2nd and 3ra markers placed) are just a signal for your brain to stop and do something different. 1st Gusset Decreases: Set-Up Round: Knit 1 round, knitting the picked up stitches along the heel flap through the back loops, and working the instep stitches in pattern. Decrease round: K to first heel marker, slip marker (SM), SSK, K to 2 stitches before marker, K2tog, SM, K to next marker, SM, work in pattern across instep. Plain Round: Work 1 round in pattern (instep stitches in diamond brocade pattern, all other stitches knit). Repeat these 2 rounds until there are only 4 stitches remaining between heel markers. 2nd Gusset Decreases: Excluding instep stitches, count remaining stitches. Move the gusset markers such that there are 12(14,16) stitches between each marker and the instep stitches. The stitches between the gusset markers represent the remaining stitches needing to be decreased away, minus 4. You want to decrease you sole stitches back down to 28(32,36) stitches. Continue the decreases as outlined above until you have 28(32,36) sole stitches. this, please visit: http://turtlegirl76.com/2011/11/07/tutorial-double-gusset-hee For Size Small - repeat is between red lines. For Size Medium - repeat is between blue lines For Size Large - repeat is entire chart.
| 37 | 36 | 35 | 34 | 33 | 32 | 31 | 30 | 29 | 28 27 | 26 | 25 | 24 | 23 | 22 | 21 | 20 | 19 | 18 | 17 | 16 15 | 14 | 13 | 12 | 11 | 10 9 | 8 | 7 | 6 | 5 | 4 | 3 | 2 1 | |||
| 一 | 8 | ||||||||||||||||||||||||||||||||||
| 一 | 一 | 一 | 一 | 一 | 一 | 7 | |||||||||||||||||||||||||||||
| 一 | 一 | 一 | 一 | 一 | 一 | 一 | 一 | 6 | |||||||||||||||||||||||||||
| 一 | 一 | 一 | 一 | 5 | |||||||||||||||||||||||||||||||
| 一 | 一 | 一 | 一 | 一 | 一 | 4 | |||||||||||||||||||||||||||||
| 一 | 一 | 一 | 一 | 一 | 一 | 3 | |||||||||||||||||||||||||||||
| 一 | 一 | 一 | 一 | 一 | 一 | 2 | |||||||||||||||||||||||||||||
| 1 |
(instep according to foot chart, sole stitches in stockinette) until 2" from tip of to.


