Lorelei Dress
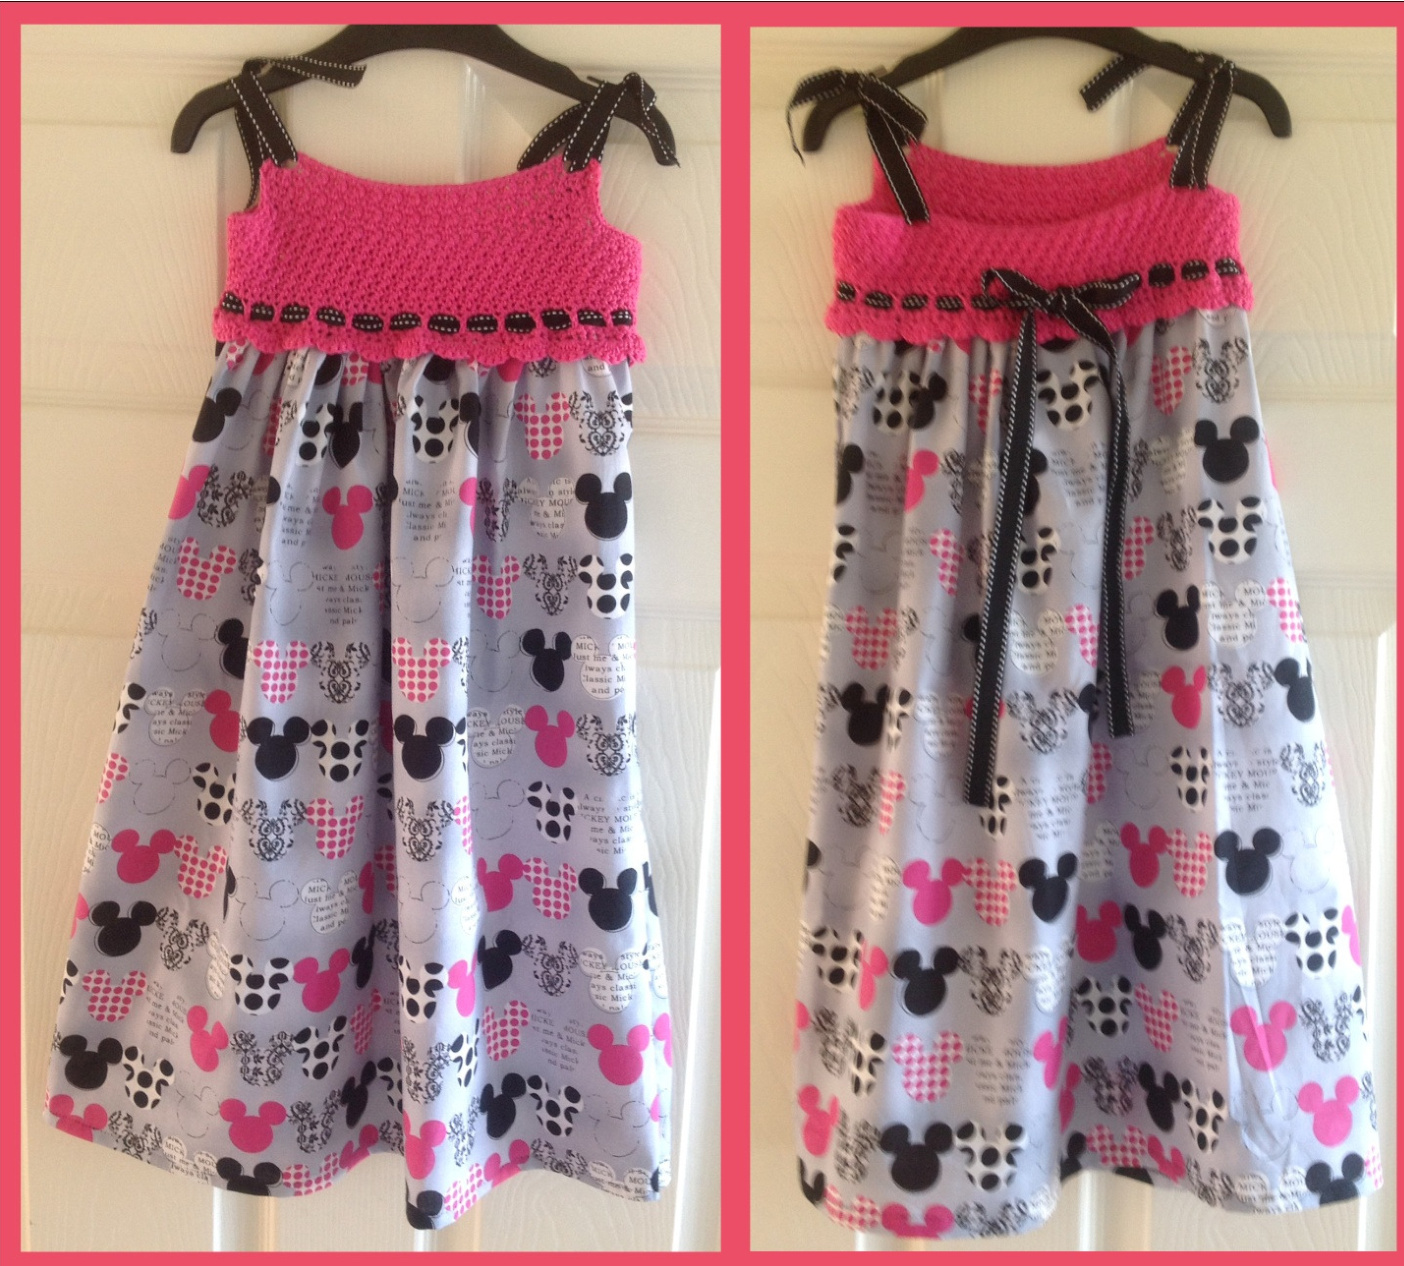
My youngest daughter, Lorelei was desperate for a new dress made with Mickey Mouse fabric. She didn't like anything that I could find online, however I remembered about this fabric that I had bought a couple of years ago simply because it was pretty and hadn't found a use for. After I dug it out from the darkest depths of one of my many boxes of stashed fabric I discovered there was not quite enough to make a full dress, so I had to come up with something else. I had seen a few dresses with crocheted bodices but I wasn't keen on the rather open stitch of the patterns, especially since she isn't one to wear t-shirts under dresses. Figuring it couldn't be that hard I had a go and this was the result. I chose to make the straps as ties to allow the dress to grow with her. She is going through a massive growth spurt at the moment so adding straps that can tie just means it will last that little bit longer. I also added the ribbon to the middle for the same reason. I made the dress an inch too big. The ribbon around the middle, apart from looking pretty lets me tighten it a bit so it will last a bit longer This dress is approximately a size 2-3 but the pattern is written in such a way that you will simply take your own measurements and work to those. I have used DK cotton for the bodice and a 3.5mm crochet hook. I wanted the fabric to have quite a tight weave when made up, gauge is not essential as you will be working to measurements so use whatever hook and yarn gives you the look you want. The skirt is quilting weight fabric but a dress weight fabric will alsowork. The sewing in this dress is simple. Depending on the size you make you may need to join a couple of panels but it is all straight seams. I hand stitched everything so a sewing machine really isn't necessary but it will be significantly quicker!
You Will Need:
·Atape measure · Pen and paper to make a note of your measurements Stitch markers · Fabric for the skirt, dress or quilting weight will work best, light weight or heavy weight fabrics might look odd and the latter will be hard to sew in · Co-ordinating yarn of your choice. I recommend cotton for the summer but anything will work Scissors Sewing needle and cotton to match your fabric. I sewed all this by hand, a sewing machine would make this a LOT quicker. · Thread to match your ribbon · Darning needle · Crochet Hook Ribbon. how much will depend on the size but as a guestimate i used twice my chest around measurement for the piece around the chest, then about 8 inches for each side of each strap (32" total) What to do.
PATTERN IS WRITTEN IN US TERMS
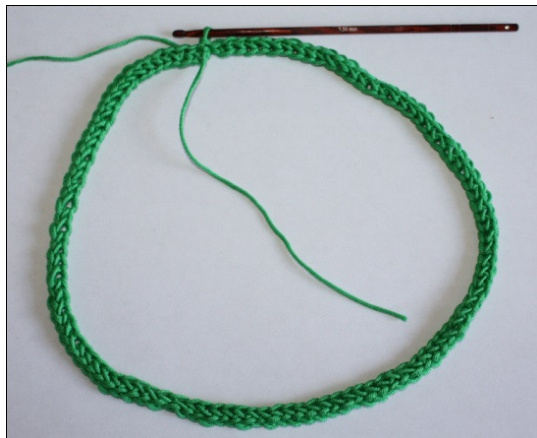
Right first thing you need is some measurements. CHEST AROUND- Measure the chest all the way around add about an inch to allow growing room. My wee girl is 3 and a half but she is TINY and barely in an age 2-3 clothing. Her chest measurement was 19 inches with her puffing out and standing bolt upright. I actually made the bodice 20 inches wide to allow growingroom. UNDERARM TO CHEST- The measurement from under the arm to where you want the bottom of the bodice to sit. This doesn't include the shell border that is there to hide the join of the skirt to the bodice. In my Little Miss that was 3 inches. CHEST WIDTH- this is basically the width of the neckline you want. I measured arm pit to arm pit and took a bit off giving me a measurement of about 7 inches. The straps will sit just slightly inside this measurement. CHEST HEIGHT ABOVE UNDERARM- Basically how much higher you want the chest to come up above under the arm. Mine was about an inch. For the bodice. You will work the bodice from the bottom up in joint rounds. 1. Fsc to your chest around measurement (including growing room) needs to be a multiple of 4. If you can't Fsc then you need to chain to your chest around measurement then ch 1, turn, sc in same st, sc across. My chain was 20". Sl st to 1st sc in chain to create a loop. Take care not to twist the chain. (appendix shows you how to Fsc in pictures, but there are a lot of good videos on youtube that explain it far better than I do.) You my make items from my patterns for sale, but please credit the pattern to me if you do so.
2. Ch1. Sc in same st, sc around. Join with sl st to 1st sc in round. 3.Ch3. Sk st, dc in next st, \*ch1, sk st, dc in next st\*. Rpt \* to \* around. Ch1 join with sl st to 2nd ch in start chain.
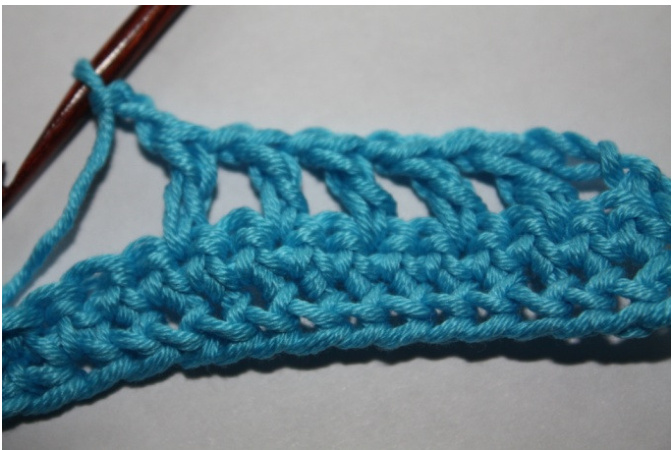
4.Ch1. Sc in same st.\* Scin ch1 sp, sc in dc\*. Rpt \* to \* around. Sc in last Ch1 sp. Slst to 1st sc in round.
5. Ch1. Sc in same stitch, \*dc in next st, sc in next stitch\*. Repeat \* to \* around. Dc in last st. Slt to 1st sc in round.8
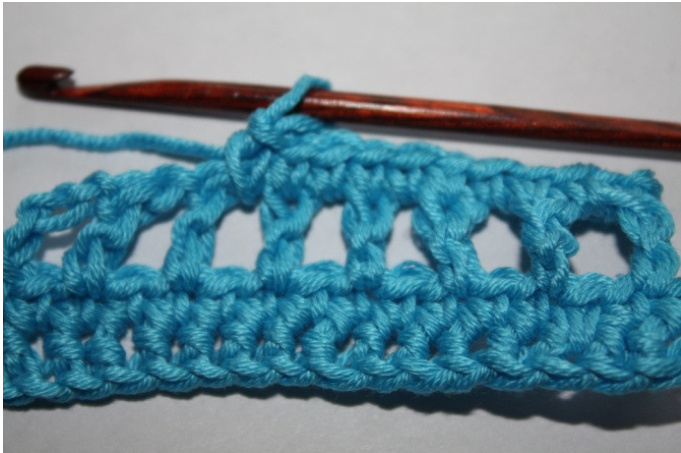
6. Ch2. \*Sc in dc, dc in sc\*. Rpt \* to \* sc in last dc. Join with sl st to top of st chain.
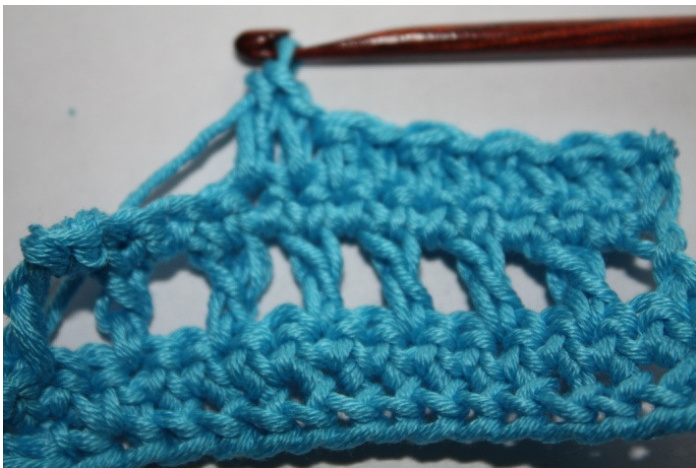
7. Ch 1, sc in same st. \*dc in sc, sc in dc\*. Repeat \* to \* around. Dc in last sc. Join with sl st to 1st sc in round. You get a really interesting texture by doing this:
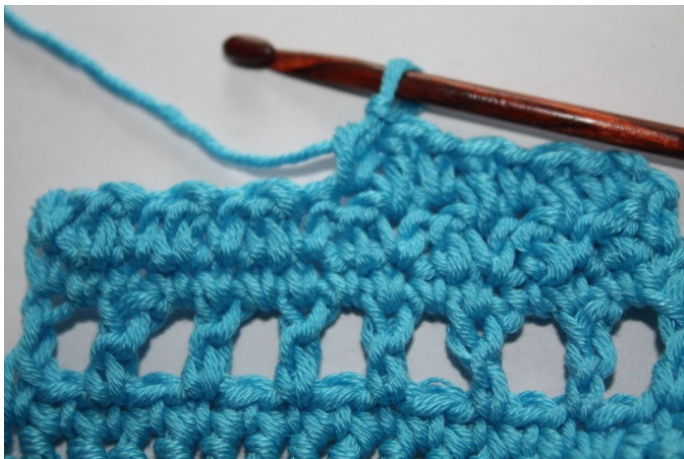
Page 5 of 13 Repeat rows 6 and 7 until the fabric measures the same as your UNDERARM TO CHEST measurement Right now you need to do a bit of simple maths. Take you work and lay it flat (it will be in half because it's a tube) and measure the length. In my case that was about 10 inches. From this measurement you need to minus the CHEST WIDTH measurement. Divide the answer by 2. So for me that was 10 inches - 7 inches = 3 inches. Divided by 2, that is 1.5inches. Measure in from each side the answer you get (1.5 inches) and mark the closest stitch...you can make sure you have a equal number of stitches on each side if you want I didn't I was close enough. 8. Sl st over to the stitch marker, then work the pattern (sc over dc, dc over sc) over to the next marked stitch. 9. Ch and turn as per pattern and work across. Repeat rows 8 and 9 until the fabric is 2 rows short of the CHEST HEIGHT ABOVE UNDERARM measurement. In the next 2 rows you will create the ch2 spaces needed to hold the straps. 10. Ch1. sc in same st, sc in next stitch, ch2 sk 2 stitches, sc in next st. then continue the pattern across until you have 5 stitches remaining. sc in 5th stitch from end, ch 2, sc in next 2 stitches. 11. Ch 1. sc around the entire edge. Pop 2 sc in to each of the ch 2 spaces. You will need to create 2 more ch 2 spaces in this row as well. if you lie the piece flat then just create the ch 2 spaced on the back of the work opposite the ch 2 spaces on the front. Join and tie off Now to create the shell bottom. 12. Join the yarn to the bottom edge of the work. Ch 3, 4dc in same stitch. sk st. sc in next stitch, sk stitch, \*5 dc in next stitch , sk st, sc in next st\*. Repeat \*to\* around. Join, tie off and weave in all ends.
For the skirt.
The fabric need to be cut so the width is twice your CHEST AROUND measurement plus an inch. The height you want it to drop to plus about an inch. This should be measures from the foundation chain on the bodice not from the shell border. It is worth cutting it a litle longer and leaving the hem unmade until you have sewn the skirt on then you can measure it and pin it exactly where you want it then just sew it up. If you are doing this for an older child you may need to do this as 2 separate panels each one the same width as the chest measurement plus an inch. Hem the top edge and the 2 side edges using a % inch double fold hem (you can hem the bottom but as I said it is worth doing this after attaching so you get the exact length you want), on both panels if you are using 2. Fold the fabric right side to right side (on place the 2 panels right side to right side and sew up inside the hem to create a tube. Press the seam(s) open.
sing a doubled piece of cotton run a very loose running stitch around the top hem of the skirt

Page 7 of 13 Use this to gather the skirt. (the skirt still needs to be inside out for this).
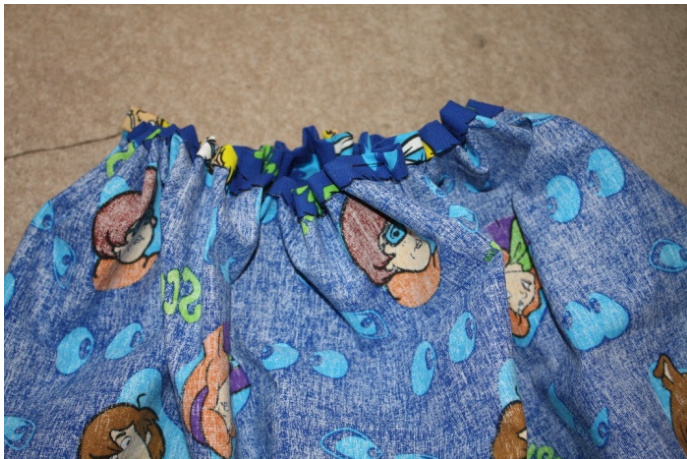
Take your bodice and turn it inside out. Put the bodice inside the gathered edge of the skirt, with the seam(s) lined up to the sides of the bodice. So the top edge of the skirt lines up rough with the 2 lines of sc between row 3 and the shell border. You will need to play a bit with the gathering and rearrange the gathering a bit as you go. I found it useful to tack the seam to one side and the middle point (in a bigger skirt the 2 seams) to the other side so I had an equal amount of gather on each side.
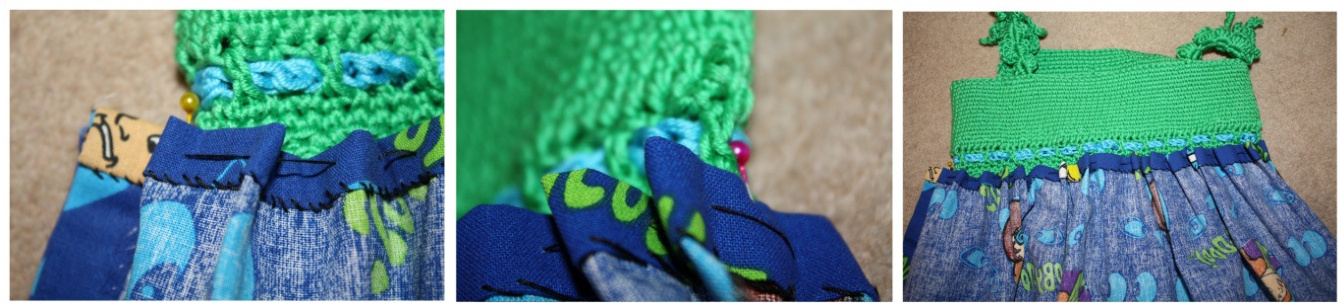
Using the yarn you used to make the bodice whip stitch the skirt in place... this is where using a cotton for the bodice came in to its own because I was able to separate out 2 strands of the cotton to make it easier to run through the gathered fabric.

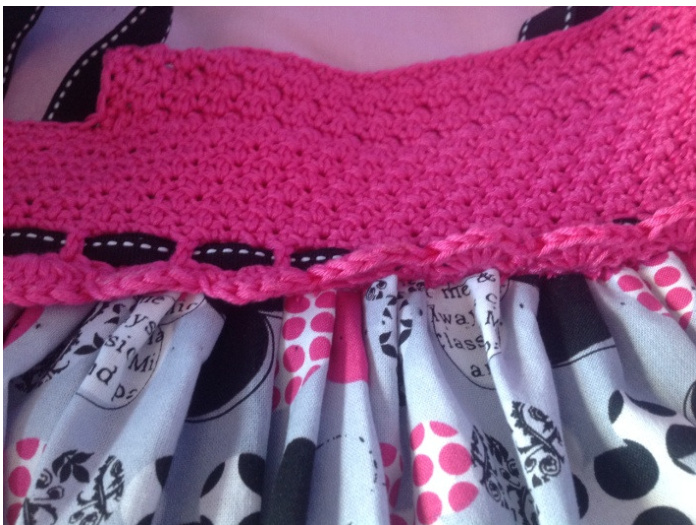
Once the skirt is firmly secured cut out the piece of cotton you used to gather the skirt. This Picture shows the way the skirt looks attached from the front, the shell border hides a multitude of sins!
Attach the straps. Cut 4 straps from the ribbon. Mine were about 7 or 8 inches. You want enough to go over the shoulder and allow you to tie it up, plus a little extra. Don't forget to seal the edges of the ribbon against fraying. Passing the end through a flame usually works. Thread the ribbon in to the ch2 space, then sew the edge back on to the other side of the ribbon using matching thread.

Thread the remaining ribbon through the spaces created in row 3. Cut to desired length. Seal ends of ribbon.
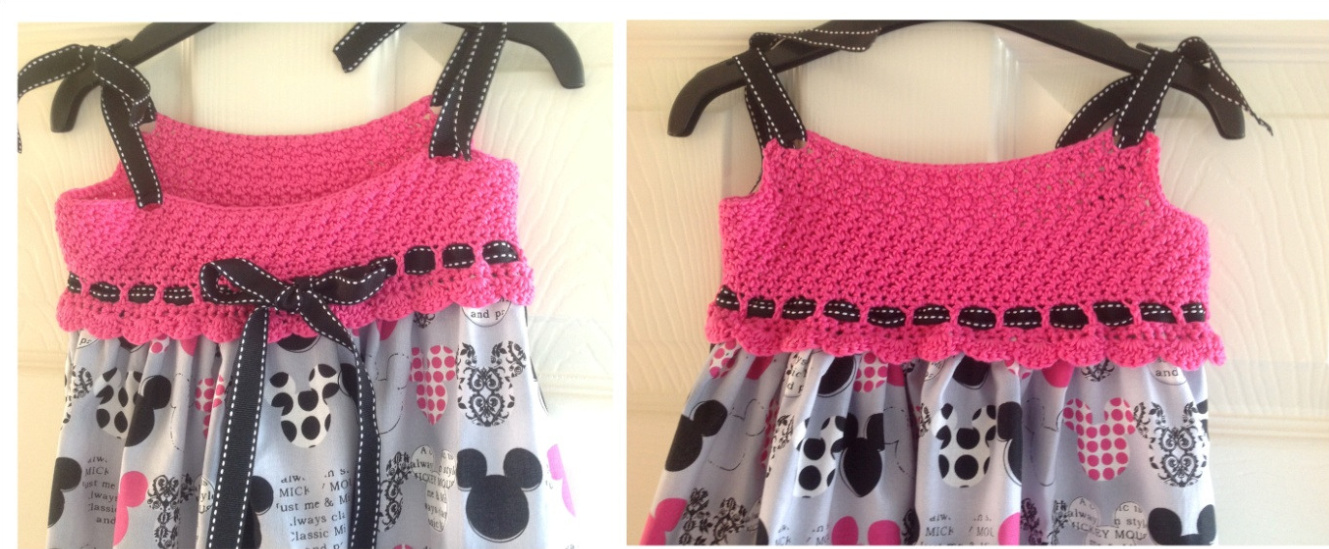
Hem the bottom edge to desired length. Turn right side out. That's it. You are done!
Appendix
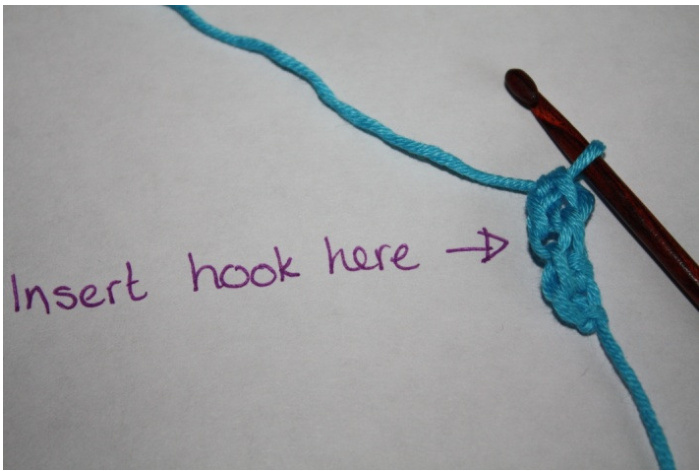
Ok here is a step by step on how to Fsc. This means Foundation Single Crochet. Basically you will create a foundation chain and a row of single crochet at the same time. I thoroughly recommend finding a tutorial on youtube and watching it in action. Makes more sense then. 1.Ch2.
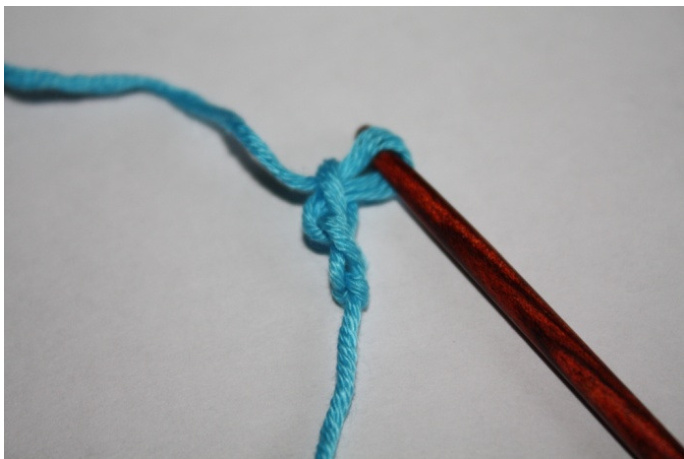
Thats the easy part to explain. 2. Insert hook in to second chain from hook (1st chain) YOH, pull through chain. 2 loops on hook.
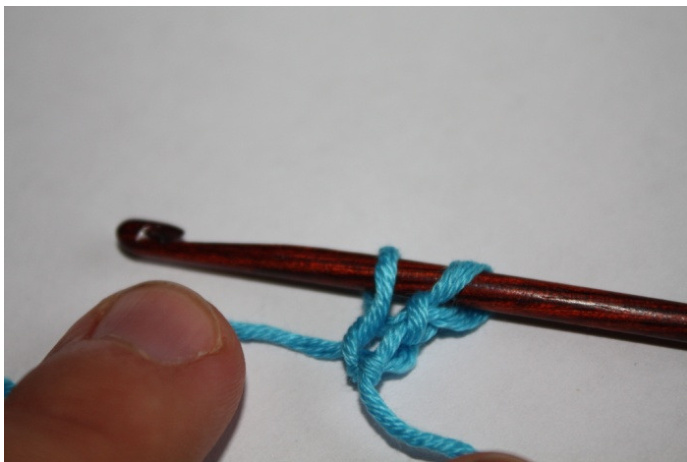
YOH, pull through 1 loop on hook. 2 loops on hook. (This creates the chain part of the stitch)
YOH, pull through both loops on hook. 1 loop on hook. (this creates the sc part of the stitch)
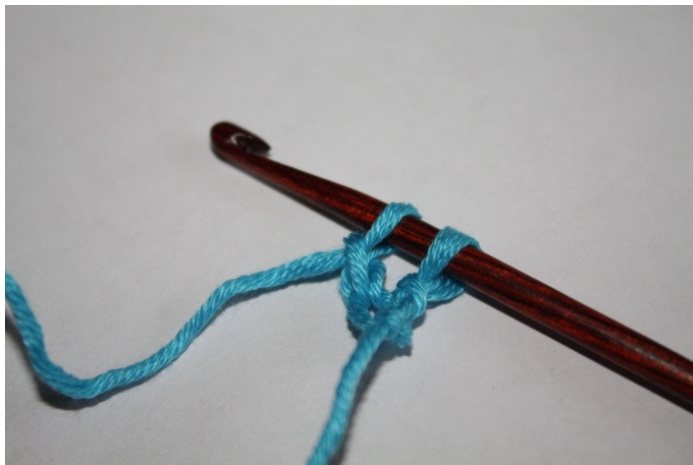
5. Insert the hook in to the chain stitch created in step 3.

6. Repeat steps 3 & 4 (YOH, pull through one loop. YOH pull through 2 loops) 7. Insert hook in to the chain stitch created on this stitch
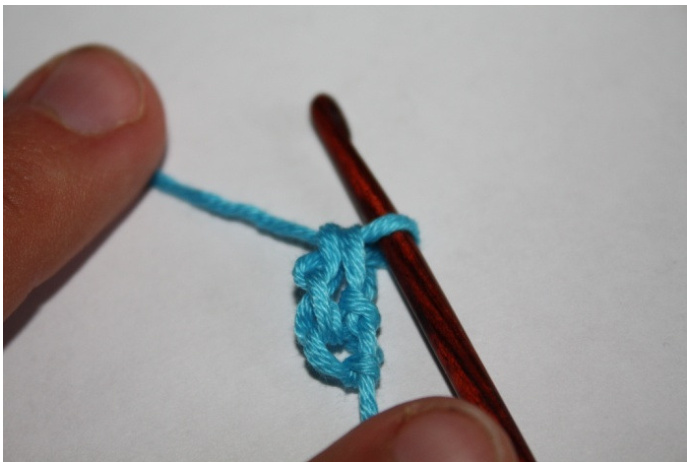
Keep inserting the hook in to the previous chain stitch at the bottom of the previous stitch. The same process can be applied to hdc and dc. For fhdc- Ch2, \*YOH, insert hook in to 2nd chain from hook, YOH, pull through chain. (3 loops on hook) YOH, pull through 1 loop (this creates the chain part of the stitch). YOH, pull through all loops on hook to create hdc part of stitch. Insert Hook in to chain created in previous stitch\*. Repeat \* to \*. For fdc- Ch3, \*YOH, insert hook in to 2nd chain from hook, YOH, pull through chain (3 loops on hook). YOH, pull through 1 loop (this creates the chain part of the stitch). YOH, pull through 2 loops on hook, YOH, pull through 2 loops on hook, to complete the dc part of the stitch\*. Repeat \* to \*.


