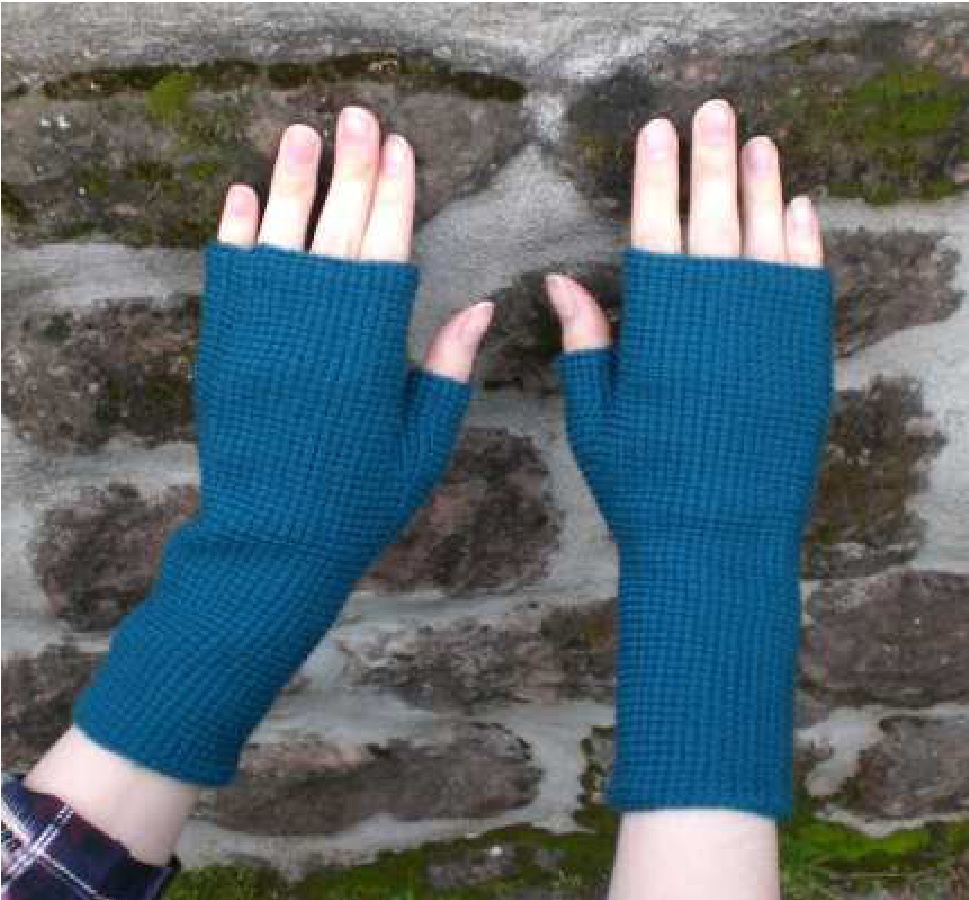
Kylie - fingerless mitts
by Stefanie Bold
sizes
hand circumference above thumb: 16,5 - 17,5 - 18,25 - 19 - 20 - 21 cm [6.5 - 6.875 - 7.125 - 7.5 - 7.875 - 8.25 inch] finished circumference of mitt is equivalent to hand circumference finished length: 24,5 - 24,5 - 25,5 - 25,5 - 26,5 - 26,5 cm [9.625 - 9.625 - 10 - 10 - 10.5 - 10.5 inch] with 10cm [4 inch] of cuff
material
wool yarn in fingering weight up to light sport weight, 150-210 Meter/50g, for example Lang Yarns ,Merino 150" (100% Merino) yardage: 185 - 195- 210 - 220 - 235 -245 meter tunisian crochet hook 3 - 4mm (as needed to obtain gauge) a lockable stitch marker (or something similar to secure a stitch) tapestryneedle
gauge
10cm [4 inch] = 28 stitches and 24 rows in tunisian simple stitch
how these fingerless mitts are worked
These mitts are worked sideways. Each row starts at the end where the fingers are and is worked towards the elbow. Each mitt is started at the outer edge of the hand. Half of the mitt is worked, then the thumb is added in short rows. You need to cast on new stitches for the short "thumb" which is done with a new strand of yarn. With the old strand, the second half is worked. Finally the cast-on and bind-off edge are sewn together to close the mitt. Also the seam on the thumb part is closed.
abbreviations and notes
These mitts are worked entirely in tunisian simple stitch. Each row consists of a forward pass and a back pass. To shorten the instructions itself and to prevent misunderstandings, I'd like to state some abbreviations and give some notes on the special character of tunisian crochet. "pick up a stitch" on the forward pass means to insert the hook under the front vertical bar, yarn over, and then pull that yarn over through the bar. Now you have one loop more on your hook. Each back pass begins with a chain stitch. This chain stich will always be mentioned in the "slip stitch" is worked on the last row to finish your work. Insert hook as usual, yarn over, pull yarn over through the vertical bar AND through the last loop on your hook. On the end of a forward pass, you are working an "edge stitch". Therefore you insert the hook into the vertical bar AND into the first loop that you can see on the back of your work. Yarn over and pull this yarn over through two loops on your hook. The edge stitch is mentioned in the instructions as you are not going to work these on short rows. To work these, you simply do not pick up all of the stitches in one row. This results in "stair steps" in your fabric. If you are then working a longer row, you are picking up stitches from the short row. Then you follow these "stairs" and pick up stitches on the row below. The nice thing about tunisian short rows is that you do not need to wrap stitches and you do not get holes! A characteristic about tunisian crochet fabric is rolling in the direction you are working. As these mitts are worked sideways, you do not need to work any cuff. Once the mitts are sewn up, they will no longer roll! Another characteristic shows when counting stitches. When a forward pass is finished, you will always have one loop more on your hook than you picked up stitches. This is due to that one loop that is left when you have bound off all stitches in a back pass. Note: this loop does not count as astitch.
instructions
note: for the thumb you need a second yarn tail. If you have just one ball of yarn, wind it into a ball where you have access to both ends.
first hand part
Make a slip knot and chain 60 - 60 - 62 - 62 - 64 - 64. Row 1: starting with the second loop after your hook, pick up 59 - 59 - 61 - 61 - 63 - 63 stitches; as you are working into the chains, remember to pick up just the upper loop and not both loops as in "normal" crochet. Chain 1 and bind off until only one loop is left. Ravelry-Name: stebo079 Row 2: pick up 58 - 58 - 60 - 60 - 62 - 62 stitches and work an edge stitch. Chain 1 and bind off until only one loop is left. Repeat row 2 17 - 18 - 19 - 20 - 21 - 22 times more. Remove hook from loop. Secure this loop with a locking stitch marker.
thumb gusset - part one
Using a second yarn end (or the other tail of your ball) and leaving a tail that is long enough to sew up across the thumb, make a slip knot and chain 6 - 6 - 7 - 7 - 8 - 8. Row 1: Starting with the second loop from your hook, pick up 5 - 5 - 6 - 6 - 7 - 7 stitches. On your previously worked fabric, leave the first 16 - 16 - 17 - 17 - 18 - 18 stitches out and pick up another 5 - 5 - 4 - 4 - 5 - 5 stitches. You now have 11 - 11 - 11 - 11 - 13 - 13 loops on your hook. Chain one and bind off until one loop is left. only for the sizes 6,5 - 17,5 - 18,25 - 19: Row 2: pick up 12 stitches. Chain one and bind off until one loop is left on the hook. for all sizes: Row 3: pick up 14 stitches. Chain one and bind off until one loop is left on the hook. Row 4: pick up 16 stitches. Chain one and bind off until one loop is left on the hook. Row 5: pick up 18 stitches. Chain one and bind off until one loop is left on the hook. Row 6: pick up 20 stitches. Chain one and bind off until one loop is left on the hook. only for sizes 20 - 21: Row 7: pick up 22 stitches. Chain one and bind off until one loop is left on the hook. Row 8: pick up 24 stitches. Chain one and bind off until one loop is left on the hook.
thumb gusset - middle part
The first part of the gusset is done. Now a middle part is worked before the second part of the gusset. Row 1: pick up 47 - 47 - 49 - 49 - 51 - 51 stitches, work an edge stitch, chain one and bind off until one loop is left on the hook. only for sizes 18,25 - 19: Row 2: pick up 22 stitches. Chain one and bind off until one loop is left on the hook. Row 3: pick up 47 - 47 - 49 - 49 - 51 - 51 stitches, work an edge stitch, chain one and bind off until one loop is left on the hook.
thumb gusset - part two
Jow you are going to work the second part of the thumb gusset in short rows. only for sizes 20 - 21: Row 1: pick up 24 stitches. Chain one and bind off until one loop is left on the hook. Row 2: pick up 22 stitches. Chain one and bind off until one loop is left on the hook. Ravelry-Name: stebo79 for all sizes: Row 3: pick up 20 stitches. Chain one and bind off until one loop is left on the hook. Row 4: pick up 18 stitches. Chain one and bind off until one loop is left on the hook. Row 5: pick up 16 stitches. Chain one and bind off until one loop is left on the hook. Row 6: pick up 14 stitches. Chain one and bind off until one loop is left on the hook. Row 7: pick up 12 stitches. Chain one and bind off until one loop is left on the hook. only for sizes 16,5 - 17,5 - 18,25 - 19: Row 8: pick up 10 stitches. Chain one and bind off until one loop is left on the hook. For all sizes you are going to work a "bridge": Row 9: pick up 5 - 5 - 6 - 6 - 7 - 7 stitches. Chain one and bind off until one loop is left on the hook. Row 10: pick up 4 - 4 - 5 - 5 - 6 - 6 stitches and work an edge stitch. Chain one and bind off until one loop is left on the hook. Now work 5 - 5 - 6 - 6 - 7 - 7 slip stitches. Cut yarn leaving a tail long enough to sew up the thumb seam later. Pull on the loop until the end slips free.
second hand part
Remove the stitch marker and replace the loop onto your hook. First you are going to work a ,bridge" too: Row 1: pick up 16 - 16 - 17 - 17 - 18 - 18 stitches. Chain one and bind off until one loop is left on the hook. Row 2: pick up 15 - 15 - 16 - 16 - 17 - 17 stitches and work an edge stitch. Chain one and bind off until one loop is left on the hook. Continue with full length rows as follows: Row 3: pick up 16 - 16 - 17 - 17 - 18 - 18 stitches. Continue on the thumb gusset after the slip stitches and pick up another 42 - 42 - 43 - 43 - 44 - 44 stitches. Work an edge stitch. Now you have 60 - 60 - 62 - 62 - 64 - 64 loops on your hook. Chain one and bind off until one loop is left on the hook. Row 4: pick up 58 - 58 - 60 - 60 - 62 - 62 stitches and work an edge stitch. Chain one and bind off until one loop is left on the hook. Repeat row 4 17 - 18 - 19 - 20 - 21 - 22 times more. Finally work 59 - 59 - 61 - 61 - 63 - 63 slip stitches. Cut yarn leaving a tail long enough to sew up the edges. Pull on the loop until the ends slips free.
finishing
With the tapestry needle, sew the side seam using mattress stitch, inserting the needle into the vertical loops. This way the seam is nearly invisible. Also sew up the thumb and finally close the "bridge". Weave in ends. please respect my copyright and use this pattern only non-commercially - thanks!


