through the looking-glass
by gustavs This is a universal template of a cap you can apply different patterns to. I normally do caps with a'scallopy' edge; however, you may choose any other solution. The design is not created for a specific yarn weight, so the number of stitches to be cast on will depend solely on your gauge. I strongly advise to knit a twenty-stitch-wide sample and calculate the gauge from it unless you have dealt with the exact yarn-and-needle combination before.
instructions
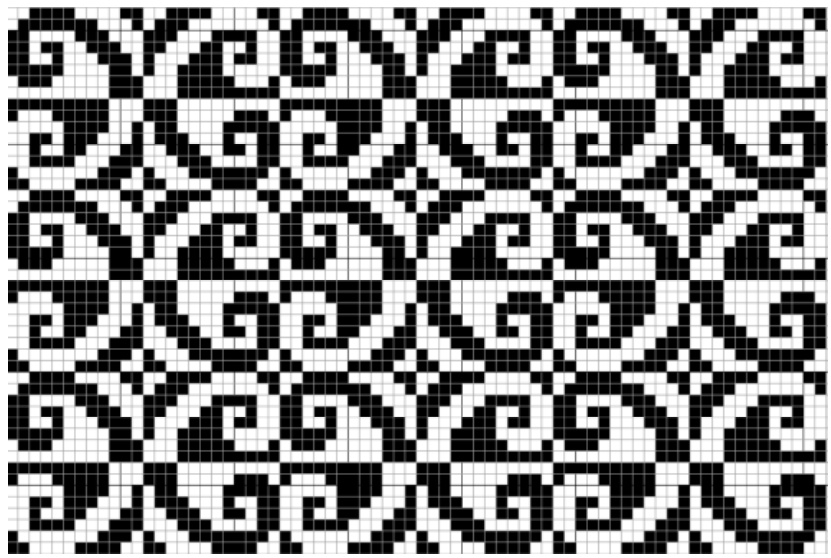
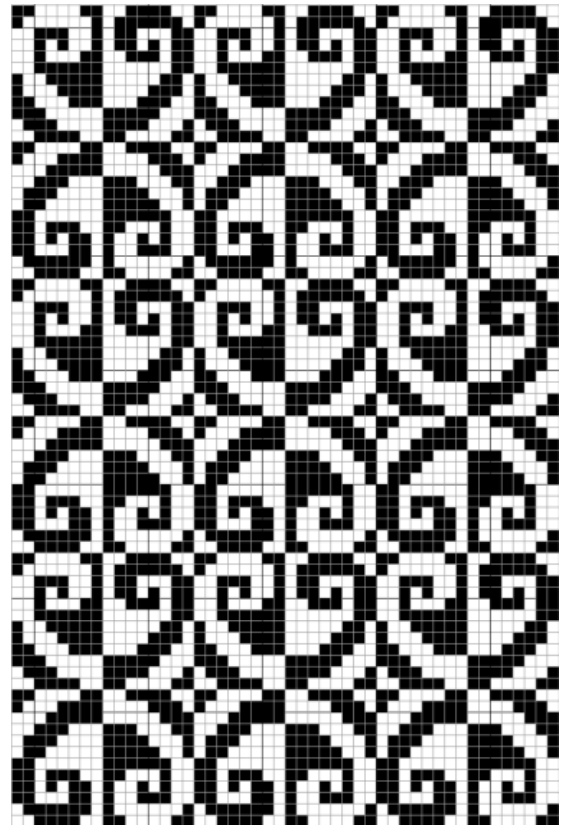
· cast on the necessary number of stitches with either yarn. As the pattern is truly balanced (the number of either colour stitches is the same), there is no distinction between the pattern colour and the background colour. The number of stitches must be a multiple of the pattern width (16 or 24 depending on whether you use the pattern vertically or horizontally). Divide the stitches on four double-pointed needles evenly; · knit about 15 rows in plain stocking stitch: it is going to be the inner brim. You may include a ~ten-row-high pattern there for the recipient's 'private' use, though it is highly optional; · do one row \*k2tog, yo\* (knit two together, yarn over); you will fold the brim inside along this line later; carry on with three rows in plain stocking the same colour and start the pattern in the fourth; · knit the body' of the cap for \~16 cm from the dotted row (l estimate the recipient's head by eye - S, M, L, XL) and adjust the cap to the head rather by depth than by circumference - i.e., if I feel it might be slightly lose, it is probably 15.5 cm, for extra-large heads it may reach 17.5 cm; ● start decreasing: divide all stitches into six equal stretches of an even number of stitches in each one, adding the extra stitches to the first stretches - e.g., if you have cast 16\*8=128 stitches on, it would be 22+22+22+22+20+20. ·knit two stitches together both at the beginning and the end of each stretch (12 decreased stitches in a row) the following way: at the beginning - insert the needle into the two stitches from the right side & pull the thread through; the new stitch slants to the left (in other words: slip one, knit two together, pass the slipped stitch over (sl1, k2tog, psso)); at the end - insert the needle into the two stitches from the left side & pull the thread through; the new stitch slants to the right (k2tog); · when you get to 6 stitches, bind off; · for a better look I knit the second and the last but one stitch in each stretch the colour/yarn used for decreasing (at any time two stitches at either end ofa stretch are the same colour); · pull the loose ends in, if any; · fold the brim inside and sew it up; you can hide the sewing-up thread by placing it vertically inside a knit stitch or between knit stitches on the right side. Stay on the lose side in sewing; · wash, press lightly & dry the cap; heads' made of old newspapers are of good use for that; an extra-large jar will do as well; · good luck & get in touch if any questions arise. explanations 1 cm = .3937 inches stocking stitch = stockinette stitch colour = color ;P pattern used horizontally: 24 stitches\*16 rows; max float 9 stitches used vertically: 16 stitches\*24 rows; max float 6 stitches
waiver of rights You are highly encouraged to use the pattern for commercial production: nothing would make the author happier than seeing the market flooded with things made after his design. ;D gustavs ;)


