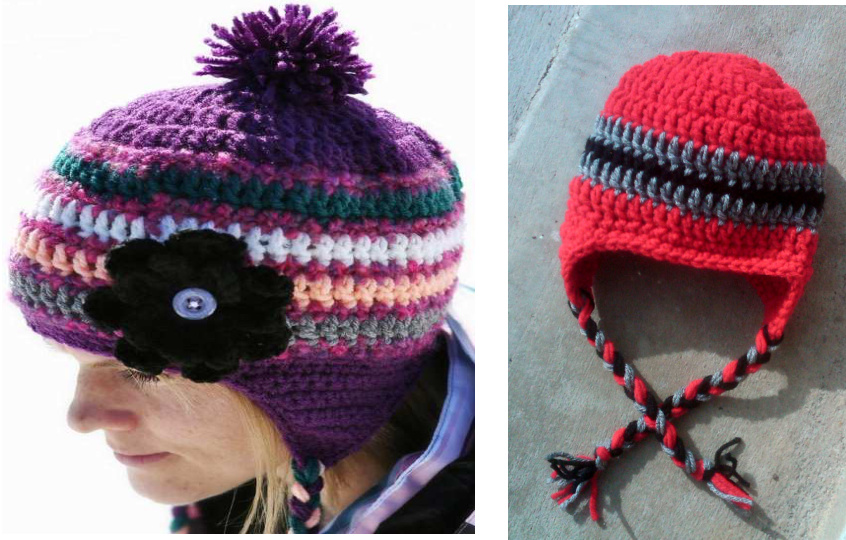
Janies Boarder Hat
Materials: Worsted weight yarn in choice of colors Hooks: H hook (4.5mm), I hook (5.0mm) Yarn needle Note: This pattern can be made in a variety of colors and designs. Alternate colors for stripes or make a solid color.
Directions:
With H hook and yarn, Ch 6 (or magic loop), join and pull closed. 1. 2sc in each stitch around (12sts). 2. \*sc 1, 2 sc in next sc\*, repeat to end of round. (18sts) 3. \*sc 2, 2 sc in next sc\*, repeat to end of round. (24sts) 4. \*sc 3, 2 sc in next sc\*, repeat to end of round. (30sts) newborn 5. \*sc 4, 2 sc in next sc\*, repeat to end of round. (36sts) 3-6 mths 6. \*sc 5, 2 sc in next sc\*, repeat to end of round. (42sts) 6-12 mths 7. \*sc 6, 2 sc in next sc\*, repeat to end of round. (48sts) 12-24 mths 8. \*sc 7, 2 sc in next sc\*, repeat to end of round. (54sts) Child/preteen 9. \*sc 8, 2 sc in next sc\*, repeat to end of round. (60sts) Teen/Adult 10. \*sc 9, 2 sc in next sc\*, repeat to end of round. (66sts) Large adult Remove marker and hdc each stitch until hat is the desired length (see chart below) Earflaps: Fold hat in half. With right side of hat facing you, attach yarn with a sl st to one side. Start with the appropriate size: Up to 6 mths: sc 7 6 mths to 4T: sc 8 Child: sc 9 Preteen/teen: sc 10 Teen/adult: sc 12 After first row of sc as listed above, follow these instructions for all sizes. Turn (do not ch 1). Working on WS, sk first st, sc across. Turn (do not ch 1). Working on RS, sk first st, sc across. Turn (do not ch 1). Repeat rows 2 and 3 until no st are left. Finish off. Fold hat in half to find placement for 2nd earflap. It should start exactly across from the first flap. Starting on the RS of the hat, attach yarn and follow directions for earflap. Attach braids if desired.
Regular Braids
Cut 2, 20" strands of 3 different colors. Fold hat in half to find placement. Use a yarn needle to pull end through one side of hat. Pull through until even with other end and braid. Repeat for other side.
Twirly Tails
With H hook and one strand of yarn, Ch 52. Turn, 2hdc in second chain from hook. \*Sk 1, 3hdc in next ch\*, repeat to end of chain. Finish off, leaving a 6" tail. Fold hat in half to find sides. Pull one yarn tail to inside of hat, approximately 1" from bottom. Pull both yarn tails until twirly tail is in place and tie a secure knot. Weave in ends. Make another twirly tail and repeat on other Side of hat.
PomPoms
Hold one strand of each color, and wrap 20-30 times around the palm of your hand (wrap more times for a thicker pom). Carefully slide the yarn off your hand and wrap an 8" length of yarn around the center, pulling tight and knotting to hold in place. Do NoT cut this piece of yarn. Cut loops of pompom. Sometimes I leave a few or all loops uncut for a whimsical pompom. Thread end of the yarn you tied around the
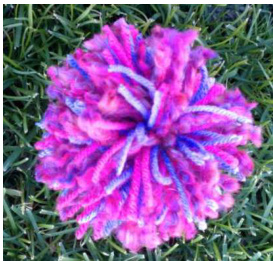
pom through a yarn needle. Pull through end of hat. Firmly tie a knot next to the hat. Trim pompom as desired. A piece of cardboard or pompom maker may also be used. Note: The pompom in the picture is loosely attached and looks messier than normal. For a whimsy pom: Include a novelty yarn, such as fun fur, in your beginning wrap. When trimming pom, only cut some loops (see pink pom).
MAGIC LOOP
I refer to this throughout the entire pattern pack because it is THEE best way to start a circle. Please google or youtube "magic loop" or "adjustable loop" for help. You will be so happy you did. I can never get a regular joined chain to close completely. You really will say this technique is "magic". If you have any questions, comments or suggestions please email me at heidi@snappy-tots.com. This pattern has been tested, but it is very important to me that information is easy to understand and accurate. I would appreciate knowing any errors found so they could be fixed. Thank you in advance. auci! io yupyuyicu tu ouappyluto aiu lay lut ue uupicu iui icoaig ! pait ui wiu from this pattern MAY be sold. Please include a link to snappy-tots.com if selling online
HEAD AND HAT SIZE CHART for brand new babies to adult men
x 1" smaller than the head circumference so they will stretch and not be too bic Note: All measurements are approximate and based on "average" head sizes according to several online sources. Hat "height" is the measurement from top of crown to bottom edge. Brand new babies Head Circ: 12" - 13" Hat Circ: 11 - 12" Hat Height: 5" - 5.5" Head Circ: 13" - 14" Hat Circ: 11.5" - 13" Hat Height: 5.5" to 6" Baby - 3 to 6 months Head Circ: 14" - 17" Hat Circ: 13" - 16" Hat Height: 6.5 - 7" Baby - 6 to 12 months Head Circ: 16" - 19" Hat Circ: 15" - 18" Hat Height: 7.5" Toddler (1 - 3 years) Head Circ: 18" - 20" Hat Circ: 17" - 19" Hat Height: 8" Child (3 - 10 years) Head Circ: 19" - 20.5" Hat Circ: 18" - 19.5" Hat Height: 8.5" Preteen/Teen Head Circ: 20.5" - 22" Hat Circ: 19.5" - 21" Hat Height: 9 -10" Adult Woman Head Circ: 21.5" - 22.5" Hat Circ: 20.5" - 21.5" Hat Height: 11" Adult Man Head Circ: 23" - 24"" Hat Circ: 22" - 23" Hat Height: 11" - 11.5" Snappy-tots.com \~ snappytots@hotmail.com


