VERSAILLES: Fingerless Mitts
Deborah Tomasello Now you see it... Now you don't!
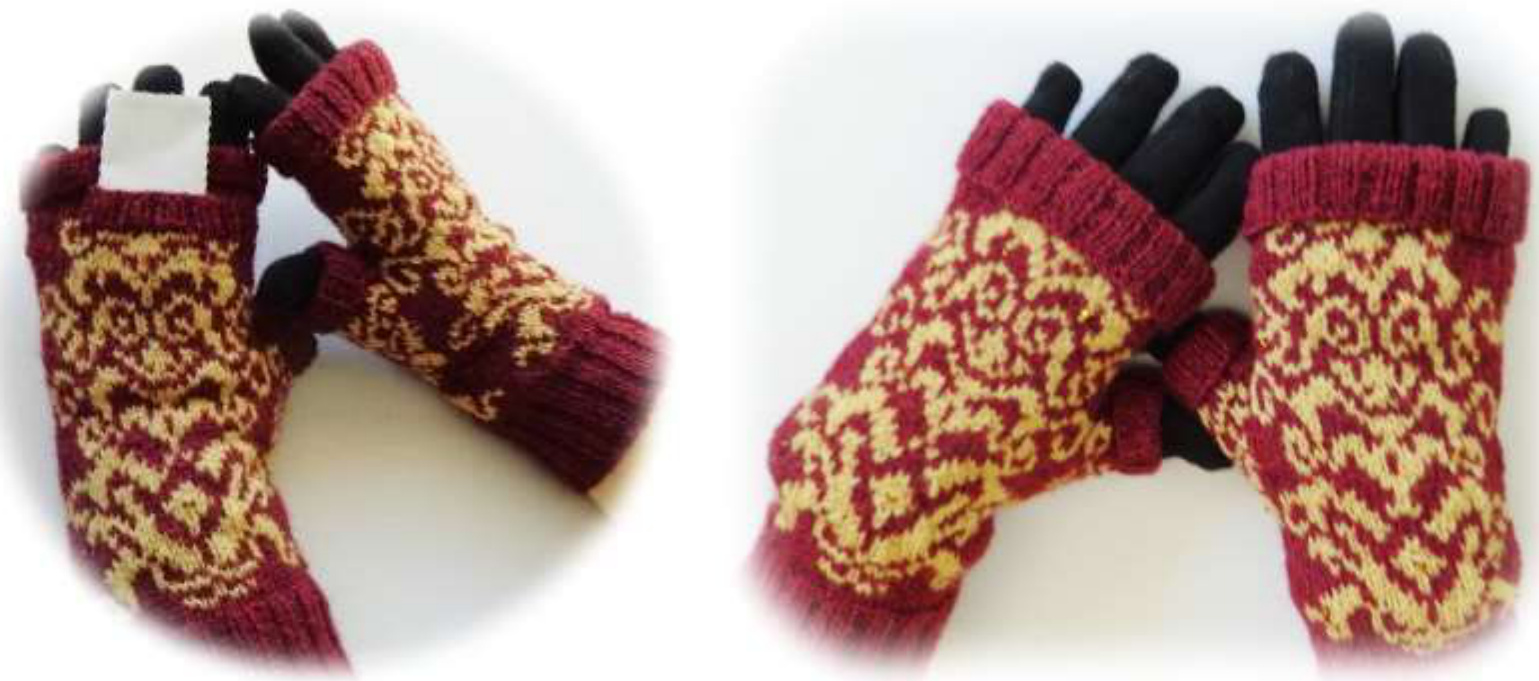
Test knit and photos by cpainter An ornate, swirly, baroque design reminiscent of Versailles. With glass beads for added added effect, these mitts coordinate with my VERSAILLES hat. Sizes: Woman's and Teen's Medium Materials: 1 ball each of KnitPicks Palette: Hollyberry and Turmeric. (or any two contrasting colors you choose) Five #3 DPNs (or size needed to obtain gauge) Stitch marker tapestry needle 6mm beads and small crochet hok for applying them Gauge: 32 stitches and 30 rounds = 4" using #3 needles. Abbreviations: M1: This is not “the" M1 stitch. It is the Bumpless m1. It is a modification of KFB. See my video tutorial here: https://www.youtube.com/watch?v=syFeOy1B90k Pocket (Optional): CO 20 stitches with Turmeric. Knit, back and forth in stockinette, about 30 rows or 3.5 inches. End with a purl row. DO NOT Bind off. Steam block. Set aside.
MITTS (MAKE TWO):
Mitt: With DPNs, CO 64 sts (16 sts on eah of 4 DPNs) using Hollyberry. Join to work in the round taking care not to twist sts.(if using circs) Knit 2x2 rib for 26 rounds, or to desired cuff length. CHART Knit 1, place marker between fist two stitches. You are merely placing a marker after the very first stitch. This first stitch will eventually become the thumb. So, you will be working the pattern on 64 sts still. Follow chart for 13 rounds. Continue to follow chart, and inc for thumb as follows: To increase thumb: Round 14: m1, k1, m1 in first st (3 sts now in first st). See video linked above. Continue to k sts as shown around Round 15: knit all sts according to chart Round 16: m1, k3, m1, continue to k sts as shown around Round 17: knit all sts around according to chart Round 18: m1, k5, m1, continue to k sts as shown around Round 19: knit all sts around according to chart Round 20: m1, k7, m1, continue to k sts as shown around Round 21: knit all sts around according to chart Round 22: m1, k9, m1, continue to k sts as shown around Round 23: knit all sts around according to chart Round 24: m1, k11, m1, continue to k sts as shown around Round 25: knit all sts around according to chart Round 26: m1, k13, m1, continue to k sts as shown around Round 27: knit all sts around according to chart Round 28: m1, k15, m1, continue to k sts as shown around Round 29: knit all sts around according to chart Round30: m1, k17, m1, continue to k sts as shown around Round 31: knit all sts around according to chart Round 32: m1, k19, m1, continue to k sts as shown around Round 33: knit all sts around according to chart Round 34 Move 21 thumb sts to fifth DPN (or waste yarn) to be worked as thumb later. M1\* st in next st so you will be working the chart's 64 sts. Follow chart around with 64 stitches on needles. \* See tutorial here: https://www.youtube.com/watch?v=syFeOy1B90k Rounds 35 to 50: Knit chart. (The mitt will be a minimum of 1 inch longer. If you want a shorter mitt, you might want to rip back some rounds before proceeding with the next step). If adding a pocket, do so here: Pocket: Round 51: Add pocket—-Knit 6 stitches. Move next 20 sts to stitch holder. Retrieve needle with pocket stitches, and with pocket front (stockinette side) facing you, continue to knit chart with these stitches. Knit chart through round 55, or if, the mitts are long enough, stop at round 51. Detach Turmeric, and using that color, knit 2x2 rib twice as long as you want the cufflength. Bind off loosely. Fold cuff back over itself. If you added a pocket, Move 20 stitches from stitch holder to needle. Attach Turmeric and knit 2x2 rib for 6 rows. Bind off. Sew rib sides to mitt, creating the pocket top. When the mitt cuff is folded back, it will hide the pocket opening.
Thumb:
Using Turmeric, pick up 7 sts from body of mitt and add them to the 21sts from 5# DPN or waste yarn (split so you're working on 3 needles) for a total of 28 thumb sts. Join. Knit 2x2 rib for 16 rounds or desired length. Bind off. Pocket: Sew 3 sides of pocket to the inside of the mitt. Finishing: Tie and trim all yarn ends. Wear layered over gloves for extra warmth or as-is for easy texting!
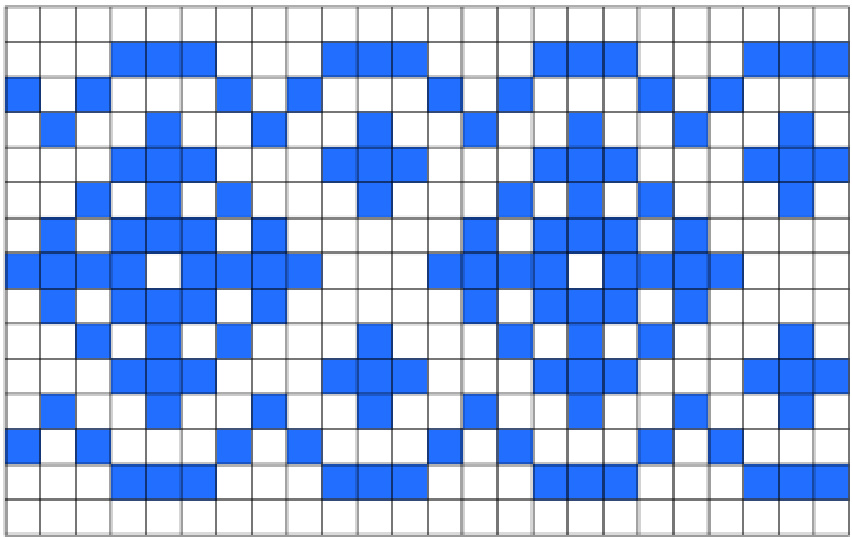
CHART Squares with dots indicate bead placement
Copyright ? 2015 by Deborah Tomasello All rights reserved. This pattern or any portion thereof may not be reproduced or used in any manner whatsoever without the express written permission of the publisher. WARNING: Giving or accepting a free copy of this pattern to another, without permission of the designer, is stealing.
A Word About Color Dominance
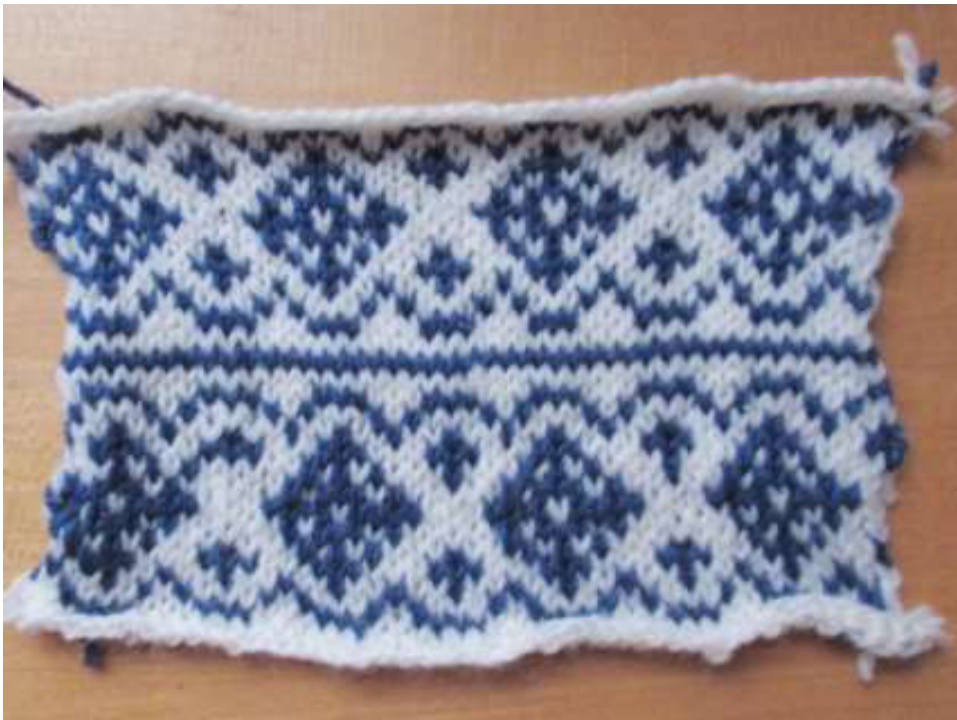
In the above swatch, I knitted the same motif across the piece, and then I repeated it. The only difference I made was the position in which I held my yarns. In the bottom half, I held my yarns so that the blue was dominant, that is to say more obvious than the white, on the front of the work, and the white receded into the background. On the top half, I knitted the same stitches but I held my yarns so that the white dominated and the blue receded. You see a definite difference in the appearance of the motifs when comparing the top and bottom halves of my swatch.
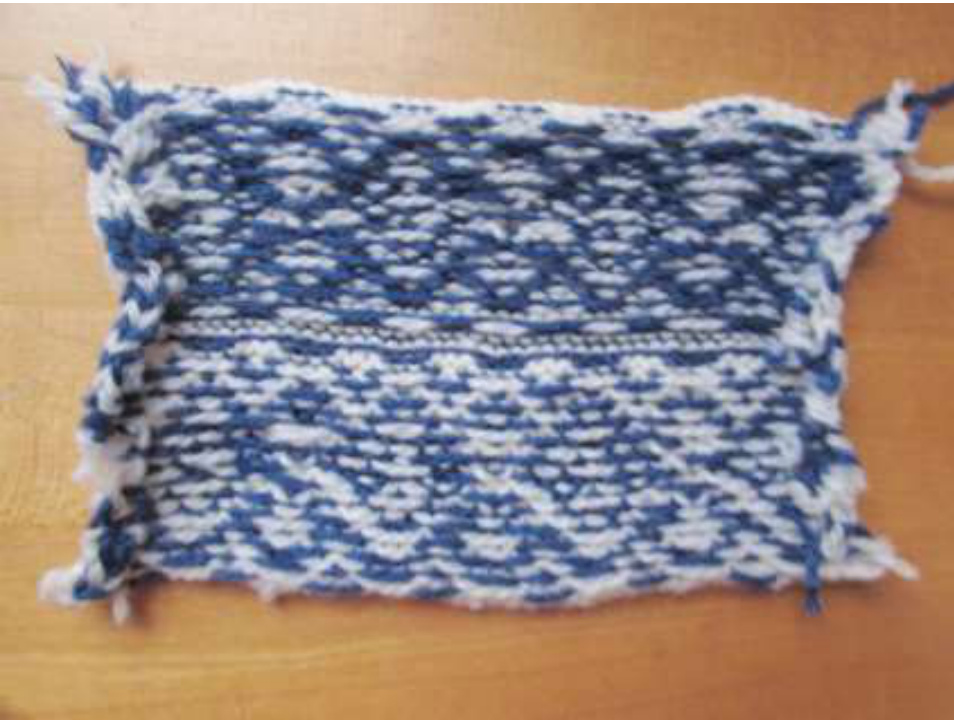
Viewing my swatch from the back, you notice that the color that dominated on the front recedes on the back, and the color that was recessive on the front dominates on the back. A color cannot be dominant both on the front and the back at the same time. So, how do you control for this? How does a color become dominant? I have read many explanations of color dominance, and frankly, they all leave me scratching my head. Terms are used like “over" and “under,”" which are nonsensical to me. Over where? Under where? Also, each knitter has her own yarn-holding method. We need an explanation that works no matter how we hold our yarns. First, it is important to point out that, whatever way you hold your yarns when stranding, you want to maintain the same position throughout the piece so that you catch your floats the same way, consistently. That said, here's how color dominance happens. (And it happens whether you like it or not!) The color that will dominate---or stand out—on the front of your work is the color that consistently lies closer to your work as you go. In the above example, on the bottom half of the front of the piece, the blue is more prominent than it is on the top portion of the piece. This is because it lay closer to the piece as I was working the bottom half. How do we know this? Look at the back of the swatch. The bottom on the back shows more white relative to the top of the swatch. You see more white because the floating yarn, the white, is floating over, or around, the blue..it lies further from the piece, has farther to travel, than the blue. Because the white lies closer to you on the bottom half when viewing the back, it is more visible to you than is the blue. Because it is more visible—dominant—on the back, it cannot be, at the same time, the dominant color on the front. No matter how you choose to hold your yarns, one in each hand, both in the right hand, or between your toes as I do, the above rules apply. Try a swatch as I did. Try knitting with the yarns in one position and then switching them. Take note of the color that has to travel to float around the color that lies closer to the work. The one that has to travel to float around the close color is not the color that will dominate on the front of your swatch, but it is the color that will be most evident on the back. Try knitting this chart with two, highly-contrasting colors and DPNs so that you are working inthe-round. You will cut the swatch open when you complete it: