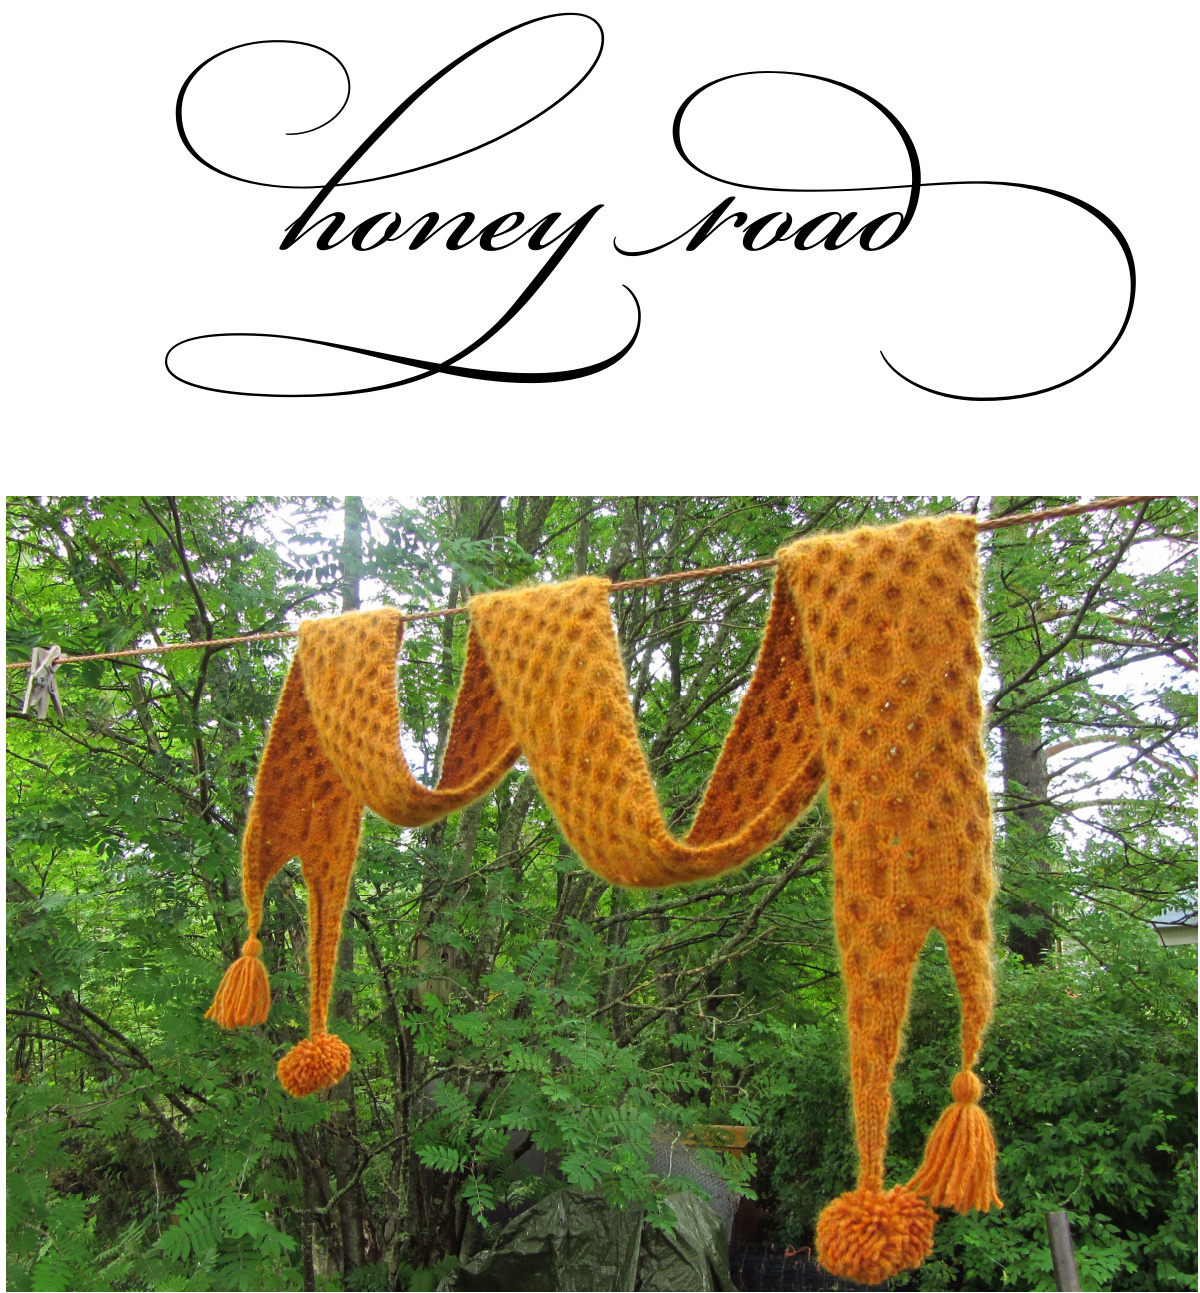
a sweet scarf designed by Daien Forrest Living in Hawaii doesn't require scarves, but my first few weeks in Europe taught me that I needed one, and fast! As a beekeeper I love bees, honeycomb, and honey, and during a particularly cold evening, dreaming of the warmth of the hive, this scarf danced into my imagination. The body is practical, and the tails, tassels and pompoms provide some fun! Because my yarn choice has been, sadly, discontinued, I've suggested two alternatives that should work just as beautifully. You may, of course, use any yarn that gives you your desired result.
Size and Finished Measurements
One; 5"x 70" gently blocked, depending on your yarn choice
Materials
Yarn: Posh Yarn Sophia [discontinued] (100% cashmere; 200yds per 55g skein); color: Vintage. 2skeins OR Jade Sapphire Mongolian Cashmere 4 ply (100% cashmere; 200yds per 55g skein); color: Tuscan Sunset; 2 skeins OR Malabrigo Finito (100% superfine merino wool; 200yds per 50g skein); color: Glitter; 2 skeins Needle Size: US 6; I used a circular needle for ease, straights will work just as well Notions: waste yarn, 4 stitch markers, 1 or 2 stitch holders, tapestry needle, large eye sewing needle (optional)
Gauge
34 sts/32 rows = 4 inches in honeycomb pattern; but any weight or gauge that appeals to you is fine
Pattern Notes
In order to create a nice edge, slip the first stitch of every row knitwise as directed in the pattern. Please note that the written directions won't indicate slipping the two edge markers in the pattern, but you now know to do so. When the markers are placed for the bee portion of the pattern, the directions will indicate slipping those two markers. Speaking of which, the bee pattern was garnered from a few sources and then modified to suit my personal taste.
Additionally, because I was working with cashmere, and didn't want any waste, I made my tassels and pompoms before knitting the scarf. This way, I knew how far I could knit in order to end up with nothing leftover. You, of course, can decide to forgo them altogether, include another 72 row repeat in the first section, bind off straight, and then knit until you run out of yarn in the second section. The choice, gentle knitter, is yours. Honeycomb Pattern (for gauge swatch; 4 multiples of 8 sts + 2 sts = 34 sts): Row 1 [RS]: s1, \*c2f, c2b\* 4 times, k1 Row 2 [WS]: s1, p32, k1 Row 3: sl,k33 Row 4: sl, p32, k1 Row 5: s1, \*c2b, c2f\* 4 times, k1 Row 6: sl, p32, k1 Row 7: sl,k33 Row 8: sl, p32, kl Repeat rows 1-8 for pattern
Charts
The charts for the repeated body portion and the two tail ends of the scarf are found after the written portion of the pattern. Whilst the main scarf body portion is bare bones, the tails portion includes each row for clarity.
Legend
slip 1 stitch knitwise slip, slip, knit; slip two stitches knitwise one by one, and then knit them together g: knit two stitches together g: purl two stitches together Honey Road designed by Daien Forrest; Ravelry: Daien; PDF Version 1.1; 22 July 2013 p2tbl: purl two stitches together through their back loops CO: cast stitches onto right needle using the loop over the finger or thumb method. Here's a lovely photo tutorial from TECHknitter showing how: http: / / techknitting.blogspot.co.uk /2006 /12 / casting-on-by-looping-on-method.html skpsso: slip 1 stitch knitwise, knit 1 stitch, pass the first slipped stitch over the knit stitch yo: yarn over klyok1: dip right needle under all three previously dropped yos and knit one stitch, yo, dip right needle under yos again and knit another stitch; 3 stitches created! c2f: slip 2sts to cable needle and hold to front of work, k2sts, k2sts from cable needle c2b: slip 2sts to cable needle and hold to back of work, k2sts, k2sts from cable needle pm: place marker sm: slip marker
Directions
Begin first half of scarf:
Using waste yarn, crochet a chain at least 50 stitches long. Using main yarn, pick up and knit 40 stitches into the bumps on the back of the crochet chain. This is the provisional cast on row. And if you'd like more instruction, here is a great photo tutorial from the Purl bee on how to dc a provisional cast-on with a crochet chain: http: / /www.purlbee.com/provisional-cast-on-tutorial/2007/12/10/provisional-cast-on tutorial.html Turn work. Set-up row: s1, k1, pm, p36, pm, k2. Row 1 [RS]: s1, k1, \*c2f, c2b\* 4 times, c2f, k2 Row 2 [WS]: s1, k1, p36, k2 Row 3: s1, k39 Row 4: s1, k1, p36, k2 Row 5: s1, k1, \*c2b, c2f\* 4 times, c2b, k2 Row 6: sl, k1, p36, k2 Row 7: sl, k39 Row 8: s1, k1, p36, k2 Rows 9-12: Repeat rows 1-4 Row 13: s1, k1, c2b, c2f, c2b, k8, \* c2f, c2b\* 2 times, k2 Row 14: sl, k1, p16, pm, p3, k2tog, yo, ssk, p3, pm, p10, k2 Row 15: s1, k11, sm, k2, p2tbl, drop previous yo, 2yo, p2tog, k2, sm, k18 Row 16: s1, k1, p16, sm, p1, k2tog, drop previous 2yo, 3yo, ssk, p1, sm, p10, k2 Row 17: s1, kl, c2f, c2b, k2, sm, p2tbl, co3, drop previous 3yo, klyok1, co3, p2tog, sm, k4, c2f, c2b, c2f, k2 Row 18: (remove bee markers as you come to them) s1, k1, p16, sm and remove, p5, ssk, p4, sm and remove, p10, k2 Rows 19 and 20: Repeat rows 3 and 4 Row 21: s1, k1, c2b, c2f, k16, c2b, c2f, c2b, k2 Rows 22-24: Repeat rows 2-4 Rows 25-48: Repeat rows 1-8 three times Row 49: s1, ki, \*c2f, c2b\* two times, k8, c2f, c2b, c2f, k2 Row 50: s1, k1, p11, pm, p3, k2tog, yo, ssk, p3, pm, p15, k2 Row 51: s1, k16, sm, k2, p2tbl, drop previous yo, 2yo, p2tog, k2, sm, k13 Honey Road designed by Daien Forrest; Ravelry: Daien; PDF Version 1.1; 22 July 2013 Row 52: s1, k1, p11, sm, pl, k2tog, drop previous 2yo, 3yo, ssk, p1, sm, p15, k2 Row 53: s1, k1, c2b, c2f, c2b, k3, sm, p2tbl, co3, drop previous 3yo, klyok1, co3, p2tog, sm, k3, c2f, c2b, k2 Row 54: (remove bee markers as you come to them) s1, k1, pl1, sm and remove, p5, ssk, p4, sm and remove, p15, k2 Rows 55 and 56: Repeat rows 3 and 4 Row 57: s1, k1, c2f, c2b, c2f, k16, c2b, c2f, k2 Rows 58-60: Repeat rows 2-4 Rows 61-64: Repeat rows 5-8 Repeat these 72 rows twice more, ending on the wrong side. Turn work. Begin working Tail 1 as follows: Row 1: \$1, k1, ssk, k2, c2b, c2f, c2b, k2tog. k2, place next 18 stitches on small stitch holder, turn work Row 2: s1, kl, p16, k2 Row 3: s1, k19 Row 4: s1, kl, p2tog, p12, p2tbl, k2 Row 5: s1, k3, c2f, c2b, c2f, k2 Row 6: sl, k1, p14, k2 Row 7: sl, k17 Row 8: s1, kl, p14, k2 Row 9: s1, k1, ssk, c2b, c2f, k2, k2tog, k2 Row 10: sl, kl, p12, k2 Row 1l: sl, k15 Row 12: sl, kl, p12, k2 Row 13: s1, k2, c2f, c2b, k5 Row 14: sl, kl, p2tog, p8, p2tbl, k2 Row 15: sl, k13 Row 16: s1, kl, p10, k2 Row 17: s1, kl, c2b, c2f, k4 Row 18: sl, k1, p10, k2 Row 19: s1, k1, ssk, k6, k2tog, k2 Row 20: s1, k1, p8, k2 Row 21: s1, k4, c2b, k3 Row 22: s1, kl, p8, k2 Row 23: s1, k11 Row 24: s1, k1, p2tog, p4, p2tbl, k2 Row 25: s1, k3, c2f, k2 Row 26: sl, k1, p6, k2 Row 27: s1,k9 Row 28: sl, k1, p6, k2 Row 29: s1, k1, ssk, k2, k2tog, k2 Row 30: sl, k1, p4, k2 Row 31: s1, k7 Row 32: s1, kl, p4, k2 Row 33: sl, k7 Row 34: s1, k1, p2tog, p2tbl, k2
Row 35: s1, k5 Row 36:s1, k1, p2, k2 Row 37: s1, k5 Row 38: s1, k1, p2, k2 Row 39: sl, remove markers (slipping stitches back and forth as necessary), ssk, k2tog, k1 Row 40: s1, k3 Row 41: sl, k3 Row 42: sl, k3 Row 43: s1, k3 Row 44:P2tog,p2tbl Row 45: skpsso, cut yarn, leaving a long tail with which to attach pompom(s), and pull yarr tight through last cast-off loop
Begin working Tail 2 as follows:
Move stitches from stitch holder to needles, with right side facing. Row 1: hold yarn as if to knit, s1, k1 with held yarn, ssk, c2f, c2b, k2, k2tog, k2 Row 2: sl, k1, p12, k2 Row 3: sl, k15 Row 4: s1, k1, p2tog, p8, p2tbl, k2 Row 5: s1, k1, c2b, c2f, k4 Row 6: sl, kl, p10, k2 Row 7: s1, k1, ssk, k6, k2tog, k2 Row 8: s1, kl, p8, k2 Row 9: s1, k4, c2b, k3 Row 10: s1, k1, p2tog, p4, p2tbl, k2 Row 11: s1, k9 Row 12: sl, k1, p6, k2 Row 13: s1, k1, ssk, k2, k2tog, k2 Row 14: sl, k1, p4, k2 Row 15: sl,k7 Row 16: s1, kl, p2tog, p2tbl, k2 Row 17: sl, k5 Row 18: sl, k1, p2, k2 Row 19: sl, remove markers (slipping stitches back and forth as necessary), ssk, k2tog, k1 Row 20: s1, k3 Row 21: sl, k3 Row 22: s1, k3 Row 23: ssk, k2tog Row 24: skpsso, cut yarn, leaving a long tail with which to attach tassel, and pull yarn tight through last cast-off loop
Turn and work second half of scarf.
Carefully undo and remove the provisional crocheting from the cast-on edge, placing the stitches on your needle right side facing. Begin at row 3 on Chart 1, placing edge markers between stitches 2 & 3, and stitches 38 & 39, and work same as first half of scarf. Make tassels and pompoms: Make 2 Tassels: 20 wraps around a 3.25" piece of cardboard. Make from 2 to 6 Pompoms: 30 wraps around a 2.5" diameter circle of cardboard, with 1" hole (width of wrap is %"). I made 6 pompoms and attached three together to each Tail 1. You can adjust the number of your wraps to use up all your yarn if you like. If you're unsure how to make tassels and pompoms, or need a refresher course, I highly recommend these photo tutorials from TECHknitting:
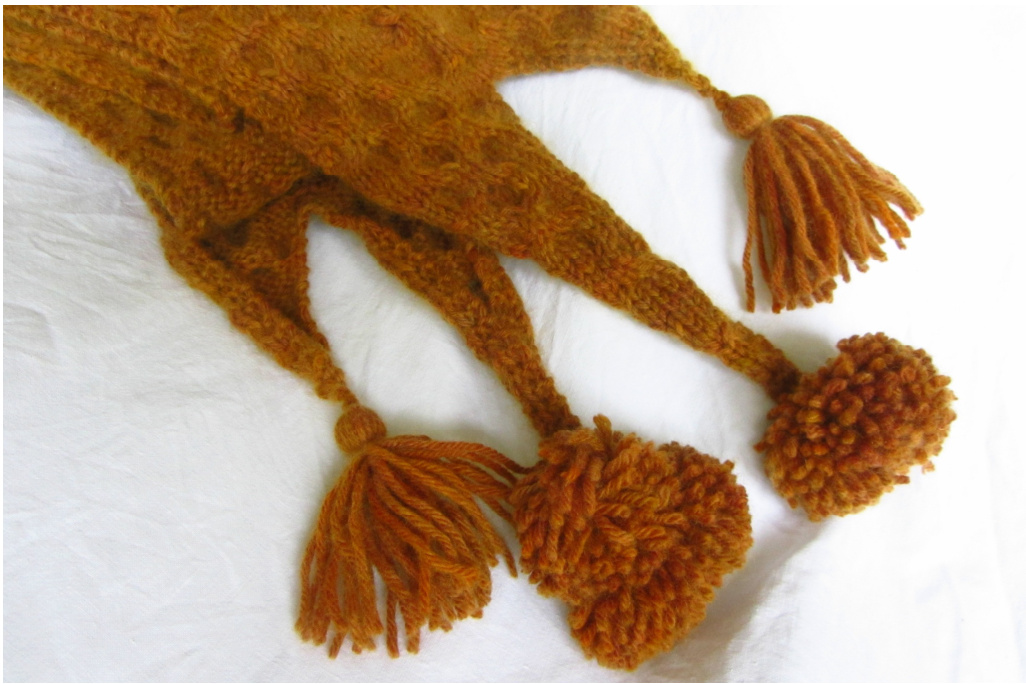
http: //techknitting.blogspot.ie /2008/05/how-to-make-pom-poms.html http: / /techknitting.blogspot.ie /2008/06 /how-to-make-tassels.html Attach 3 pompoms to each Tail 1, and 1 tassel to each Tail 2, using the long tail of your cast off. I tied the tails of the tassels/ pompoms onto the long tail, and then wove the tail back into the body of the knitting. Then I wove the leftover yarn tails of the tassels / pompoms down into the tassel / pompom with the large eyed sewing needle.
Finishing:
Weave in any loose ends and block gently as desired.
Honey Road :: Stitch Key and Charts
Right side rows (odd) are read from right to left, and wrong side rows (even) from left to right All wrong side rows (even) are purled, with the exception of the bee pattern sections as charted
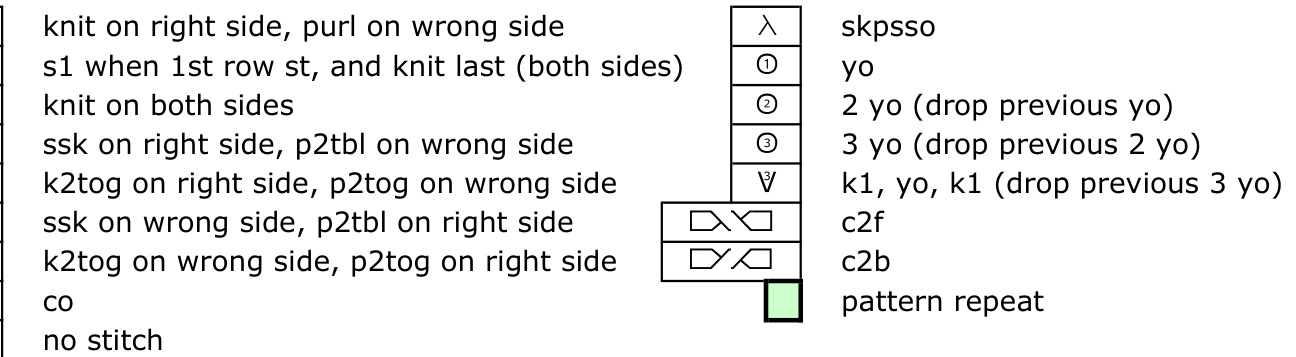
Chart 1
| + | DO | D | DXKO | + 57 | |||||||||||||||||||||||||||||||||
| 54 | + | 7 | + | ||||||||||||||||||||||||||||||||||
| + | ?人 | 8 | α | A | α | α | IN | ?人 | DY | + 53 | |||||||||||||||||||||||||||
| 52 | + | ③ | 7 | + | |||||||||||||||||||||||||||||||||
| + | ③ | 7 | + 51 | ||||||||||||||||||||||||||||||||||
| 50 | + | A | 7 | + | |||||||||||||||||||||||||||||||||
| + | ?人 | D | DXKO | + | 49 |


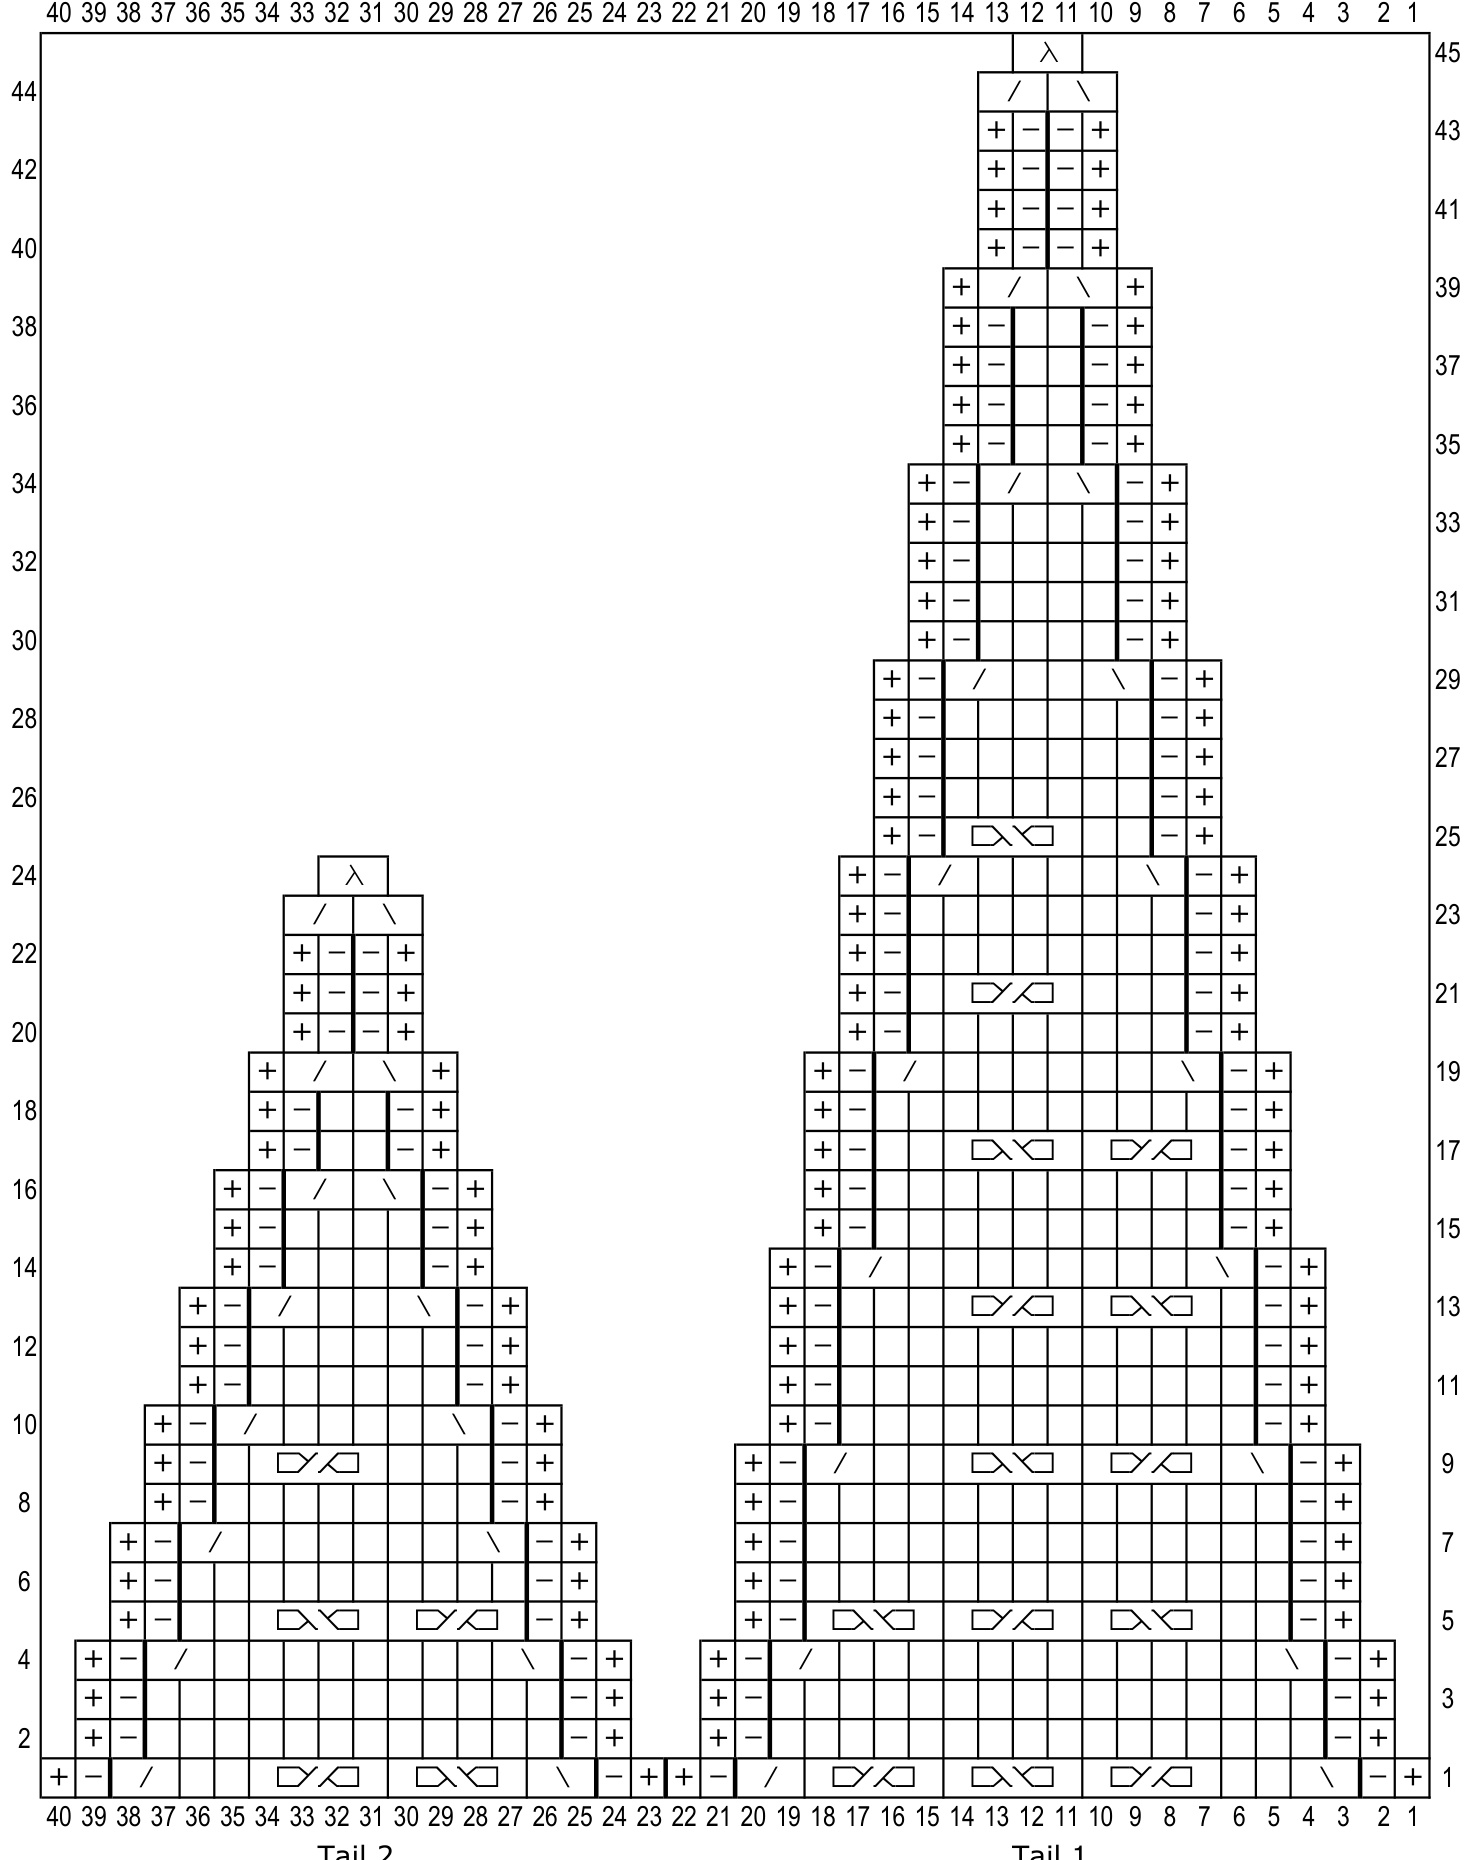
Tail 2 Tail 1


