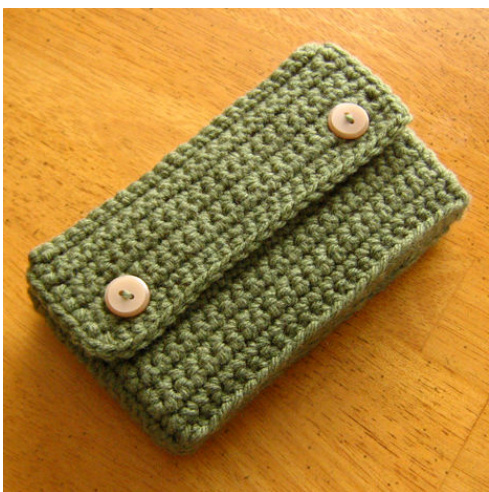
NINTENDO DS LITE POCKET
$\copyright$ 2010 Julie Mnemosyne (http://sjedesigns.blogspot.com/)

PATTERN NOTES · This pattern has no sewn seams - al seaming is integrated into the crocheting. ·Unless otherwise noted, always single crochet into the stitch at the base of a turning chain to get straight sides. I'm right-handed, which means that all of the diagrams in this pattern are drawn from a right-handed perspective; if you're left-handed, mentally flip the images horizontally to get the appropriate orientation. I might include storage for game cartridges in a later version of this pattern, once I work out an efficient method of adding pockets, so keep an eye out for that. YARN About 1 to $1.5\ \mathrm{oz}$ of your favorite aran-weight yarn HOOK SIZE G$\mathrm{4.0\mm})$ crochet hook or smaller/larger as needed to obtain gauge. GAUGE 17.5 sts and $20\ \mathrm{rows}=4$ in. $(10.2\;\mathrm{cm})$ in sc NOTIONS ·Yarn needle ·Smaller size crochet hook for use in tight spots (optional) Two buttons (obtain these after you've finished making the pocket so that you can make sure that they're the right size for your buttonholes) Thread (optional) Sewing needle (optional) CROCHET STITCHES AND TECHNIQUES REQUIRED (US TERMS) Chain (ch) single crochet (sc), single crochet into front loop only (flsc), single crochet into back loop only (blsc), slip stitch (sl st),joining yarn SEWING STITCHES REQUIRED Buttonhole stitch or whipstitch TERMS OF USE This pattern is not for commercial use (meaning that if you make something with it, you can't sell it). You may post this pattern elsewhere and alter it to your liking, although I would appreciate a link back to my Ravelry profile or my blog. If you use this pattern, please link me to a picture so I can gush over how awesome your creation is!
PATTERN
BEFORE YOU BEGIN The pocket pattern is split into sections for easier reference - you do not break your yarn between sections, as the pocket is made as one whole piece. Note: This pattern is designed to fit perfectly - not too snugly, not too loosely. I would suggest checking the size of your work against the DS it's intended to hold at the points indicated in the pattern.
POCKET TOP FLAP
Ch 23 sts plus 1 turning ch (24 chs). Turn, skip first ch next to hook, sc in ea ch (23 scs). Row 1: Row 2: Ch 1, turn, sc in first 2 sts, ch 2, skip next two sts, sc in next 15 sts, ch 2, sc in last 2 sts (19 scs and 2 ch-2sps). Row 3: Ch 1, turn, sc in first 2 sts, sc twice in ch-2 sp, sc in next 15 sts, sc twice in ch-2 sp, sc in last 2 sts (23 Scs). Rows 2 and 3 create two buttonholes on the top flap. Row 4 to 7: Ch 1, turn, sc across (4 rows of sc). Check against DS for width after Row 4. Row 8: Row 9: Ch 1, turn, blsc across. Ch 1, turn, sc in free loops of Row 7 (the ones you didn't sc in Row 8) AND back loops of Row 8, treating these two sets of loops as one set of normal sc loops. See diagram below for clarification if needed.
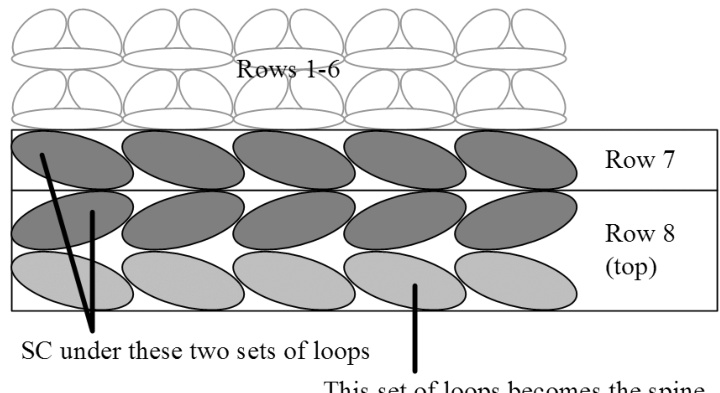
If you did this correctly, the front loops of Row 8 will form a spine on the right side of your fabric. When the top flap is folded into position along this spine, the fold creates a corner that corresponds to one of the corners on your DS, providing a bit of extra protection against bumps. Rows 10 to 12: Repeat Row 4 (3 rows of sc). Row 13: Ch 1, turn, flsc across. Row 14: Ch 1, turn, sc in free loops of Row 12 (the ones you didn't sc in Row 13) AND front loops of Row 13, treating these two sets of loops as one set of normal sc loops. This has the same effect as Rows 8 and 9 but, since you're working on the wrong side of your fabric, you have to change the orientation of the stitches to shape the corner in the correct direction. NINTENDO DS LITE POCKET POCKET BACK PANEL Rows 15 to 27: Repeat Row 4 (13 rows of sc). Check against DS for depth after Row 15. BOTTOM PANEL Rows 28 to 29: Repeat Rows 8 and 9. Row 30: Ch 1, turn, sc in first 14 sts, ch 4, skip next 4 sts, sc in last 5 sts (19 scs and 1 ch-4 sp). Check against DS for height. Row 31: Ch 1, turn, sc in first 5 sts, sc twice in ch-4 sp, sc in last 14 sts (23 scs). Rows 30 and 31 create an opening for the charger port on the DS. Row 32: Repeat Row 4. Rows 33 to 34: Reneat Rows 13 and 14. POCKET FRONT PANEL Rows 35 to 43: Repeat Row 4 (9 rows of sc). POCKET SIDE PANELS Ch 1, turn, skip first ch next to hook, sc twice into first edge st of front panel, sc 9 times evenly across edge, sl st into nearest edge st of bottom panel. (11 scs, 1 sl st). Seam: Turn, skip first ch next to hook, sc in ea ch, sc in ea sc, sl st into nearest edge st of bottom panel (13 scs, 1 sl st). Ch 1, turn, sc across (13 scs). Repeat Side Row 4, sl st into nearest edge st of bottom panel. Check against DS to see if there is enough room to slide the DS into the pocket - there should be very little to no gap or overlap between the side panel and back panel when the DS is in position. Fold your fabric so that the top of Row S1-5 and the lower 13 edge sts on the back panel line up. Rotate the fabric so that the live loop is oriented to start a new row. Ch 1, sl st one set of loops in Row S1-5 to the edge sts of the back panel (13 sl sts). See diagram below for clarification if needed. Slip stitch these two sets of loops together
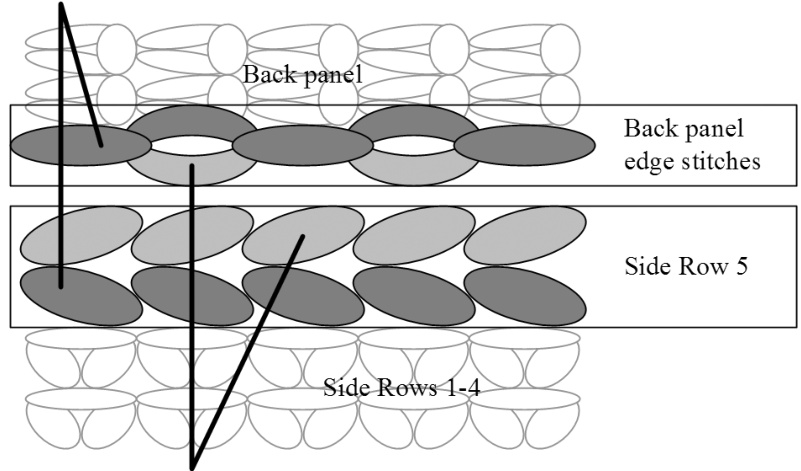
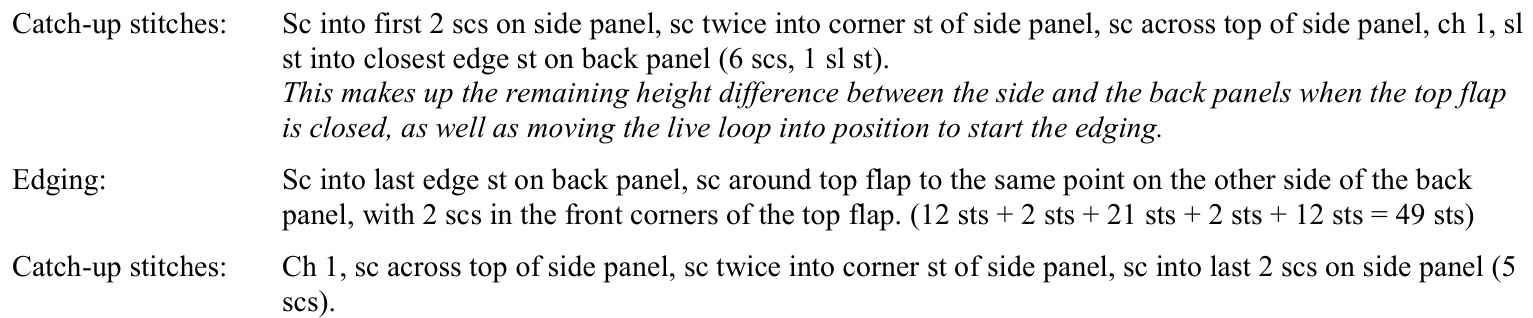
These two sets of loops will be hidden on the inside This creates a finished seam on the outside of the edge, hiding the unfinished edge stitches inside Catch-up stitches: Ch 1, sc into 2 top edge sts of side panel, ch 1, sc twice into back of second ch of Row S1-2, sc into back side of first ch of Row S1-2 (5 scs). This makes up half of the height difference between the side and the back panels when the top flap is closed, as well as moving the live loop into position to go across the front panel and start the second side. Row44: Sc across Row 43 to other side of front panel. RowS2-1: Repeat Row S1-1 (12 scs, not counting sl st). RowS2-2: Ch 1, turn, sc in ea sc of previous row, ch 1 plus 1 turning ch (12 scs and 2 chs). Rows S2-3 to S2-5: Repeat Side 1, Rows 3-5. Seam: Repeat Seam from first side panel. Catch-up stitches: Ch 1, sc into 2 top edge sts of side panel, ch 1, sc twice into back of first ch of Row S2-2 (4 scs). Row45: Sc across Row 44 to other side of front panel. POCKET TOP FLAP EDGING Break off yarn and weave in ends.
FINISHING Reinforce buttonholes and charger port hole with buttonhole stitch or whipstitch. Position and sew on buttons. You can use yarn and a yarn needle or thread and a sewing needle for finishing, whichever works for you. I used the full thickness of my yarn for reinforcing the holes with buttonhole stitch and then split a length of yarn into two sets of plies to sew on the buttons, since my buttons had smallish holes. CARRYING STRAP (OPTIONAL) Join yarn into top edge of one side panel, in the first stitch from where it connects to the back panel, leaving at least an 8 in. $(21{\mathrm{~cm}})$ tail. Ch to desired length of the strap, sl st in corresponding st on the top edge of the opposite side panel. Row 1: Sl st in next st in edge (serves as turning ch), turn, sc in ea ch, sl st in top edge of first side panel. Row2: Turn, sc across, sl st in top edge of opposite side panel. Row3: Repeat Row 2. Break off yarn about 8 in. $(21\;\mathrm{cm})$ from the end of the strap and use the ends to reinforce the join between the strap and the pocket as you weave them in. Have fun and happy gaming! If you have any questions or spot an error, please send me a message on Ravelry or email me at mnemosyne.star@gmail.com.