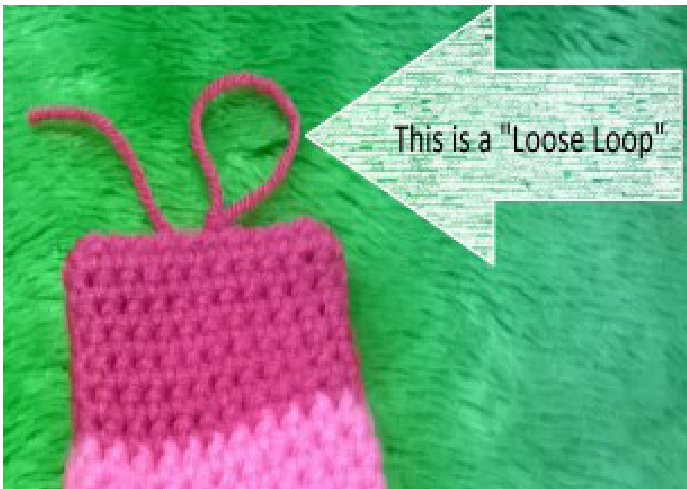
Shiny Sylveon Scoodie Sunday, November 15, 2015 4:26 PM Terms/Stitches need to know: MC: Magic Circle (Magic Circle Tutorial) SC: Single Crochet HDC: Half Double Crochet DC: Double Crochet SLST: Slip Stitch STS: Stitches Loose Loop: leaving last stitch open instead of tying off (Look at photo for reference -->) What you need: 6.50mm hook(US-K) 5.50mm hook(US-l) 5.00mm hook (US-H) Stitch markers Yarn needles 4 pieces of cut Jewelry wire (two 11inches long & two 16inches long) Fabric Glue 1 Skein of Red Heart Super Saver Jumbo: White 2 Skeins of Red Heart with love: Jadiete 1 Skein of Red Heart with love: Bubblegum 1 Skein of Red Heart with love: Hot pink Gloves: 6.50mm hook and two strings of blue yarn Chain 45, skip the first two chains from needle hdc across Row 1-6: HDC across Step #7 Ch 1 sc across side of project (6sts) Step#8 Ch 2 HDC across bottom project (43 sts) Step #9 Ch 1 SC across other side of project (6sts) Step #10 Ch 2 HDC across top of project (43 sts) fasten off & weave in tails put aside for later

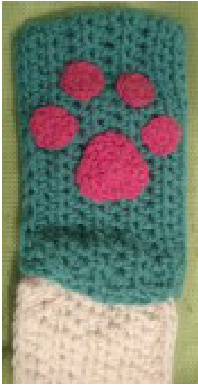
Paw Print Appliques:
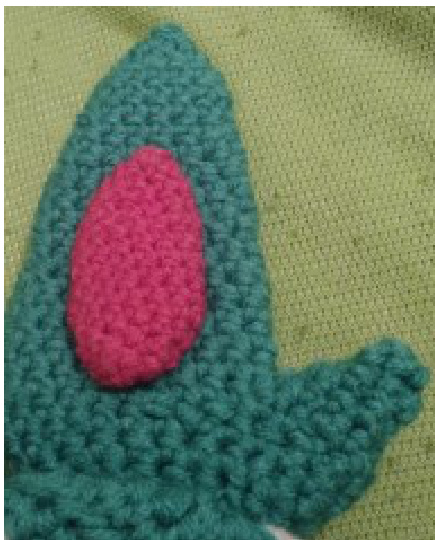
(Make 2 sets, yarn NOT held doubled) Using a 5.0 mm hook Each set, or Paw Print, includes 4 identical toes and 1 pad. So for the Scoodie, make 8 toes and 2 pads, using the Dark pink yarn. Toes: Make a magic circle and hdc 9 into the ring. Break yarn and finish off, leaving a long tail for sewing. Pad: Row 1: Make a Magic Circle and into the ring hdc 2, dc, hdc 2, dc 2, hdc, sc, hdc, dc 2. Join to first hdc with a sl st. [HDC,HDC,DC,HDC,HDC,DC,DC,HDC,SC,HDC,DC,DC] Row 2: Ch 2, hdc into the first st, hdc, 3 dc in the next st, hdc in the next 2 sts, 2 dc in the next 2 sts, hdc in the next st, sc in the next st, hdc in the next st, 2 dc in each of the last 2 sts. Use seamless join to finish off, leaving long tail for sewing. [HDC,HDC,3DC,HDC,HDC,2DC,2DC,HDC,SC,HDC,2DC,2DC] From<http://www.mooglyblog.com/cuddly-cat-crochet-scoodie/>
Scarf:
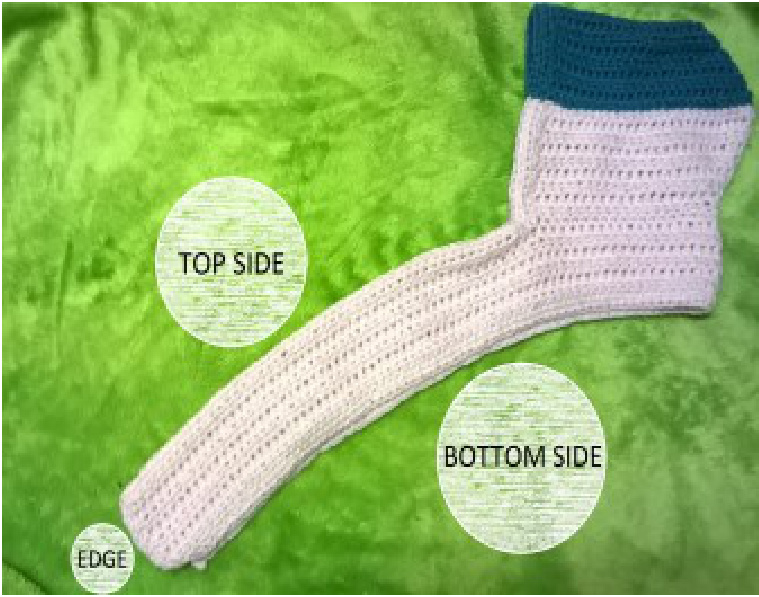
With 6.50mm hook chain 132 with two strings of white yarn for base of scarf Row #1-6: Hdc across Step #7: When done with row#1-6 cut off string from yarn ball but DoN'T fasten off and weave in tails; leave a loose loop ContinueontoHood instructions
Hood:
(6.5 mm hook and two strings of white yarn) Find center stitch of scarf and place marker (pm). Counting out from marked stitch, pm on either side at 17 sts. Row #1: Join Main Color (held doubled) with a slip stitch to an outer marked st. (Remove this marker.) Ch 2, hdc in each st across, moving center marker up to new center st, ending with a hdc in the last marked st. (Remove this marker.) Turn. (35 hdc) Row #2: Ch 2, hdc in each st to one st before middle marker, 2 hdc in next st, hdc in center (pm), 2 hdc in next st. Hdc in remaining sts to end of hood. Turn. (37hdc) Rows #3 - 10: Repeat Row 2. Turn Row #11: Join Blue and SLST across Row #12: Ch 2, hdc in each st to two before marker, hdc2tog, hdc in center (pm), hdc2tog, hdc in remaining sts. Turn. Rows #13-23: Repeat previous Row instructions. Fold hood in half and sl st closed through both sides, Weave in ends. From htto://www.mooalvbloa.com/cuddlv-cat-crochet-scoodie/
Finishing upScarf&Hood:
Starting with the loose loop from row #7 in Scarf using 6.50 mm hook attach two strings of white and ch 2. Step #1: HDC across top of scarf and up part of the hood, when reached at row #11 of hood attach blue and hdc until reaching row #11 again on the other side. Attach white and continue down the hood and end of the scarf. Step #2: At end of scarf SC 2 HDC along edge of scarf (7HDC). Step#3: HDC on bottom side of scarf Step #4: Repeat Step #2 Repeat Step #1-4 until desired length of hood (I did this twice) Making sure the wrong side is outward fold scarf & hood in half. Using a yarn needle and blue thread, sew up the top of the hood to complete this part of the assembly. Once done turn it inside out the make sure no stitch marks are showing.
Ear Indentations:
Ears: Using a 6.50mm hook and two strings of blue yarn Magic Circle (9sc) Row #1: sc around (9) Row #2: \*sc 2, inc; rpt \* around (12) Row #3: sc around (12) Row #4: \*sc 3, inc; rpt \* around (15) Row #5: \*sc 4, inc; rpt \* around (18) Row #6: sc around (18) Row #7: \*sc 2, inc; rpt \* around (24) Row #8: sc around (24) Row #9: \*sc 3, inc; rpt \* around (30) Row #10: sc around (30) With 5.50 mm Hook and dark pink yarn MC (5SC) Row #1: SC 1, INC Row #2: SC 3, INC Row #3: SC around Row #4: SC 4, INC Row #5-8: SC around Row #9: SC 4, DEC Row #10:SC3 DEC Row#11: SC 2 DEC Row #12: SC 1, DEC Fasten off & weave in ends Iuv o. sl aluuiu (4) Row #9: \*sc 3, inc; rpt \* around (30) Row #10: sc around (30) Row #11: skip 8, sc 22 (22) UWV#II.L Row #12: SC 1, DEC Fasten off & weave in ends At this point, you'll be working with a tube of 22 sc and the gap will be worked on later for the notch. Row #12: sc around (22) Row #13: \*sc 10, inc; rpt \* around (24) Row #14-15: sc around (24) Row #16: \*sc 10, dec; rpt \* around (22) Row #17: sc around (22) Row #18: \*sc 19, dec; rpt \* around (20) Row #19-20: sc around (20) Row #21: \*sc 8, dec; rpt \* around (18) Row #22: sc around (18) Row #23: \*sc 7, dec; rpt \* around (16) Row #24: sc around (16) Row #25: \*sc 6, dec; rpt \* around (14) Row #26: \*sc 5, dec; rpt \* around (12) Continue in this manner until you end with 4 sc. Then decrease twice and finish with a slip stitch. Bow: Make two Using 6.50mm hook & two strings of blue Row #1 MC 9 Row #2 sc 2 inc Row #3 sc 3 inc Row #4 sc 4 inc Row #5 sc 5 inc Row #6 sc 6 inc SWITCH to two strings of white Row #7 sc around Row #8 sc 7 inc Row #9 sc around Row #10 sc 8 inc Row #11 sc around Row #12 sc 9 inc Row #13 sc around Fold hood in half and sl st closed through both sides, Weave in ends. From<http://sirpurlgrey.deviantart.com/art/Sylveon-Ear-and-Tail-Crochet-pattern-432816034>
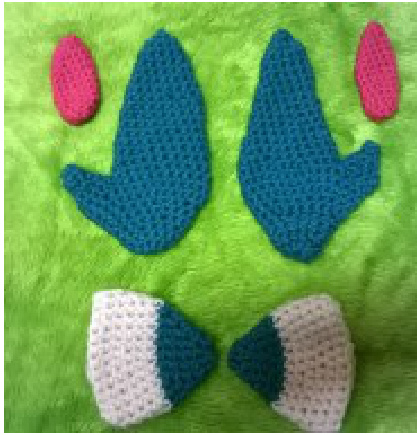
Ribbon:
Step 1: Making the tips of the ribbon need to make two of these. First cone cut from ball of yarn fasten and weave in ends, the second one leave a loose loop. With 5.50 mm Hook and light pink yarn MC (SC 5) Row #1: SC 1, INC Row #2: SC 3, INC Row #3: SC around Row #4: SC 4, INC Row #5-6: SC around When you have two cones; hold them together side by side like in photo Row #7: Continue sc all way around both cones joining them together Row#8-9: SC around Row#10: Join darker pink and continue SC around with 5.50mm Hook Row #11-20: SC around Row #21: Join blue and continue SC around with 5.50mm Hook Row #22-29: SC Around Row #30: Join white and continue SC around with 5.50mm Hook Row #31-57: SC Around (22 sts) [for 2nd shorter ribbon look here->] Insert the two 16 inch wire now Row #58: DEC, DEC, SC Across (20 sts) Row #59-60: SC Around Row # 61: DEC, DEC SC Around (18 sts) Row # 62-63: SC Around Row # 64: DEC, DEC SC Around (16 sts) Row # 65-66: SC Around Row # 67: DEC, DEC SC Around (14 sts) Row # 68-69: SC Around Row # 70: DEC, DEC SC Around (12 sts) Row # 71-72: SC Around 2nd Shorter Ribbon: Starting with row #31 Row #31-47: sc around Insert the two 11 inch wires now Row #47: DEC, DEC, SC Across (20 sts) Row #48-49: SC Around Row # 50: DEC, DEC SC Around (18 sts) Row # 51-52: SC Around Row # 53: DEC, DEC SC Around (16 sts) Row #54-55: SC Around Row # 56: DEC, DEC SC Around (14 sts) Row #57-58: SC Around Row # 59: DEC, DEC SC Around (12 sts) Row # 60-61: SC Around

Assembly:
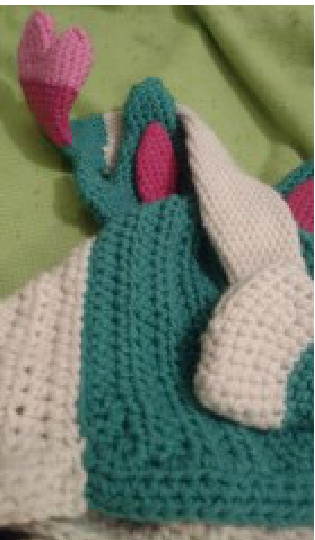
For the Ears: Using yarn needle and hot pink yarn place ear indentations to your liking and attach to actually ears, make note to not sew thru both layers of the ear indentation, just through the layer closest to the actual ear. Do this for both ears and set asideforlater
For the Bow: place the blue parts together and using yarn needle and Jadiete(Blue) yarn sew them together to make the bow whole. Set aside for later. For the gloves: fold in half the blue piece of work from Gloves section making sure the wrong side is showing outwards and using yarn needle sew attach a good size string to the work and sew along the side, do this again for the other side leaving the top open. Once done turn inside out to show no stitch marks. Do this to both gloves For the paws: Using yarn needle and hot pink yarn, place paw prints in correct place and sew together. Do this to both gloves
Attaching gloves to scarf: Making sure to measure to fit your arms, insert white part into the gloves a little and using white yarn to attach with yarn needle making sure no of the white yarn pokes out of the blue glove
Attaching ears, bow and ribbons: Best if using a friend wearing the hood for placement, find the best place to attach ears, bow and ribbon. Again using yarn needle and blue thread for ears to be attach. The bow comes next with blue yarn again and the placing the end of ribbon behind the bow attach with white or blue yarn and yarn needle. With the inserted wire your can bend and shape the ribbons to your will, for the wrap around the ear though you will want to attach part of the ribbon to back of the ear to hold it in place.


