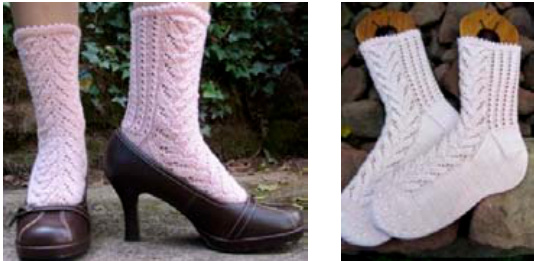
hisper Lace Socks.
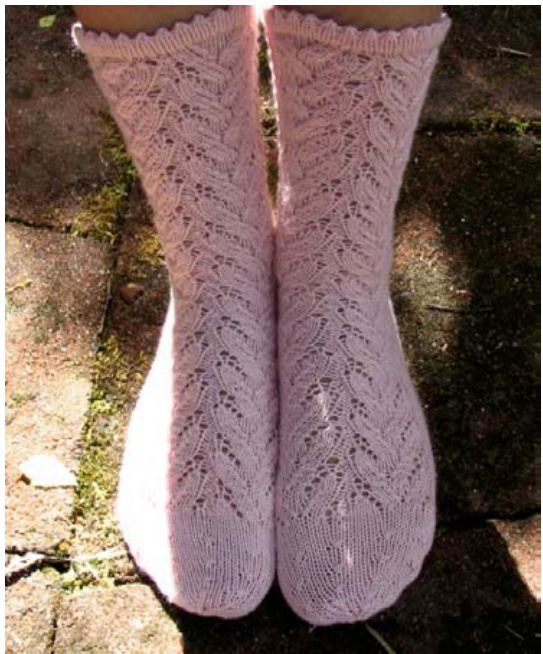
laa pattern on the baek of the sock. Materials: 2 skeins of Lorna's Laces Shepherd Sock in Whisper, or your choice of fingering-weight yarn 2.5mm (US 1.5) circular or double-pointed needles, or size needed to obtain gauge. Gauge: 9 stitches per inch Size: This sock is sized for a woman's medium $8^{\circ}$ circumference) foot. The lace pattern is quite stretchy. Notes: This pattern is written for both two circulars and double pointed needles. When there is a differentiation, the instructions for circulars comes first, with the instructions for DPNs in parenthesis.
Jnstruetions: Cast on 60 stitches, and divide evenly over two (four) needles. Round 1-6: Knit all stitches. Round 7: \*k2tog, yo; repeat from \* across. Round 8-13: Knit all stitches. Round 14: Form picot edging by picking up the first loop from the cast-on edge, and knitting together with the live stitch on the needle. Repeat across all stitches, picking up the corresponding loop from the cast-on edge, and knitting it with the stitch on the needle. 60 stitches remain on the needles. Round 15: \*p1, k 13, pl; repeat from \* once more across the first 30 stitches. p1, M1, ki, p1 \*(p1, k2, pl); repeat from \* to last 3 stitches; p1,k1, M1, p1. There should now be 30 stitches (15 stitches) across the first (first two) needles, and 32 (16) stitches across the second (last two) needles. Now that the set-up round is complete, knit the 15 stitches from Chart A twice for the front of the sock, and repeat Chart B eight times across the remaining 32 stitches for the back of the sock. Continue with Chart A for the front, and Chart B for the back of the sock until the leg reaches $6^{\circ}$ or to your desired length, ending on either Round 5 or Round 11. Note: I prefer to knit my heel flap by slipping the stitches on the WS of the work, but it doesn't make a difference in the look of the flap. The directions below are for my preferred method, but knit the heel flap the way you feel most comfortable. Heel Flap: Row 1: Knit across the 32 stitches on the second (third and fourth) needle; turn work. Row 2: \*sl1, pl; repeat from \* across. Row 3: sl1, knit across. Repeat rows 2 and 3 until heel flap measures $2^{\circ}$ , ending with Row 2. Turn the heel: Row 1: sll, k17, ssk, kl; turn Row 2: sl1, p5, p2tog, p1; turn Row 3: sl1, k6, ssk, k1; turn Row 4: sll1, p7, p2tog, pl; turn. Continue in this manner, working until all stitches have been incorporated. There should be 18 stitches remaining on the needle. Gussets: sl1, k17. Pick up and knit 16 stitches along the first side of the heel flap. Continue in pattern over front 30 stitches (instep) of the sock (starting with either Round 6 or Round 12, depending on where you left off). Pick up and knit 16 stitches on the second side of the heel flap. There should now be 50 stitches on the second (third and fourth) needles for the sole of the sock. The new beginning of round is on the bottom of the foot, after the first 25 stitches of the sole. If you are knitting on circulars, you may wish to place a stitch marker at this point. If you are knitting on double-pointed needles, what has been designated as the fourth needle up until now will become needle 1. Next round: Knit to last three stitches on the first needle; k2tog, k1. Continue in pattern across the next 30 stitches on needle 1 (needles 2 and 3). At the beginning of needle 2 (needle 4), k1, ssk, knit across. Next round: Knit even across the sole stitches, and continue in pattern across instep. Continue decreasing two stitches every other round until there are 32 stitches remaining for the sole of the sock. Once the gusset decreases have been completed, continue knitting in established pattern, until the foot reaches the desired length, less $2^{\circ}$ ; ending on Round 6 or 12 of Chart A. Toe decreases: Note: In order for me to use the round toe that I wanted, I had to fudge the numbers a little bit by increasing tuo stitches before starting the toe decreases. I know not everyone likes a round toe, so feel free to substitute your favorite toe, disregarding the instructions for increasing those two stitches right before the decreases begin. Needle 1 (2 and 3): k1, m1, knit across to last 2 stitches; m1, k1. 32 stitches. Needle 2 (4 and 1): knit across (needle 1 [2 and 3] will now be the beginning of the round). Next round: $^{\ast}\mathrm{k}6$ , k2tog; repeat from \* across all stitches. Knit 6 rounds even. Next round: $^{\ast}\mathrm{k}5$ , k2tog; repeat from \* across all stitches. Knit 5 rounds even. Next round: $\star1\!\!_{\mathrm{K}}4$ , k2tog; repeat from \* across all stitches. Knit 4 rounds even. Next round: $\bf{\nabla}^{\ast}k3$ , $_{\mathrm{k}2}$ tog; repeat from \* across all stitches. Knit 3 rounds even. Next round: $^{\ast}\mathbf{k}2$ , k2tog; repeat from \* across all stitches. Knit 2 rounds even. Next round: $\boldsymbol{\ast}\mathbf{k}\mathbf{1}$ , k2tog; repeat from \* across all stitches. Knit 1 round even. Next round: $_{\mathrm{k}2}$ tog across all stitches; 8 stitches remain. Cut yarn, leaving a tail at least $8^{\circ}$ long. Using a tapestry needle, thread yarn through the stitches on the needles, and draw tightly closed. Weave in ends, and enjoy!
Charto:
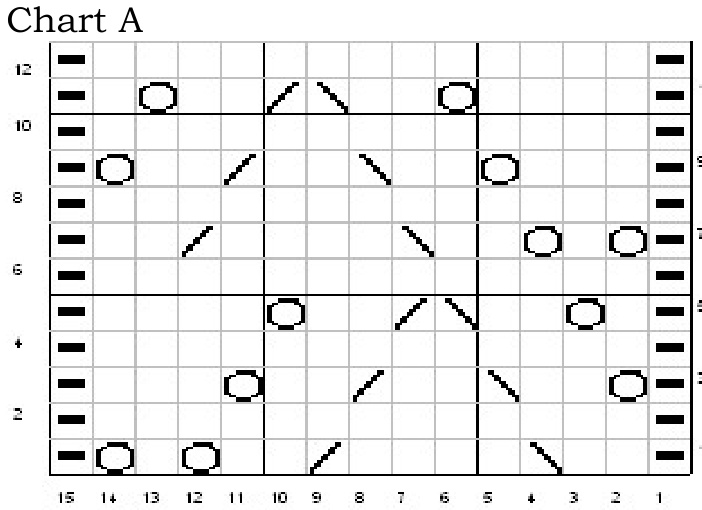
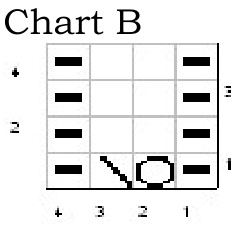
Chart legend knit purl k2tog ssk Abbreviations: k2tog: knit 2 stitches together ssk: slip, slip knit M1: make one done by picking up the bar between two knit stitches, and knitting into the back loop) yo: yarn over


