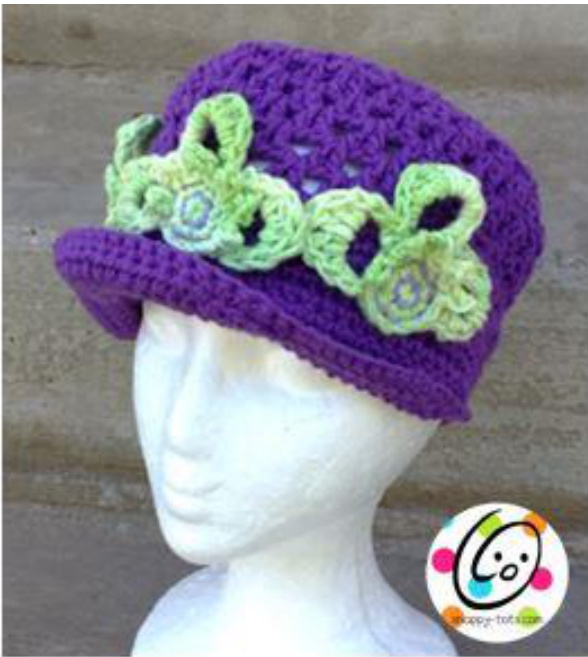
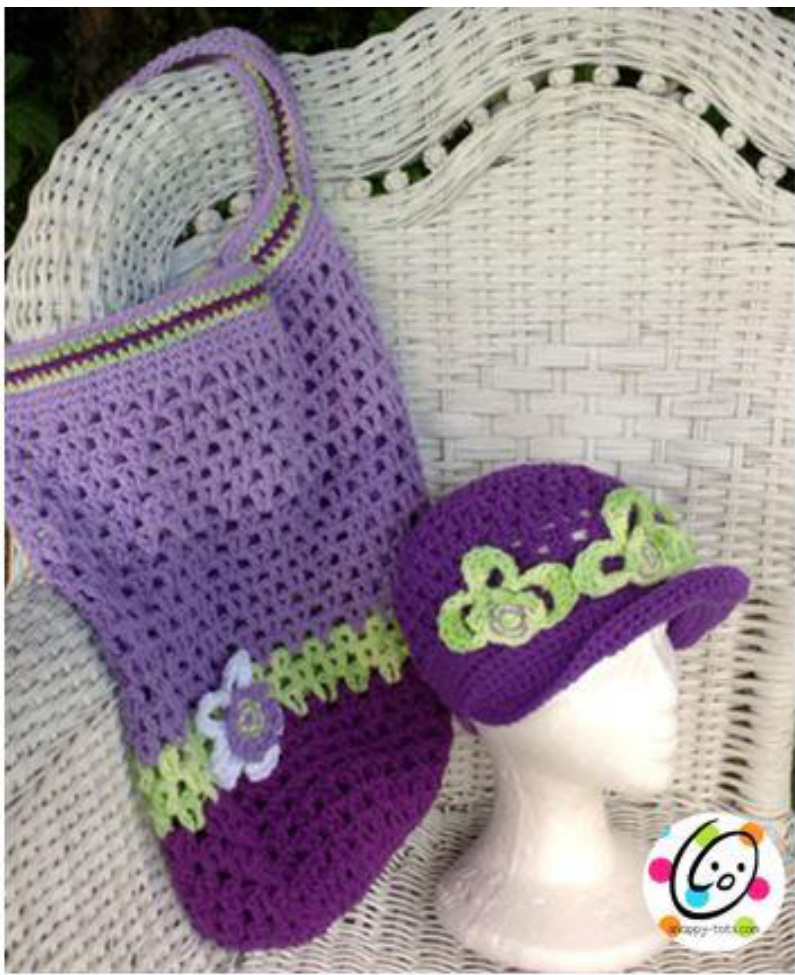
Farmer's Market Set
Materials
Yarn: Worsted weight cotton yarn (Hat: 100 yards of main color, 20 yards for flowers; Bag: 300 yards) Crochet Hooks: H, J Miscellaneous: yarn needle Gauge for hat (with H hook): 4" = 12 dc and 9 rounds Sizes: Child, Teen, Adult Note: Starting on round 3, work stitches in the space between stitches of previous round.
Directions for Child 5-8T:
Width of bottom edge when measured flat: 10" 1. With H hook and ww yarn, start with a magic circle of 9 sts (or preferred method for starting a circle of 9 sC sts), join. (9 sts) 2. Ch 2, 2dc in each st, sl st to join (18sts) 3. See "note" at beginning of pattern. Ch 2, \*2dc in first space, dc in next space\*, repeat to end of round, sl st to join. (27sts) 4. Ch 2, \*2dc in first space, dc in each of next 2 spaces\*, repeat to end of round, sl st to join. (36sts) 5. Ch 2, \*2dc in first space, dc in each of next 3 spaces\*, repeat to end of round, sl st to join. (45sts) 5.25" 6. Ch 2, \*2dc in first space, dc in each of next 4 spaces\*, repeat to end of round, sl st to join. (54sts) 6.25" 7. Ch 2, \*(dc, ch 1, dc) in next space, sk 1 space\*, repeat until 2 spaces remain, sk 1, dc, ch 1, sl st to beginning ch to join. (27 V sts) 8. Ch 3, dc in same space as ch, \*(dc, ch 1, dc) in space between V st (not in the middle of the V, but in between 2 V sts)\*, repeat to end of round, sl st in 2nd ch at beginning to join. (27 V sts) 9. Ch 2, \*dc in space between V st, (dc, ch 1, dc) in space between V sts 8 times\*, repeat once, dc in space between V st, (dc, ch 1, dc) in space between V sts 7 times, dc in last space, ch 1, sl st in top of beginning ch to join. (24 V sts, not counting single dc) 10. Note: For single dc from previous round, start V st with dc in space before post, ch 1, then dc in space after post. This counts as a V st. Ch 3, dc in space after dc, \*(dc, ch 1, dc) in space between V sts 7 times, dc in space before single dc, ch 1, dc in space after single dc\* , repeat until 1 space remains, (dc, ch1, dc), sl st to 2nd ch at beginning. (24 v sts) 11. Ch 2, (dc, ch 1, dc) in space between V sts to end of round, dc in last space, ch 1, sl st in top of beginning ch to join. (24 V sts) 12. Ch 1, sc in same sp, \*2sc in space between 2 V st, sc in middle of V st\*, repeat to end of round, sl st to join. (70 sts) Note: Be careful not to work the following rounds too tightly or it will affect the size of the hat. 13. Ch 1, \*sc2tog, sc 8\*, repeat to end of round, sl st to join. (63 sts) 14-16. Ch 1, sc in each st to end of round, sl st to join.
Choose a Style
Regular beanie: Repeat step 16 two more times or until hat is desired length. Finish off and weave in ends. Add flowers if desired.
Brimmed hat:
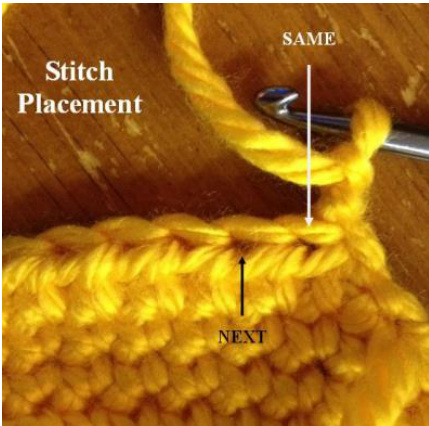
1. Place a marker. Working in FLO for this row, sl st in next 41 sts, ch 1, turn. (41) 2. Working around sl sts from previous row for extra strength, sc around same st and next 18, 2sc around next st, sc, 2sc around next st, sc 19, ch 1, turn. (43) 3. Sl st in next st and in each stitch across, ch 1, turn. (42) 4. Working around previous sl st row, sc around same st and next 18 sts, 2sc around next st, sc around next 20 sts, sc2tog, ch 1, turn. (42) 5. Sc2tog (same and next sts), sc 16, 2sc in next st, sc 3, 2sc in next st, sc in next 17 sts, sc2tog, ch 1, turr (42) 6. Sc2tog (same and next sts), sc 15, 2sc in next st, sc 5, 2sc in next st, sc in next 16 sts, sc2tog, ch 1, turn (42) 7. Sc2tog (same and next sts), sc 14, 2sc in next st, sc 7, 2sc in next st, sc in next 15 sts, sc2tog, ch 1, turn (42) 8. Sc2tog (same and next sts), sc 10, hdc 3, 2hdc in next st, hdc 9, 2hdc in next st, hdc 3, sc in next 11 sts, sc2tog, ch 1, turn. (42) 9. Sc2tog (same and next sts), sc 9, hdc 19, sc 10, sc2tog (do not turn). (40) 10. This step is worked around entire bottom of hat and visor and slightly tighter than the rest of the hat. Sc 5 sts along side of visor. Sc2tog (one st on visor and one st on hat), pulling snug. See arrows in photo. Sc in each st across back of hat until 1 st before other side of visor. Sc2tog (one st on hat and one st or visor), pulling snug. Sc across visor, sl st in first st of round. Finish off and weave in ends. Finger shape the visor by tugging into shape as desired. Flip the visor section up for a fun look. It also can be worn down with a slight arc in front.
Directions for Teen:
Width of bottom edge when measured flat: 9.75' 1. With H hook and ww yarn, start with a magic circle of 9 sts (or preferred method for starting a circle of 9 sC sts), join. (9 sts) 2. Ch 2, 2dc in each st, sl st to join (18sts) 3. See “note" at beginning of pattern. Ch 2, \*2dc in first space, dc in next space\*, repeat to end of round, sl st to join. (27sts) 4. Ch 2, \*2dc in first space, dc in each of next 2 spaces\*, repeat to end of round, sl st to join. (36sts) 5. Ch 2, \*2dc in first space, dc in each of next 3 spaces\*, repeat to end of round, sl st to join. (45sts) 5.25" 6. Ch 2,\*2dc in first space, dc in each of next 4 spaces\*, repeat to end of round, sl st to join. (54sts) 6.25" 7. Ch 2, \*2dc in first space, dc in each of next 8 spaces\*, repeat to end of round, sl st to join. (60sts) 7" 8. Ch 2, \*(dc, ch 1, dc) in next space, sk 1 space\*, repeat until 2 spaces remain, sk 1, dc, ch 1, sl st to beginning ch to join. (30 V sts) 9. Ch 3, dc in same space as ch,\*(dc, ch 1, dc) in space between V st (not in the middle of the V, but in between 2 V sts)\*, repeat to end of round, sl st in 2nd ch at beginning to join. (30 V sts) 10. Ch 2, \*dc in space between V st, (dc, ch 1, dc) in space between V sts 9 times\*, repeat once, dc in space between V st, (dc, ch 1, dc) in space between V sts 8 times, dc in last space, ch 1, sl st in top of beginning ch to join. (27 V sts, not counting single dc) 11. Note: For single dc from previous round, start V st with dc in space before post, ch 1, then dc in space after post. This counts as a V st. Ch 2, dc in space after first dc from previous round, (dc, ch 1, dc) in space between V sts 8 times, dc in space before single dc, ch 1, dc in space after single dc, (dc, ch 1, dc) in space between V sts 3 times, dc in next space, (dc, ch 1, dc) in space between V sts 4 times, dc in space before single dc, ch 1, dc in space after single dc, (dc, ch 1, dc) in space between V sts 8 times, sl st in top of beginning ch to join. (25 V sts, not counting single dc) 12. Ch 3, dc in space after first post, (dc, ch 1, dc) in space between V sts 11 times, dc in space before single dc, ch 1, dc in space after single dc, (dc, ch 1, dc) in space between V sts 12 times, sl st in 2nd ct at beginning to join. (28 V sts) 13. Ch 1, sc in same sp (before single dc), 2sc in next space (after single dc), sc in middle of V st, \*2sc in space between 2 V st, sc in middle of V st\*, repeat to end of round, sl st to join. (76 sts) Note: Be careful not to work the following rounds too tightly or it will affect the size of the hat 14. Ch 1, sc 4, \*sc2tog, sc 10\*, repeat to end of round, sl st to join. (70 sts) 15. Ch 1, \*sc2tog, sc 12\*, repeat to end of round, sl st to join. (65sts) 17-19. Ch 1, sc in each st to end of round, sl st to join.
Choose a Style
Regular beanie: Repeat step 17 two more times or until hat is desired length. Finish off and weave in ends. Add flowers if desired. Brimmed hat: 1. Place a marker. Working in FLO for this row, sl st in next 41 sts, ch 1, turn. (41) 2. Working around sl sts from previous row for extra strength, sc around same st and next 18, 2sc around next st, sc, 2sc around next st, sc 19, ch 1, turn. (43) 3. Sl st in next st and in each stitch across, ch 1, turn. (42) 4. Working around previous sl st row, sc around same st and next 18 sts, 2sc around next st, sc around next 20 sts, sc2tog, ch 1, turn. (42) 5. Sc2tog (same and next sts), sc 16, 2sc in next st, sc 3, 2sc in next st, sc in next 17 sts, sc2tog, ch 1, turn. (42) 6. Sc2tog (same and next sts), sc 15, 2sc in next st, sc 5, 2sc in next st, sc in next 16 sts, sc2tog, ch 1, turn. (42) 7. Sc2tog (same and next sts), sc 14, 2sc in next st, sc 7, 2sc in next st, sc in next 15 sts, sc2tog, ch 1, turn. (42) 8. Sc2tog (same and next sts), sc 10, hdc 3, 2hdc in next st, hdc 9, 2hdc in next st, hdc 3, sc in next 11 sts, sc2tog, ch 1, turn. (42) 9. Sc2tog (same and next sts), sc 9, hdc 19, sc 10, sc2tog (do not turn). (40) 10. This step is worked around entire bottom of hat and visor and slightly tighter than the rest of the hat. Sc 5 sts along side of visor. Sc2tog (one st on visor and one st on hat), pulling snug. See arrows in photo. Sc in each st across back of hat until 1 st before other side of visor. Sc2tog (one st on hat and one st on visor), pulling snug. Sc across visor, sl st in first st of round. Finish off and weave in ends. Finger shape the visor by tugging into shape as desired. Flip the visor section up for a fun look. It also can be worn down with a slight arc in front.
Directions for Adult:
Width of bottom edge when measured flat: 1. With H hook and ww yarn, start with a magic circle of 9 sts (or preferred method for starting a circle of 9 sc sts), join. (9 sts) 2. Ch 2, 2dc in each st, sl st to join (18sts) 3. See “note" at beginning of pattern. Ch 2, \*2dc in first space, dc in next space\*, repeat to end of round, sl st to join. (27sts) 4. Ch 2, \*2dc in first space, dc in each of next 2 spaces\*, repeat to end of round, sl st to join. (36sts) 5. Ch 2, \*2dc in first space, dc in each of next 3 spaces\*, repeat to end of round, sl st to join. (45sts) 5.25" 6. Ch 2, \*2dc in first space, dc in each of next 4 spaces\*, repeat to end of round, sl st to join. (54sts) 6.25" 7. Ch 2, \*2dc in first space, dc in each of next 5 spaces\*, repeat to end of round, sl st to join. (63sts) 7.25" 8. Ch 2, \*(dc, ch 1, dc) in next space, sk 1 space\*, repeat until 2 spaces remain, sk 1, dc, ch 1, sl st to beginning ch to join. (32 V sts) 9. Ch 3, dc in same space as ch, \*(dc, ch 1, dc) in space between V st (not in the middle of the V, but in between 2 V sts)\*, repeat to end of round, sl st in 2nd ch at beginning to join. (32 V sts) 10. Ch 2, \*dc in space between V st, (dc, ch 1, dc) in space between V sts 7 times\*, repeat 2 more times, dc in space between V st, (dc, ch 1, dc) in space between V sts 6 times, dc in last space, ch 1, sl st in top of beginning ch to join. (28 V sts, not counting single dc) 11. Note: For single dc from previous round, start V st with dc in space before post, ch 1, then dc in space after post. This counts as a V st. Ch 3, dc in same space as ch (before first post), ch 1, dc in space after post, \*(dc, ch 1, dc) in space between V sts 6 times, dc in space before single dc, ch 1, dc in space after single dc\*, repeat to end of round, sl st in 2nd ch at beginning to join. (28 V sts) 12-13. Ch 2, (dc, ch 1, dc) in space between V sts to end of round, dc in last space, ch 1, sl st in top of beginning ch to join. (28 V sts) 14. Ch 1, sc in same sp, \*2sc in space between 2 V st, sc in middle of V st\*, repeat to end of round, sl st to join. (85 sts) Note: Be careful not to work the following rounds too tightly or it will affect the size of the hat. 15. Ch 1, sc, \*sc2tog, sc 10\*, repeat to end of round, sl st to join. (78 sts) 16. Ch 1, sc 6, \*sc2tog, sc 7\*, repeat to end of round, sl st to join. (70sts) 17-19. Ch 1, sc in each st to end of round, sl st to join.
Choose a Style
Regular beanie: Repeat step 17 two more times or until hat is desired length. Finish off and weave in ends. Add flowers if desired. Brimmed hat: 1. Place a marker. Working in FLO for this row, sl st in next 45 sts, ch 1, turn. (45) 2. Working around sl sts from previous row for extra strength, sc around same st and next 20, 2sc around next st, sc, 2sc around next st, sc 21, ch 1, turn. (47) 3. Sl st in next st and in each stitch across, ch 1, turn. (46) 4. Working around previous sl st row, sc around same st and next 20 sts, 2sc around next st, sc around next 22 sts, sc2tog, ch 1, turn. (46) 5. Sc2tog (same and next sts), sc 17, 2sc in next st, sc 5, 2sc in next st, sc in next 18 sts, sc2tog, ch 1, turn. (46) 6. Sc2tog (same and next sts), sc 16, 2sc in next st, sc 7, 2sc in next st, sc in next 17 sts, sc2tog, ch 1, turn. (46) 7. Sc2tog (same and next sts), sc 15, 2sc in next st, sc 9, 2sc in next st, sc in next 16 sts, sc2tog, ch 1,turn. (46) 8. Sc2tog (same and next sts), sc 11, hdc 3, 2hdc in next st, hdc 11, 2hdc in next st, hdc 4, sc in next 11 sts, sc2tog, ch 1, turn. (46) 9. Sc2tog (same and next sts), sc 10, hdc 21, sc 11, sc2tog (do not turn). (44) 10. This step is worked around entire bottom of hat and visor and slightly tighter than the rest of the hat. Sc 5 sts along side of visor. Sc2tog (one st on visor and one st on hat), pulling snug. See arrows in photo. Sc in each st across back of hat until 1 st before other side of visor. Sc2tog (one st on hat and one st on visor), pulling snug. Sc across visor, sl st in first st of round. Finish off and weave in ends. Finger shape the visor by tugging into shape as desired. Flip the visor section up for a fun look. It also can be worn down with a slight arc in front.
Bag:
Sample is 19" x 14"; stripes: 13 rounds purple yarn, 3 rounds green yarn, 15 rounds lavender yarn 1. With J hook and ww yarn, start with a magic circle of 9 sts (or preferred method for starting a circle of 9 sc sts), join. (9 sts) 2. Ch 2, 2dc in each st, sl st to join (18sts) 3. See "note" at beginning of pattern. Ch 2, \*2dc in first space, dc in next space\*, repeat to end of round, sl st to join. (27sts) 4. Ch 2, \*2dc in first space, dc in each of next 2 spaces\*, repeat to end of round, sl st to join. (36sts) 5. Ch 2, \*2dc in first space, dc in each of next 3 spaces\*, repeat to end of round, sl st to join. (45sts) 5.25" 6. Ch 2, \*2dc in first space, dc in each of next 4 spaces\*, repeat to end of round, sl st to join. (54sts) 6.25" 7. Ch 2, \*2dc in first space, dc in each of next 5 spaces\*, repeat to end of round, sl st to join. (63sts) 7.25" 8. Ch 2, \*(dc, ch 1, dc) in next space, sk 1 space\*, repeat until 2 spaces remain, sk 1, dc, ch 1, sl st to beginning ch to join. (32 V sts) 9. Ch 3, dc in same space as ch, \*(dc, ch 1, dc) in space between V st (not in the middle of the V, but in between 2 V sts)\*, repeat to end of round, sl st in 2nd ch at beginning to join. (32 V sts) 10. Repeat step 9 until bag is desired length. 11. Ch 1, sc in same sp, \*2sc in space between 2 V st, sc in middle of V st\*, repeat to end of round, sl st to join. (94 sts) 12. This step creates the first handle. Ch 1, sc 47, ch 60, sl st in first st of this round (make sure ch is not twisted. 13. Ch 1, sc in each st to end of round, sl st to join. 14-17. Ch 1, sc in each st to end of round, sl st to join. Note: for the sample I changed colors each round: green, dk purple, green, lavender. Finish off and weave in end. 18. This step creates the second handle. With first handle to your right (if right handed), attach lavender yarn in st shown in photo (it is the last st worked on first handle before ch 60).
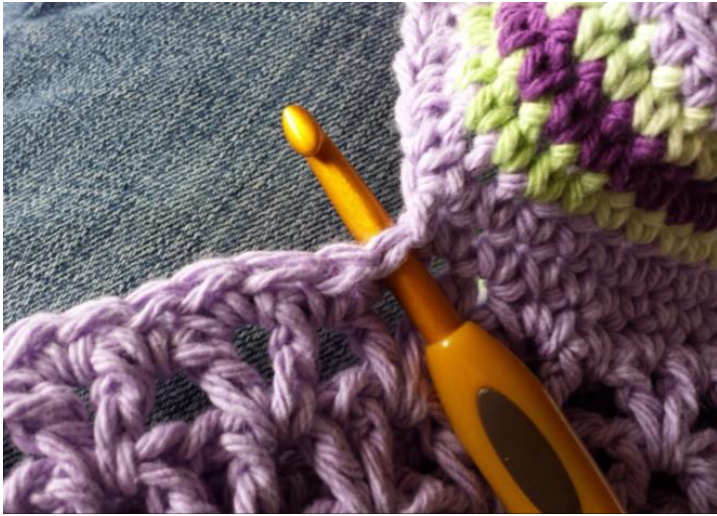
Sc in each st to opposite side, ending with a st in same as last worked st from first handle, ch 60, sl st in first st of this round (make sure ch is not twisted. 19. Ch 1, sc in each st to end of round, sl st to join. 20-23. Ch 1, sc in each st to end of round, sl st to join. Note: for the sample I changed colors each round: green, dk purple, green, lavender. Finish off and weave in end.
Half Flowers (make 3-5):
1. With H hook and yarn color of choice, start with a magic circle of 5 sts (or preferred method for starting a circle of 5 sc sts), join. (5sts) 2. Ch 1, 2sc in each st to end of round, sl st to join. (10sts) 3. \*Ch 8, sl st in BLO of next st, slst in BLO of next st\*, repeat 2 more times, sc 5 (this is the bottom of the flower). 4. \*(2sc, hdc, 3dc, hdc, 2sc) in ch 8 loop, sl st in underlined st from previous round\*, repeat 2 more times, sl St 5. 5. Ch 1, working in remaining front loops from step 3, \*sl st in next st, ch 4, sl st in same st\*, repeat 5 more times (6 loops). Finish off and weave in tails. Finger shape the flowers by bending the top of each petal back slightly. With yarn needle and contrasting yarn, stitch center of each flower to hat. One flower is front center, with a flower on eachside.
Full Flower (make 1):
1. With H hook and yarn color of choice, start with a magic circle of 5 sts (or preferred method for starting a circle of 5 sc sts), join. (5sts) 2. Ch 1, 2sc in each st to end of round, sl st to join. (10sts) 3. \*Ch 8, sl st in BLO of next st, sl st in BLO of next st\*, repeat to end of round. 4. \*(2sc, hdc, 3dc, hdc, 2sc) in ch 8 loop, sl st in underlined st from previous round\*, repeat to end of round. 5. Ch 1, working in remaining front loops from step 3, \*sl st in next st, ch 4, sl st in same st\*, repeat to end of round. Finish off and weave in tails. Finger shape the flowers by bending the top of each petal back slightly. With yarn needle and contrasting yarn, stitch center of each flower to hat or bag. Note: a double strand of yarn shows up better with this stitching. ; written using blue yarn for top, black yarn for sc rounds, orange yarn for brir Ribbon: 1. With H hook and black yarn, ch 25, sc in 2nd ch from hook and in each ch across. (24sts) 2. Ch 1, turn, sl st 2, sc, hdc 18, sc, sl st 2. Finish off and weave in ends. 3. Fold ribbon in half. With black yarn and yarn needle sew middle of ribbon to back center of hat in black band section.

22 Helpful Tips
| Common Crochet Abbreviations | |
| Ch - chain | Sc2tog - decrease, single crochet 2 sts together |
| St - stitch | Dc2tog - decrease, double crochet 2 sts together |
| Sp - space; sps - spaces | Fp - front post |
| Sc - single crochet | Bp - back post |
| Hdc - half double crochet | Fpdc - front post double crochet |
| Dc - double crochet | Bpdc - back post double crochet |
| Beg - beginning | BLO - back loop only |
| Sl st - slip stitch | FLO - front loop only |
| Yo - yarn over | ** - repeat instructions between, as many ti times as indicated |
If you have any questions, comments or suggestions please email heidi @ snappy-tots.com. This pattern has been tested. It is very important to me that information is easy to understand and accurate. I would appreciate knowing any errors found so they could be fixed. Thank you in advance. This pattern is copyrighted to snappytots and may not be copied for resale in part or whole. It is illegal to post this pattern online or share with others without written consent from Heidi Yates. Items created from this pattern MAY be sold. Please include a link to snappy-tots.com if selling online.
| Brand new babies Head Circ:12"-13"Hat Circ:11-12"Hat Height:5"-5.5 |
| Newborm Head Circ:13"-14"Hat Circ:11.5"-13"Hat Height:5.5"to 6” |
| Baby-3to6months Head Circ:14"-17"Hat Circ:13"-16"Hat Height:6.5” |
| Baby-6to12months |
| Head Circ:16"-19"Hat Circ:15-18"Hat Height:7” |
| Toddler(1-3years) Head Circ:18"-20"Hat Circ:17"-19"Hat Height:7.5" |
| Child(3-10years) |
| Head Circ:19"-20.5"Hat Circ:18"-19.5"Hat Height:8 Preteen/Teen |
| Head Circ:20.5"-22"Hat Circ:19.5”-21"Hat Height:8.5" |
| AdultWoman Head Circ:21.5"-22.5"Hat Circ:20.5”-21.5"Hat Height: 9" |
| AdultMan Snappy-tots.com |
HEADANDHATSIZECHART newbabiestoadultmen Iprefer tomake hats approximately 1”smaller than the head circumference so they will stretch and not be too big.Note:All measurements are approximate and based on“averagehead sizes according to several online sources.Hat“height”is themeasurement from top of crown to bottomedge. Jisit Snappy Tots on facebook for giveaways, new release announcements, events and fun.


