Little Owl's Hut www.LittleOwlsHut.com
Crochet + Kniting Pattern
ByGalinaAstashova Skill level: Experienced

About this pattern
The toy is crocheted in continuous spirals without joining the rounds. You will need a stitch marker to keep track of where the beginning of each round starts. Move the marker up to the first stitch of the next round after finishing the previous one. If you don't have a stitch marker you can always use a scrap of contrasting yarn instead. You can see it in my photos. I use USA terminology for my pattern (don't worry if you use UK terms, all the differences are explained in the pattern).
Finished size
Finished size approx. 20 cm (7.8 inches) tall, 30 cm (11.9 inches) long using the yarn and crochet hook stated in the pattern.

Bramblehog the Alien
Materials
White yarn for the eyes and claws (of the same weight as the yarn for the main parts) - small amount. Tip: You can use any yarn that is suitable for the crochet hook o.8-1.5 mm. I used the yarn approximately 50g/275m. If you use thicker yarn, the height of the toy will increase sufficiently. Make sure purple, pink and white yarn is of the same weight. 'Any eyelash yarn for the vest matching the color of the main yarn - 100 g. I used “Swan's Down" by Nazar (1oo% Nylon (Polyamide), 100g/170m). Steel crochet hook. I used 1 mm (UK 6 1/2, US 12) crochet hook for the yarn mentioned above. A pair of knitting needles 3.5 mm for the vest. Any stuffing. A pair of ready-made eyes. Sewing thread of matching colors for sewing small pieces. Tapestry needle for tightening and sewing needle. Wooden stick for stuffing hard-to-get places. Tip: If you don't have special sticks for stuffing, it is very convenient to stuff hard-to-get-to places using wooden sticks, toothpicks (if opening is very small), or brushes of different thickness with wooden handles. Four feathers matching the color of the body. White plastic matte beads for the teeth - about 40 (quantity depends on the size of the jaw). A pair of plastic fangs (you can make them using polymer clay (instructions are not given in the pattern) or crochet them instead (visit this page for crochet instructions http://goo.gl/2ezsc2) Strong thread for tightening. PVCsingle core copper electrical wire approximately 150 cm (59 inches) long 3 mm in diameter. Use only copper wire for the frame as copper can better stand bending compared to aluminum. You can buy it at electric supplies stores.
Plaster - adhesive-backed fabric tape 1 cm wide to work up the wire (the one you use to cover wounds).
Tip (make it right)
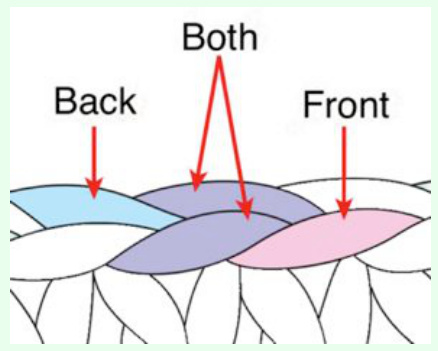
If there are no special notes, the toy is crocheted under both parts of the loop. In some rows, there are special notes:‘into the front loop only' or “into the back loop only'. In that case, you need to follow these instructions.
TIP (yarn and wire)
If you use different yarn, the toy will be bigger or smaller and you will need more or less yarn and wire than stated in the pattern (i.e. thicker yarn will produce a larger toy and you may require more yarn and wire). If you decide to use thicker yarn you should buy thicker wire as well. The thicker your yarn the taller the toy will be.
Tip (gauge)
When making toys, you should use a much smaller hook than recommended for the yarn you choose. Make sure you crochet tight enough; otherwise, the stuffing will show through the holes.
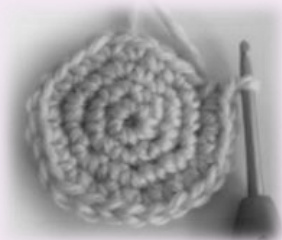
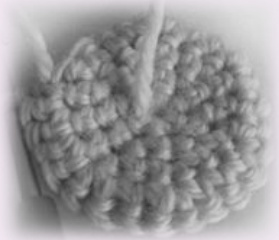
Tip (make it right)
When making toys the right side looks like this:
And the backside looks like this:
Abbreviations
ch(s) = chain(s) inc(s) = increasing(s) (2 sc in 1 st) double inc = double increasing (3 sc in 1 st) double dec = double decreasing (single crochet three together) st(s) = stitch(es) dec(s) = decreasing(s) (sc2tog) sc2tog =single crochet two stitches together sl st = slip stitch sc = single crochet dc = double crochet rnd = round K = knit P = purl yo = yarn over If there is a record in the brackets in the pattern, multiplied by some number, for example (3 sc, 1 inc) x 3, it means you need to repeat this action 3 times, that is 3 sc, 1 inc, 3 sc, 1 inc, 3 sc, 1 inc.
USA/UK terminology comparison chart.
| Abbreviations USA Abbreviations |
| s UK ch - chain ch - chain |
| sc -single crochet dc-doublecrochet |
| hdc -half double crochet htr-halftreble |
| dc - double crochet tr - treble |
| tr - treble (triple crochet) dtr-double treble |
| dtr-double treble tr tr - triple treble |
| sl st - slip stitch sl - slip stitch |
Other differences in crochet terminology used:

Skill levels
| Terminology USA | Terminology UK |
| fasten off | cast off |
| skip | miss |
| gauge | tension |
| over (yo) yarn | yarn 1over hook (yoh) |

Projects for first-time crocheters using basic stitches. Minimal shaping. INTERMEDIATE EXPERIENCED Projects using yarn with basic stitches, repetitive stitch patterns, simple color changes, and simple shaping and finishing. Projects using a variety of techniques, such as basic lace patterns or color patterns, mid-level shaping and finishing. Projects with intricate stitch patterns, techniques and dimension, such as non-repeating patterns, multicolor techniques, fine threads, small hooks, detailed shaping and refined finishing. Any questions or comments: info@LittleOwlsHut.com
NOTE!!!
If you decided to use much thicker yarn than recommended in the pattern (for example DK/8 ply and hook 3 mm) then the parts will twist more than needed. In this case you need to work Shift stitches. Since the pattern isn't written for heavier yarn weight 1I can't tell you where exactly you have to work shift stitches. By default you don't need to work shift stitches. Shift stitch is an extra single crochet stitch (stitches) in the end of a round worked to move the beginning of next round one of few stitches further than the original beginning of next round. If you use thicker yarn you will need to keep the marker going as on my pictures. If you notice that marker moves to the right more, you need to work an extra stitch (or stitches) in the end of round (shift stitch(es)). Place marker after that/those extra stitches. Now last worked extra stitch of the round becomes 1st st of next round.Shift stitch is not included in description of rounds.
Eye (make 2)
Work with white yarn, crochet hook 1 mm. Rnd 1. 6 sc in magic ring Rnd 2. 6 inc = 12 sts Rnd 3. (1 sc, 1 inc) x 6 = 18 sts Rnd 4. (2 sc, 1 inc) x 6 = 24 sts Rnd 5. (3 sc, 1inc) x 6 = 30 sts Rnd 6. 8 sc, 2 inc, 20 sc = 32 sts Rnd 7. 9 sc, 2 inc, 21 sc = 34 sts Rnd 8. 11 sc, 1 inc, 22 sc = 35 sts Rnd 9. 11 sc, 1 inc, 23 sc = 36 sts Rnd 10. 25 sc, 1 dec, 1 sc, 2 dec, 1 sc, 1 dec, 1 sc = 32 sts
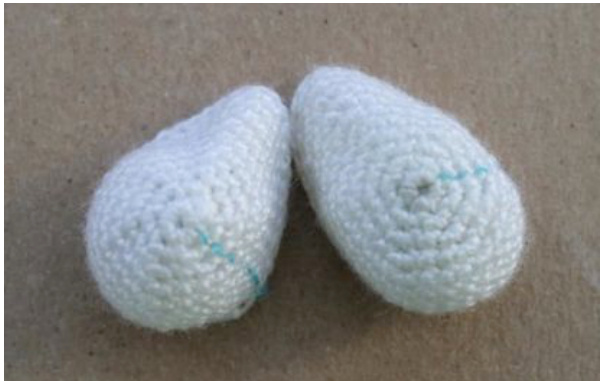
End with a sl st. Fasten off. Weave in loose ends.
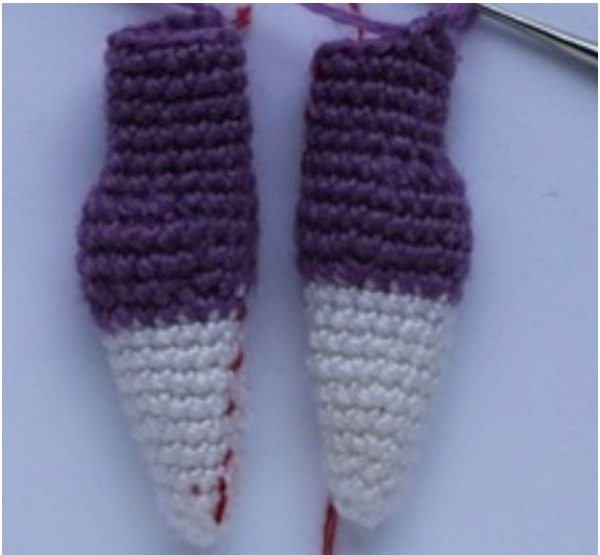
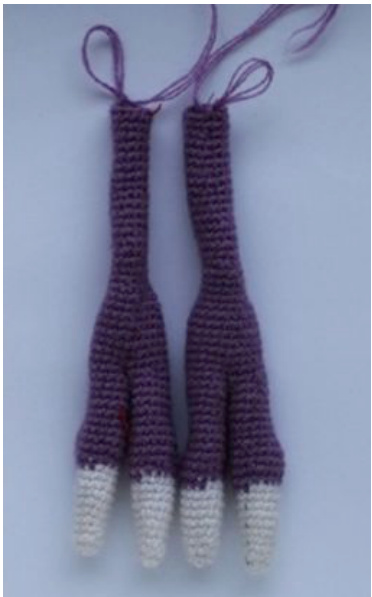
Front leg (make 2)
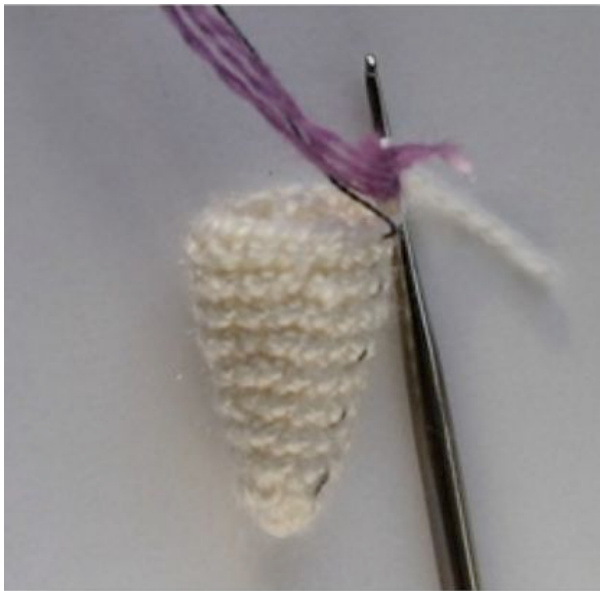
Start working the leg with claws.
First finger
Work with white yarn, crochet hook 1 mm. Rnd 1. 6 sc in magic ring Rnd 2. (1 sc, 1 inc) x 3 = 9 sts Rnd 3. 1 sc in each st around = 9 sts Rnd 4. (2 sc, 1 inc) x 3 = 12 sts Rnd 5. 1 sc in each st around = 12 sts Rnd 6. (3 sc, 1 inc) x 3 = 15 sts Rnds 7-10. 1 sc in each st around = 15 sts TIP: If you want to have smooth transition from white color to the main color than work 1 sl st at the end of rnd 10 and fasten off. Attach main color yarn at the place where you worked 1 sl st and continue crocheting as stated in the pattern. Join main yarn at the end of Rnd 10.
Rnd 11. (2 sc, 1 inc) x 5 = 20 sts Rnds 12-14. 1 sc in each st around = 20 sts Rnd 15. 4 sc, 6 dec, 4 sc = 14 sts Rnds 16-21. 1 sc in each st around = 14 sts Fasten off. Remove the marker.
Second finger
Work Rnds 1-2o the same way you did for the first finger.
Rnd 21. Work 11 sc, join the first finger and work 3 sc hooking through both sts of the second finger and 6th, 5th and 4th sts of the first finger.
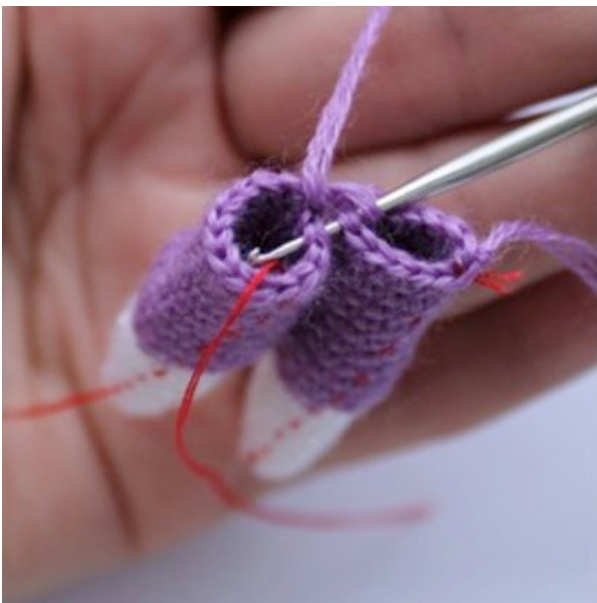
Now work around the big circle Rnds 22-29.1 sc in each st around = 22 sts Rnd 30. 8 sc, (1 dec,1 sc) x 3,1 dec, 3 sc=18 sts Rnd 31. 8 sc, 3 dec, 4 sc = 15 sts Rnds 32-35. 1 sc in each st around = 15 sts Rnd 36. 2 sc, 1 dec, 6 sc, 1 inc, 4 sc=15 sts Rnd 37. 1 sc in each st around = 15 sts Rnd 38. 2 sc, 1 dec, 6 sc, 1 inc, 4 sc=15 sts Rnd 39. 1 sc in each st around = 15 sts Rnd 40. 2 sc, 1 dec, 6 sc, 1 inc, 4 sc=15 sts Rnd 41. 1 sc in each st around = 15 sts Rnd 42. 3 sc, 1 dec, 6 sc, 1 inc, 3 sc=15 sts Rnd 43. 1 sc in each st around = 15 sts Rnd 44. 3 sc, 1 dec, 6 sc, 1 inc, 3 sc =15 sts Rnd 45. 1 sc in each st around = 15 sts Rnd 46. 3 sc, 1 dec, 6 sc, 1 inc, 3 sc =15 sts Rnd 47. 1 sc in each st around = 15 sts Rnd 48. 3 sc, 1 dec, 6 sc, 1 inc, 3 sc =15 sts Rnd 49. 1 sc in each st around = 15 sts Rnd 5o is worked differently for the left and the right legs. Rnd 5o for the left leg: Work 4 sc. Leave the remaining sts unworked. Do not fasten off but cut the thread leaving a tail for crocheting the leg into the body. Rnd 5o for the right leg: Work 11 sc. Leave the remaining sts unworked. Do not fasten off but cut the thread leaving a tail for crocheting the leg into the body.
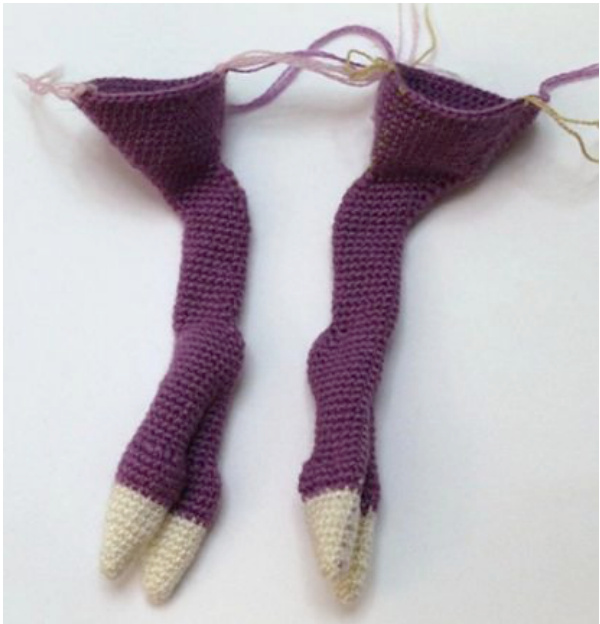
Back leg (make 2)
Start working the leg with claws. Left back leg Work with white yarn, crochet hook 1 mm. First toe Rnd 1. 6 sc in magic ring Rnd 2. (1 sc, 1 inc) x 3 = 9 sts Rnd 3. 1 sc in each st around = 9 sts Rnd 4. (2 sc, 1 inc) x 3 = 12 sts Rnd 5. 1 sc in each st around = 12 sts Rnd 6. (3 sc, 1 inc) x 3 = 15 sts Rnds 7-10. 1 sc in each st around = 15 sts Join main yarn. Rnd 11. (2 sc, 1 inc) x 5 = 20 sts Rnd 12-14. 1 sc in each st around = 20 sts Rnd 15. 4 sc, 6 dec, 4 sc = 14 sts Rnds 16-21. 1 sc in each st around = 14 sts Fasten off. Remove the marker.
Second toe
Work Rnds 1-2o the same way you did for the first toe. Rnd 21. Work 11 sc, join the first toe and work 3 sc hooking through both sts of the second finger and 6th, 5th and 4th sts of the first toe. Now work around the big circle. Rnds 22-29. 1 sc in each st around = 22 sts Rnd 30. 2 sc, 1 inc, 5 sc, (1 dec, 1 sc) x 3, 1 dec, 3 sc = 19 sts Rnd 31. 2 sc, 1inc, 5 sc, 4 dec, 3 sc = 16 sts Rnd 32. 2 sc, 1inc, 7 sc, 1 dec, 4 sc = 16 sts Rnd 33. 12 sc, 1 inc, 3 sc =17 sts Rnds 34-44. 1 sc in each st around = 17 sts Rnd 45. 6 sc, 1 double inc, 7 sc, 1 dec, 1 sc = 18 sts Rnd 46. 7 sc, 1 double inc, 8 sc, 1 dec = 19 sts Rnd 47. 8 sc, 1 double inc, 8 sc, 1 dec = 20 sts Rnd 48. 10 sc, 1 double inc, 7 sc, 1 dec = 21 sts Rnds 49-50. 1 dec, 9 sc, 1 double inc, 7 sc, 1 dec = 21 sts Rnd 51. 1 dec, 9 sc, 1 double inc, 9 sc = 22 sts Rnd 52. 11 sc, 1 double inc, 10 sc= 24 sts Rnd 53. (1 sc, 1 inc) x 7, 10 sc = 31 sts Rnd 54. 1 sc in each st around = 31 sts Rnd 55. 20 sc, 1 double inc, 10 sc = 33 sts Rnd 56. (2 sc, 1 inc) x 7, 12 sc = 40 sts Rnd 57.1 sc in each st around = 40 sts Rnd 58. 28 sc, 1 double inc, 11 sc = 42 sts Rnd 59. (3 sc, 1inc) x 7, 14 sc = 49 sts Rnd 6o. 1 sc in each st around = 49 sts Rnd 61. 36 sc, 1 double inc, 12 sc = 51 sts Rnd 62. 1 sc in each st around = 51 sts Rnd 63. 37 sc Leave the remaining sts unworked. Fasten off leav tail for crocheting the leg into the body. Mark th 38-51 and 1-5.
Right back leg
Work Rnds 1-52 the same way you did for the left back leg. Rnd 53. 10 sc, (1 sc, 1 inc) x 7 = 31 sts Rnd 54. 1 sc in each st around = 31 sts Rnd 55. 14 sc, 1 double inc, 16 sc = 33 sts Rnd 56. 12 sc, (2 sc, 1 inc) x 7 = 40 sts Rnd 57. 1 sc in each st around = 40 sts Rnd 58. 15 sc, 1 double inc, 24 sc = 42 sts Rnd 59. 14 sc, (3 sc, 1 inc) x 7 = 49 sts Rnd 6o. 1 sc in each st around = 49 sts Rnd 61. 17 sc, 1 double inc, 31 sc = 51 sts Rnd 62. 1 sc in each st around = 51 sts Fasten off. Mark the sts 1-19.
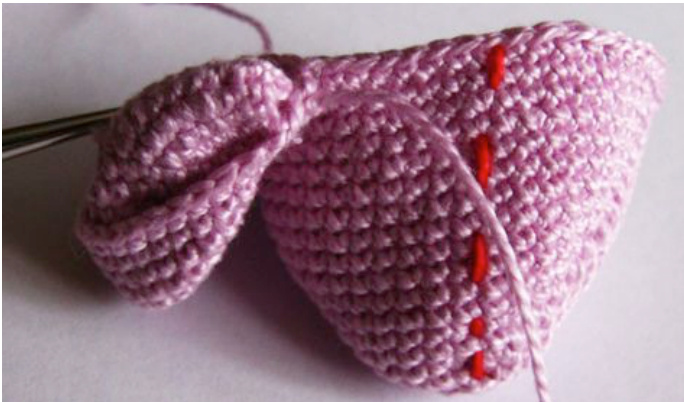
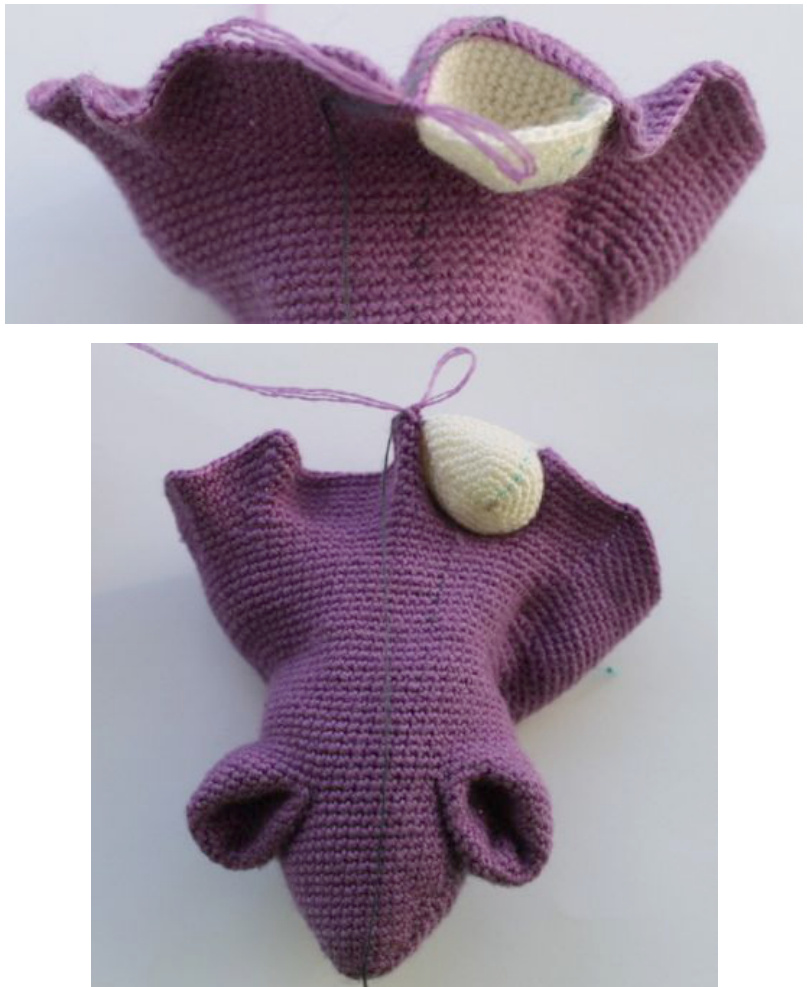
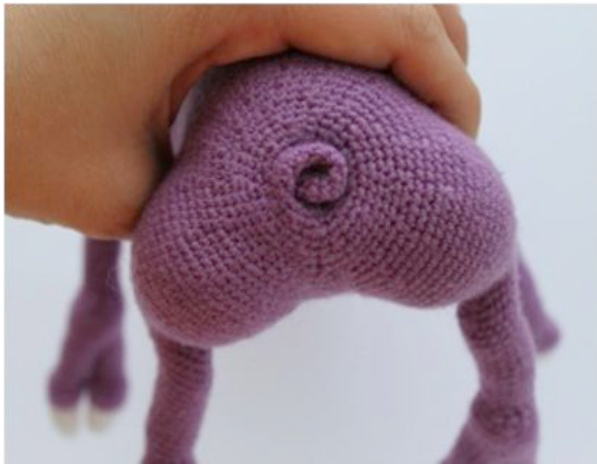
Nostril (make 2)
Work with main yarn. Crochet hook 1 mm. Rnd 1. 6 sc in magic ring Rnd 2. 6 inc = 12 sts Rnd 3. (2 sc, 1 inc) x 4 = 16 sts Rnd 4. (3 sc, 1inc) x 4 = 20 sts Rnd 5. (4 sc, 1 inc) x 4 = 24 sts Rnd 6. (5 sc, 1 inc) x 4 = 28 sts Rnd 7. 7 sc, 1 inc, 4 sc, 1 inc, 8 sc, 1 inc, 4 sc, 1 inc, 1 sc =32sts Rnds 8-11. 1 sc in each st around = 32 sts Rnd 12. 25 sc Leave the remaining sts unworked. Rnd 13. Work 1 sc in the first st. Fasten off. Fold the nostril as shown in the pictures
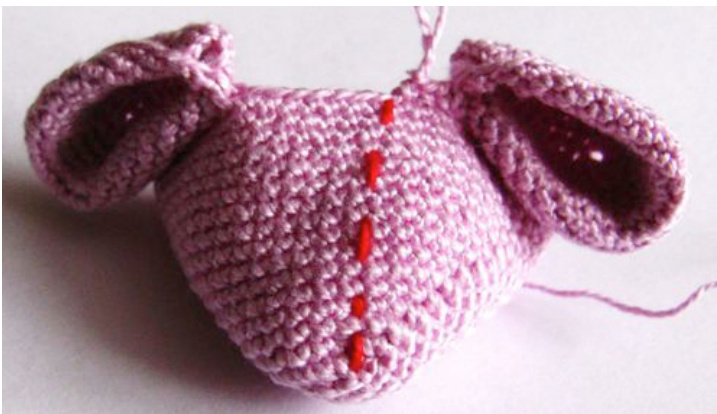
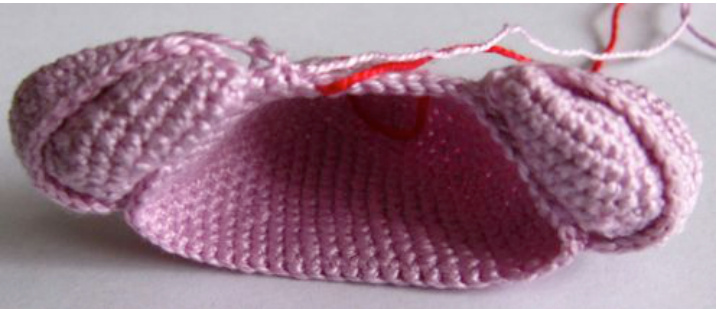
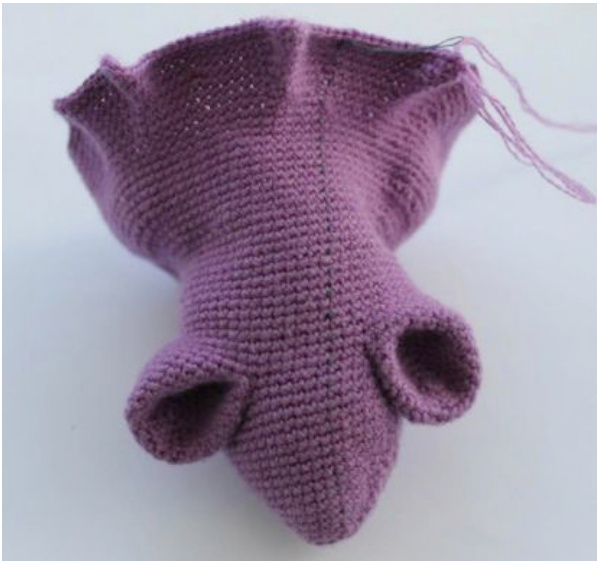
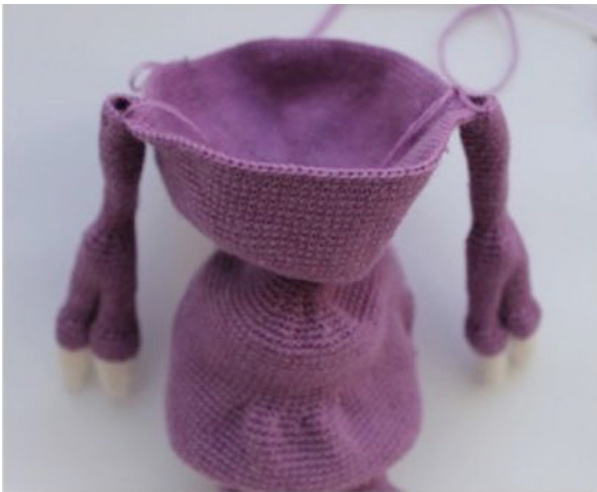
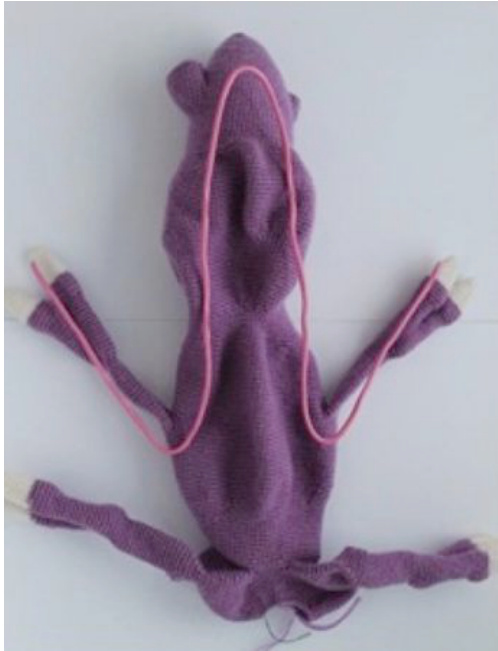
Head and body (as one piece)
Start with the nose.
Nose
Work with main yarn, crochet hook 1 mm.
Rnd 1. Ch 5
Start from 2nd st from the hook and work around the chain. Rnd 2. 3 sc, 1 double inc, 3 sc, 1 double inc = 12 sts Rnd 3. 4 sc, 1 double inc, 5 sc, 1 double inc, 1 sc = 16 sts Rnd 4. 5 sc, 1 double inc, 7 sc, 1 double inc, 2 sc = 20 sts Rnd 5. 6 sc, 1 double inc, 9 sc, 1 double inc, 3 sc = 24 sts Rnd 6. 7 sc, 1 double inc, 11 sc, 1 double inc, 4 sc = 28 sts Rnd 7. 8 sc, 1 double inc, 13 sc, 1 double inc, 5 sc = 32 sts Rnd 8. 7 sc, 1 inc, 1 sc, 1inc, 14 sc, 1 inc, 1 sc, 1 inc, 5 sc =36sts Rnd 9. 10 sc, 1 inc, 18 sc, 1 inc,6 sc = 38 sts Rnd 10. 10 sc, 1 inc, 19 sc, 1 inc, 7 sc = 40 sts Rnd 11. 11 sc, 1 inc, 19 sc, 1 inc, 8 sc = 42 sts
Rnd 12. 11 sc, 1 inc, 21 sc, 1 inc, 8 sc = 44 sts Rnd 13. 12 sc, 1 inc, 22 sc, 1 inc,8 sc = 46 sts Rnd 14. 12 sc, 1 inc, 23 sc, 1 inc, 9 sc = 48 sts Rnd 15. 13 sc, 1 inc, 23 sc, 1inc, 10 sc = 50 sts Rnd 16. 13 sc, 1 inc, 24 sc, 1 inc, 11 sc = 52 sts Rnd 17. 14 sc, 1 inc, 26 sc, 1 inc, 10 sc = 54 sts Rnd 18. 7 sc, put the head and one nostril together with their right sides facing each other and work 10 sc hooking through both sts 25-16 of the nostril and sts of the head;

24 along the head; join the second nostril and work 10 sc hooking through both sts 11-2 of the nostril and sts of the head;
Rnd 19. 7 sc along the head, 16 sc along the nostril (as we have 15 sts of the nostril, use one st of the Rnd 13 of the nostril and then insert hook in the ist st of the Rnd 12 of the nostril), 24 sc along the head, 16 sc along the nostril (as we have 15 sts of the nostril, use one st of the Rnd 13 of the nostril and then insert hook in the 1st st of the Rnd 12 of the nostril), 3 sc along the head = 66 sts

3 sc along the head = 54 sts
Rnd 20. 17 sc, 1 dec, 32 sc, 1 dec, 13 sc = 64 sts Rnd 21. 17 sc, 1 dec, 30 sc, 1 dec, 13 sc = 62 sts Rnd 22. 17 sc, 1 dec, 29 sc, 1 dec, 12 sc = 60 sts Rnds 23-33. 1 sc in each st around = 60 sts Rnd 34. 17 sc, (1 inc, 1 sc) x 17, 1 inc, 8 sc = 78 sts Rnds 35-37. 1 sc in each st around = 78 sts Rnd 38. 18 sc, 5 inc, 40 sc, 5 inc, 10 sc = 88 sts Rnds 39-44. 1 sc in each st around = 88 sts Check the position of the marker. It should go as on my pastures. If you think your marker moves to the right more than needed (it may happen if you use thicker yarn) then work 3-5 shift stitches at the end of the round 44. Rnd 45. 78 sc, (1 inc, 4 sc) x 2=90 sts Rnd 46. (1 inc, 5 sc) x 2, (1 inc, 4 sc) x 2, 1 inc, 67 sc = 95sts You can start stuffing the head as you go. Rnd 47. 83 sc, (1 inc, 5 sc) x 2 = 97 sts Rnd 48. 1 inc, 6 sc, 1 inc, 6 sc, 1 inc, 5 sc, 1 inc, 5 sc, 1 inc, 56 sc, (1 inc, 6 sc) x 2 = 104 sts Rnd 49. 1 inc, 7 sc, 1 double inc, 7 sc, 1 inc, (6 sc, 1 inc) x 2, 57 sc, 1 inc, 7 sc, 1 double inc, 7 sc = 113 sts Rnd 50. 9 sc, 1 double inc, 16 sc, 1 double inc, 7 sc, 1 inc, 60 sc, 1 inc, 8 sc, 1 double inc, 8 sc = 121 sts Rnd 51. 10 sc, 1 double inc, 18 sc, 1 double inc, 8 sc, 1 inc, 62 sc, 1 inc, 9 sc, 1 double inc, 9 sc = 129 sts Rnd 52. 11 sc, 1 double inc, 20 sc, 1 double inc, 9 sc, 1 inc, 64 sc, 1inc, 10 sc, 1 double inc, 10 sc = 137 sts
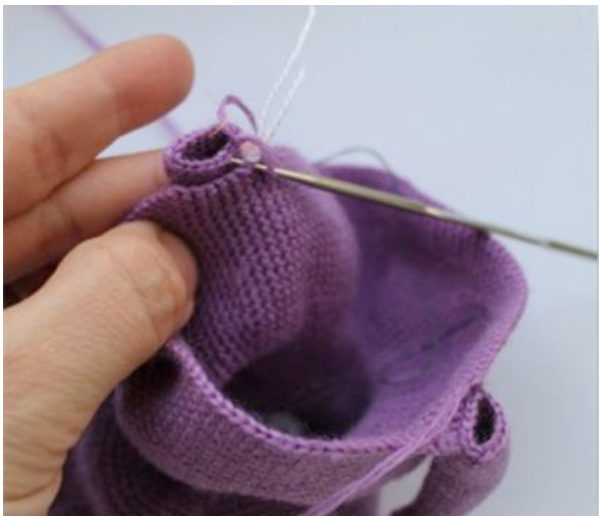
Rnd 53. 12 sc, 1 double inc, 22 sc, 1 double inc, 10 sc, 1 inc, 66 sc, 1 inc, 12 sc; now join the left eye: work 22 sc hooking through the sts 32-11 of the eye and the sts of the head (11 sts of this Rnd and 11 sts of the next Rnd) (insert the hook from the back of the eye), 1 sc = 143 sts Move the marker behind the last worked st.
Rnd 54. 3 sc, now join the right eye: work 22 sc hooking through the sts 13-1 and 32-24 of the eye and the sts of the head (insert the hook from the back of the eye), 12 sc, 1 inc, 23 sc, (1 dec, 2 sc) x 5, 1 dec, 23 sc, ch 3, skip 3 (you should notice a hole), 8 sc, skip 3; now work along the eye into the front loop only: 10 sc + 1 sc along the head = 123 sts
Rnd 55. 1 dec, 1 sc; work 10 sc along the eye into the front loop only; skip 3 sts of the head, 8 sc, ch 3, skip 3, 23 sc, (1 dec, 1 sc) x 5, 1 dec, 22 sc, 3 sc in 3-ch arch, 19 SC =101 sts Rnd 56. 20 sc, 3 sc in 3-ch arch, 78 sc = 101 sts Rnds 57-61. 1 sc in each st around = 101 sc Rnd 62. 93 sc, (1 dec, 2 sc) x 2 = 99 sts Rnd 63. (1 dec, 2 sc) x 2, 1 dec, 89 sc. = 96 sts Rnd 64. 87 sc, (1 dec, 1 sc) x 3 = 93 sts Rnd 65. (1 dec, 1 sc) x 3, 1 dec, 73 sc, (1 dec, 1 sc) x 3 = 86sts Rnd 66. (1 dec, 1 sc) x 3, 1 dec, 75 sc = 82 sts Rnd 67. 1 sc in each st around = 82 sc Rnd 68. 33 sc, (1 dec, 3 sc) x 3, 1 dec, 32 sc = 78 sts Rnd 69. 1 sc in each st around = 78 sc Rnd 70. 33 sc, 1 dec, 2 sc, 1 dec, 1 sc, 1 dec, 2 sc, 1 dec, Any questions or comments: info@LittleOwlsHut.com 32 sc. = 74 sts Rnd 71. 32 sc, (1 dec, 1 sc) x 3, 1 dec, 31 sc. =70 sts Rnd 72. 30 sc, (1 dec, 1 sc) x 3, 1 dec, 29 sc. = 66 sts Tip: If you think the head is slightly twisted, do not worry. When the part is stuffed twist it a little bit in the needed direction. Tightening and stuffing will help youtomakeitlooknice. Rnds 73-77 (neck). 1 sc in each st around = 66 sc Now work the body. Rnd 78. 3 sc, 1 double inc, (5 sc, 1 inc) x 10, 2 sc = 78 sts Rnd 79. 4 sc, 1 double inc, 73 sc = 80 sts Rnd 80. 5 sc, 1 double inc, 8 sc, 1 inc, (6 sc, 1 inc) x 9, 2 sC = 92 sts Rnd 81. 6 sc, 1 double inc, 85 sc = 94 sts Rnd 82. 7 sc, 1 double inc, 10 sc, 1 inc, (7 sc, 1 inc) x 9, 3 sc = 106 sts Rnd 83. 8 sc, 1 double inc, 97 sc = 108 sts Rnd 84. 9 sc, 1 double inc, 12 sc, 1 inc, (8 sc, 1 inc) x 9, 4 SC = 120 sts Rnds 85-86.1 sc in each st around = 120 sts Rnd 87. 11 sc, 1 inc, 108 sc = 121 sts Rnds 88-89. 1 sc in each st around = 121 sts Rnd 90. 12 sc, 1 inc, 108 sc = 122 sts Rnds 91-92. 1 sc in each st around = 122 sts Rnd 93. 13 sc, 1 double inc, 108 sc = 124 sts Rnd 94. 54 sc, 1 inc, 42 sc, 1 inc, 26 sc = 126 sts Rnd 95. 54 sc, 1 inc, 44 sc, 1 inc, 26 sc = 128 sts Rnd 96. 54 sc, 1 inc, 46 sc, 1inc, 26 sc = 130 sts Rnd 97. 54 sc, 1 inc, 48 sc, 1 inc, 26 sc = 132 sts (mark 56th and 112th sts) Join front legs: Use the tails of yarn left after finishing the front legs to join the legs to the body. Join the right leg to the marked 56th st.
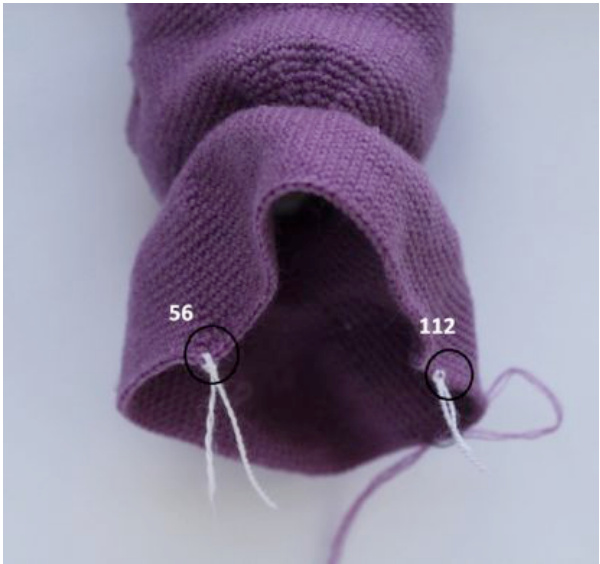
Work 7 sc (insert hook from the back side of the body) hooking through both 56-50 sts of the body and 12-15 sts + 1-3 sts of the front leg. Fasten off. Join the left leg to the marked 112th st.
Work 7 sc (insert hook from the back side of the body) hooking through both 112-106 sts of the body and 5-11 sts of the front leg. Continue crocheting the body.
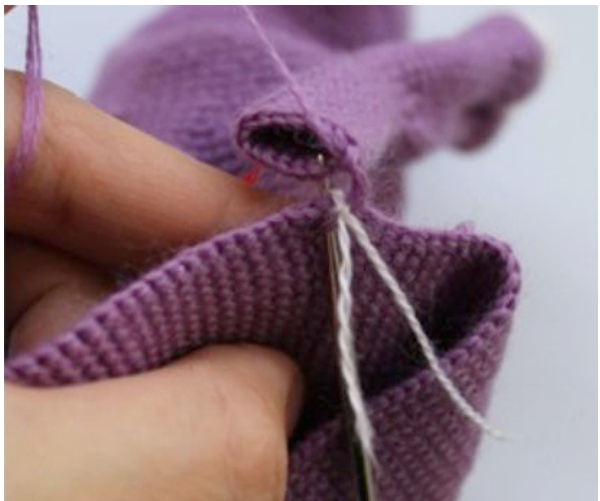
Rnd 98. 49 sc; insert the hook into the worked 5oth st of the body and 3rd st of the leg and sc them together (you should notice that the hole is closed); 8 sc along the leg, again insert the hook into the worked 12th st of the leg and 56th st of the body and sc them together; 49 sc, again insert the hook into the worked 106th st of the body and 1ith st of the leg and sc them together; 8 sc along the leg, insert the hook into the worked 5th st of the leg and 112th st of the body and sc them together; 20 sc = 138 sts

Rnd 99. 1 sc in each st around = 138 sts Rnd 100. 50 sc, 1 dec, 65 sc, 1 dec, 19 sc. = 136 sts Rnd 101. 49 sc, 1 dec, 65 sc, 1 dec, 18 sc. = 134 sts Rnds 102-113. 1 sc in each st around = 134 sts Rnd 114. 61 sc, (1 dec, 7 sc) x 5, 1 dec, 26 sc = 128 sts Rnd 115. 1 sc in each st around = 128 sts Rnd 116. (6 sc, 1 dec) x 16 = 112 sts Rnd 117. 1 sc in each st around = 112 sts Rnd 118. (5 sc, 1 dec) x 16 = 96 sts Rnd 119. 1 sc in each st around = 96 sts Rnd 120. (4 sc, 1 dec) x 16 = 80 sts Rnds 121-129. 1 sc in each st around = 80 sts Rnd 130. 49 sc, 1 dec, 5 sc, 1 dec, 22 sc = 78 sts Rnd 131. 1 sc in each st around = 78 sts Rnd 132. 48 sc, 1 dec, 5 sc, 1 dec, 21 sc = 76 sts Rnd 133.1 sc in each st around = 76 sts Rnd 134. 30 sc; join right back leg and work 19 sc hooking through both 19-1 sts of the leg (insert the hook from the back side of the leg) and sts of the body; 5 sc along the body, now join left back leg: put the pieces with their right sides facing each other and work 19 sc hooking through both 5-38 sts of the leg (insert the hook from the back side of the leg) and sts of the body; 3 sc along the body = 76 sts
Rnd 135. 30 sc; insert the hook into the worked 31st st of the body and 19th st of the leg and sc them together; 32 sc along the right leg, insert the hook into the worked ist st of the leg and 49th st of the body and sc them together; 5 sc, again insert the hook into the worked 55th st of the body and 5th st of the left leg and sc them together; 32 sc along the left leg, insert the hook into the worked 38th st of the leg and 73th st of the body and sc them together; 3 sc = 106 sts
Rnds 136-138. 1 sc in each st around = 106 sts Rnd 139. 14 sc, 1 dec, (4 sc, 1 dec) x 15 = 90 sts Rnd 140. 1 sc in each st around = 90 sts Rnd 141. (3 sc, 1 dec) x 18 = 72 sts Rnd 142. 1 sc in each st around = 72 sts Rnd 143. (2 sc, 1 dec) x 18 = 54 sts Rnd 144. 1 sc in each st around = 54 sts Cut 4 pieces of wire and work up the edges with plaster. 1. First finger of the first front leg - first front leg - body - head - body - second front leg- first finger of the second front leg
2+3. Second finger of the front leg - body - first toe of the back leg
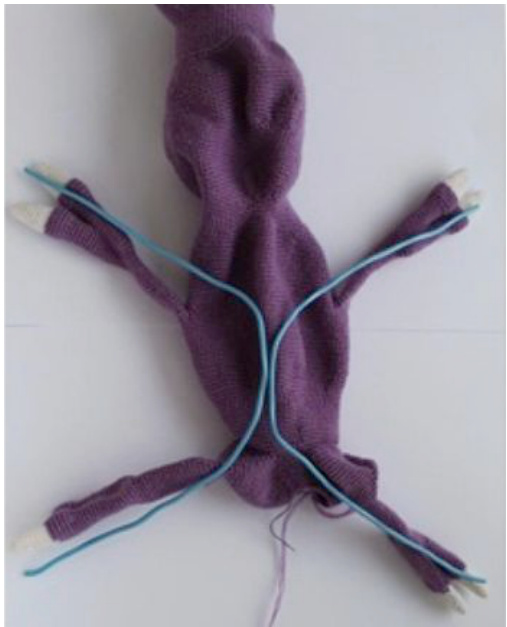
4. Second toe of the first back leg - body - second toe of the second back leg
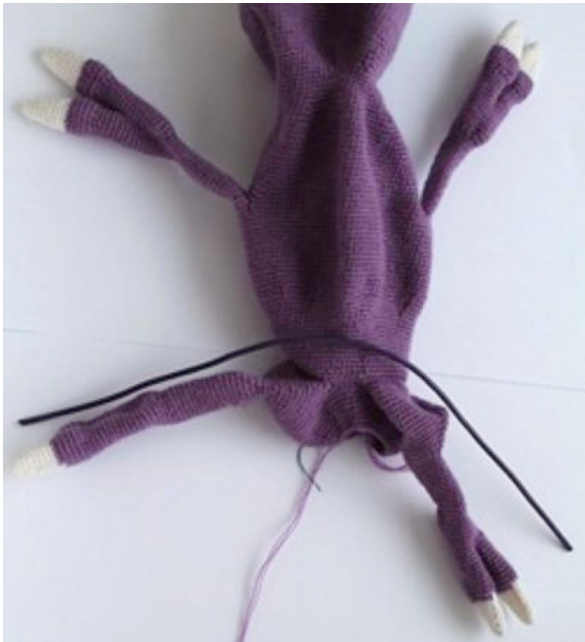
Stuff the head, legs and body. Stuff eyes lightly. Do not stuff the nose too tight. Make sure you will be able to make tightening on the tip of the nose. Rnd 145. (2 sc, 1 dec) x 6, 8 sc, 2 double dec, 12 sc, 1 dec, 2 sc = 43 sts Rnd 146. 24 sc, 3 dec, 13 sc = 40 sts Rnd 147. (1 dec, 2 sc) x 10 = 30 sts Rnd 148. 1 sc in each st around = 30 sts Rnd 149. (1 sc, 1 dec) x 10 = 20 sts Rnds 150-157. 1 sc in each st around = 20 sts Rnd 158. (2 sc, 1 dec) x 5 = 15 sts Rnd 159. (1 sc, 1 dec) x 5 =10 sts Rnd 16o. 5 dec = 5 sts You can leave the tail sticking out of the bottom.
Or you can leave it unstuffed and twist like in the picture below. Secure it with few stitches if needed or press it into the bottom.
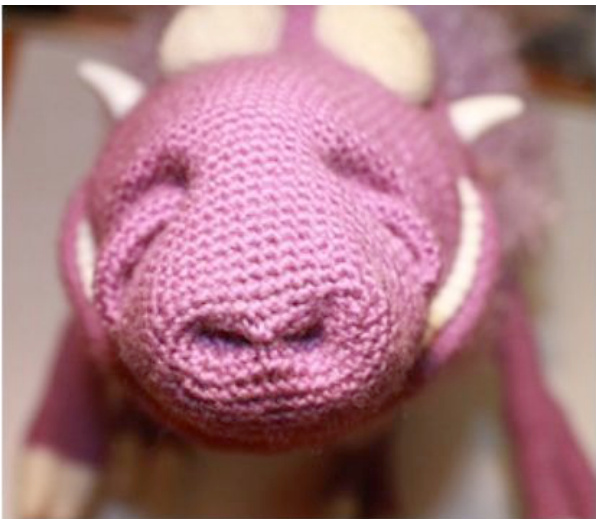
Tightening for the eyes and the chin
Thread a tapestry needle with main yarn. 1. Insert the needle at the area of Rnds 58-6o of the head at the point where the chin is supposed to start. 2. Pull the needle out somewhere under the eyes. 3. Pull up the thread. Repeat steps 1-3 all the way along the chin line to the point where the chin is supposed to end. You should end up with a dent for sewing the chin onto the head. The eyes should be positioned deeper.
Lower jaw
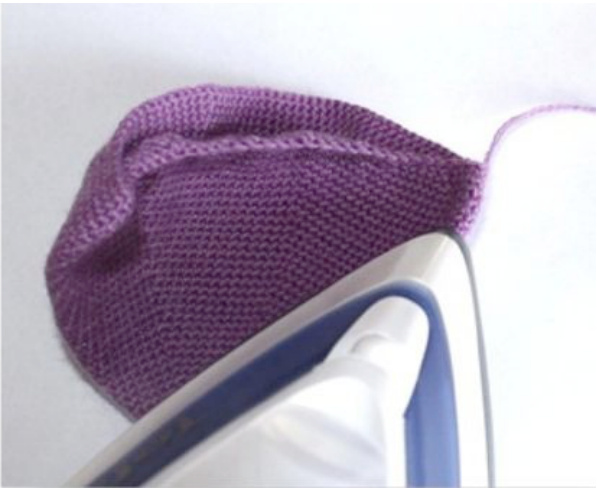
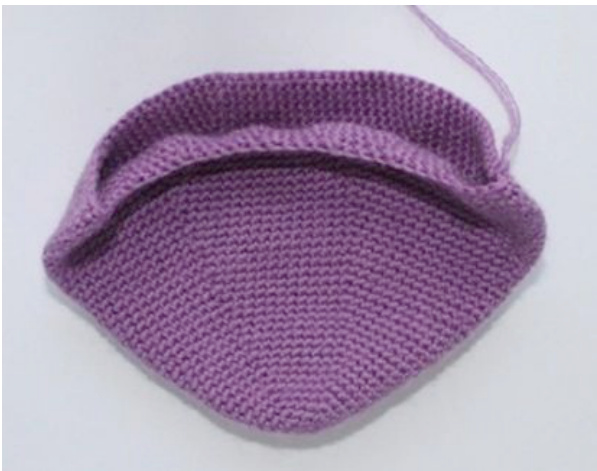
Work with main yarn, hook 1 mm. Rnd 1. 6 sc in magic ring Rnd 2. 6 inc = 12 sts Rnd 3. (1 sc, 1 inc) x 6 = 18 sts Rnd 4. (2 sc, 1 inc) x 6 = 24 sts Rnd 5. (3 sc, 1inc) x 6 = 30 sts Rnd 6. (4 sc, 1 inc) x 6 = 36 sts Rnd 7. (5 sc, 1 inc) x 6 = 42 sts Rnd 8. 1 sc in each st around = 42 sts Rnd 9. (6 sc, 1 inc) x 6 = 48 sts Rnd 10. 1 sc in each st around = 48 sts Rnd 11. (7 sc, 1 inc) x 6 = 54 sts Rnd 12. 1 sc in each st around = 54 sts Rnd 13. (8 sc, 1 inc) x 6 = 60 sts Rnd 14. 1 sc in each st around = 60 sts Rnd 15. (9 sc, 1 inc) x 6 = 66 sts Rnd 16. 1 sc in each st around = 66 sts Rnd 17. (10 sc, 1 inc) x 6 = 72 sts Rnd 18. 1 sc in each st around = 72 sts Rnd 19. (11 sc, 1 inc) x 6 = 78 sts Rnd 20. 1 sc in each st around = 78 sts Rnd 21. (12 sc, 1 inc) x 6 = 84 sts Rnd 22. 1 sc in each st around = 84 sts Rnd 23. (13 sc,1 inc) x 6 = 90 st Rnd 24. 1 sc in each st around = 90 sts Rnd 25. (14 sc, 1 inc) x 6 = 96 sts Rnd 26. 1 sc in each st around = 96 sts Rnd 27. (15 sc, 1 inc) x 6 = 102 sts Rnd 28.1 sc in each st around = 102 sts Rnd 29. (16 sc,1 inc) x 6 = 108 sts Rnd 30. 1 sc in each st around = 108 sts Rnd 31. (17 sc, 1 inc) x 6 = 114 sts Rnd 32. 1 sc in each st around = 114 sts Rnd 33. (18 sc,1 inc) x 6 = 120 sts Rnd 34. 1 sc in each st around = 120 sts Rnd 35. (19 sc,1 inc) x 6 = 126 sts Rnd 36.1 sc in each st around = 126 sts Rnd 37. 36 sc, 1 dec, (5 sc, 1 dec) x 5, 1 sc, (1 dec, 5 sc) x 5, 1 dec, 15 sc = 114 sts Rnd 38. 35 sc, 1 dec, (4 sc, 1 dec) x 5, 1 sc, (1 dec, 4 sc) x 5, 1 dec, 14 sc = 102 sts Rnd 39. 34 sc, 1 dec, (3 sc, 1 dec) x 5, 1 sc, (1 dec, 3 sc) x 5, 1 dec, 13 sc = 90 sts Rnd 40. Work 35 sc Leave the remaining sts unworked. Fasten off leaving a tail for sewing. Fold the piece as shown in the picture and iron it over.
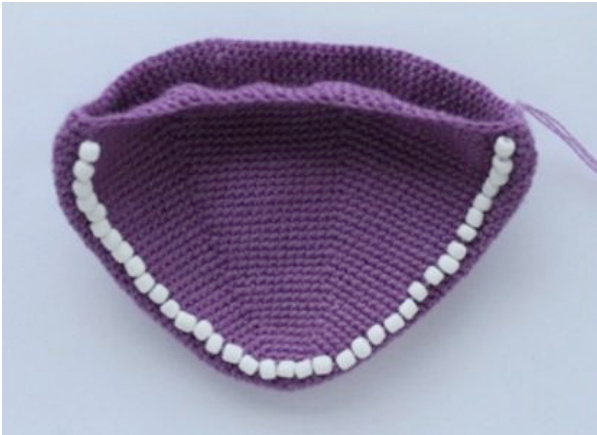
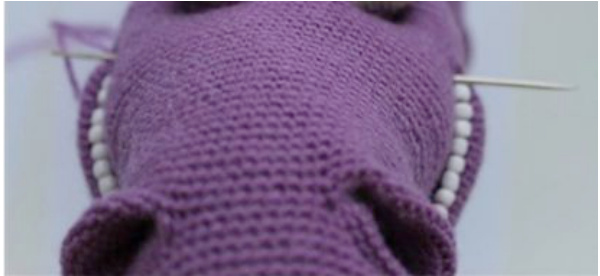
Sew the teeth into the jaw (large white plastic beads).
Join the lower jaw to the head sewing its upper edge into the fold that you ended up with after the tightening for the chin.
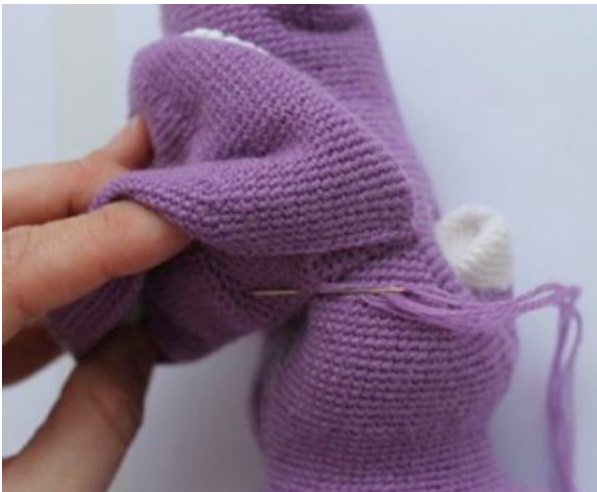
Stuff the lower jaw slightly and sew its second half onto the head.
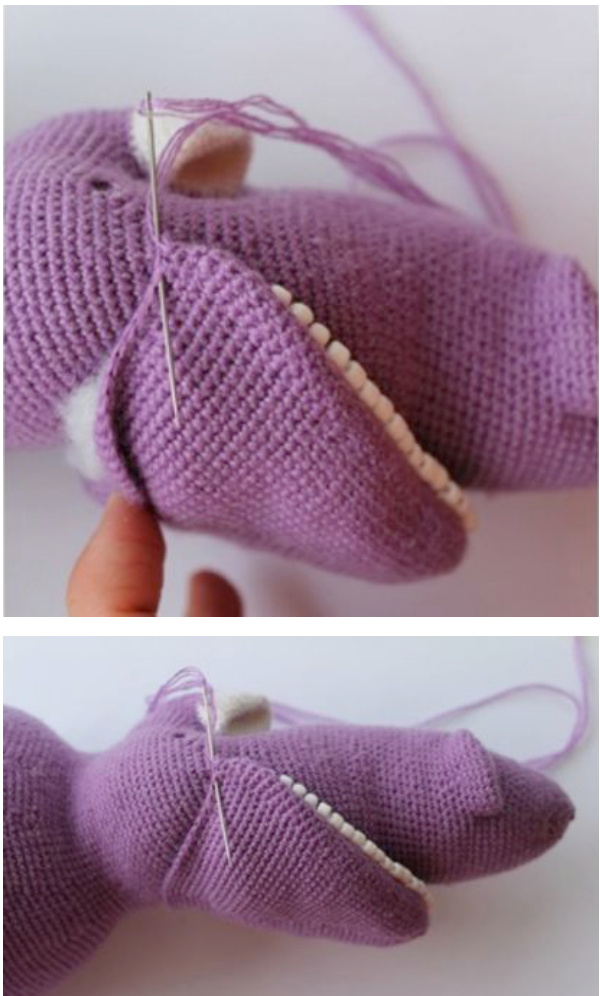
If you want the teeth line to be more straight, run thread through the teeth and make a horizontal tightening throughout the head inserting the needle back and forth from the left cheek to the right one.
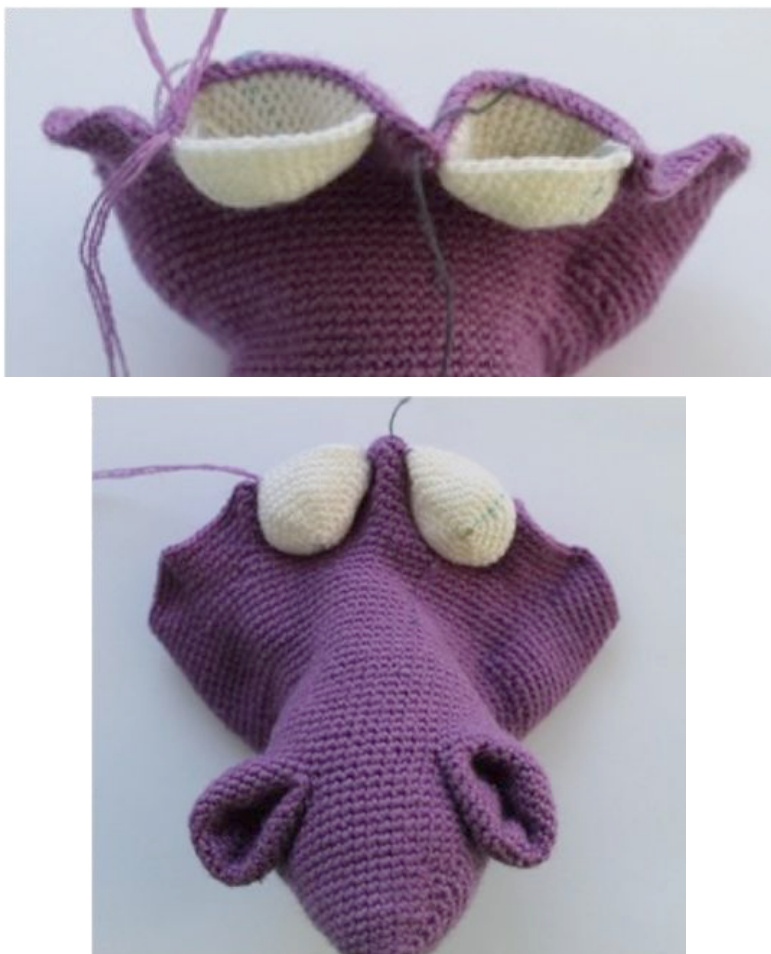
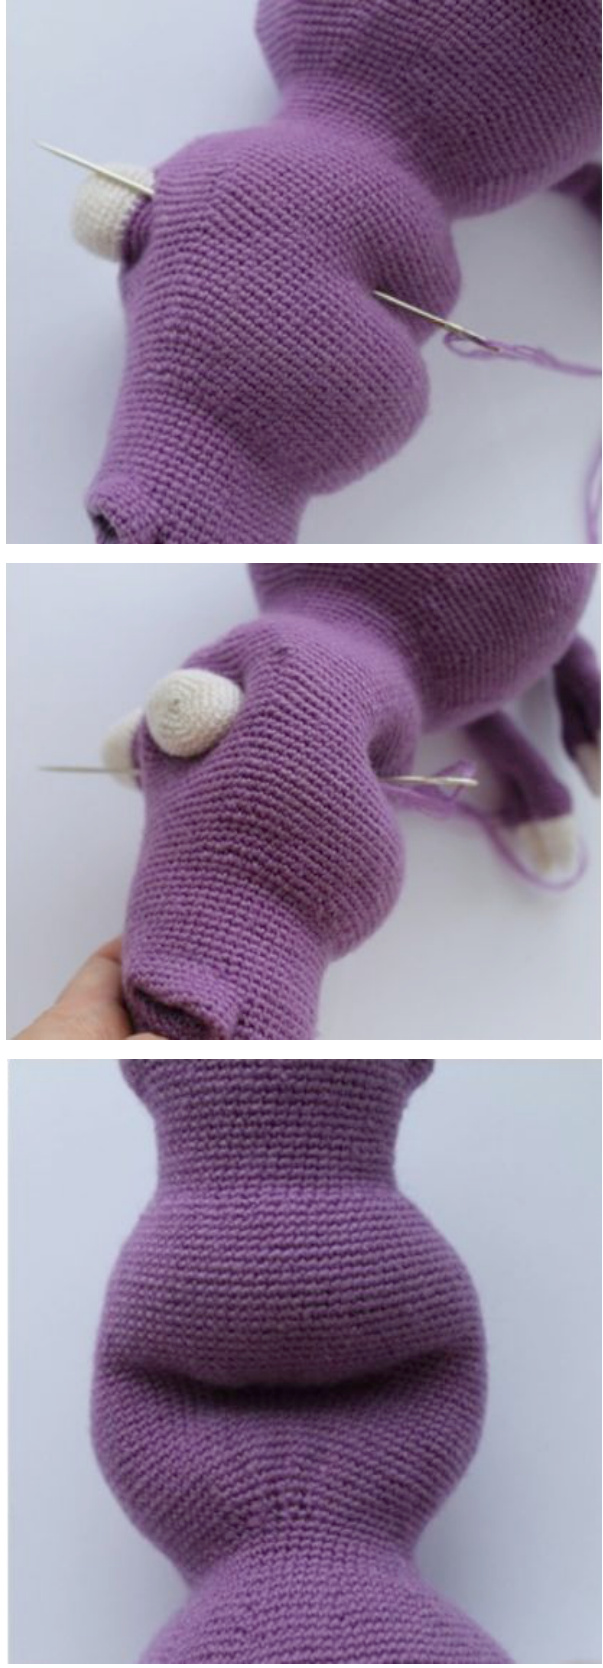
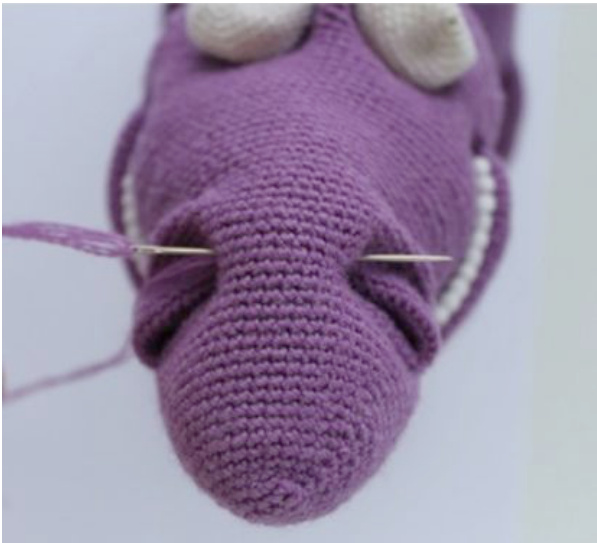
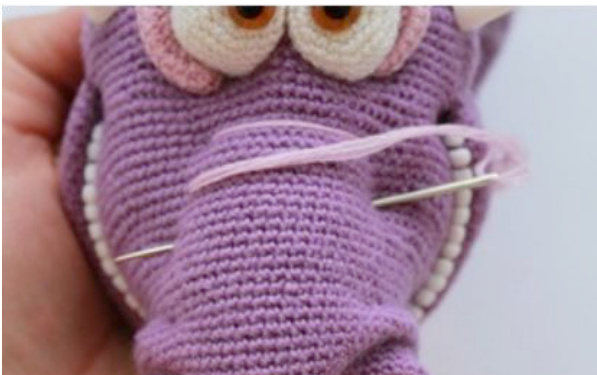
Form the nostrils securing them with tightening (see pictures for reference). Insert finger into the right nostril and push it inside the head. Make sure you form a fold behind the nostril. Thread a needle with matching thread. Insert needle from the inside of the nostril and take it out behind the fold. Step one stitch aside and make a stitch back to secure the fold. Repeat once more and secure the thread.
Repeat the same with the left nostril. Thread a needle with matching thread and make few tightening above the nostrils.
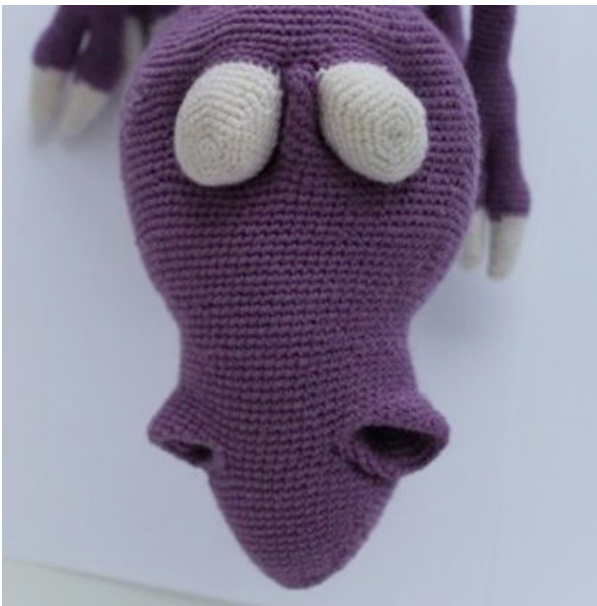
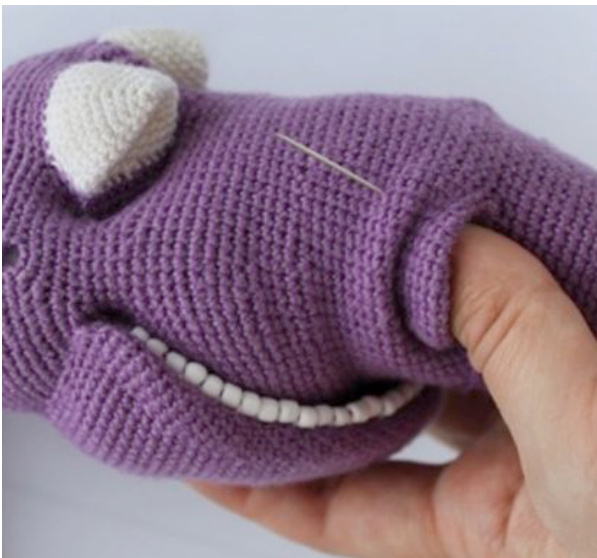
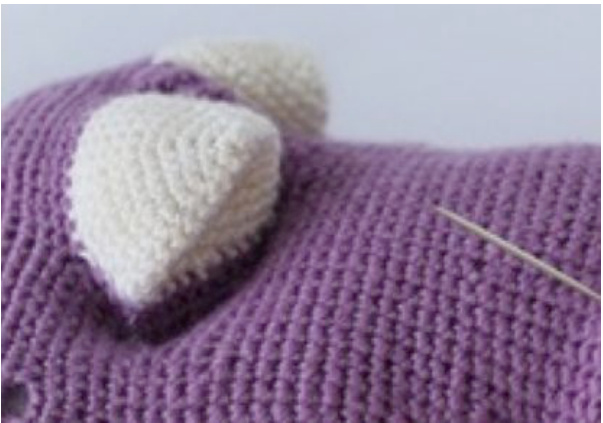
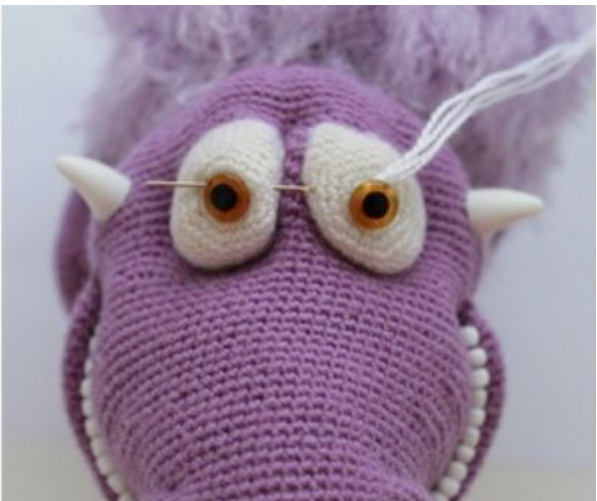
Glue the plastic “horns" into the holes near the eyes.

TIP: If you wan to crochet horns, visit this page for crochet instructions http://goo.gl/2ezsc2
Make tightening for the nose.
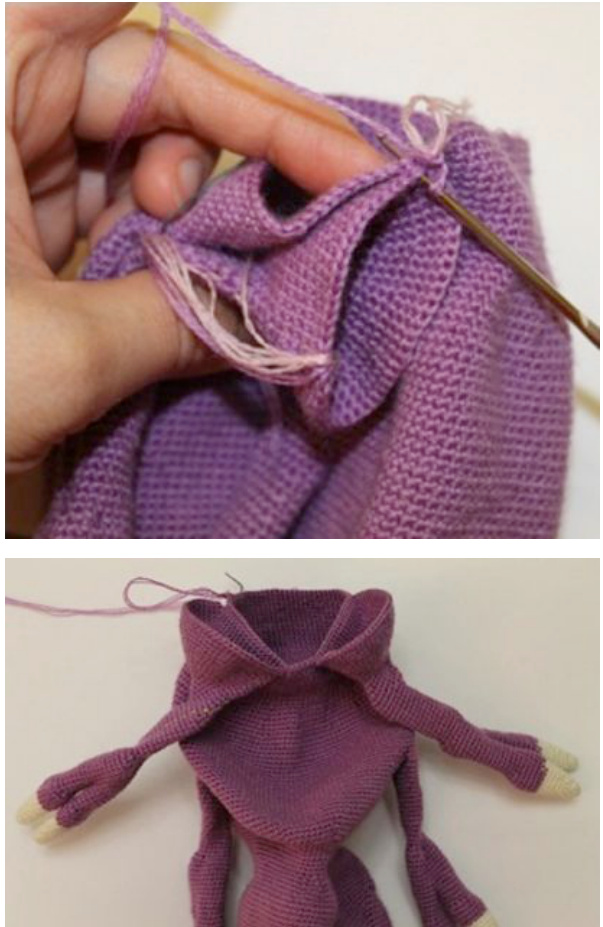
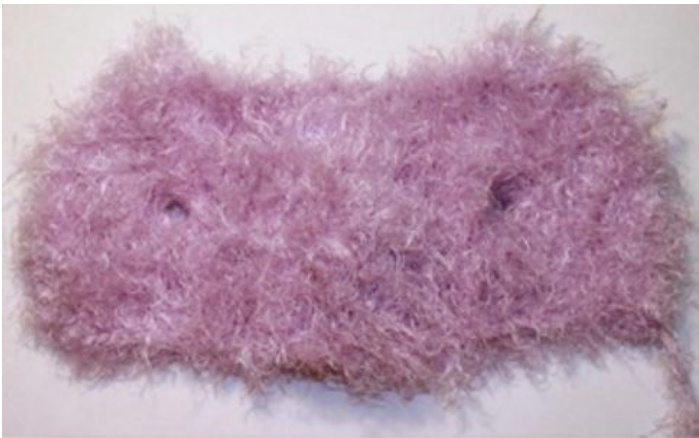
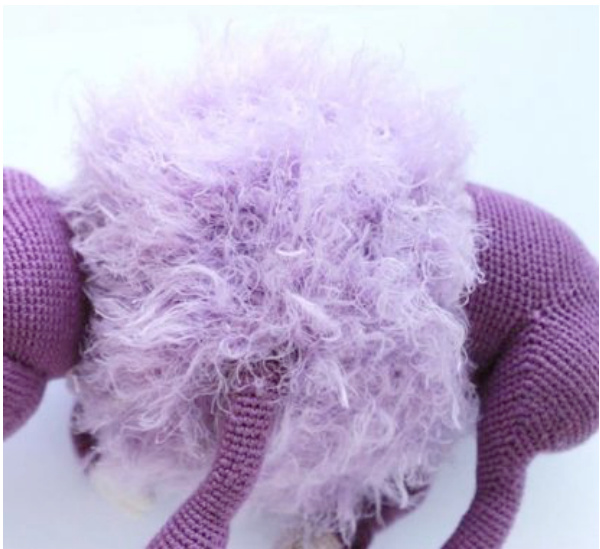
Fluffy part of the body
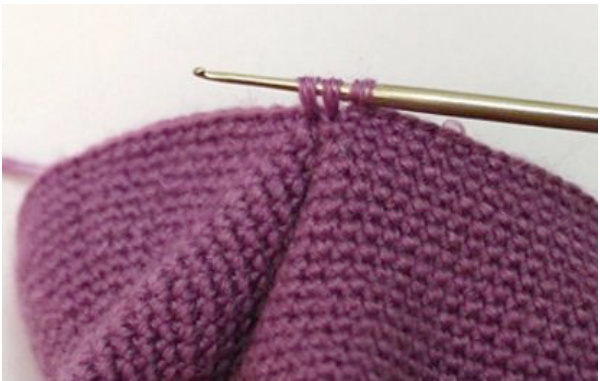
This part is worked as a vest. Work with eyelash yarn, knitting needles 3.5 mm. Row 1. Cast on 30 sts. Row 2. K30; Row 3. P30; Row 4. K30; Row 5. P30; Row 6. (K5, yo) x 5, K5 = 35 sts Row 7. P35 (cross the sts when working yo); Row 8. (K6, y0) x 5, K5 = 40 sts Row 9. P40; Row 10. (K7, y0) x 5, K5 = 45 sts Row 11. P45; Row 12. (K8, y0) x 5, K5 = 50 sts Row 13. P50; Row 14. (K5, y0) x 9, K5 = 59 sts Row 15. P59; Row 16. (K6, y0) x 9, K5 = 68 sts Row 17. P68; Row 18. K14, cast off 2 sts, K34, cast off 2 sts, K14 = 68 sts You should notice two holes. They are for the front legs. Row 19. P15, 2 yo, P35, 2 y0, P14 = 68 sts Row 20. K68; Row 21. P68; Row 22. K68; Row 23. P68; Row 24. (K5, knit 2 sts together knitwise) x 9, K5 = 59 sts Row 25. P59; Row 26. (K4, knit 2 sts together knitwise) x 9, K5 = 50 sts Row 27. P50; Row 28. (K3, knit 2 sts together knitwise) x 9, K5 = 41 sts Row 29. P41; Row 30. K41; Row 31. P41. Cast off sts. Leave a tail for sewing the vest together. Put on the vest. Insert the front legs into the holes of Rnd 18. Sew the opposite sides of the vest together on the belly. Sew the vest onto the body around the neck and waist.
Attach the eyes. Make sure eyes are not stuffed tight. If they are stuffed tight, just take a small hook, insert it into the eye and move some stuffing from the eye into the head. Fold eyes a little bit like on the picture below.
Using fingers form nice “drop" or “oval" eye shape. Thread a needle with matching thread and make. tightening for the eyes pulling them together towards each other.
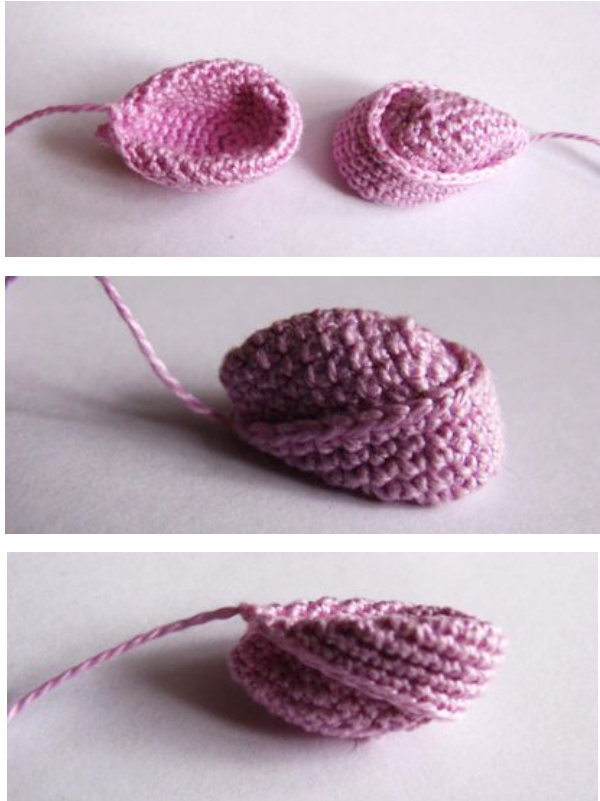
Lower eyelid (make 2)
Work with pink yarn, crochet hook 1 mm. Ch 15, start from 2nd st from the hook and work around the chain. Rnd 1. (13 sc, 1 double inc) x 2 = 32 sts Rnd 2. 14 sc, 1inc, 15 sc, 1 inc, 1 sc = 34 sts Rnd 3. 33 sc, then fold the piece in half and work 16 sc hooking through the opposite sides of the eyelid. Stuff the piece as you go.

Sew the lower eyelids under the eyes using picture below as a reference.
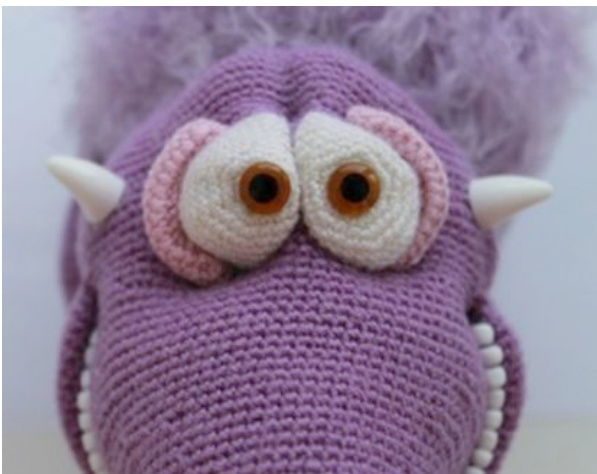
Make long horizontal stitches on the nose using the same yarn as for the eyelids.
You can make a nice back for your Bramblehog if you like ? But you can leave him or her as they are now.
Back
The back consists of four parts: three small parts and one big part.
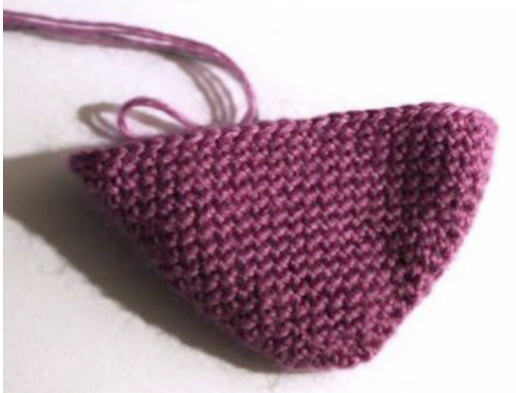
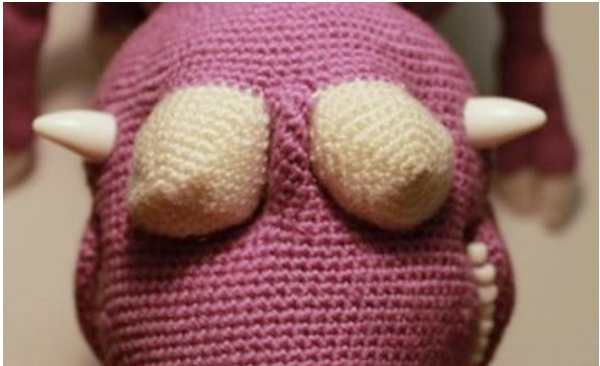
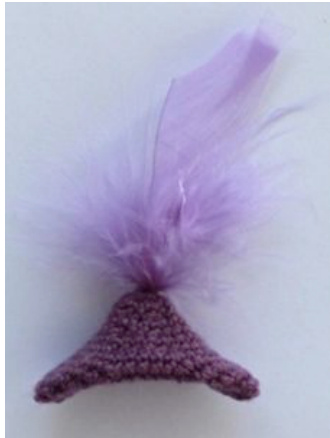
Small part (make 3)
Work with main yarn, crochet hook 1 mm. Rnd 1. 6 sc in magic ring Rnd 2.6 inc = 12 sts Rnd 3. 1 sc in each st around = 12 sts Rnd 4. (1 sc, 1 inc) x 6 = 18 sts Rnd 5. 1 sc in each st around = 18 sts Rnd 6. (2 sc, 1 inc) x 6 = 24 sts Rnd 7.1 sc in each st around = 24 sts Rnd 8. (3 sc, 1 inc) x 6 = 30 sts Rnd 9. (4 sc, 1 inc) x 6 = 36 sts Rnd 10. (5 sc, 1 inc) x 6 = 42 sts Rnds 11-12. 1 sc in each st around = 42 sts Insert a feather in the Rnd 1. Stuff the piece slightly.
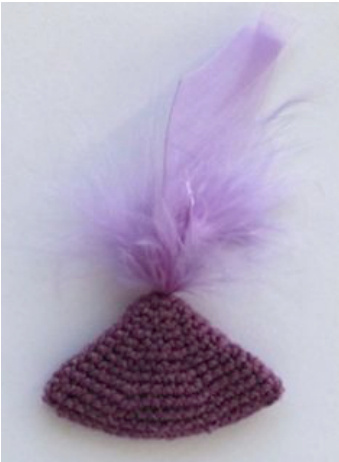
Fold the piece in half and work 20 sc hooking through the opposite sides. Fold the piece as shown in the picture below.
Big part (make 1)
Work with main yarn, crochet hook 1 mm. Rnd 1. 6 sc in magic ring Rnd 2. 6 inc = 12 st Rnd 3. 1 sc in each st around = 12 sts Rnd 4. (1 sc, 1 inc) x 6 = 18 sts Rnd 5. 1 sc in each st around = 18 sts Rnd 6. (2 sc, 1 inc) x 6 = 24 sts Rnd 7.1 sc in each st around = 24 sts Rnd 8. (3 sc, 1inc) x 6 = 30 sts Rnd 9. 1 sc in each st around = 30 sts Rnd 10. (4 sc, 1 inc) x 6 = 36 sts Rnd 11. 1 sc in each st around = 36 sts Rnd 12. (5 sc, 1 inc) x 6 = 42 sts Rnd 13. 1 sc in each st around = 42 sts Rnd 14. (6 sc, 1 inc) x 6 = 48 sts Rnd 15. 1 sc in each st around = 48 sts Rnd 16. (7 sc, 1 inc) x 6 = 54 sts Rnd 17. (8 sc, 1 inc) x 6 = 60 sts Rnds 18-19. 1 sc in each st around = 60 sts Insert a feather in Rnd 1. Fold the piece in half and work 29 sc hooking through the opposite sides. Stuff the big part as you go. Sew all parts onto the back using pictures as a reference - one small part on the head, the big part at the shoulders (centred), one small part down the back, the last small part on the bottom.
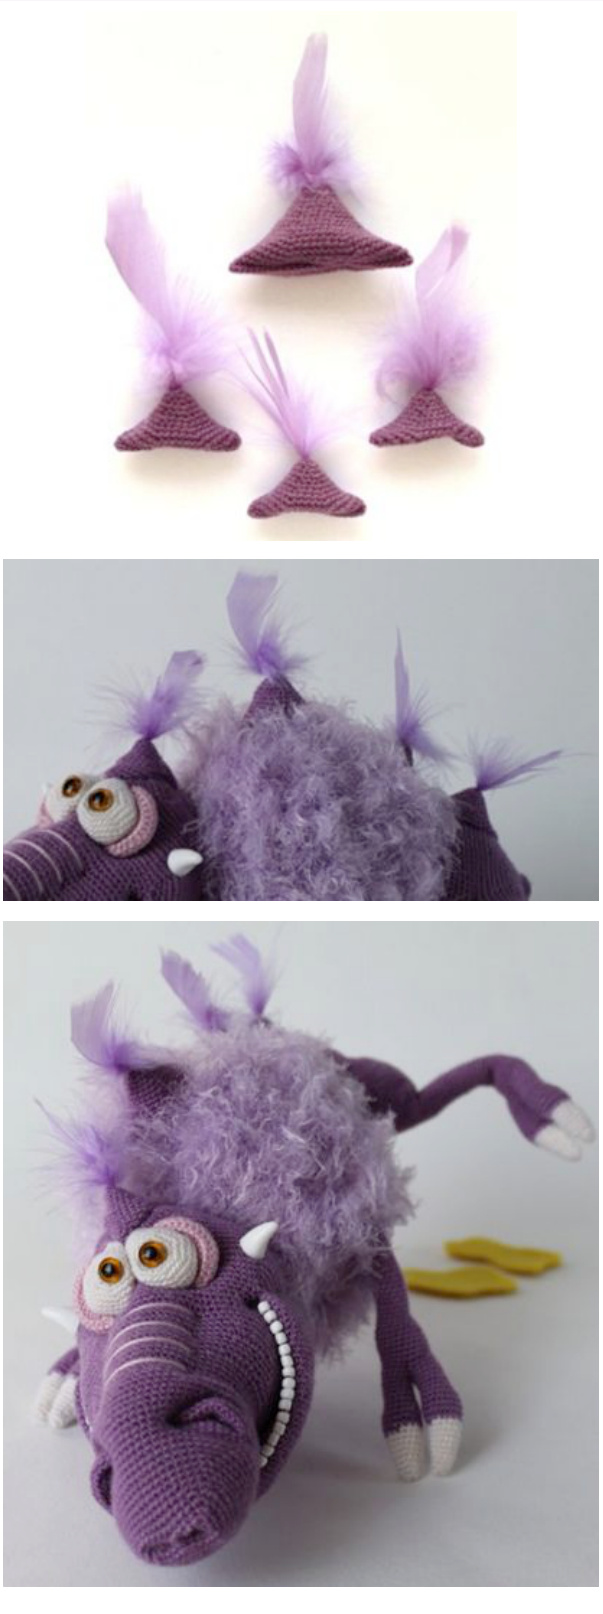
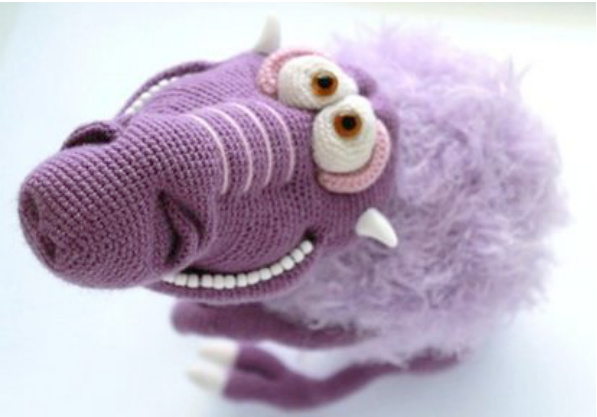
Your Bramblehog is ready!
FREE Crochet Patterns at www.LittleOwlsHut.com
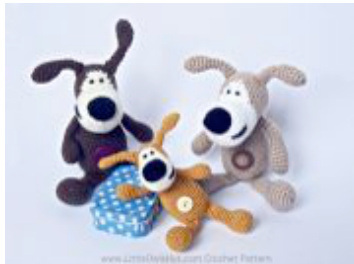
Dog Buffy
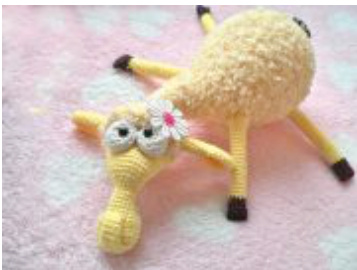
Sheep Dolly
Dog Lucky
Crochet patterns available for sale at Little Owl's Hut www.LittleOwlsHut.com
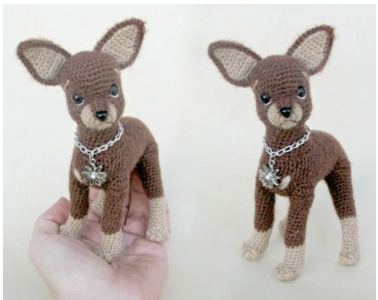
Toy Terrier
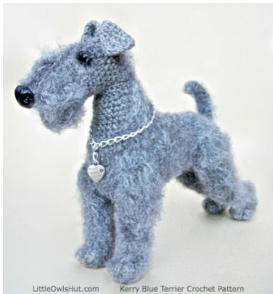
Kerry Blue Terrier
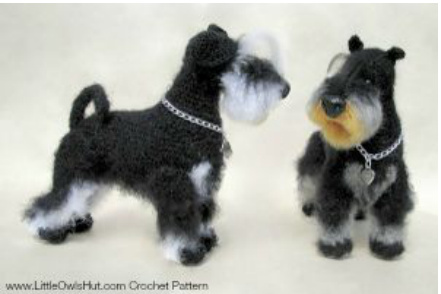
Miniature Schnauzer
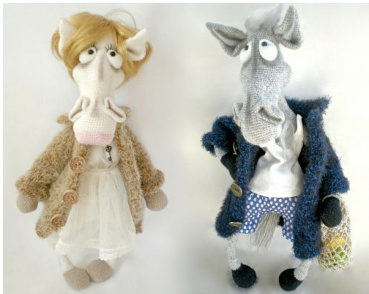
Mr and Mrs Horse Coming soon! Subscribe to our Newsletter at www.LittleOwlsHut.com to receive notifications when new patterns are available for sale and get 3o%discount if purchased within a few days of the release date.
Dog
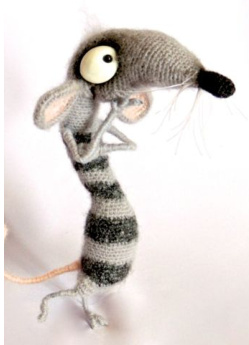
Rat Serafima
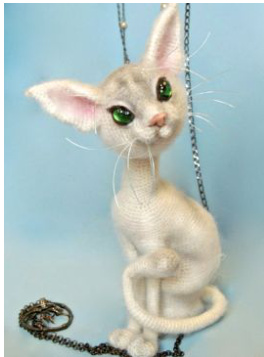
Kitty
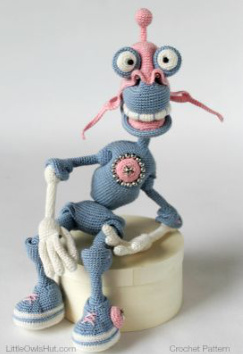
Robot
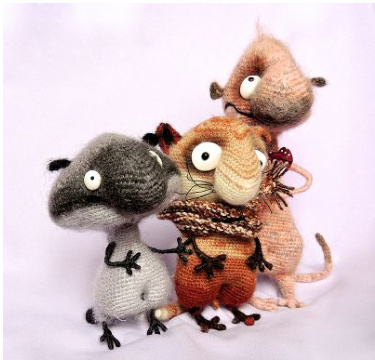
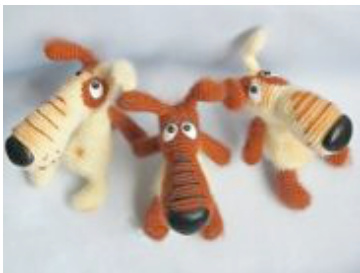
Three friends

Download the free “QRcode APP” for your iPhone/smart-phone and scan this code to take you straight to our website. And much more at www.LittleOwlsHut.com Contacts: I'd love to see the results of your hard work! Please share photos of your finished creation directly on our Facebook page, add project to the pattern on Ravelry and Craftsy, email me, and/or find me on other sites. Just search “Little Owl's Hut". Tell me about your crocheting adventures, I would love to hear it. Facebook: https://www.facebook.com/Littleowlshut Ravelry: http: //www.ravelry.com/stores/little-owls-hut www.ravelry.com/groups/little-owls-hut-amigurumi-toys-crochet-pattern Craftsy: http://www.craftsy.com/user/575334/pattern-store Copyright notes: 2o15 Littl Owl's Hut. Finished products created with this pattern may be used for commercial sale, provided you comply with the following: · The items must be 1oo% handmade by you - the purchaser of the pattern (no production-line allowed). Every person who uses my patterns to make items for sale must have their own copy of the pattern. Any items for sale must state in the item description that they are based on ‘LittleOwlsHut' pattern, include the name of the designer and also include a link to my website (www.LittleOwlsHut.com) Any items you sell based on my patterns must feature only your own photographs of the item you have made to sell. You do not have permission to use my photographs to help sell your Work. If you have an online or street shop where you sell items made from my patterns, you're eligible to be included in my list of LittleOwlsHut-designed toy sellers, and get some free publicity for your shop. It's 10o% free service to you! Please visit (www.LittleOwlsHut.com) for details on how to apply.
es Convrigbt @?ois by I ittleOwlsHut all rights reserved. cs CoPy11grrt @zo15 by LrttcOv
No pattern may be reproduced or distributed - mechanically, electronically, or by any other means, including photocopying, without written permission. I work very hard to design and write these patterns. Thank you so much for your understanding, and happy crocheting! Warnning: Because your finished projet may have smal pats,please etremely cautiou if you decide to give it to a child. Also, if you decide to sell your finished project, remember to include warning for people purchasing it.


