Fox Gloves
Materials:
Stitchionary (UK terminology):
Two balls of Cygnet Merino Superwash in Copper and one ball each of Black and Cream. 4mm hook. Sewing up needle.
Gauge:
4.5 sts and 3.5 rows per inch (not critical) Ch - Chain. Dc - Double crochet. Inc - Work two stitches into next stitch. St/s - Stitch/es. Rd - Round. Sl-st - Slip stitch. Htr - Half treble. Fptr - Front post treble crochet. Bptr - Back post treble crochet. Htr2tog - Half treble two stitches together. Rw - Row. Tr - Treble. Dtr2tog - Double treble two stitches together. Dtr - Double treble. To fit: A small to medium woman's hand - roughly 7-7.5" around palm above thumb. If you need it bigger or smaller, just increase more or less after round 7.
Mittens (Make Two):
Using the black, ch2 and work 6 dc's into the first ch, don't join but do work in the round. Round 1: Inc into every stitch (12 sts), don't join. Rd 2: Inc into every stitch (24 sts), sl-st into next stitch. Rd 3: Introduce orange yarn, ch2 as a turning ch and work a htr into every stitch around, sl-st to join. Rd 4: ch 2, htr into same space as sl-st, work 10 htrs, 2htr into next st, work 10 htrs, sl-st to join (26 sts). Rd 5: ch2, htr into same space as sl-st, work 12 htrs, 2htr into next st, work 12 htrs, sl-st to join (28 sts). Rd 6: ch2, htr into same space as sl-st, work 14 htrs, 2htr into next st, work 14 htrs, sl-st to join (30 sts). Rd 7: ch2, htr into same space as sl-st, work 16 htrs, 2htr into next st, work 16 htrs, sl-st to join (32 sts). Rds 8 - 23: ch2, htr all around, sl-st to join.
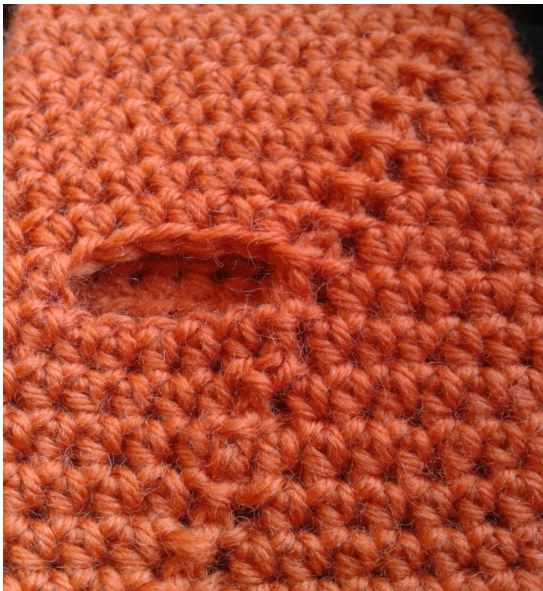
Now, because we're working with sl-sts rather than as a spiral (amigurumi style), you will have a mark running around the mitten in a spiral - it looks like a ladder. When I'm working a thumbhole I choose the positioning based on where that ladder falls. I do this by trying the mitten on and making sure it falls over the palm of the hand. Can you see the ladder on the photo there? Rd 24 (thumbhole): Try on your mitten making sure it falls in the right way, work to the beginning of your thumb, ch6, miss 6 sts, htr into the 7th st, continue to the the of the round and sl-st to join. Rd 25: ch2, htr all around, working a st into each thumbhole ch, sl-st to join. Rd 26: ch2, htr all around making sure to htr2tog in the middle of the thumbhole ch sts, sl-st to join. Rds 27 - 32: ch2, htr all around, sl-st to join. Rds 33 - 37: ch3, \*fptr, bptr\*, repeat between \* and \* to end, sl-st to join. Break yarn, fasten securely and I sew in the ends at this point to save time later.
Thumbs:
Rd 1: With right side facing and making sure that where you start is the corner nearest to the palm of your hand, introduce orange yarn and ch2, work a htr into each st and ch as you come to them and two on each side. (16 sts). Rd 2: ch2, htr all around, htr2tog twice evenly around, sl-st to join (14 sts). Rds 3 - 7: ch2, htr all around, sl-st to join. Rd 8 : ch2, htr2tog all around, sl-st to join, break with a tail at least a couple of inches long and use that tail to eave through all of the sts to draw up the top of the thumb.
Face (Make Two):
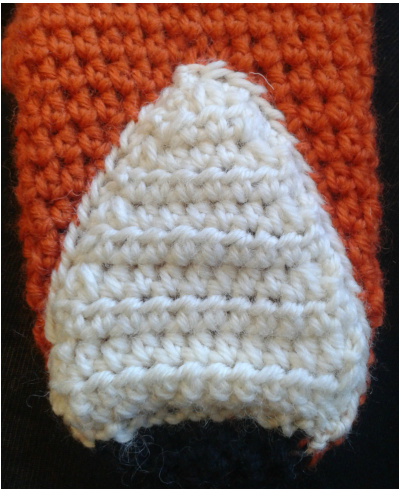
With white, ch13, working into the bumps on the back of the ch, htr into 3rd bump from hook and every bump thereafter. (11 sts not including turning ch). Rw 1 - 2: ch2, htr all across. Rw 3: ch2, htr2tog, 7htr, htr2tog (9 sts). Rw 4: ch2, htr all across. Rw 5: ch2, htr2tog, 5htr, htr2tog (7 sts). Rw 6: ch2, htr all across. Rw 7: ch2, htr2tog, 3htr, htr2tog (5 sts). Rw 8 :ch2, htr2tog, htr, htr2tog (3 sts). Rw 9: ch2, htr2tog. Edging: ch1, work dcs all aroun the edge of the triangle and sl-st to join. I worked 14 on the long sides and a st for each st at the short side. Break yarn with enough yarn to sew the piece on and secure. Use the ends to sew the faces onto the mittens at the front. I use 'end' from the beginning to sew the short side to just above the nose and then the other end to sew the rest of the triangles to the mittens. The point should be pointing towards the hand opening.
Use black yarn to sew eyes onto the face, I do a french knot - you can do what you want. I do each eye about one stitch in from the side of the white bit and on the fourth row down from the point. Sew in all of your ends.
Ears (Make Four) - Worked in rows:
Using orange yarn, ch11, turn. Rw 1: 2 dc, 2 htr, 2 tr, 2 htr, 2dc. Rw 2: Ch1, sl-st, dc, 2 htr, dtr2tog, 2 htr, dc, sl-st. Rw 3: Ch1, sl-st, dc, htr, tr, dtr, tr, htr, dc, sl-st, break yarn and secure. Fold point to point and sew edges together with ends. Using the ends sew the ears just to the side of the face at the same angle as the face and sew in the ends.
Optional I-cord:
Spend a moment identifying the ladder and each ladder of it:
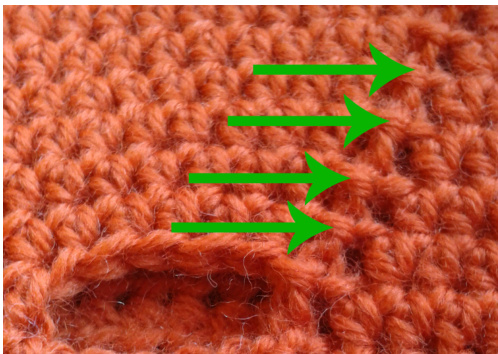
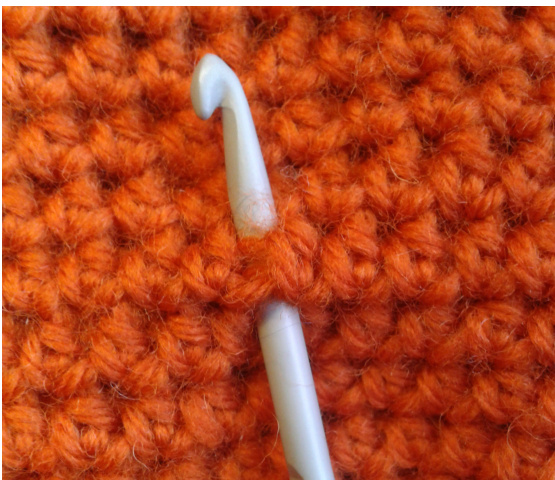
\*To fill in the gaps created by the beginning of the round, we're going to sl-st up the ladder created. Introduce the orange yarn at the very base of the ladder - to do this, with the right side facing, insert your hook under the first ladder to catch it and back up to the front, like the photo to the left: Draw through a loop and ch1 to secure. Into each ladder from hereon in, insert your hook like before, draw a loop and sl-st through the loop on the hook. Eventually you will reach the base of the faux-ribbing, then you need to stop working in a spiral and start working straight up towards the edge. Once you reach the edge, work a stitch as before into the very edge and make 65 chains but don't break the yarn.\* With a new ball of yarn, do exactly the same as before from \* to \*. Now, start working cs into every bump of the ch on the first mitten, work a sl-st into the base of that chain, break yarn and secure. Go back to the middle of the faux I-cord and work a dc into each bump of the ch on the other side, again work a sl-st into the base of that chain, break yarn and secure. Sew in your ends. Wear and be pleased!


