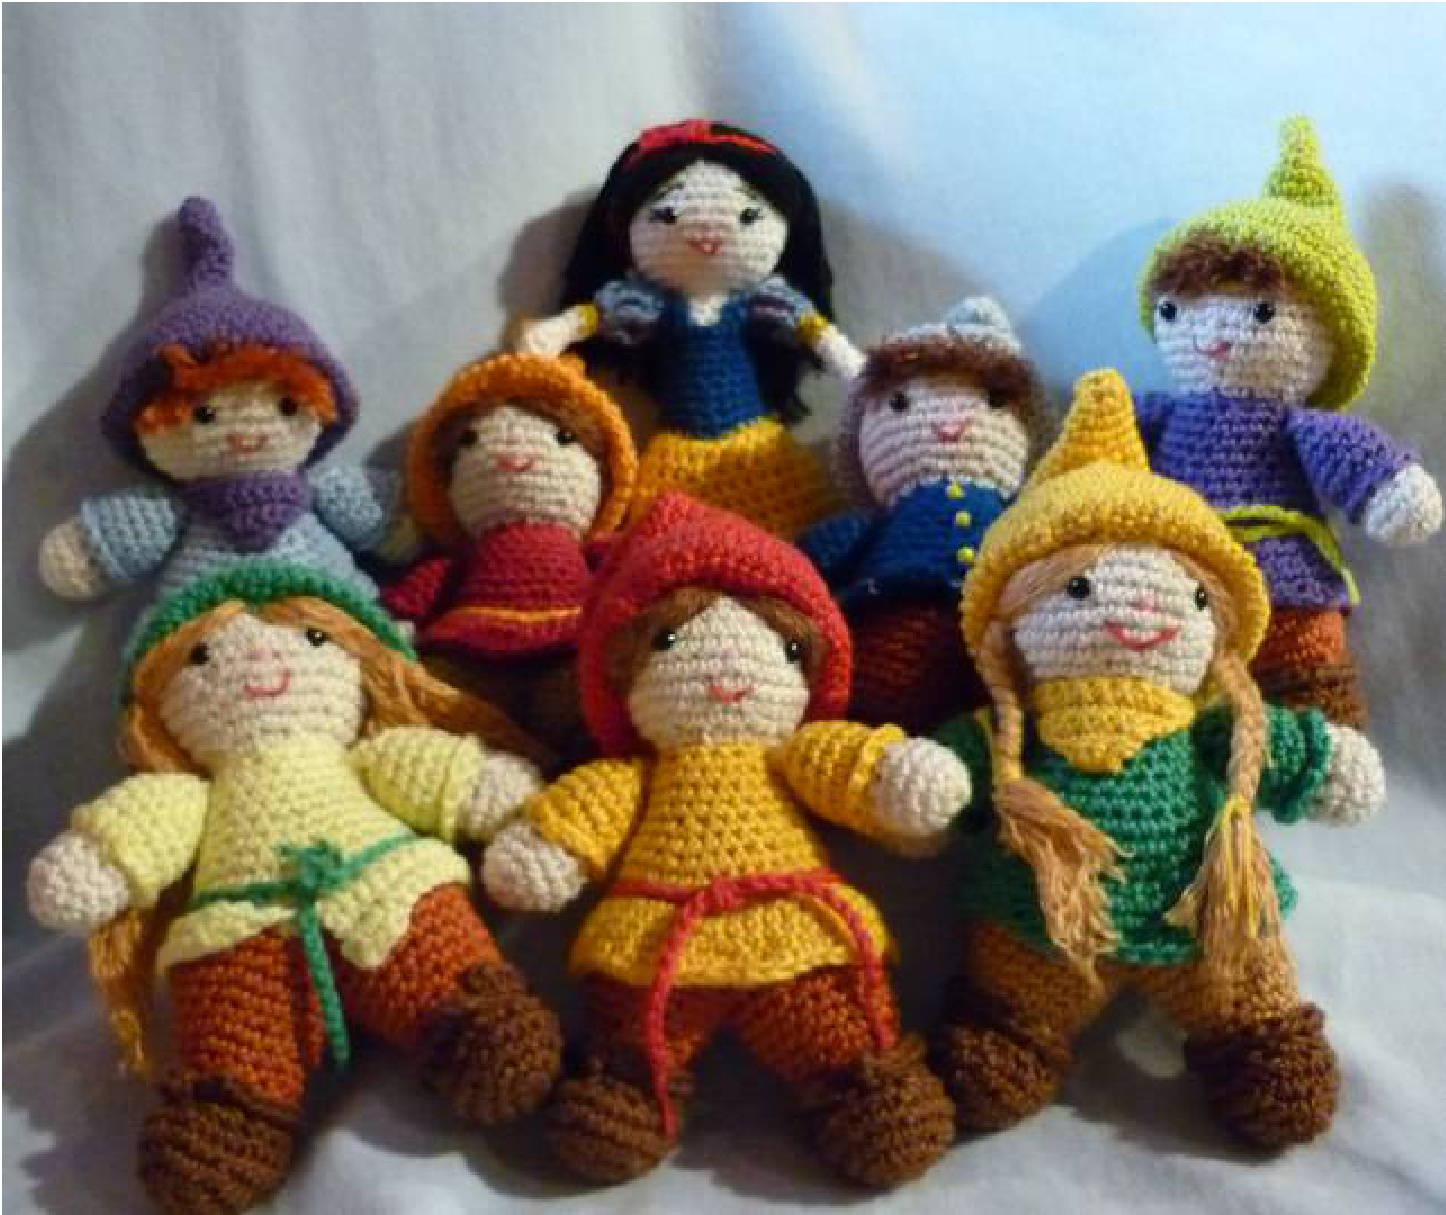
for Seven Dwarfs
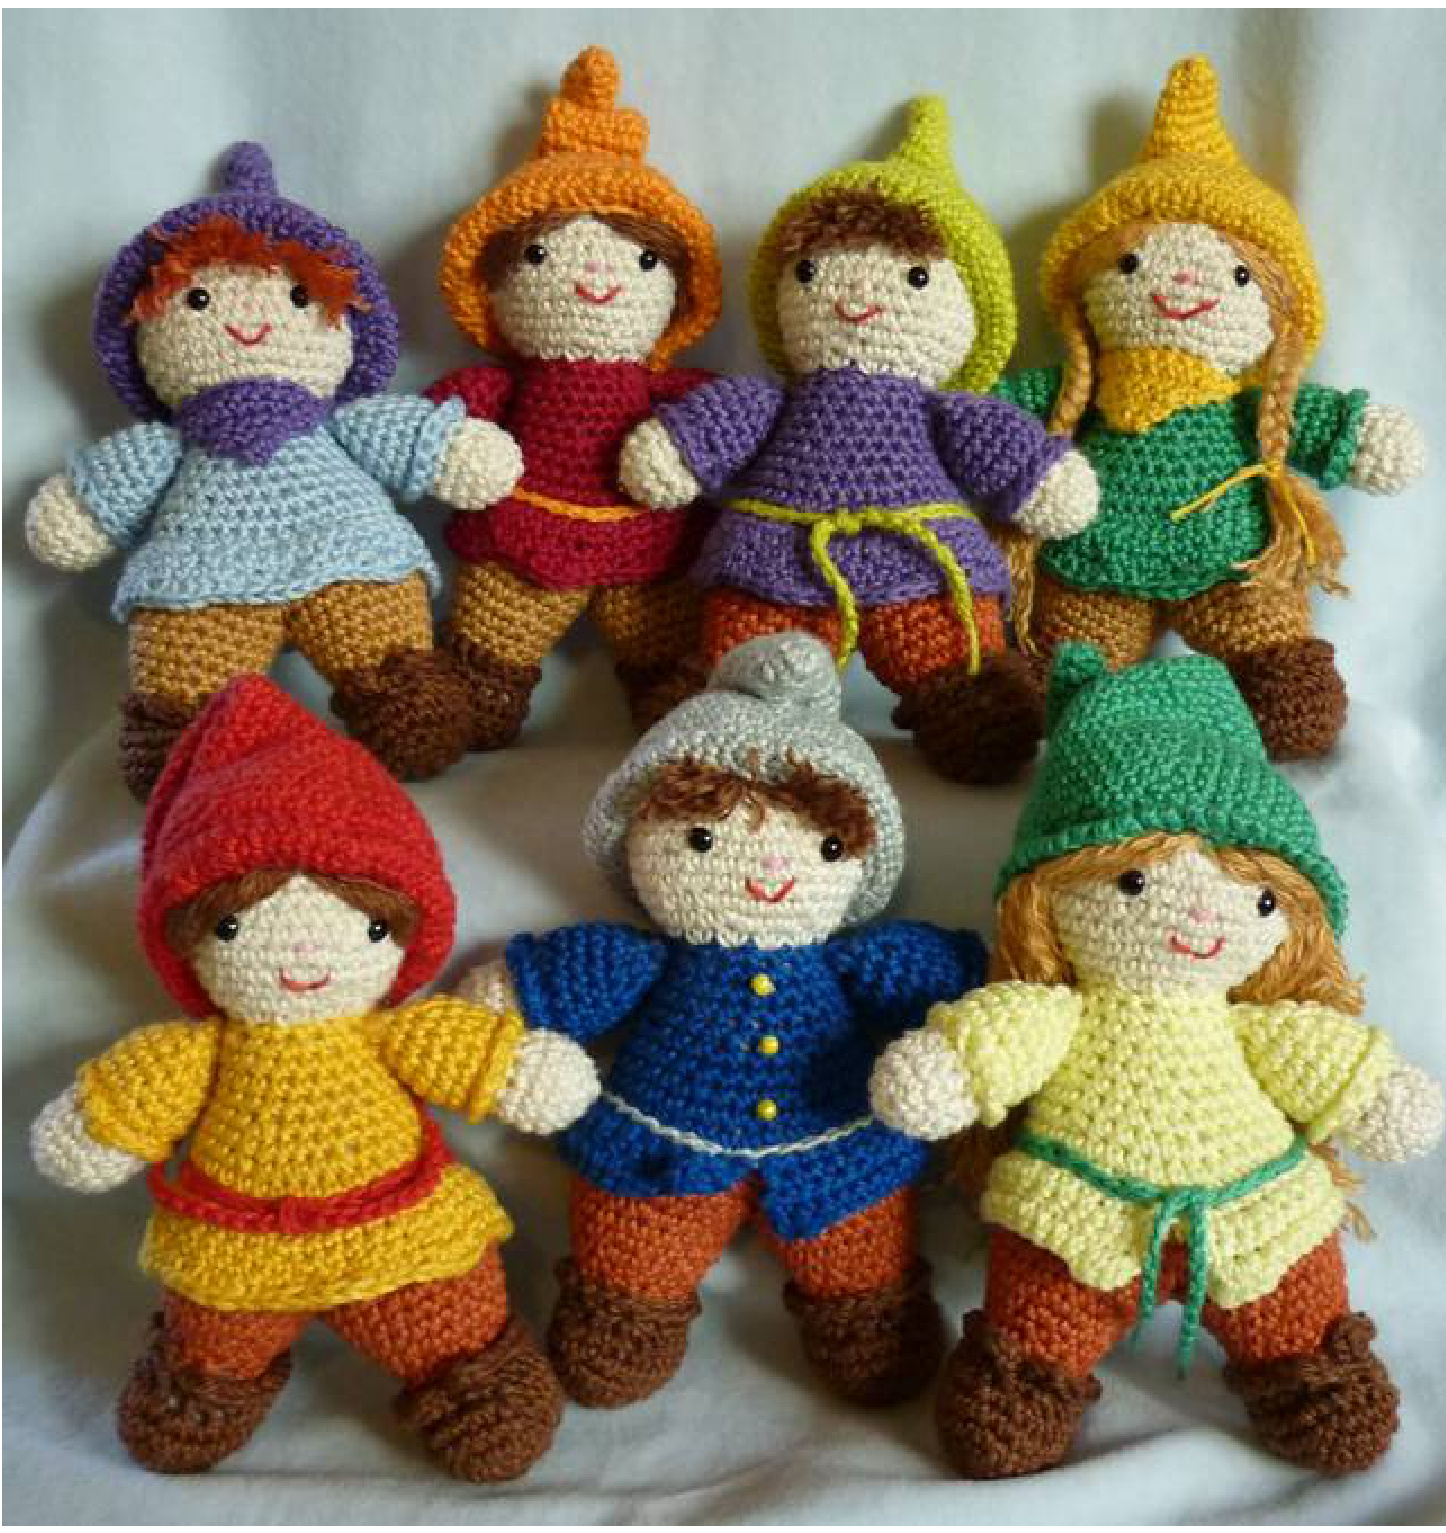
ttern for Seven Dwarfs, there is of course another pattern to make Little Snow White, too. I prefer Catania from Schachenmayr (1o0 % 4-ply cotton), but you can use every other yarn you like with a hook in matching size. Note: using different yarn will probably change the size of the finished doll.
Materials:
Abbreviations:
3.00 crochet hook 4-ply cotton (Catania from Schachenmayr) in your favourite colours or in the colours I used, corresponding the following list. Note: Schachenmayr did unfortunately stop production of the colours red brown (210) and camel (179). As I started the Dwarfs, I did not know that and used just what I had in stock. For each dwarf: 2 black beads (4 mm) or safety eyes Polyester fiberfill ch = chain tch = turning chain (if working in rows) sc = single crochet st = stitch sl = slip stitch hdc = half double crochet R = round tog = together rep = repeat This project is working in continuous rounds. Do not join or turn unless otherwise stated. Mark first stitch of each round. Changing colour: Draw thread of new colour through last two loops of last stitch of first colour. Knot ends together.
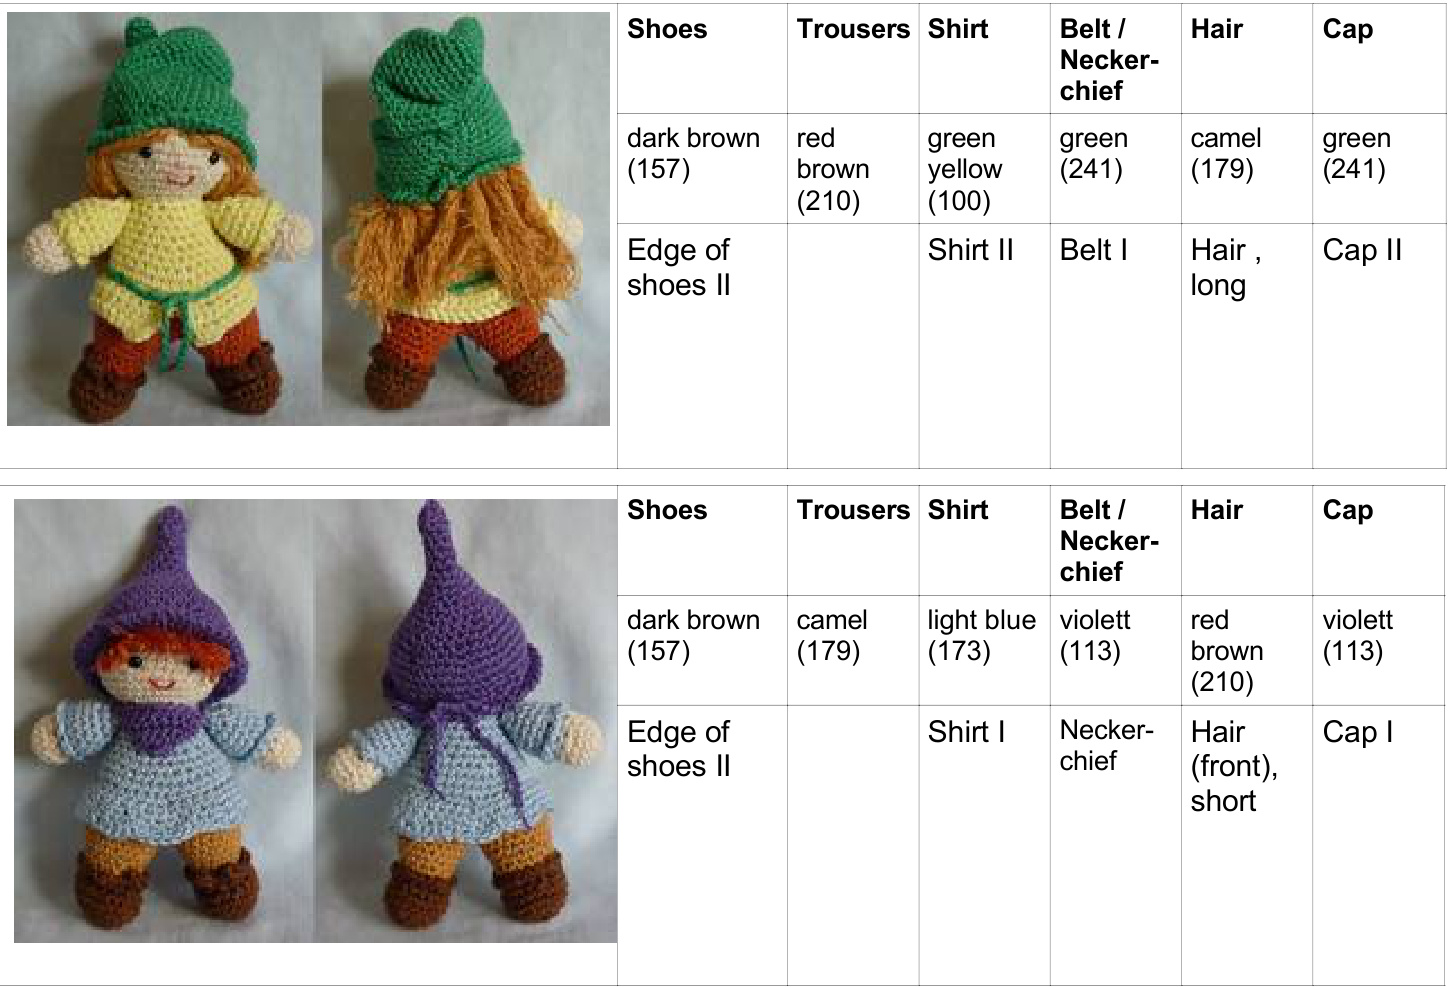
| Shoes | Trousers | Shirt | Belt/ Necker- chief | Hair | Cap | |
| Darkbrown (157) | Red brown (210) | violett (113) Shirt I | Anise green (245) Belt | | marone (157) Hair | Ansie green (245) Cap I | |
| Edge of shoes I | (front), short |
| Shoes | Trousers | Shirt | Belt/ Necker- chief | Hair | Cap | |
| darkbrown (157) | red brown (210) | sun yellow (208) | red (115) Beltl | dark brown (157) Hair | red (115) | |
| Edge of shoes II | Shirt I | (front), long | Cap II |
| Shoes | Trousers | Shirt | Belt/ Necker- chief | Hair | Cap | |
| darkbrown (157) | red brown (210) | royal blue (201) | pearl (255) | dark brown (157) | pearl (255) | |
| Edge of shoesI | Shirt II | Belt II | Hair (front), short | Cap III |
Foot and Leg (make 2)
Start with colour of shoes, changing to colour of trousers when indicated ch 7 R1 sc in second ch from hook, sc in next 4 chs, 3 sc in next ch, working in remaining loops on backside of the beginning chain from here on: sc in next 4 chs, 2 sc in last ch = 14 R2 (2 sc in first st, sc in next 4 sts, 2 sc in next st, sc in next st) 2 times = 18 R3 (2 sc in next st, sc in next 2 sts) rep = 24 R4 sc in each st around = 24 R5 sc in next 9 sts, (sc next 2 sts tog) 4 times, sc in next 7 sts = 20 R6 (sc next 2 sts tog, sc in next st, sc next 2 sts tog, sc in next 4 sts) 2 times, sc next 2 sts tog = 15
Changing to colour of trousers in last 3 loops of last st of R 6.
R7 Working in back loops only: (sc in next st, sc next 2 sts tog) rep = 10 R8 (2 sc in next st, sc in next st) rep = 15 R 9 sc in each st around = 15 R 10 (sc in next 2 sts, 2 sc in next st) rep = 20 R 11+12 sc in each st around = 20 R 13 (2 sc in next st, sc in next 4 sts) rep = 24 R 14 sc in each st around = 24 Fasten off first leg, do not fasten off second leg.
Edge of shoes I
Insert hook from shoe to trousers, join into free loops of R 7, working in colour of trousers: (sc in next 2 sts, 2 sc in next st) rep = 20
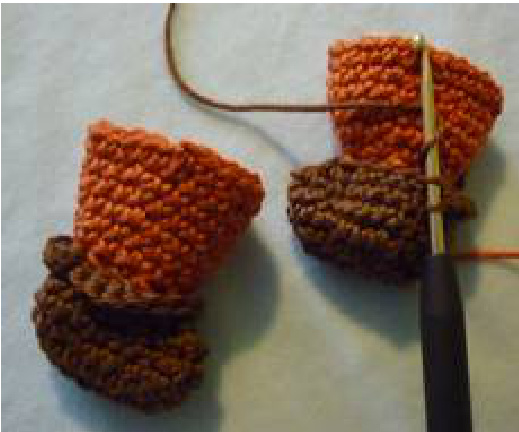
fasten off, pull ends to the inside.
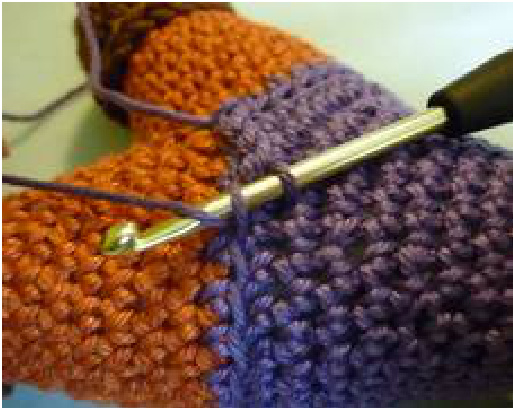
Edge of shoes ll
Insert hook from shoe to trousers in the center front stitch, join into free loops of R 7, working in colour oftrousers: (ch 2, dc, hdc) into first st, sc in next 2 sts, (2 sc in next st, sc in next 2 sts) 2 times , (hdc, dc, ch 2, sl) into lastst fasten off, pull ends to the inside.
Body and Head
Continue in colour of trousers, changing to colour of shirt / skin colour when indicated.

Keep legs together with matching sts, feet are pointing forward, working through both layers of first and second leg: R 1 join legs with 1 sc in each of the next 4 sts ,sc in next 20 sts (2nd leg) and sc in next 20 sts (1st leg) = 40 R 2 sc in next 17 sts, (sc next 2 sts tog, sc in next 2 sts, sc next 2 sts tog), sc in next 17 sts = 38
Changing to colour of shirt in last st of R 2
R3 sc in next 18 sts, (sc next 2 sts tog) 2 times, sc in next 16 sts =36
Stuff legs
R4 Working in back loops only: sc in each st around = R5 sc in each st around = 36 R6 (sc in next 4 sts, sc next 2 sts tog) rep = 30 R7 sc in each st around = 30 R8 (sc in next 3 sts, sc next 2 sts tog) rep = 24 R 9-11 sc in each st around = 24 R 12 (sc in next 2 sts, sc next 2 sts tog) rep = 18 R 13 (sc next 2 sts tog, sc in next st) rep = 12 changing to skin colour in last st of R 13 Stuff legs and tummy R 142 sc in each st around = 24 R 15 (sc in next 3 sts, 2 sc in next st) rep = 30 R 16 (2 sc in next st, sc in next 4 sts) rep = 36 R 17 sc in first 2 sts, (2 sc in next st, sc in next 5 sts) 5 times, 2 sc in next st, sc in last 3 sts = 42 R18-20 sc in each st around = 42
Mark place for safety eyes R 18 and 19
R21 (sc next 2 sts tog, sc in next 5 sts) rep = 36 R 22 sc in each st around = 36 R23 (sc next 2 sts tog, sc in next 4 sts) rep = 30 R 24 sc in each st around = 30
Fix safety eyes, embroider mouth in red and nose in pink
R25 (sc next 2 sts tog, sc in next 3 sts) rep = 24 R26 (sc next 2 sts tog, sc in next 2 sts) rep = 18
Stuff head firmly
R27 (sc next 2 sts tog, sc in next st) rep = 12 R28 (sc next 2 sts tog) rep = 6 fasten off, sew opening close.
Edge of Shirt I
Insert hook from shirt to trousers, join with sl in colour of shirt into free loops of R R1 sc in each st around = 36 R2 (sc in next 5 sts, 2 sc in next st) rep = 42 R3 (2 sc in next st, sc in next 6 sts) rep = 48 R4 sc in each st around = 48 R5 (sc in first st, skip next st, 2 hdc in each of the next 2 sts, skip next st, sc in next st) rep = 48
fasten off.
Edge of Shirt II
Row 1 sc in each st across, turn = 36 Row2 tch, (sc in next 5 sts, 2 sc in next st) rep, turn = 42 Row3 tch, (2 sc in next st, sc in next 6 sts) rep, turn = 48 Row4 tch, sc in each st across, turn = 48 Row5 2 tch, dc in first st, hdc in second st, sc in next 44 sts, hdc in next st, (dc, ch 2, sl) into last st fasten off.
Belt I
Ch 60, sew over tummy with only few stitches, knot ends.
Belt II
Ch 32, sew over R 5 with only few stitches over tummy, beginning and end of the belt should meet at one point.
Necker-chief
Working in rows ch 2 Row1 3 sc in second ch from hook, turn = 3 Row2 tch, 2 sc in first st, sc in next st, 2 sc in next st, turn = 5 Row3 tch, 2 sc in first st, sc in next 3 sts, 2 sc in next st, turn = 7 Row4 tch, 2 sc in first st, sc in next 5 sts, 2 sc in next st, turn = 9
fasten off.
Ch 20, join to last st of R 4, 2 sc in first st, sc in next 7 sts, 2 sc in next st, ch 20, fasten 0
Arms (make 2)
Starting with skin colour, changing to colour of shirt when indicated. ch 2 in skin colour R1 6 sc in second ch from hook = 6 R2 2 sc in each st around = 12 R3 (sc in next 3 sts, 2 sc in next st) rep = 15 R4 sc in each st around = 15 R5 (sc next 2 sts tog, sc in next st) rep = 10
Changing colour in last st of R 5
R6 sc in each st around = 10 R7 Working in back loops only: (sc in next st, 2 sc in next st) rep = 15 R 8-10 sc in each st around = 15 R 11 (sc in next 3 sts, sc next 2 sts tog) rep = 12 R 12 (sc in next 2 sts , sc next 2 sts tog) = 9 stuff arms, if necessary take hook or pencil as tool. R13 (sc in next st, sc next 2 sts tog) = 6, R 14 flatten last round with matching sts, working throught both layers: sl in last 2 sts, fasten off, leave long end for sewing.
Edge of arm
Working into free loops of R 7, with colour of shirt, inserting hook from arm to hand, join with sl:
(sc in first 3 sts, 2 sc in next st) 2 times, sc in last 2 sts, join with sl in first st, fasten off. Sew arms to body.
Hair
Hair (front), short
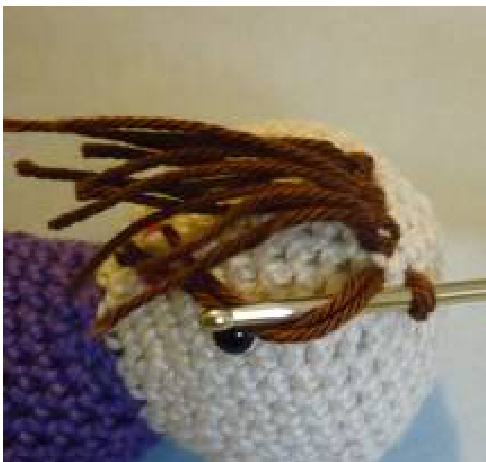
Cut 14 pieces of yarn of approx. 10 cm, take 2 threads together and fix them over forehead as shown in picture. Split the yarn in its single threads to get smooth and slightly curly hair. Don't cut hair to its final length until cap is sewn to head.
Hair (front), long
Cut 14 pieces of yarn of approx. 17 cm, take 2 threads together and fix them on forehead as showen in picture. Split the yarn in its single threads to get smooth and slightly curly hair. Don't cut hair to its final length until cap is sewn to head. Divide hair in two parts, one half to the left, one to the right, insert hook under cap from backside to face (where there could be ears) and pull end of hair under cap.
Hair, long with braids
Cut 14 pieces of yarn of approx. 25, take 2 threads together and fix them on forehead as shown in picture. Split the yarn in its single threads to get smooth and slightly curly hair. Don't cut hair to its final length until cap is sewn to head. Divide hair in two parts, one half to the left, one to the right and sew each fringe with one stitch directly under cap (where there could be ears). Make two braids and fix them with colourful piece offyarn.
Long hair
Cut approx. 80 pieces of yarn of 25 cm, if necessary some more. Take 2 threads together and fix them on forehead and around the whole head as shown in picture above. When cap is sewn to head you should not see the knots any longer. Split the yarn to its single threads to get smooth and slightly curly hair. Don't cut hair to its final length until cap is sewn to head. Divide 8 fringes of the forehead in two parts, sew them at the left and the right side directly under cap (where there could be ears), let remaining hair hang down.
Cap I
ch 2 R1 4 sc in second ch from hook = 4 R2 (2 sc in next st, sc in next st) rep = 6 R3 (2 sc in next st, sc in next 2 sts) rep = 8 R 4,5 sc in each st around = 8 R6 (2 sc in next st, sc in next 3 sts) rep = 10 R7 (2 sc in next st, sc in next 4 sts) rep = 12 R 8-10 sc in each st around = 12 R 11 (2 sc in next st, sc in next 3 sts) rep = 15 R12 sc in each st around = 15 R 13 (2 sc in next st, sc in next 2 sts) rep = 20 R14 sc in each st around = 20 R15 (2 sc in next st, sc in next 3 sts) rep = 25 R16 sc in each st around = 25 R 17 (2 sc in next st, sc in next 4 sts) rep = 30 R18 (sc in next 4 sts, 2 sc in next st) rep = 36 R 19 sc in first 2 sts, (2 sc in next st, sc in next 5 sts) rep 5 times, 2 sc in next st, sc in last 3 sts = 42 R 20 (2 sc in next st, sc in next 13 sts) rep = 45 R 21-24 sc in each st around = 45 R25 Working in front loops only: (2 sc in next st, sc in next 2 sts) rep = 60 R 26 Working in Reversed Stitch: sl, change direction, (Reversed stitch in next 4 sts, skip next st) = 50
fasten off, leave long end for sewing the cap.
Pull yarn end through free loops of R 25, put cap on and adjust its size by pulling the yarn closer. Sew cap to head, cut hair as mentioned above. Reversed Stitch is explained on last page of this pattern!
Cap II
ch 2 R1 6 sc in second ch from hook = 6 R2 sc in each st around = 6 R3 (2 sc in next st, sc in next st) 2 times = 8 R4 sc in each st around = 8 R5 (2 sc in next st, sc in next 2 sts) 2 times = 10 R6 sc in each st around = 10 R7 (2 sc in next st, sc in next 3 sts) 2 times = 12 R8 sc in each st around = 12 R9 (2 sc in next st, sc in next 4 sts) 2 times = 14 R 10 sc in each st around = 14
go on increasing like that until you reach 44 sts:
R39 (2 sc in next st, sc in next 20 sts) 2 times = 44 R 40 sc in each st around = 44 R41 2 sc in first st, sc in next 44 sts = 45 R 42 sc in each st around = 45 R 43 Working in front loops only: (2 sc in next st, sc in next 2 sts) rep = 60 R 44 Working in Reversed Stitch: sl, change direction, (Reversed stitch in next 4 sts, skip next st) = 50
fasten off, leave long end for sewing the cap.
Green Cap: For marking first st of each round, I use a piece of yarn. Or you can weave in a thread from R 14 to 42 into cap. Now I pull this thread close to fold the cap regularly.. Red Cap: Fold pointed end down at the side or backside and fix by sewing . Pull yarn end through free loops of R 43, put cap on and adjust its size by pulling the yarn closer. Sew cap to head, cut hair as mentioned above. Reversed Stitch is explained on last page of this pattern!
Cap Ill
ch 2 R1 6 sc in second ch from hook = 6 R2 sc in each st around = 6 R3 (2 sc in next st, sc in next st) 2 times = 8 R4 sc in each st around = 8 R5 (2 sc in next st, sc in next 2 sts) 2 times = 10 R6 sc in each st around = 10 R7 (2 sc in next st, sc in next 3 sts) 2 times = 12 R8 sc in each st around = 12 R9 (2 sc in next st, sc in next 4 sts) 2 times = 14 R 10 sc in each st around = 14
continue increasing until you reach 20 sts:
R 11 sc in next 4 sts, 2 sc in each of the next 4 sts, sc in next 12 sts = 24 R 12 sc in next 8 sts, se in each of the next 4 sts, sc in next 12 sts = 28 R 13 sc in next 12 sts, (2 sc in next st, sc in next st) 4 times, sc in next 12 sts = 32 R14 (2 sc in next st, sc in next 7 sts) rep = 36 R 15 (2 sc in next st, sc in next 8 sts) wdh = 40 R 16 (2 sc in next st, sc in next 9 sts) wdh = 44 R 17-21 sc in each st around = 44 R 22 working in front loops only: (2 sc in next st, sc in next 2 sts) rep = 60 R23 Working inReversed Stitch: sl, change direction, (Reversed Stitch in next 4 sts, skip next st) rep = 50
fasten off, leaving long end for sewing.
Pull yarn end through free loops of R 22, put cap on and adjust its size by pulling the yarn closer. Fold point to front of cap and sew it. Sew cap to head, cut hair as mentioned above. Reversed Stitch is explained on last page of this pattern!
Mutze IV
Ch 2 R1 4 sc in second ch from hook = 4 R2 (2 sc in next st, sc in next st) rep = 6 R3 (2 sc in next st, sc in next 2 sts) rep = 8 R 4, 10 sc in each st around = 8 R 11 (2 sc in next st, sc in next 3 sts) rep = 10 R 12 (2 sc in next st, sc in next 4 sts) rep = 12 R 13-20 sc in each st around = 12 R 21 (2 sc in next st, sc in next 3 sts) rep = 15 R 22 sc in each st around = 15 R 23 (2 sc in next st, sc in next 2 sts) rep = 20 R 24 sc in each st around = 20 R25 (2 sc in next st, sc in next 3 sts) rep = 25 R 26 sc in each st around = 25 R 27 (2 sc in next st, sc in next 4 sts) rep = 30 R 28 (sc in next 4 sts, 2 sc in next st) rep = 36 R 29 sc in first 2 sts, (2 sc in next st, sc in next 5 sts) 5 times, 2 sc in next st, sc in last 3 sts = 42 R 30 (2 sc in next st, sc in next 13 sts) rep = 45 R 31-34 sc in each st around = 45 R35 working in front loops only: (2 sc in next st, sc in next 2 sts) rep = 60 R 36 Working in Reversed Stitch: sl, change direction, (Reversed Stitch in next 4 sts, skip next st) rep = 50
abketten,langenFadenzumAnnähenderMutzelassen.
fasten off, leaving long end for sewing.
Pull yarn end through free loops of R 35, put cap on and adjust its size by pulling the yarn closer. Fold point of cap twice and sew it. Sew cap to head, cut hair as mentioned above. Reversed Stitch is explained on last page of this pattern!
Youll find more on: Akinna-Stisu.blogspot.com
Reversed stitch
versed stitch is worked from left to right and is used to finish a crochet round
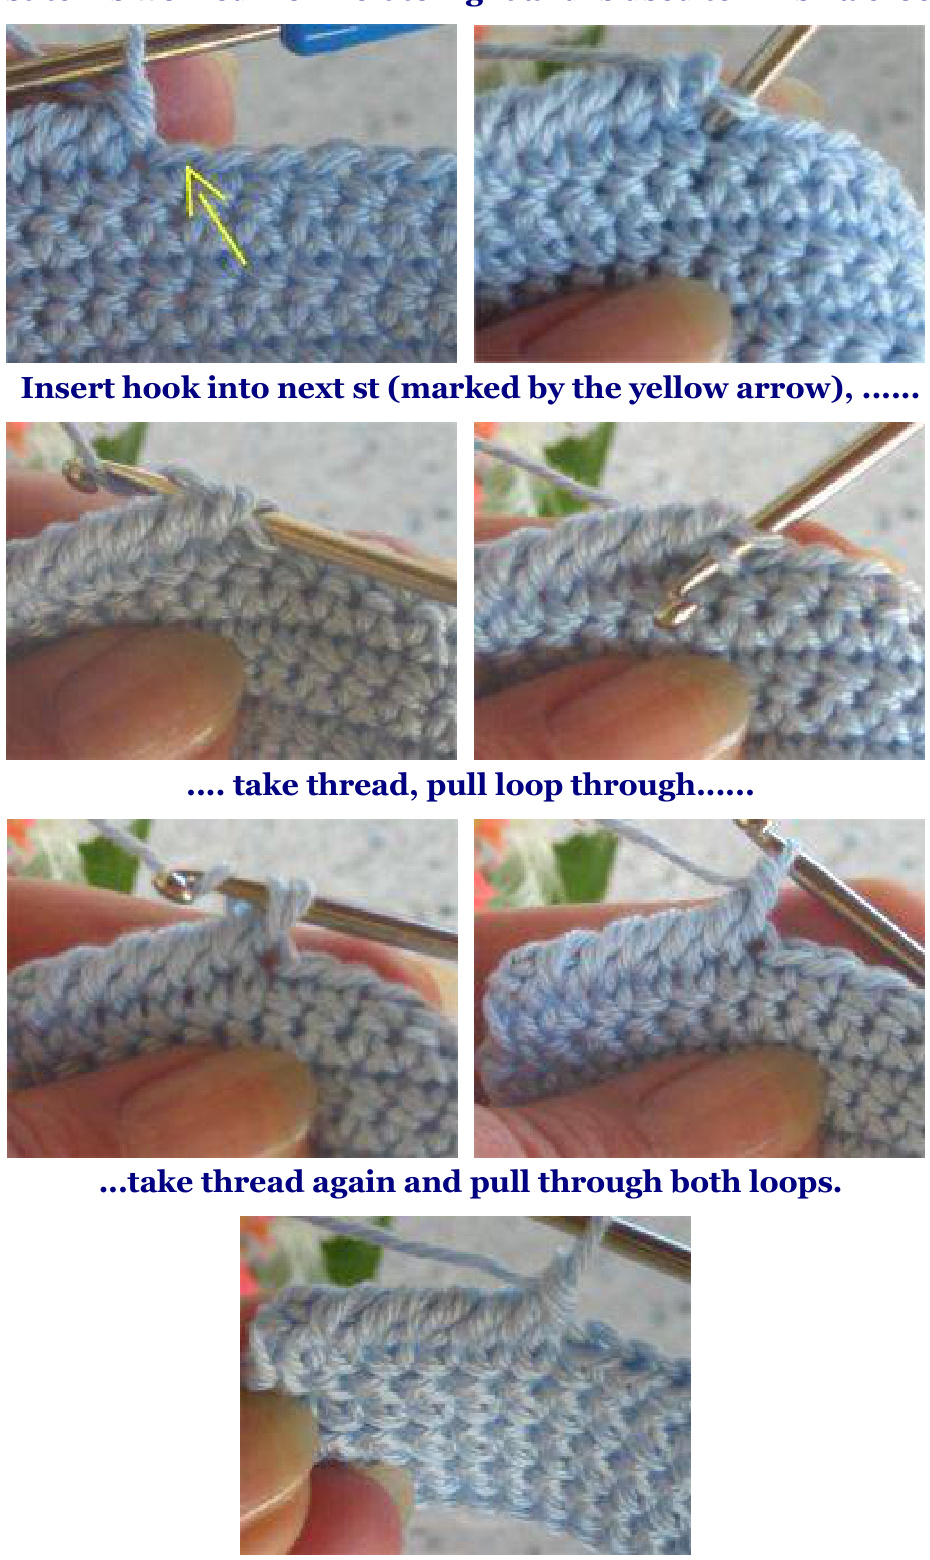
Using this stitch, the last stitches dissapear and you get a rounded edge.


