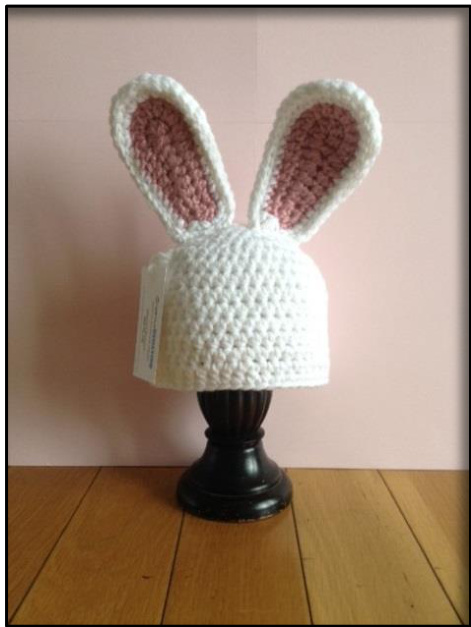
WWW.FACEBOOK.COM/CR EATIVEBEHAVIORCROCHET by CreativeBEHAViOR

\*Photo credit to Kara Hiers Photography
Materials:
Any worsted weight yarn in 2 colors (A&B) I used Lion Brand Vanna's Choice (Mammoth Cave) Red Heart Soft (Ivory) J (6.0 mm) ? Yarn needle
Gauge:
with J hook I and 2 strands of yarn: 4 rows and 6 stitches of HDC = 2x2 in.
Abbreviations:
SC - single crochet HDC - half double crochet FPDC - front post double crochet BPDC - back post double crochet ch - chain slst - slip stitch color A - main color (hat and outer ear) color B - secondary color (inner ear) R - round
Notes:
chain never counts as a stitch, unless otherwise stated “SC in same” means that you place a SC in the same stitch that you slst in “SC in next" means that you SC in the very next stitch ·“4 HDC" means that you put 1 HDC in each of the next 4 stitches. A pattern increase will be written as “2 HDC in each of the next 6 st" or "2 SC in next' “2 SC in next 2” means that you place 2 SC in the next 2 stitches · Numbers in () are the total number of stitches after completing the row
Hat
Double strand of color A J hook (5.5 mm)
Always begin your row in the same stitch that you placed the slst. You have the option to make the hat with or without the ribbing around the bottom. If you prefer your hat without it, simply replace the FPDC rows with a HDC in eachstitcharound. Be sure to measure your ending hat length. You may need to add or remove a row or two depending on your gauge/child's head size
Approximate final length:
0-3 months - 5.5 in. 3-6 months - 6 in. 6-12 months - 6.5 in. 1-3 years - 7-7.5 in.
0-3 Months - J Hook
R1 - magic ring, ch1, 9 HDC in center of ring, slst to 1" HDC (9) R2 - ch 1, 2 HDC in each, slst to 1" HDC (18) R3 - ch 1, \*1 HDC in same, 2 HDC in next, Repeat from \* around, slst to 1" HDC (27) R4 - ch 1, \*HDC in 1" 2, 2 HDC in next, Repeat from \* around, slst to 1" HDC (36) R5 - ch1, HDC in 1" 18, 2 HDC in next, HDC in next 16, 2 HDC in last (38) R6 and beyond- ch 1, HDC in each stitch around, slst to 1" HDC (38) For Ribbed Edging - repeat row 6 until hat measures 4.5 inches long, and continueto edging For NO Ribbed Edging - repeat row 6 until hat measures 5.5 inches long, andcontinuetoLastRow Edging - ch 2, \*FPDC in 1", BPDC in next\*, repeat from \*, slst to 1 FPDC (38) Last Row - ch 1, SC in each st around, bind off and weave in ends (38)
3-6 Months -- J Hook
R1 - magic ring, 9 HDC in center of ring, slst to 1" HDC (9) R2 - ch 1, 2 HDC in each, slst to 1" HDC (18) R3 - ch 1, \*1 HDC in same, 2 HDC in next, Repeat from \* around, slst to 1" HDC (27) R4 - ch 1, \*HDC in 1" 2, 2 HDC in next, Repeat from \* around, slst to 1" HDC (36) R5 - ch 1, \*HDC in 1"t 6, 2 HDC in next, Repeat from \* around, ending with 1HDC, slst to 1" HDC (41) nd beyond - ch 1, HDC in each stitch around, slst to 1" HDC (41) For Ribbed Edging - repeat row 6 until hat measures 5inches long, and continue to Edging For NO Ribbed Edging - repeat row 6 until hat measures 6 inches long, and continuetoLastRow Edging - ch 2, \*FPDC in 1", BPDC in next\*, repeat from \*, slst to 1" FPDC (41) Last Row - ch 1, SC in each st around, bind off and weave in ends (41)
6-12 Months - J Hook
R1 - magic ring, 9 HDC in center of ring, slst to 1" HDC (9) R2 - ch 1, 2 HDC in each, slst to 1" HDC (18) R3 - ch 1, \*1 HDC in same, 2 HDC in next, Repeat from \* around, slst to 1" HDC (27) R4 - ch 1, \*HDC in 1"t 2, 2 HDC in next, Repeat from \* around, slst to 1" HDC (36) R5 - ch 1, \*HDC in 1" 3, 2 HDC in next, Repeat from \* around, slst to 1" HDC (45) R6 and beyond - ch 1, HDC in each stitch around, slst to 1" HDC (45) For Ribbed Edging - repeat row 6 until hat measures 5.5 inches long, and continuetoedging For NO Ribbed Edging - repeat row 6 until hat measures 6.5 inches long, andcontinuetoLastRow ', \*FPDC in 1", BPDC in next\*, repeat from \*, slst to 1" FPDC (45 Last Row - ch 1, SC in each st around (45)
1-3 Years - J Hook
R1 - magic ring, 9 HDC in center of ring, slst to 1" HDC (9) R2 - ch 1, 2 HDC in each, slst to 1s HDC (18) R3 - ch 1, \*1 HDC in same, 2 HDC in next, Repeat from \* around, slst to 1" HDC (27) R4 - ch 1, \*HDC in 1" 2, 2 HDC in next, Repeat from \* around, slst to 1" HDC (36) R5 - ch 1, \*HDC in 1" 3, 2 HDC in next, Repeat from \* around, slst to 1" HDC (45) R6 - ch1, HDC in first 18, 2 HDC in next, HDC in next 18, 2 HDC in next, HDC in last 7 st, slst to 1"t HDC (47) R8 and beyond - ch 1, HDC in each st around, slst to 1" HDC (47) For Ribbed Edging - repeat row 6 until hat measures 6-6.5 inches long, and continue to edging For NO Ribbed Edging - repeat row 6 until hat measures 7-7.5 inches long, andcontinuetoLastRow Edging - ch 2, \*FPDC in 1", BPDC in next\*, repeat from \*, slst to 1 FPDC (47) Last Row - ch 1, SC in each st around (47)
Ears: Worked with a double strand of yarn
For ALL Highlighted Stitches:
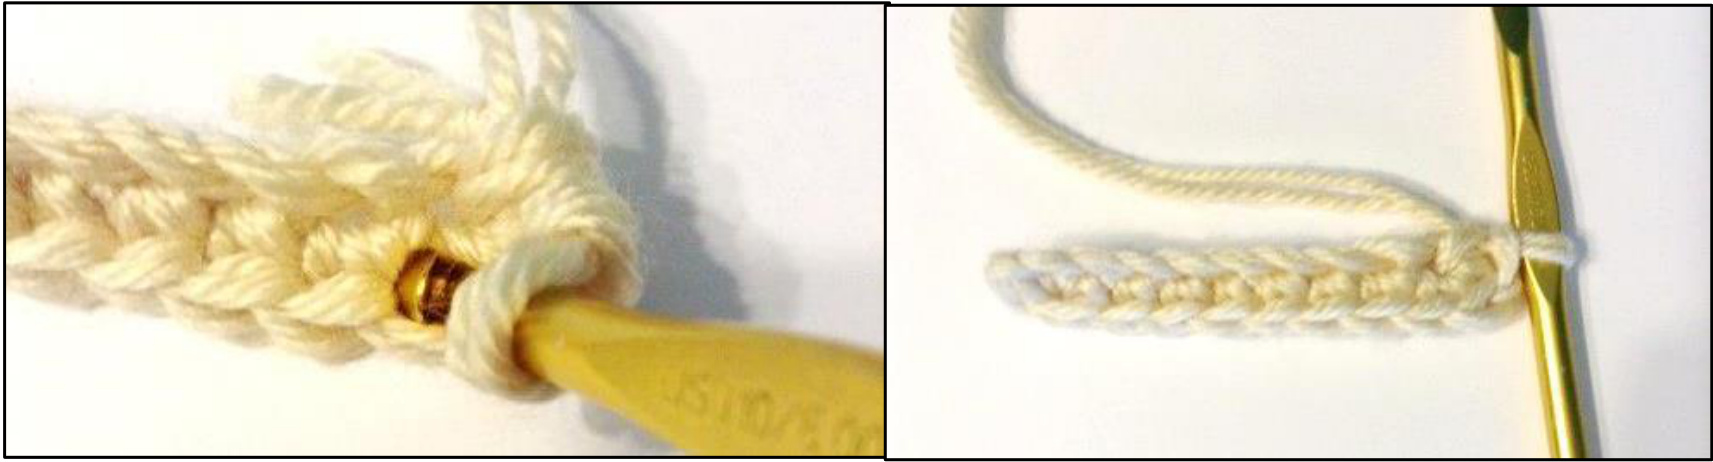
Insert your hook between the bars of the stitches from the opposite side of the chain. This will help avoid gaps that form when working both sides of the chain. If you prefer, you may work in thechainitself
Large Ears
J hook (6.0 mm)
\*Ears are worked in the round. When you come to the end of the chain, do NOT turn - continue working around the other side of the chain.
With Color A:
Part 1- Back of Ear
R1 - ch 10, SC in 2"d ch from hook, 2 SC, 4 HDC, 1 DC, 5 DC in last ch 1 DC, 4 HDC, 3 SC, slst to 1t sc (21) R2 - ch1, SC in same, 2 SC in next, 1 SC, 4 HDC, 1 DC, 2 DC in next 6, 1 DC, 4 HDC, 1 SC, 2 SC in next, 1 SC, slst to 1" sC (30) R3 - ch 1, 2 SC in same, 2 SC in next 2, 9 SC, 2 SC in next 7, 9 SC, 2 SC in next 2, slst to 1s sC, do not bind off, pull up a loop and put aside, move to part 2 (42)
Part?-FrontofFar.. 1atz1ronc
With color B:
R1 - ch 10, SC in 2"d ch from hook, 2 SC, 4 HDC, 1 DC, 5 DC in last ch 1 DC, 4 HDC, 3 SC, slst to 1t sc (21) R2 - ch1, SC in same, 2 SC in next, 1 SC, 4 HDC, 1 DC, 2 DC in next 6, 1 DC, 4 HDC, 1 SC, 2 SC in next, 1 SC, slst to 1" sC, do not bind off, attach color A and continue to R3 (30)
With Color A:
R3 - slst color A to 1" SC of the last row, ch 1, 2 SC in same, 2 SC in next 2, 9 SC, 2 SC in next 7, 9 SC, 2 SC in next 2, slst to 1st SC, (42)
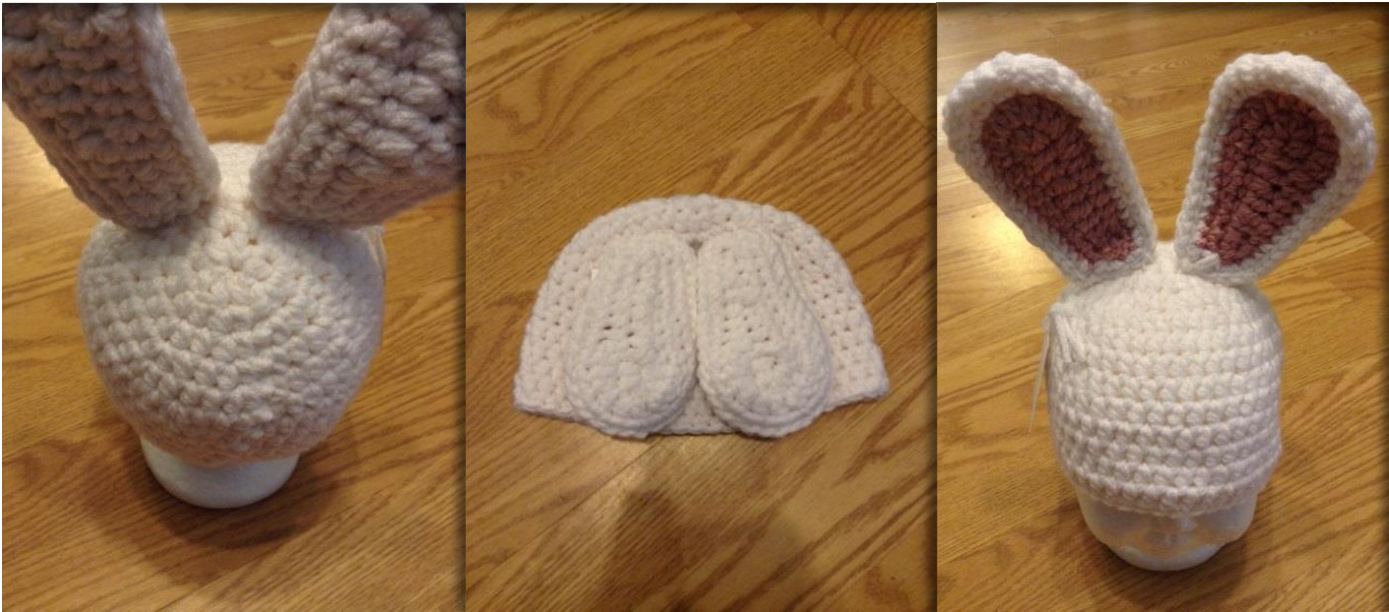
Assembly
Use the loop you pulled up from Part 1 SC in each st around, going through both loops on parts 1 & 2. Bind off, leave a long tail for sewing. (42) REPEAT part 1 and part 2 to make the second ear. \*Skip to Finishing\*
Small Ears (x4)
J hook (6.0 mm)

\*Ears are worked in the round. When you come to the end of the chain, do NOT turn - continue working around theother sideof thechain.
Part 1- Front of Ear
With color B:
R1 - ch7, SC in 2"d ch from hook, 2 SC, 1 HDC, 1 DC, 5 DC in last ch 1 DC, 1 HDC, 3 SC, slst to 1" SC (15) R2 - ch 1. SC in same, 3 SC, 2 HDC, 2 HDC in next 3, 2 HDC, 4 SC, slst in next, do not bind off, pull up a loop and put aside (18)
Part 2- Back of Ear
With color A:
R1 - ch7, SC in 2"d ch from hook, 2 SC, 1 HDC, 1 DC, 5 DC in last ch 1 DC, 1 HDC, 3 SC, slst to 1" SC (15) R2 - ch 1. SC in same, 3 SC, 2 HDC, 2 HDC in next 3, 2 HDC, 4 SC, slst in next, do not bind off, pull up a loop and put aside (18)
Assembly
Use the loop you pulled up from Part 1 SC in each st around, going through both loops on parts 1 & 2. Bind off, leave a long tail for sewing. (18) REPEAT part 1 and part 2 to make the second ear.
Finishing
Ears should be placed between R3 and R4 of hat with a whip stitch, going through both loops at the base of the ear. For extra stability, repeat this going through the second to last row of stitches on the back of the ear.
This pattern is Copyrighted and the sole property of Meredith Robinson (Creative Behavior). You may not copy, reproduce, or sell this pattern without written consent from Meredith Robinson. Feel free to sell your completed products, however, please do not use my photos. Please e-mail me at MeredithManning2 @ gmail.com with any questions or concerns. I will be more than happy to help you. Enjoy!


