Poivre & Sel
by Elise Dupont
Pattern information
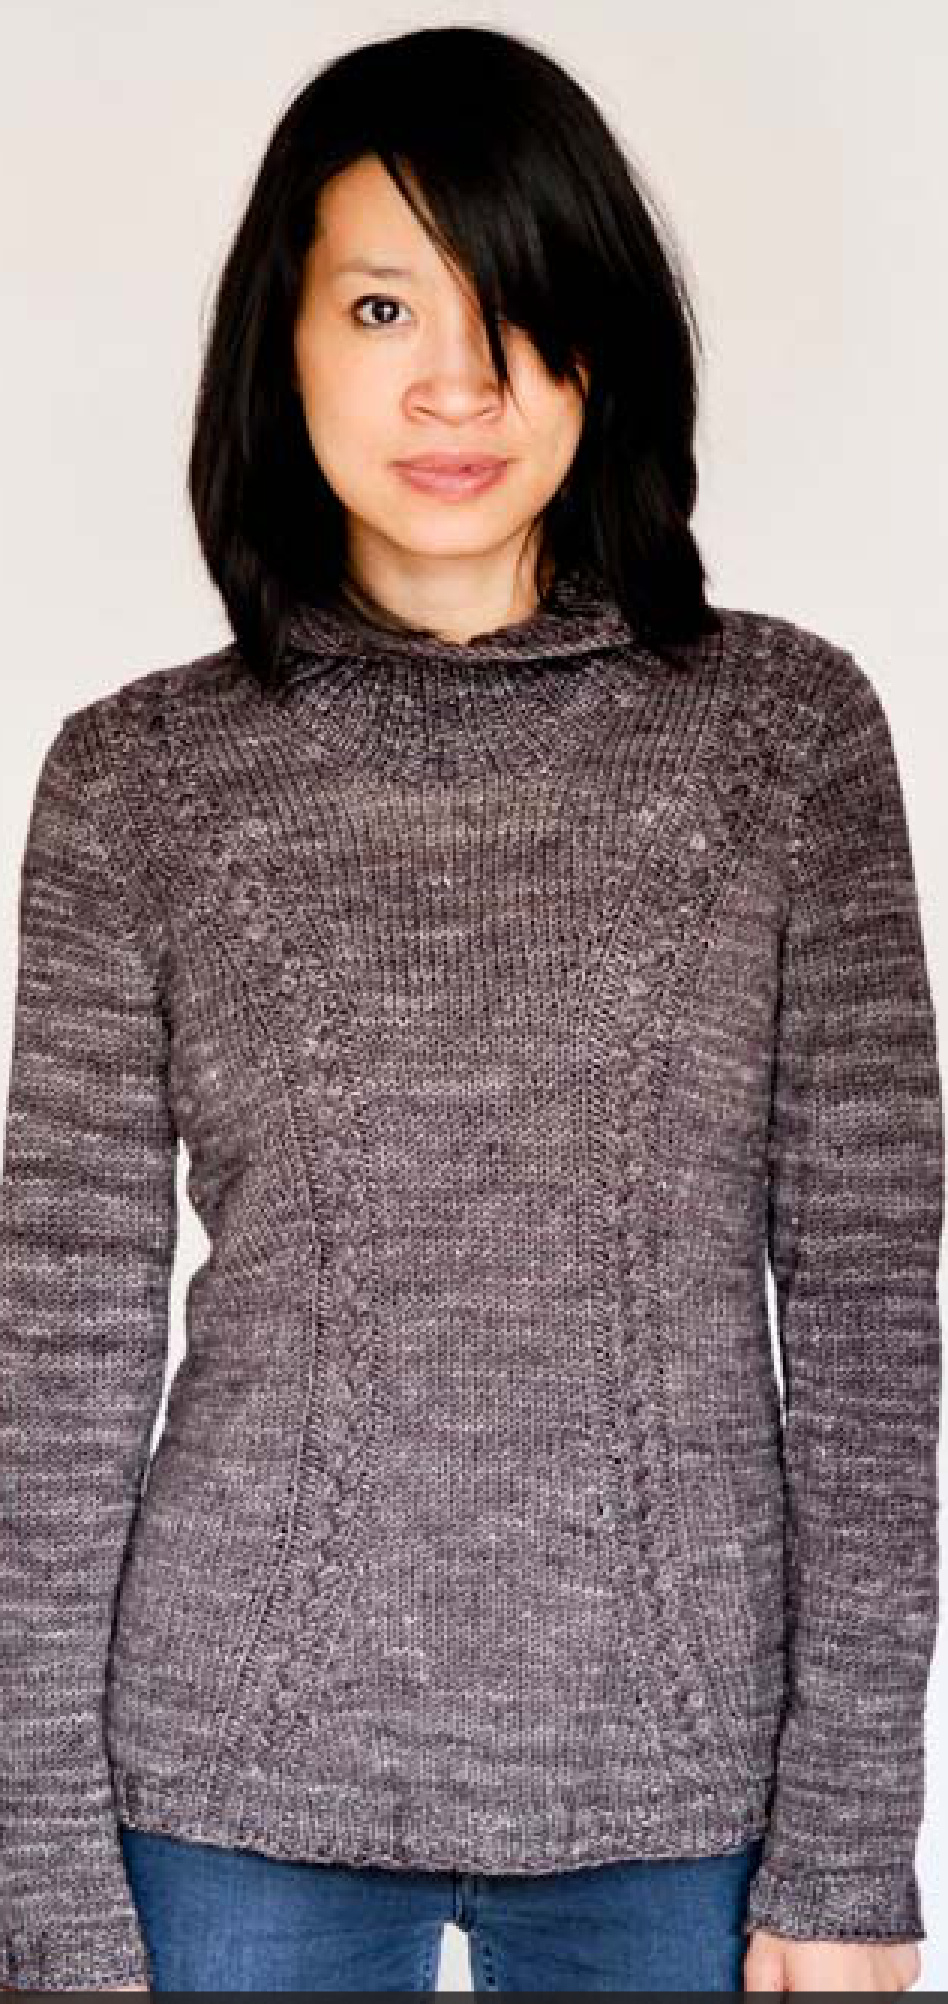
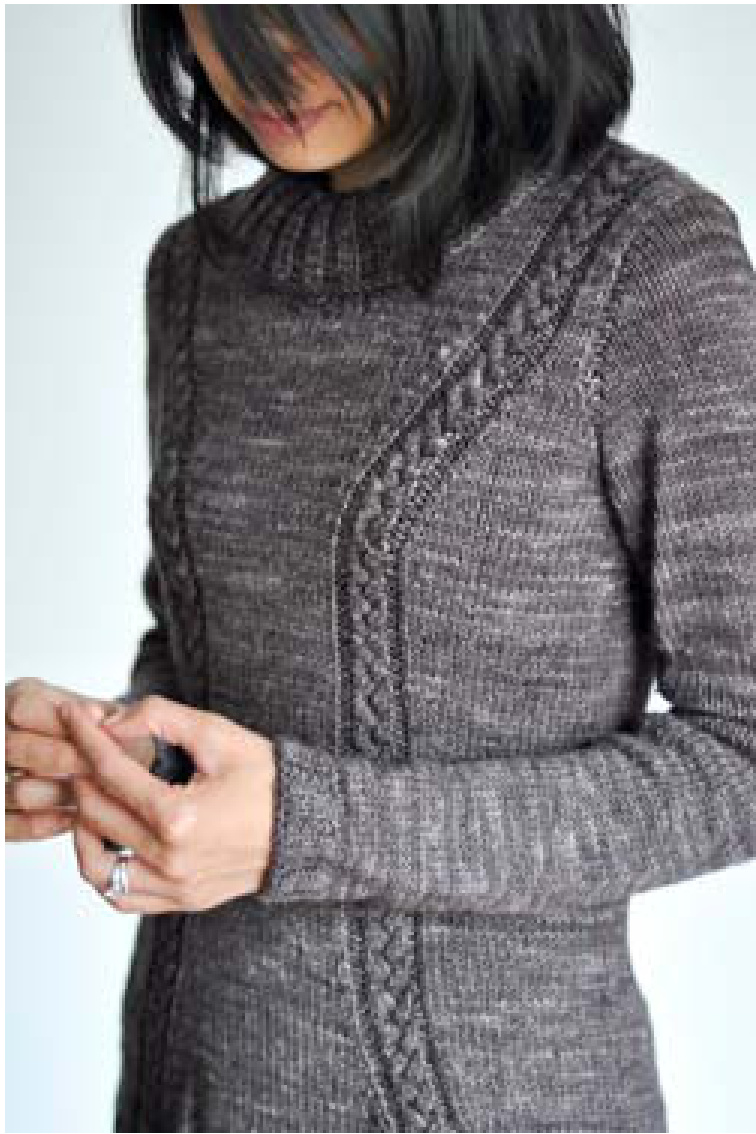
Poivre & Sel is a feminine pullover with subtle lines to shape your body and give it a nice feminine yet chic silhouette. The cowl is protecting the neck but in a loose comfortable way. This garment is worked seamlessly from the top down, in one piece and in the round, with set-in sleeves. The waist and hips are shaped in a unique way: the shaping takes place on the front and the back, with a specific ratio to follow closely the back curve and avoid being too adjusted on the tummy. The model presented has 2 1/4 to 2 3/4" of positive ease. This is the perfect pullover: comfy and feminine at the same time.
Gauge
18 sts and 26 rows = 10cm / 4" in stockinette stitch washed and blocked, with needles A.
Materials
Yarn: DK weight
950 [998, 1.045, 1.118, 1.166, 1.213, 1.260, 1.334] meters / 1.040 [1.091, 1.142, 1.223, 1.275, 1.326, 1.378, 1.458] yards (including + 5% for security factor) The sample is shown in Leizu DK from Julie Asselin (Poivre colorway).
Needles:
Circular needles: A: 4.5mm / Us 7 main needles B: 4mm / US 6 for the ribbing C: 5mm / Us 8 for the cowl Please adjust the needles if needed to obtain gauge!
Other:
7 stitch markers, tapestry needle, waste yarn. You can also use a cable needle if you feel more comfortable using it.
Skill level
Protect your Planet:

To preserve our planet, I recommend that you only print the instructions, from page 4 to page 9. Thank you:-)
About the pattern layout
If you see a blue line like this one, this means that these instructions are going to be repeated more than once. If you see a \*text in blue\* it means that you will have to repeat this part of the sentence more than once.
Blue Print
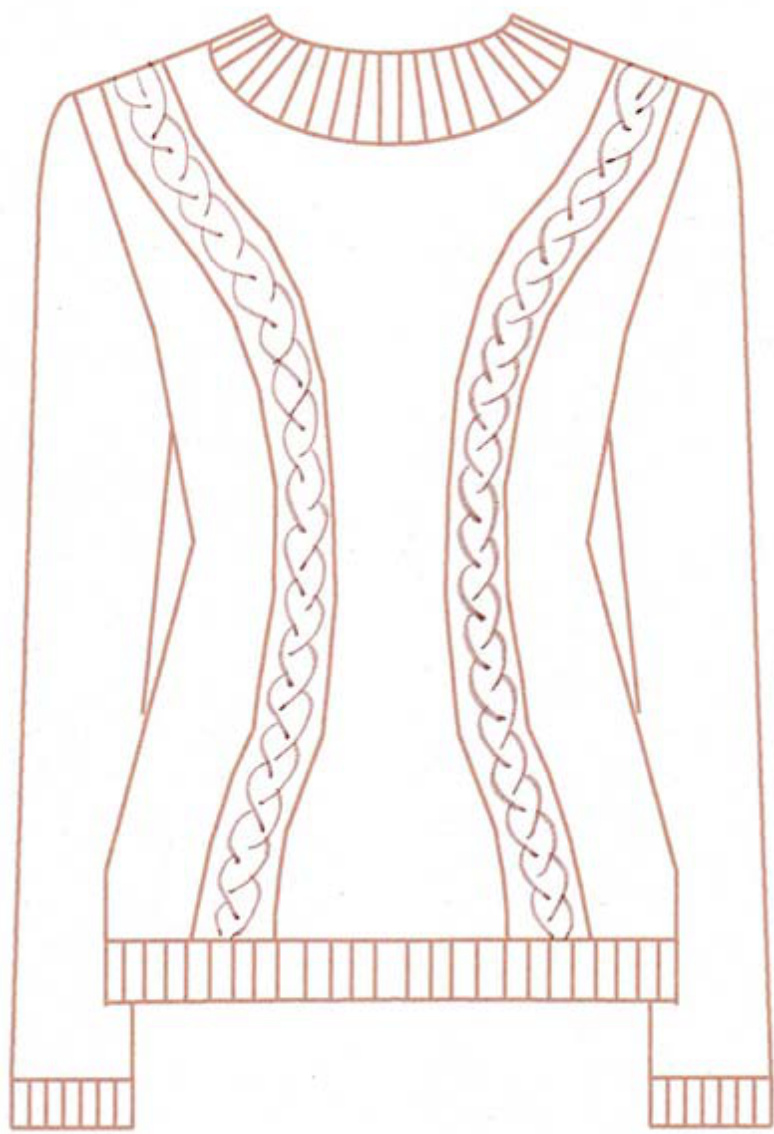
pattern is intended to be worn with 2 1/4 to 2 3/4" positive ease in the bust are
Standard (European) measures
To choose your size, measure your bust at the widest point.
| Size | 32 | 34 | 36 | 38 | 40 | 42 | 44 | 46 |
| Real bustcirc. | 32 1/4" 82cm | 34 1/4" 87cm | 36 1/4" 92cm | 38 1/4" 97cm | 40 1/4" 102cm | 42 1/4" 107cm | 44" 112cm | 46' 117cm |
Pullover finished dimensions
| Size | 32 | 34 | 36 | 38 | 40 | 42 | 44 | 46 |
| Bust circ. | 35" 89cm | 36 1/2" 93cm | 38 1/2" 98cm | 41" 104cm | 42 3/4" 109cm | 44 1/2" 113cm | 46 1/2" 118cm | 48 3/4" 124cm |
| Waist circ. | 30 1/4" 77cm | 32" 81cm | 33 3/4" 86cm | 36 1/2" 93cm | 38 1/4" 97cm | 40 1/4" 102cm | 41 3/4" 106cm | 44 1/2" 113cm |
| Hips circ. | 37 1/4" 95cm | 39" 99cm | 41" 104cm | 43 1/4" 110cm | 45 1/4" 115cm | 47" 119cm | 48 3/4" 124cm | 51 1/2" 131cm |
| Armhole depth | 6 3/4" 17cm | 7" 18cm | 71/2" 19cm | 71/2" 19cm | 7 3/4" 20cm | 73/4" 20cm | 81/4" 21cm | 83/4" 22cm |
| Garment length | 23 3/4" 60.5cm | 23 3/4" 60.5cm | 24 1/4" 61.5cm | 24 1/4" 61.5cm | 24 1/2" 62cm | 25" 63.5cm | 25" 63.5cm | 25 1/4" 64cm |
| Arm circ. | 11 3/4" 30cm | 12 1/4" 31cm | 12 1/2" 32cm | 13" 33cm | 14 1/2" 37cm | 15" 38cm | 15 1/4" 39cm | 15 3/4" 40cm |
Glossary (alphabetical order)
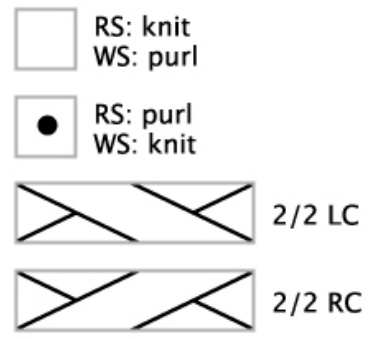
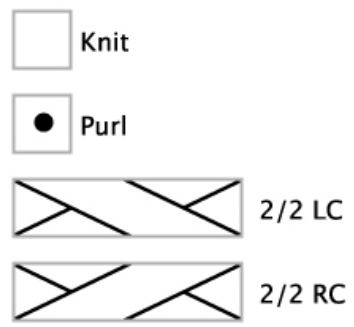
cO: cast on beg: beginning K: knit K2tog: K 2 sts together K2tog TBL: K 2 sts together trough the back loop. Your right-hand needle goes through the back loop of the first stitch, then the second. Then make a knit stitch as normal, pulling both loops off the left-hand needle. One stitch remains on the right-hand needle M1L: make one left (see techniques below) M1R: make one right (see techniques below) P: purl P2Tog: P 2 sts together pm: place marker (to avoid confusion between pm and sm, pm is in orange in the pattern) Rd: round RS: right side slip 1 st wyif: slip one stitch with yarn in front (short rows stitch) sm: slip marker st(s): stitch(es) SSK: slip 1 st, Slip 1 st, insert the left hand needle into the front of the 2 sts and K them together TW: turn work WS: wrong side 2/2 RC: slip 2 to cable needle, hold to back, k2; k2 from cable needle 2/2 LC: slip 2 to cable needle, hold to front, k2; k2 from cable needle
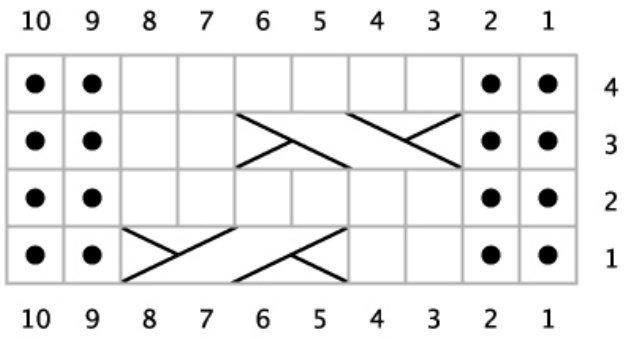
Cable chart
Chart (worked flat):
Row 1 (RS): P2, K2, 2/2 RC, P2. (10 sts) Row 2 (WS): K2, P6, K2 Row 3: P2, 2/2 LC, K2, P2 Row 4: Repeat row 2
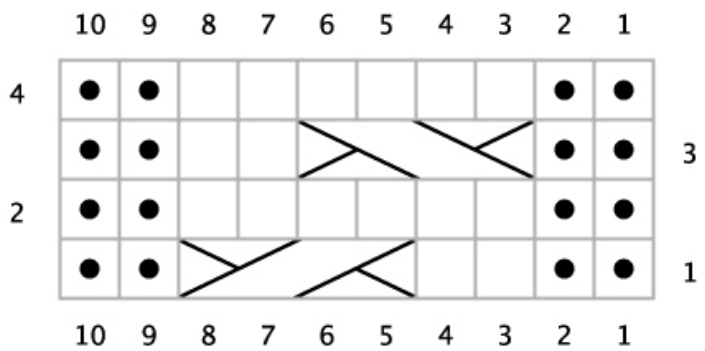
Chart (worked in the round): Round 1: P2, K2, 2/2 RC, P2. (10 sts) Round 2: P2, K6, P2 Round 3: P2, 2/2 LC, K2, P2 Round 4: Repeat round 2
Instructions
1 // BACK
With the needle A, cast on 60 [62, 64, 66, 68, 70, 74, 76] sts. Do not join in the round: the pullover is worked flat until the fronts are joined. Setup row: K17 [18, 18, 19, 19, 20, 21, 22], pm, K26 [26, 28, 28, 30, 30, 32, 32], pm, K to end.
1.1 Shoulder shaping (German short rows):
For a tutorial on the German short rows and · Row 1: \*p to m, sm\* twice, P5, TW used in this pattern, follow these links: · Row 2: slip 1 st wyif, \*k to m, sm\* twice, K5, TW http://youtu.be/P6n561SMZXQ ·Row 3: slip 1 st wyif,\*pto m, sm\* twice, P4, P the double http://youtu.be/KooKdmoYBbw. st as one stitch (like a P2tog), P5, TW · Row 4: slip 1 st wyif, \*k to m, sm\* twice, K4, K the double st as one stitch (like a K2tog), K5, TW · Row 5: slip 1 st wyif, \*p to m, sm\* twice, P9, P the double st, P4, TW · Row 6: slip 1 st wyif, \*k to m, sm\* twice, K9, K the double st, K4, TW · Row 7: slip 1 st wyif, \*p to m, sm\* twice, P13, P the double st, P to end, TW · Row 8: \*k to m, sm\* twice, K13, K the double st, K to end, TW You can remove the markers now. Work back and forth in stockinette stitch until the piece measures 12.5 [12.5, 13, 12.5, 12.5, 12.5, 14, 13]cm / 4 3/4 [4 3/4, 5, 4 3/4, 4 3/4, 4 3/4, 5 1/2, 5] inches from C0 along the armhole edge. If you have the correct row gauge, this should represent 32 [32, 34, 32, 32, 32, 36, 34] rows from the top left or right edge. Do not measure from center back. End with a WS row.
1.2 Armhole increases:
Row 1: K1, M1L, K to 1 st, M1R, K1 Row 2: P all Repeat the last two rows for a total of 6 [7, 7, 9, 9, 10, 9, 11] times. You now have 72 [76, 78, 84, 86, 90, 92, 98] sts. Cut the yarn. Place all sts on waste yarn.
2 // RIGHT FRONT
With RS facing and beginning at armhole edge, pick up and K 1 st in each of the following number of cO sts: 17 [18, 18, 19, 19, 20, 21, 22] sts. ·Row 1: P4, pm, K2, TW · Row 2: slip 1 st wyif, P1, sm, K to end, TW · Row 3: P4, sm, K1, K the double st, P5, TW ·Row 4: slip 1 st wyif, K4, P2, sm, K2, M1L, K to end, TW · Row 5: P to m, sm, K2, P4, P the double st, P1, K2, pm, P1, TW · Row 6: slip 1 st wyif, sm, work row 1 of cable chart, sm, K to end · Row 7: P to m, sm, continue cable chart, sm, P the double st, P to end
About the cables:
You can work the cables without the help of a cable needle: it is quicker after a little bit of practice. You can find many tutorials to show you how to do it. For example: http://newstitchaday.com/cable-without-cable-needle/ Row 8: K to m, sm, continue cable chart, sm, K to 2 sts, M1L, K2 Row 9: P to m, sm, continue cable chart, sm, P to end Row 10: K to m, sm, continue cable chart, sm, K to end Row 11: P to m, sm, continue cable chart, sm, P to end Repeat last 4 rows 4 more times. Then: · Row 1: K to m, sm, continue cable chart, sm, K to 2 sts, M1L, K2 · Row 2: P to m, sm, continue cable chart, sm, P to end · Row 3: K to m, sm, continue cable chart, sm, K to 2 sts, M1L, K2 · Row 4: P to m, sm, continue cable chart, sm, P to end You now have 25 [26, 26, 27, 27, 28, 29, 30] sts. Place all sts on waste yarn and begin left front. Do not cut the yarn.
3//LEFTFRONT
With RS facing and beginning at armhole edge, pick up and K 1 st in each of the following number of CO sts: 17 [18, 18, 19, 19, 20, 21, 22] sts. ·Row 1: K4, pm, P2, TW · Row 2: slip 1 st wyif, K1, sm, P to end, TW · Row 3: K4, sm, P1, P the double st, K5, TW · Row 4: slip 1 st wyif, P4, K2, sm, P to end ·Row 5: K2, M1R, K to m, sm, P2, K4, K the double st, K1, P2, pm, K1, TW · Row 6: slip 1 st wyif, sm, work row 4 of cable chart, sm, P to end · Row 7: K to m, sm, work row 1 of the cable chart, sm, K the double st, K to end ·Row 8: P to m, sm, continue cable chart, sm, P to end · Row 9: K2, M1R, K to m, sm, continue cable chart, sm, K to end · Row 10: P to m, sm, continue cable chart, sm, P to end · Row 11: K to m, sm, continue cable chart, sm, K to end · Row 12: P to m, sm, continue cable chart, sm, P to end Repeat last 4 rows 4 more times. Then: · Row 1: K2, M1R, K to m, sm, continue cable chart, sm, K to end ·Row 2: P to m, sm, continue cable chart, sm, P to end · Row 3: K2, M1R, K to m, sm, continue cable chart, sm, K to end · Row 4: P to m, sm, continue cable chart, sm, P to end You now have 25 [26, 26, 27, 27, 28, 29, 30] sts. Add right front side sts to the end of the needle. Cut the yarn.
4 // FRONT
4.1 Joining the fronts:
· Row 1: K to m, sm, continue cable chart, sm, K to end of right front, C0 10 [10, 12, 12, 14, 14, 16, 16] sts, join left front: K to m, sm, continue cable chart, sm, K to end. Row 2: \*P to m, sm, continue cable chart, sm\* twice, P to end You now have 60 [62, 64, 66, 68, 70, 74, 76] sts. Work 4 [4, 6, 4, 4, 4, 8, 6] more rows. The front piece should now be 12.5 [12.5, 13, 12, 12.5, 12.5, 14, 13]cm / 4 3/4 [4 3/4, 5, 4 3/4, 4 3/4, 4 3/4, 5 1/2, 5] inches from C0 along the armhole edge. Do not measure from centerback.
End with a WS row. If you have the correct row gauge, this should represent 32 [32, 34, 32, 32, 32, 36, 34] rows from the top left or right edge.
4.2 Armhole increases:
· Row 1: K1, M1L, K to 1 st before m, M1R, K1, sm, continue cable chart, sm, K1, K2tog, K to 3 sts before m, SSK, K1, sm, continue cable chart, sm, K1, M1L, K to 1 st, M1R, K1 · Row 2: \*P to m, sm, continue cable chart, sm\* twice, P to end · Row 3: K1, M1l, K to m, sm, continue cable chart, sm, K to m, sm, continue cable chart, sm, K to 1 st, M1R, K1 ·Row4:likerow 2 Repeat the last 4 rows for a total of 3 [3, 3, 4, 4, 5, 4, 5] times. All sizes except 32 and 42: work rows 1 and 2 one more time. You now have 72 [76, 78, 84, 86, 90, 92, 98] sts.
5// BODY
5.1 Joining the front with the back:
You are now going to join the front and the back, and begin to work in round. Beginning at the front, C0 4 [4, 5, 5, 6, 6, 7, 7] sts, K to 1 st before m, M1R, K1, sm, continue cable chart, sm, K1, K2tog, K to 3 sts before m, SSK, K1, sm, continue cable chart, sm, K1, M1L, K to end of the front, CO 8 [8, 10, 10, 12, 12, 14, 14] sts, join the back: K24 [25, 26, 28, 29, 30, 31, 33] sts, pm, K24 [26, 26, 28, 28, 30, 30, 32] sts, pm, K24 [25, 26, 28, 29, 30, 31, 33] sts, C0 4 [4, 5, 5, 6, 6, 7, 7] sts, pm (this marker indicates the beg. of the round). Be careful: from now on, your chart is worked in the round! Advice: many knitters work tighter when they work in the round (compared to flat). Watch your gauge: if this is your case, think about changing for a bigger needle when you work in the round, to keep the same gauge! You now have 160 [168, 176, 188, 196, 204, 212, 224] sts. · Rd 1-3: \*K to m, sm, continue cable chart, sm\* twice, \*Kto m, sm\* twice, Kto end Rd 4: Kto 1 st before m, M1R, K1, sm, continue cable chart, sm, K1, K2tog, Kto 3 sts before m, SSK, K1, sm, continue cable chart, sm, K1, M1L, \*K to m, sm\* twice, K to end Repeat last 4 rows 2 more times.
5.2 Waist decreases:
· Rd 1-3: \*K to m, sm, continue cable chart, sm\* twice, \*K to m, sm\* twice, K to end · Rd 4: K to 3 sts before m, SSK, K1, sm, continue cable chart, sm, K to m, sm, continue cable chart, sm, K1, K2tog, K to 3 sts before m, SSK, K1, sm, K to m, sm, K1, K2tog, K to end · Rd 5-7: like rd 1 · Rd 8: \*Kto m, sm, continue cable chart, sm\* twice, Kto 3 sts before m, SSK, K1, sm, Kto m, sm, K1, K2tog, Kto end Repeat last 8 rounds 3 more times. You now have 136 [144, 152, 164, 172, 180, 188, 200] sts. Work 12 rounds in pattern, straight: \*K to m, sm, continue cable chart, sm\* twice, \*K to m, sm\* twice, Kto end. You can work more rows if your waist is lower.
5.3 Hips increases:
· Rd 1-3: \*K to m, sm, continue cable chart, sm\* twice, \*K to m, sm\* twice, K to end · Rd 4: Kto m, sm, continue cable chart, sm, K1, M1l, Kto 1 st before m, M1R, K1, sm, continue cable chart, sm, K to 1 st before m, M1R, K1, sm, K to m, sm, K1, M1L, K to end ·Rd 5-7: like rd 1 · Rd 8: \*K to m, sm, continue cable chart, sm\* twice, Kto 1 st before m, M1R, K1, sm, Kto m, sm, K1, M1L, Kto end Repeat last 8 rounds 1 time more. · Rd 1-3: \*K to m, sm, continue cable chart, sm\* twice, \*K to m, sm\* twice, K to end · Rd 4: Kto m, sm, continue cable chart, sm, K1, M1L, Kto 1 st before m, M1R, K1, sm, continue cable chart, sm, K to 1 st before m, M1R, K1, sm, K to m, sm, K1, M1L, K to end ·Rd 5-7: like rd 1 · Rd 8: K to 3 sts before m, K2tog, K1, sm, continue cable chart, sm, K1, M1L, K to 1 st before m, M1R, K1, sm, continue cable chart, sm, K1, SSK, K to 1 st before m, M1R, K1, sm, K to m, sm, K1, M1L, K to end Repeat last 8 rounds 2 more times. Repeat Rd 1 seven more times, then Rd 8 one last time. You now have 168 [176, 184, 196, 204, 212, 220, 232] sts. Work 2 rounds straight (no more cable chart): \*K to m, sm, P2, K6, P2, sm\* twice, \*K to m, sm\* twice, Kto end. Then switch to small circular needles for the hem. Be sure to have a st count multiple of 4 (specially if you lengthen the body)! If you want to make the body longer, do it now. Repeat this, as many times as you need to: Work Rd 1 seven times Work Rd 8 one time
5.4 Hem:
With needles B work in 2x2 ribs for 7 rows: \*P2, K2\* repeat till the end of round. then bind off all sts this way: \*K2tog TBL loosely, put the st back on the left needle keeping it loose\* (repeat from \* to \* till the end).
6 // SLEEVES
With bigger circular needles, pick up and K armhole sts, beginning at center of underarm: Pick up and K4 [4, 5, 5, 6, 6, 7, 7] sts underarm, pick up and K (approximately every other stitch) to shoulders "seam": 23 [24, 24, 25, 27, 28, 28, 29] sts, pick up and K (approximately every other stitch) to underarm: 23 [24, 24, 25, 27, 28, 28, 29] sts, pick up and K4 [4, 5, 5, 6, 6, 7, 7] sts underarn, pm. You now have 54 [56, 58, 60, 66, 68, 70, 72] sts. · Row 1: K 36 [37, 39, 40, 44, 45, 47, 48] sts, TW · Row 2: slip 1 st wyif, P17 [17, 19, 19, 21, 21, 23, 23] sts, TW · Row 3: slip 1 st wyif, K to the double st, K the double st, K1, TW · Row 4: slip 1 st wyif, P to the double st, P the double st, P1, TW ·Row5:likeRow3 ·Row6:likeRow 4
Continue to repeat rows 3 and 4, working one st past the previous double st, until you worked all sts except the 8 [8, 10, 10, 12, 12, 14, 14] underarm sts. End with a WS. Next row: K to the double st, K the double st, K4 [4, 5, 5, 6, 6, 7, 7]. From now, work in the round. Switch to bigger circular needles if you knit tighter in the round. Next round: K4 [4, 5, 5, 6, 6, 7, 7], K the double st, K to end. Work 13 rounds in stockinette stitch. Decrease round: K2, K2Tog, K to 4 sts, SSK, K2. Repeat decrease round every 9 th round, 10 times total. You now have 34 [36, 38, 40, 46, 48, 50, 52] sts. Work 9 [8, 8, 7, 6, 6, 6, 6] rounds. Next: decrease 2 [2, 0, 0, 2, 2, 2, 2] sts, so that you have a sts count multiple of 4. Change needles B and work in 2x2 ribs for 7 rounds: \*P2, K2\* repeat till the end of round. then bind off allsts this way: \*K2tog TBL loosely, put the st back on the left needle keeping it loose\* (repeat from \* to \* till the end).
7 // NECK
With needles C pick up and K the neck sts, beginning at the center back, with the following ratio: ·Back: all sts Front: where you made the front increases pick up and K 3 sts over 4. At the middle front (where you joined left and right front) pick up and K all sts.
Be careful to pick up a multiple of 4!
Continue until you reach the middle of the back. Join in round (do not forget to place a marker). Work in 2x2 ribs for 35 rounds: \*P2, K2\* repeat till the end of round. Then bind off all sts this way: \*K2tog TBL loosely, put the st back on the left needle keeping it loose\* (repeat from \* to \* till the end). Weave in ends, wash and block lightly. Tutorial to weave in ends (even if it is in French, the video is very self-explanatory): http://www.youtube.com/watch?v=PUALiz21Uu0
I/ABOUT
Elise is a designer living in Paris, France. She works a lot to find the best fit based on body shapes, for real life women. She also likes to play with colors. You can find her patterns on elisedupont.fr and on http://ravelry.com/designers/elise-dupont.
I/ THANK YOU
To Ladyoga HelEtZel marievlo dominiquerey ambredanicour Agnesdevichy lydely Christine07 nuala29 dgre008 MissOrangina pavoise Feedesetoiles and smallfanfan for their generous help with the test knit. To my man, and his unconditional support from the start. And thank you to all the knitters who have knit my patterns and encouraged me in every possible way.
I/ A PROBLEM?
If something in the instructions is puzzling you or if you have a problem, check this page: http://elisedupont.fr/en/support-errors/ For any questions you can email me at: elise.dupont@gmail.com.

When you have a question, ALWAYS give me the paragraph number where the problem is (as numbered in the pattern), so that I can help you efficiently.
I/COPYRIGHT
The entire content of this pattern and the knitted designs to which it refers are subject to copyright. In purchasing this pattern you agree to print and use this pattern only for your personal, non-commercial use. You may not distribute or sell electronic or paper copies of this pattern, nor may you sell any items produced using the directions in this pattern. @ Elise Dupont 2014.

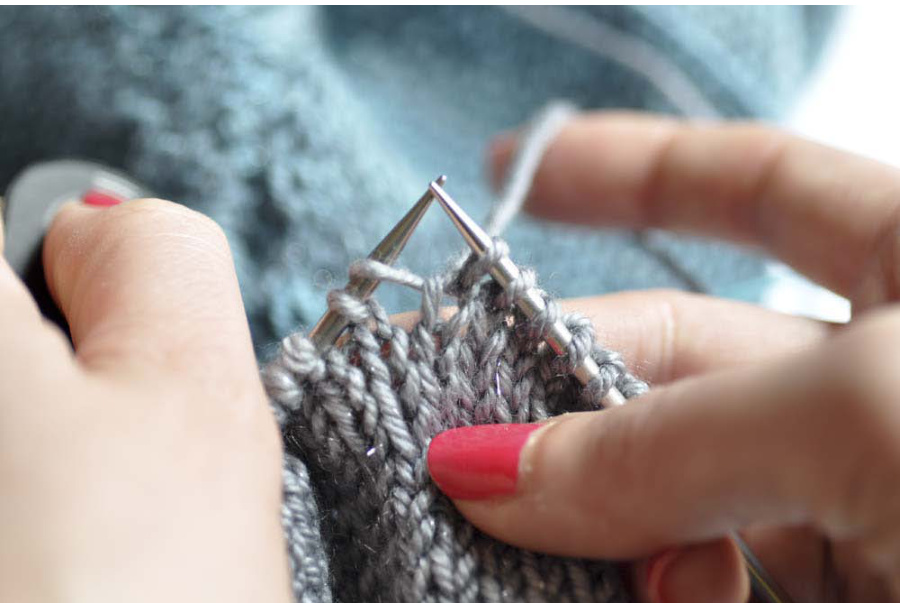
M1L: MAKE ONE LEFT
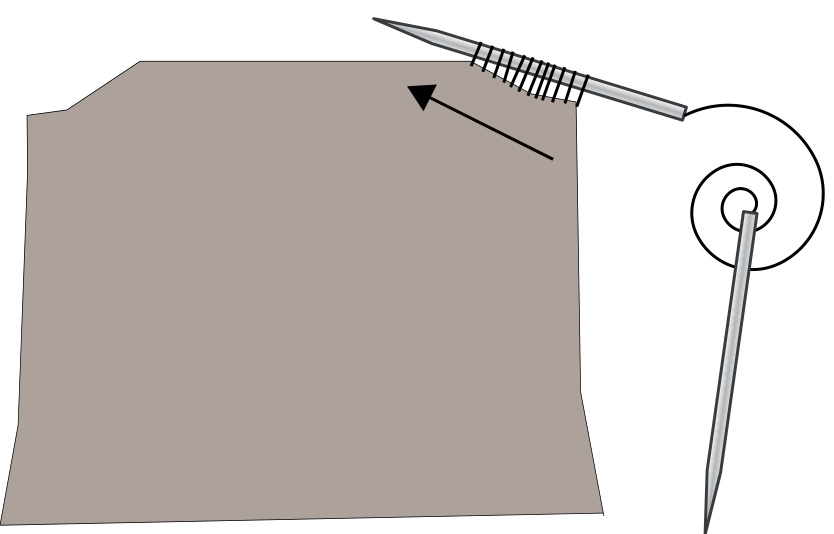
Notice the place under the strand of yarn which runs between the stitch just worked and the next stitch:

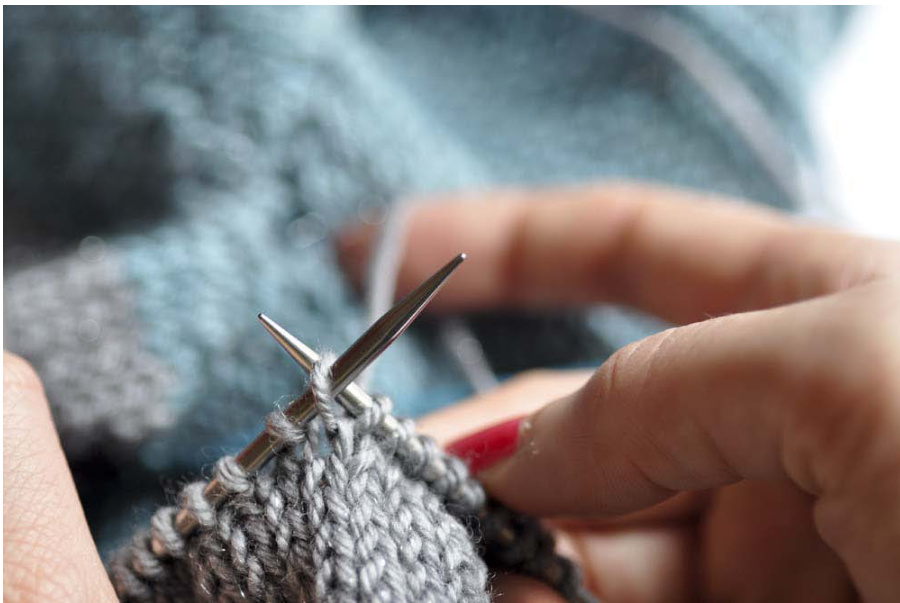
Insert the left hand needle from front to back into the strand:
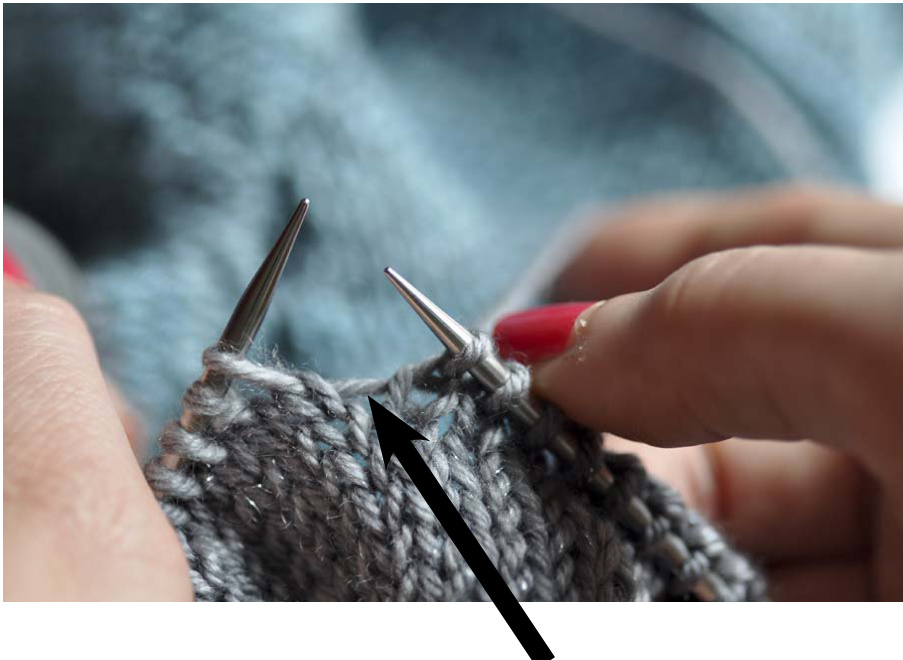
Knit this stitch through the back loop:
M1R: MAKE ONE RIGHT
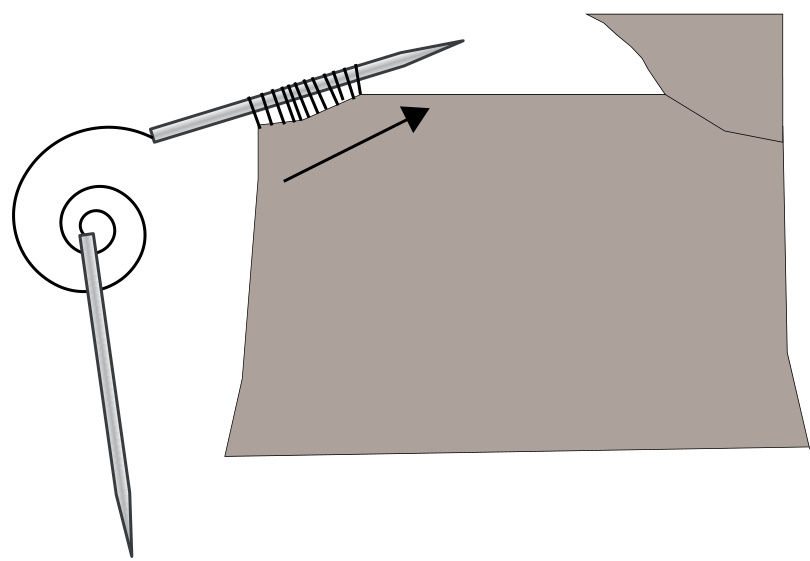
Notice the place under the strand of yarn which runs between the stitch just worked and the next stitch:
Insert the left hand needle from back to front into the strand:

Knit this stitch through the front loop: