Breast Friend Coin Purse Crochet Pattern by Jana Whitley, Oct. 2015
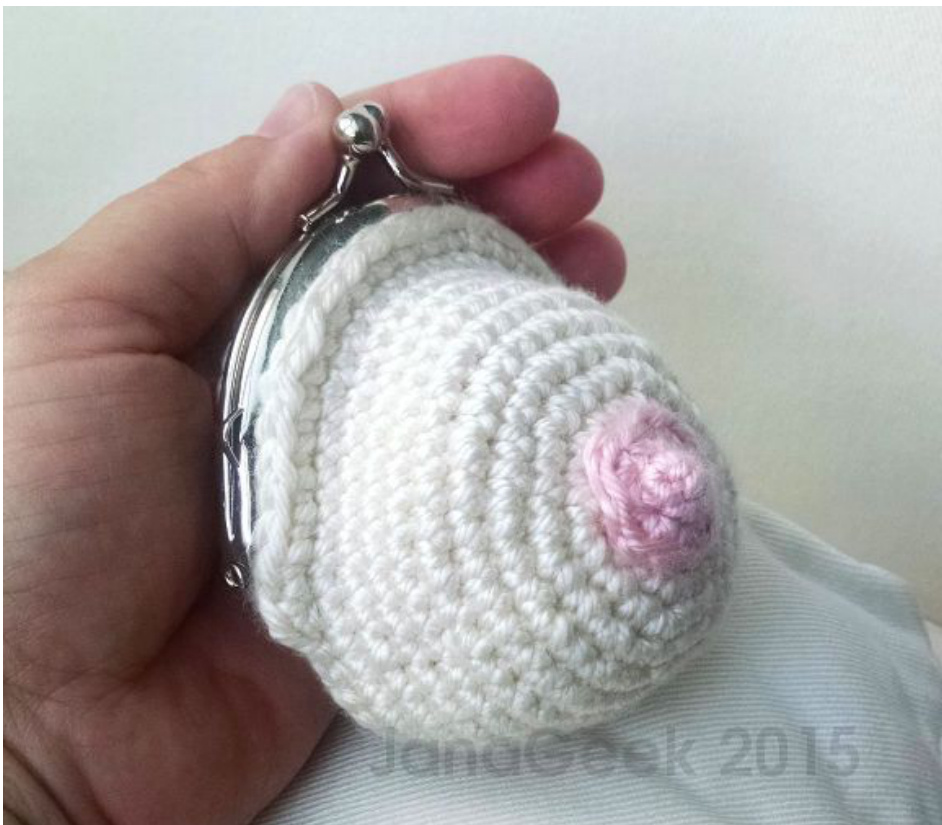
Finished size: about 3.5 inches (9cm) wide. Gauge and tension: 10 single crochet stitches x 10 rows = 2 inches (5cm) square. Ideally, you will want snug, dense stitches. If your stitches are too loose, try a smaller hook.
Materials and Tools:
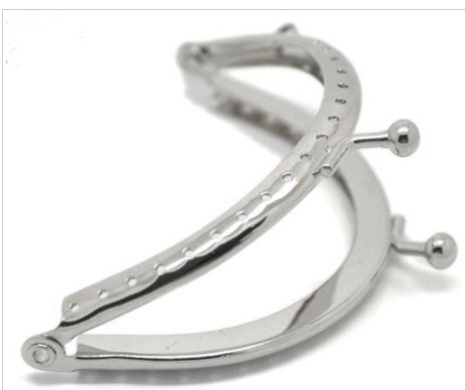
(1) 9cm x 6.3cm purse clasp with 2mm holes, available at Amazon.com D/3.25mm crochet hook Worsted weight medium (DK) yarn. I used Red Heart Soft yarn in Cream, but you can use Almond, Chocolate, Warm Brown, or any preferred tone. For the nipple, I used Caron Simply Soft yarn in pale pink, but you can use darker pink or brown. quilting needle cotton/poly all purpose thread in cream or color to match yarn tapestry needle scissors for finishing off
Abbreviations and Stitches Used
R1 Round number st, sts Stitch, stitches (6 sts) The total stitch count at the end of row or round SC Single Crochet \*.\*, rep Complete the steps within the asterisks the specified number of times FLO Front Loops Only BLO Back Loops Only FO Fasten Off Cut working yarn and pull tail through last loop to securesocrochetwillnotunravel. IFO Invisible Fasten Off, see Fig. 1. ML Magic Adjustable Loop (optional) (Contrasting I recommend beginning the doll parts with the only.) Magic Adjustable Loop (also called Magic Circle) rather than the standard "ch 2, sc 6 in 2nd ch from hook, " because you can lasso your first row of stitches together in a tight circle and avoid the "donut hole" that usually occurs. For video tutorials, search "Magic Loop Crochet" on youtube.com.
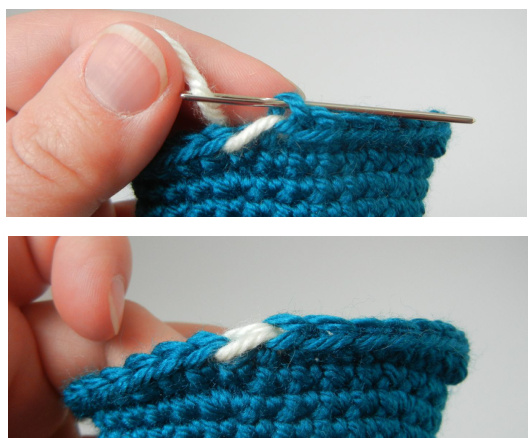
Figure 1: ShowingInvisibleFasten Off.Weave the cut tail end of yarn under both loops of next sc, then back into top loop of previous sc. (Contrastingcolortailshownfordemonstration
Notes
Parts are made by stitching continuous spiral rounds. Do not join rounds except when instructed otherwise. Mark the end of pattern round with a short piece of contrasting yarn or safety pin in last stitch (see Fig. 2). When you complete a round, count the stitches to make sure it matches the pattern, then move marker up to the loop/stitch on your hook. When you are counting stitches in a row or round, do not include the loop that is on your hook. The last stitch of the current round should end just to the RIGHT of the first stitch of the current round. Always insert your crochet hook under both loops (front and back) of the previous row or round, except when instructed otherwise with FLO or BLO.
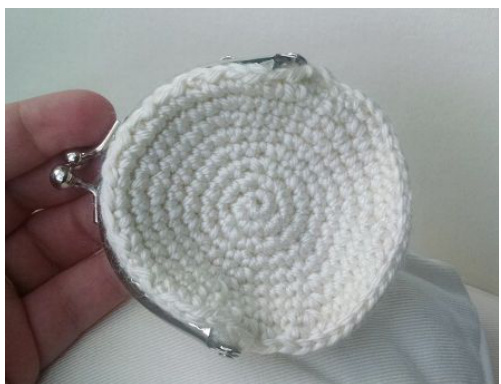
PURSE FRONT
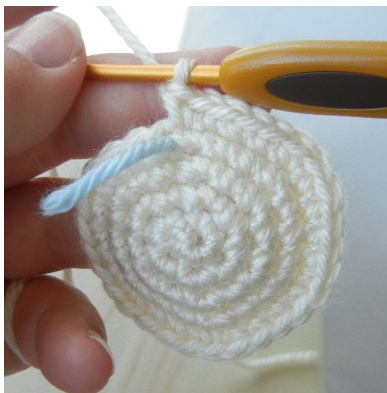
Figure 2:An example of spiral rounds,startingwith6scina Magic Loop. I used a small scrap of yarn to mark end of previous round. R1: With cream, ML, sc 6 in ML. (6 sts) R2: Sc 2 in each sc around. (12 sts) R3: \*Sc 2 in next sc, sc in next sc\*, rep 6 times. (18 sts) R4: \*Sc 2 in next sc, sc in next 2 sc\*, rep 6 times. (24 sts) R5: \*Sc 2 in next sc, sc in next 3 sc\*, rep 6 times. (30 sts) R6: \*Sc 2 in next sc, sc in next 4 sc\*, rep 6 times. (36 sts) R7: \*Sc 2 in next sc, sc in next 5 sc\*, rep 6 times. (42 sts) R8-10: (3 rounds) Sc in each sc around. (42 sts) R11: \*Sc 2 in next sc, sc in next 6 sc\*, rep 6 times. (48 sts) R12: Sc in next 24 sc. Do not finish row. FO with tail for sewing.
PURSE BACK
R1: With cream, ML, sc 6 in ML. (6 sts) R2: Sc 2 in each sc around. (12 sts) R3: \*Sc 2 in next sc, sc in next sc\*, rep 6 times. (18 sts) R4: \*Sc 2 in next sc, sc in next 2 sc\*, rep 6 times. (24 sts) R5: \*Sc 2 in next sc, sc in next 3 sc\*, rep 6 times. (30 sts) R6: \*Sc 2 in next sc, sc in next 4 sc\*, rep 6 times. (36 sts) R7: \*Sc 2 in next sc, sc in next 5 sc\*, rep 6 times. (42 sts) R8: \*Sc 2 in next sc, sc in next 6 sc\*, rep 6 times. (48 sts) FO.
NIPPLE
R1: With pink, ML, sc 4 in ML. (4 sts) R2: \*Sc 2 in next sc, sc in next sc\*, rep 2 times. (6 times) R3: Sc 2 in each sc around. (12 sts) IFO with tail for sewing to Front.
ASSEMBLY
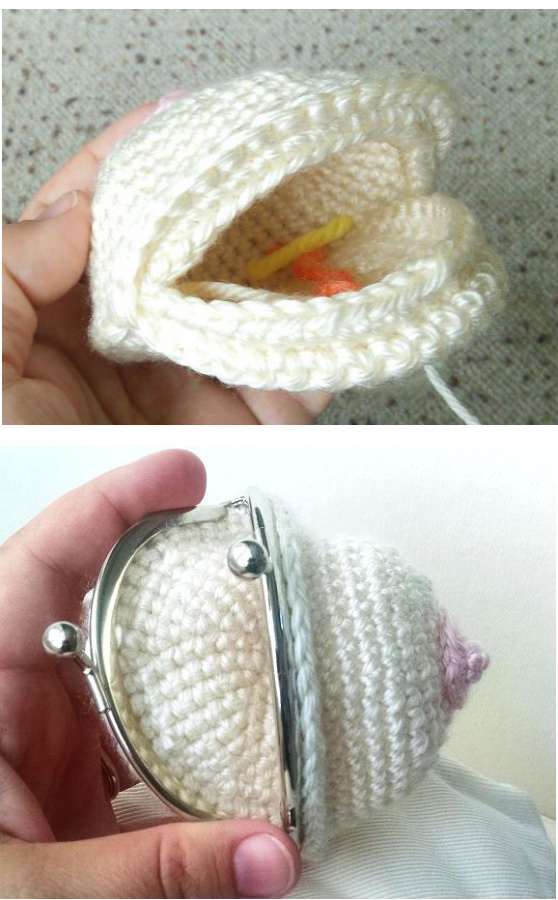
3. With hook and cream yarn, pull up a new loop in the FLO of the 12th sc from corner of the purse opening (i.e., the topmost mid-point of the purse opening). In FLO, sc in each sc of the purse opening (should be about 48 sts). IFO. 4. With hook and cream yarn, pull up a new loop in the remaining BLO of the 12th sc from the end of the seam in step 2. In remaining BLO, sc in each sc of the purse opening (should be about 48 sts). IFO. Steps 3 and 4 will created a double-edged lip around the front and back of the purse opening. 5. Match the metal clasp's hinges with the corners of the purse opening. Starting at the center-most hole of the top of the clasp, with cream thread and thin sewing needle, sew the metal clasp in between the double-edged lip of the purse opening, as follows: Insert the needle through both loops of the front lip sc, into a needle-hole of the clasp, then out through both loops of the back loop of the sc, then pull thread taut. Then insert the needle through the next back lip sc, into the next clasp hole, and out of the next front lip sc, pull thread taut, and so on. (For video instruction, see "How to attach a coin purse opener to a crocheted coin purse' on YouTube by Stephanie Davies: https://www.youtube.com/watch?v=n4y1TeOJNS8) You're finished!


