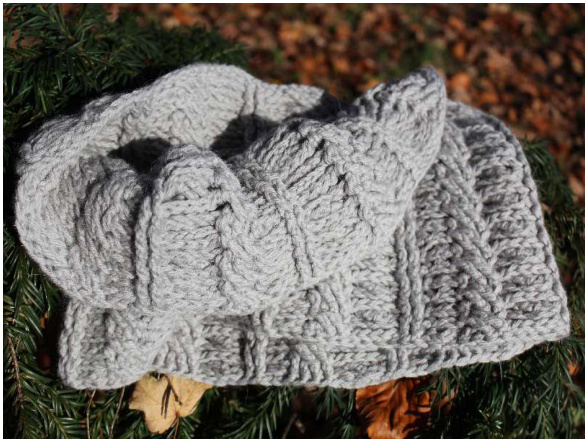
Ivy cowl1
This cowl was inspirited by the knitted Stockholm-scarf2 designed by Julie Crawford?. This cowl with cables is reversible, you can turn it out and looks the same. Make it longer or shorter, it depends how you like it :) Hook size: whatever is recommended for your yarn Yarn: I used DK weight yarn, but you are free to use any kind of yarn!
Abbreviations (US terms)
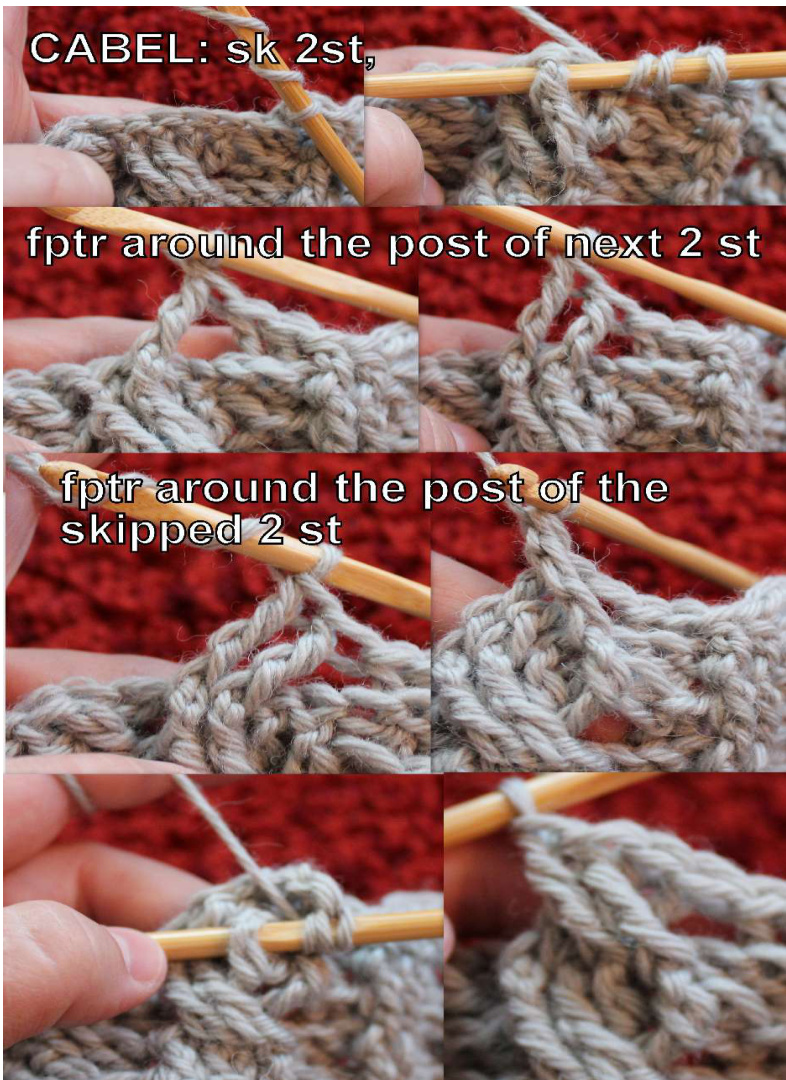
O ch - chain st - stitch(es) dc - double crochet hdc - half double crochet tr - triple crochet YO - yarn over Ifpdc - front post double crochet: Make a double crochet around the front of I the post: Yo and insert hook from the front to the back around the post of the dc/tr on the previous row. Complete as for regular dc. Ibpdc - back post double crochet: Make a double crochet around the back of the post. Yo and insert hook from the back to the front around the post of the dc/tr on the previous row. Complete as for regular dc. I fptr - front post triple crochet: Make a triple crochet around the front of the post: Yo twice and insert hook from the front to the back around the post of .5the dc on the previous row. Complete as for regular tr. fphdc - front post half double crochet: Make a half double crochet around the L front of the post: Yo and insert hook from the front to the back around the post S of the dc/tr on the previous row. Complete as for regular hdc. - bphdc - back post half double crochet: Make a half double crochet around the back of the post. Yo and insert hook from the back to the front around the post of the dc/tr on the previous row. Complete as for regular hdc. bpsl st- back post slip stitch: Make a sl st around the back of the turning chain: insert hook in front of the turning chain to the back, YO draw up a loop and draw through the loop on the hook fpsl st - front post slip stitch: Make a sl st around the front of the turning chain: insert hook at the back of the turning chain to the front, YO draw up a loop and draw through the loop on the hook Cable: sk 2st, fptr around the next 2 st, working in front of the 2 st SOmade fptr around the post of the 2 skipped st (see the picture below) Patt1: ch3 (count as a fpdc), bpdc around the post of the next 2 st, cable in the next 4st, 4 bpdc around the post of the next 4 st, \* fpdc around the post of the next 2 st, bpdc around the post of the next 2 st, cable in the next 4 st, 4bpdc around the post of the next 4 st. Repeat from \* until the end of the rnd, fpdc around the post of the next st, bpsl st arount the turning chain, turn Patt2: ch3 (count as a bpdc), bpdc around the post of the next st, cable in the next 4 st, 4 bpdc around the post of the next 4 st, fpdc around the post of the next 2 st, \* bpdc around the post of the next 2 st, cable in the next 4 st, 4bpdc around the post of the next 4 st, fpdc around the post of the next 2st. Repeat from \* until the end of the rnd, fpsl st around the turning chain, turn LastRnd1: ch2 (count as a fphdc), bphdc around the post of the next 2 st, fphdc around the post of the next 4st, 4pbhdc around the post of the next 4 st, \* fphdc around the post of the next 2 st, bphdc around the post of the next 2 st, fphdc around the post of the next 4 st, 4pbhdc around the post of the next 4 st. Repeat from \* until the end of the rnd, fphdc around the post of the next st, sl st to the turning chain LastRnd2: ch2 (count as a bphdc), bphdc around the post of the next st, fphdc aroung post of the next 4 st, 4pbhdc around the post of the next 4 st, fphdc around the post of the next 2 st, \* bphdc around the post of the next 2 st, fphdc around the post of the next 4 st, 4pbhdc around the post of the next 4 st, fphdc around the post of the next 2st. Repeat from \* until the end of the rnd, sl st to the turningchain
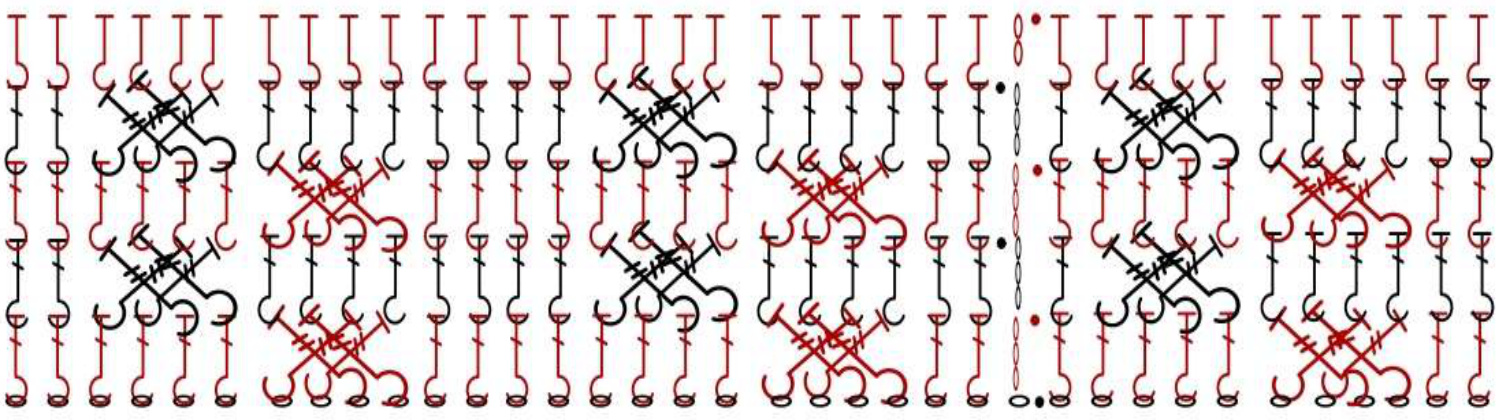
Before starting the cowl, you need to crochet at least 12-st long and 5 row high sample according to the pattern. Do not join by the end of the rows so you will get a rectangle. Measure the size of the sample and you can calculate the number of stitches to start the cowl with. Notes: If you want a softer cowl, use a hook size that is larger than recommended! If you want a scarf instead for a cowl, you may not join the rows with sl st. :oundation Row: The cowl can be started in two different ways: version A) Crochet a starting chain 108, or as many as long the cowl should be, but it must be divisible by 12, ch1 more. Turn, to the second st from hook, hdc until the end of the row; sl st into the first hdc, be carefull not to twist it, unless you want a mobius-cowl. Turn. version B) Crochet a foundation half double crochet row 108, or as many as long the cowl should be, but it must be divisible by 12; sl st into the first hdc turn, be careful not to twist it, unless you want a mobius cowl. Rnd 1: Patt1 Rnd 2: Patt2 Repeat Rnd1, Rnd2 until you have the desired width of the cowl. Last Rnd: if you ended up with Rnd 1, then crochet LastRnd2, if you ended up with Rnd 2, then crochet LastRnd1 Fasten off weave ends. Enjoy your cowl! If you have any question or remark do not hesitate to write me to mzsudesign@gmail.com!
Copyright @2012 Zsuzsanna Makai All rights reserved. This pattern is not to be redistributed without the writtenconsentofZsuzsannaMakai. Makai Zsuzsanna


