Yoshi Pattern
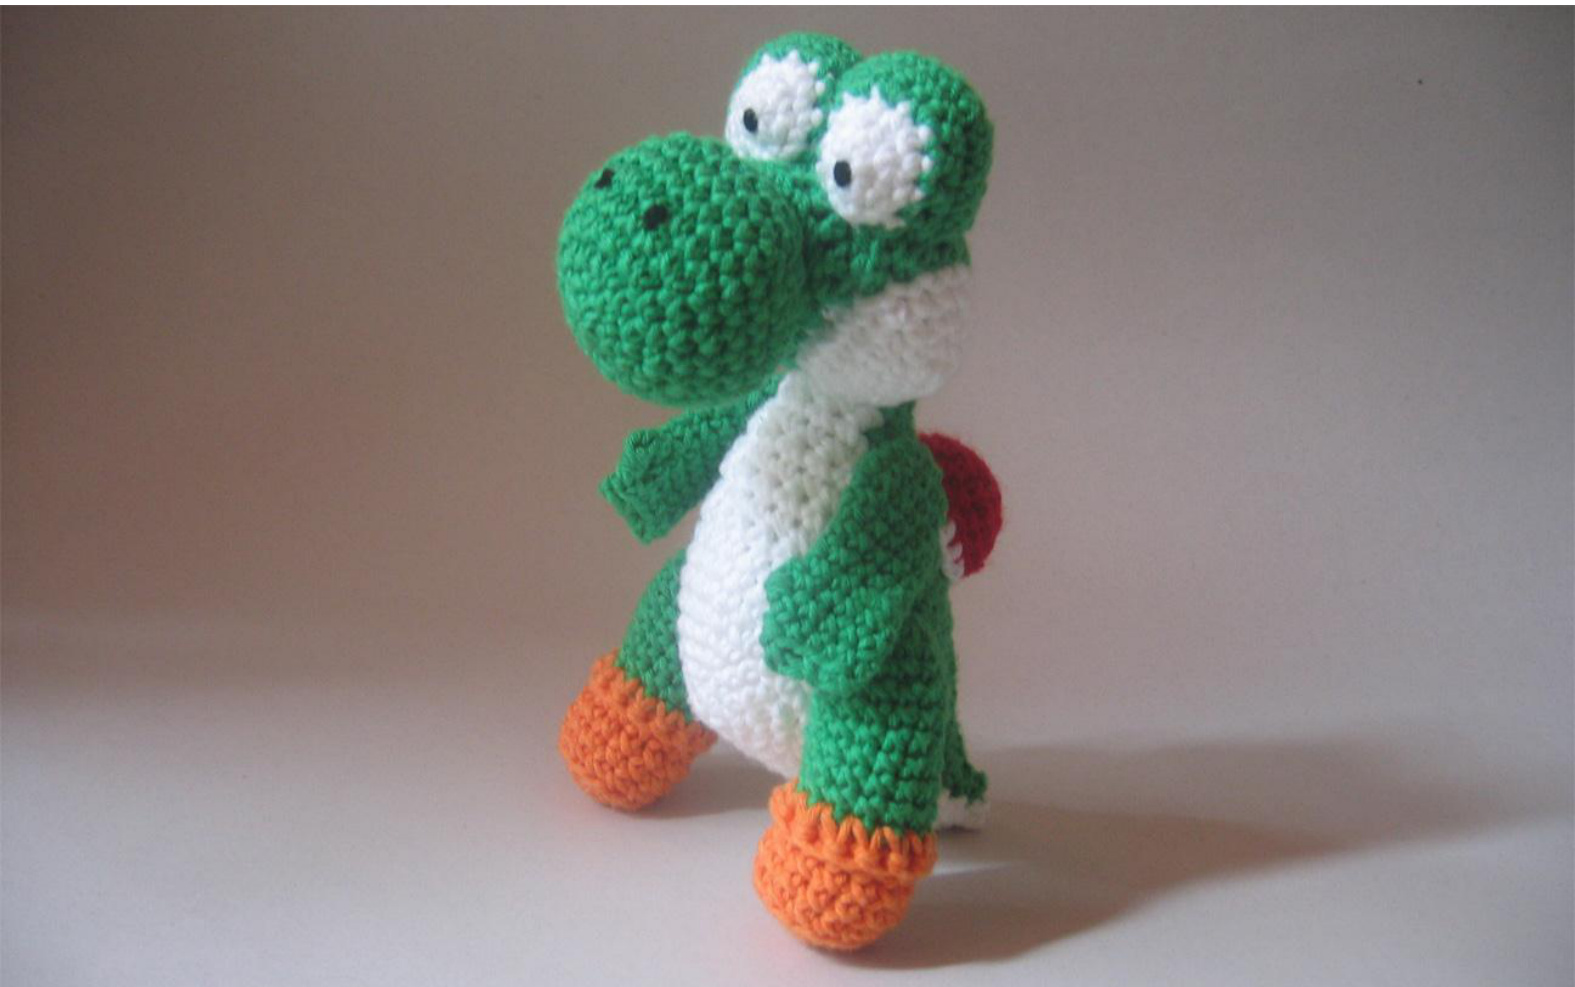
Yoshi consists of 13 pieces. Some pieces are worked flat and some in rounds, other pieces are worked in both ways. I will explain how to do this with the instruction for the relevant piece.
Material
Yarn, e.g. cotton, 100-110 meters per 50 g skein 50 g green (or desired color for body) 50 g white 10 g orange 10 g red Some meters in black Tapestry needle Crochet hook size 3,5mm (or recommended hook size) Stuffing A small piece of black felt and glue in case you do not want to embroider the eyes
Abbreviations
[brackets] - repeat instruction within brackets as often as given after brackets or to the end of the round or row (round brackets) - live stiches after this round or row Ch - chain Sc - single crochet Hdc - half double crochet Slst - slip stitch Sc2tog - single crochet 2 together (1 stitch decreased) Sc5tog - single crochet 5 together (4 stitches decreased) Inc - make two single crochet into one stitch (1 stitch increased) Inc3tog - work 3 double crochet into one stitch and do not yarn over and pull through the last two loops, yarn over and pull through 4 loops after working 3 stitches (no stitch decreased or increased)
General notes on following this pattern
Please read this page before working the pattern.
The beginning of the round
Start with chain 2 and work every first round into the first stitch made.
Changing rounds
Do not replace crochet stiches by chain stiches. Instead make spiral. Use a stitch marker to remember of the beginning of the round.
Changing rows
When working in rows do not replace crochet stitches by chain stitches either. At the end of the row chain one and turn. Continue normally as given in the pattern. The overlapping chain stitch will not be visible afterwards because the pieces will be sewn together. I will explain how to do this.
Loose ends
At the beginning of a piece leave a tail of at least 10 cm or even longer, because most of these can be used for sewing. Loose ends you do not use anymore can be pulled through some stitches on the inside of the piece and cut off. Or simply make a knot and cut of yarn after 1-2 cm. While sewing make sure every knot is on the inside.
Sewing
Sew all pieces together with mattress stitch. When sewing pieces worked in rounds pull needle through between last and second last stitch. When working pieces in rounds pull needle into one stitch as if to crochet it and back to front through following stitch.
The pattern
Eyes (work two times)
Begin with white working in rounds. Rd 1: 5 sc Rd 2: [inc] (10 sts) Continue working in rows. R 3: 3 sc, inc, sc, inc, 3 sc (11 sts, not every stitch made in round 2 has been worked) Finish off white. Continue with green. R 4: 4 sc, [inc] 3 times, 4 sc (14 sts) R 5+6: [sc] R 7: 4 sc, [sc2tog] 3 times, 4 sc (11 sts) R 8: 3 sc, sc2tog, sc, sc2tog, 3 sc (9 sts) R 9: 2 sc, sc5tog, 2 sc (5 sts) R 10: sc5tog Cut of yarn, pull end through loop.
Cheeks (work two times)
Begin with white working in rounds. Rd 1: 5 sc Rd 2: [inc] (10 sts) Rd 4: [inc, 2 sc] (20 sts) Cut of yarn, pull end through loop.
Nose
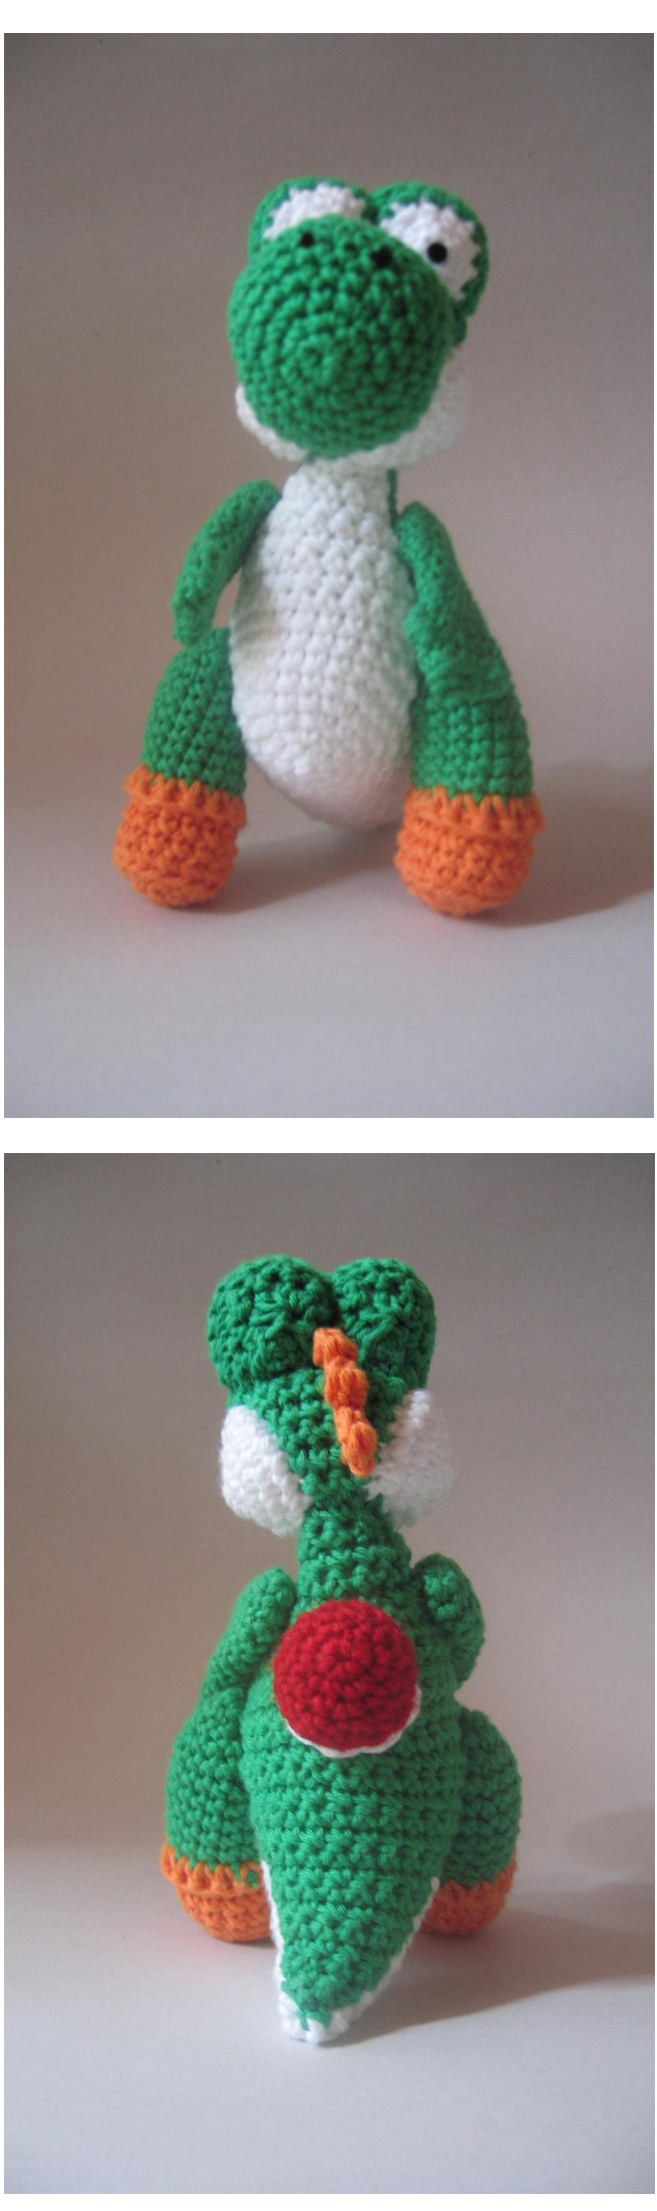
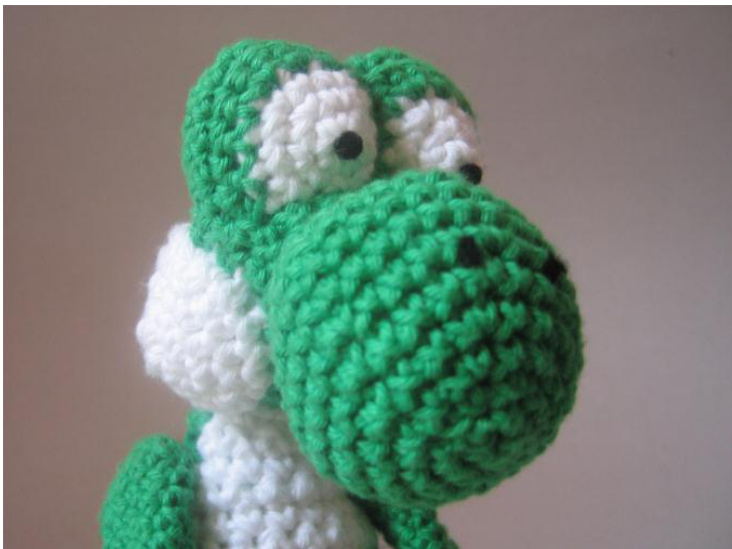
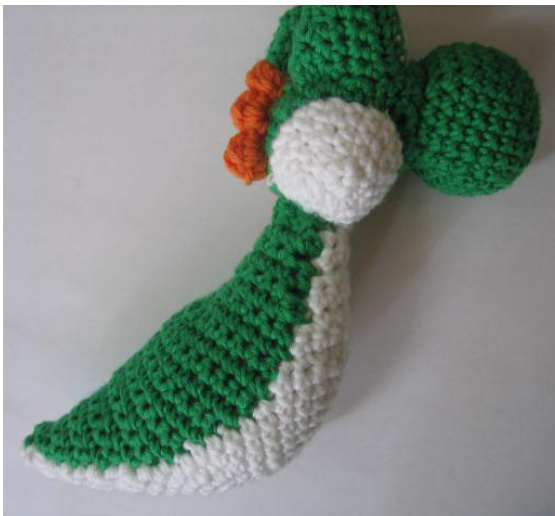
Begin with green working in rounds. Rd 1: 5 sc Rd 2: [inc] (10 sts) Rd 3: [inc, sc] (15 sts) Rd 4: [inc, 2 sc] (20 sts) Rd 5: [inc, 3 sc] (25 sts) Rd 6: [inc, 4 sc] (30 sts) Rd 7+8: [sc] (30 sts) Rd 9: [sc2tog, 4 sc] (25 sts) Rd 10: [sc2tog, 3 sc] (20 sts) Rd 11: [sc2tog, 2 sc] (15 sts) Cut of yarn, pull end through loop. Head Begin with green working in rows. R1: ch 2 R 2: [sc] (2 sts) R 3: sc, inc (3 sts) R4-12: [sc] repeat to last stitch, inc (12 sts after row 12) R 13-16: [sc] (12 sts) Cut of yarn, pull end through loop. Jaw Begin with green working in rows. R1: ch2 R 2-5: [sc] (2 sts) R 6: [inc] 2 times (4 sts) R 7: inc, 2 sc, inc (6 sts) Cut of yarn, pull end through loop. Sew the eyes together, white parts are side by side (have a look at the pictures). Embroider eyes and nostrils if desired (felt can be glued later on). Stuff nose. Sew Head against nose with the edge you worked last. Sew jaw against the opposite side of the nose with the edge you worked last. Stuff eyes and sew onto head.
Spines
With orange make 5 single crochet along the head, turn work. R 2: [ sc, hdc, sc into one stitch, 1slst] 2 times, sc, hdc, sc into one stitch Cut of yarn, pull end through loop. Pull both loose ends through the head to the inside and finish off. Sew cheeks to head/jaw, be careful to leave 3 stitches per cheek unworked for neck. Stuff head and cheeks.
Body
Start with working belly; continue with chest on one side and tail on the other side. Back begins on the end of the tail.
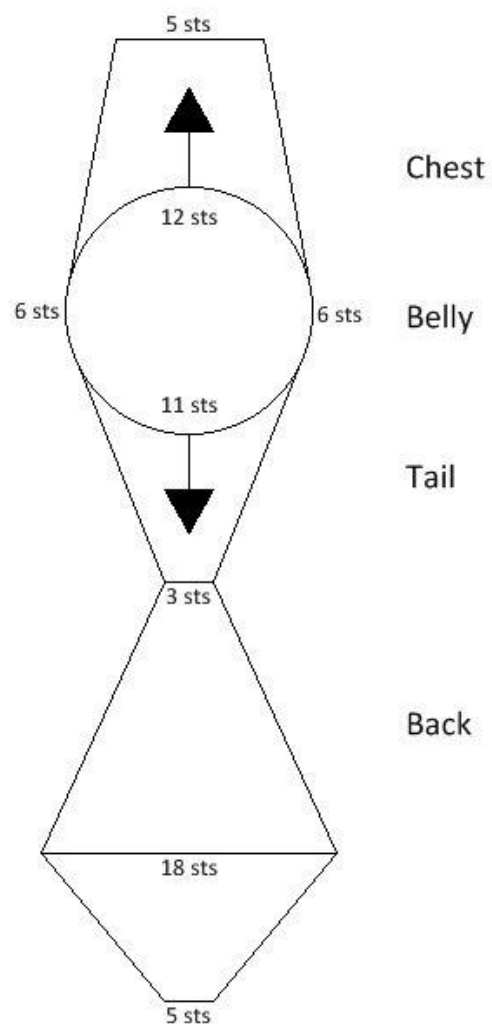
Belly
Begin with white working in rounds. Rd 1: 5 sc Rd 2: [inc] (10 sts) Rd 3: [inc, sc] (15 sts) Rd 4: [inc, 2 sc] (20 sts) Rd 5: [inc, 3 sc] (25 sts) Rd 6: [inc, 4 sc] (30 sts) Rd 7: [inc, 5 sc] (35 sts) Rd 8: [sc] (35 sts) Do not cut off yarn, continue with chest.
Chest
Continue with white working in rows. R 1: [sc] 12 times (12 sts) R 2: [sc] (12 sts) R 3-9: [sc] repeat to last 2 sts, sc2tog (5 sts after Row 9) R 10: [sc] (5 sts) Cut of yarn, pull end through loop.
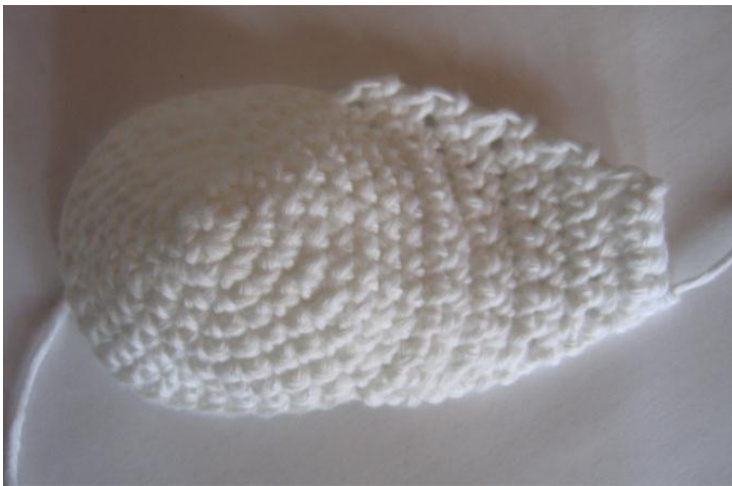
Tail
Join white yarn to belly, the diagram shows how to divide up the stitches, work in rows. R 1: [sc] 11 times (11 sts) R 2-8: [sc] to last 2 sts, sc2tog (3 sts after row 8) R 9: [sc] (3 sts) Cut of yarn, pull end through loop.
Back
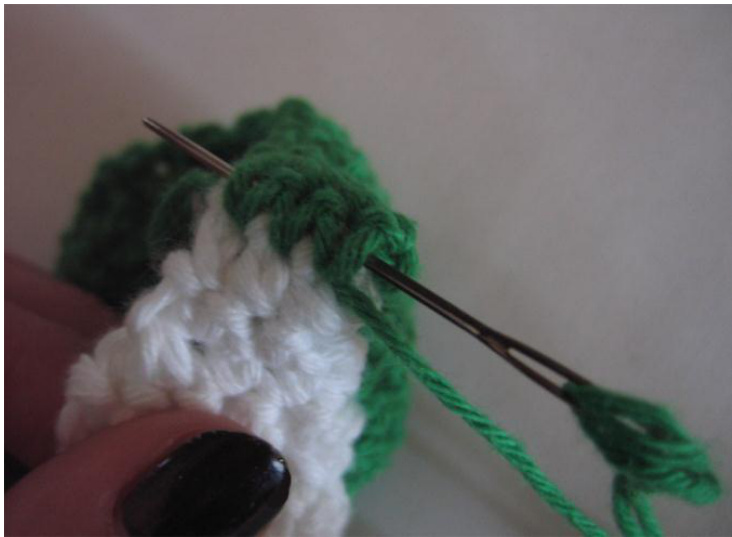
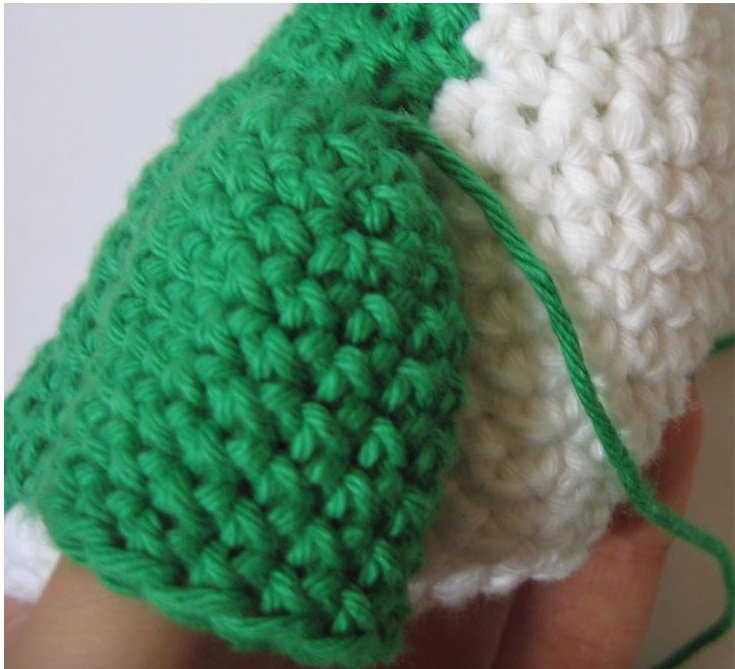
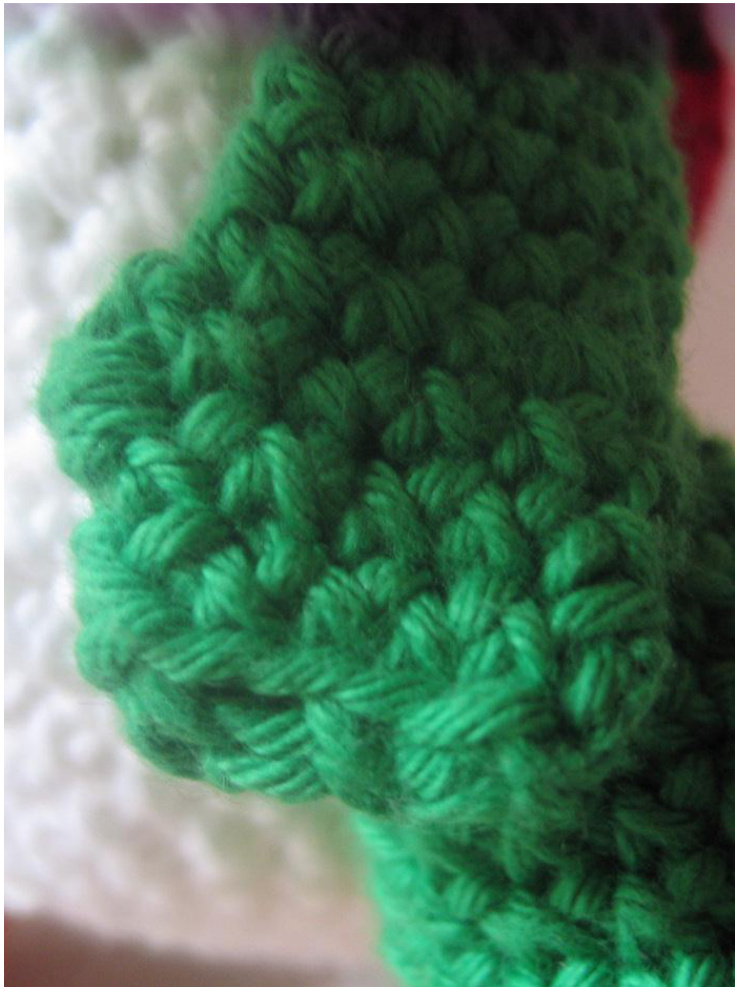
Join with green to tail, see diagram, and work in rows. R 1: [sc] (3 sts) R 2-16: [sc] to last stitch, inc (18 sts after row 16) R 17+18: [sc] (18 sts) R 19: 7 sc, [sc2tog] 2 times, 7 sc (16 sts) R 20: 6 sc, [sc2tog] 2 times, 6 sc (14 sts) R 21: 5 sc, [sc2tog] 2 times, 5 sc (12 sts) R 22-28: [sc] to last 2 sts, sc2tog (5 sts after row 28) R 29: [sc] (5 sts) Cut of yarn leaving a long tail (40-50 cm), pull end through loop. Finish off every loose end excerpt the 40-50 cm long one. Fold back over chest, belly and tail and start sewing along the hems. Ease back when you reach the second half of the belly (which means pull needle through one belly stitch and two back stitches). When you reach the tip of the tail, pull needle through the transition of white and green yarn.
Sew together the second half of the body symmetrically. Stop sewing approximately 4 stitches before the end and stuff body, continue sewing. The working yarn should be still 20 cm or longer, so finish of every loose end from the head and continue sewing head against body. Chest should be center with jaw and back should be center with head part.
Shoe
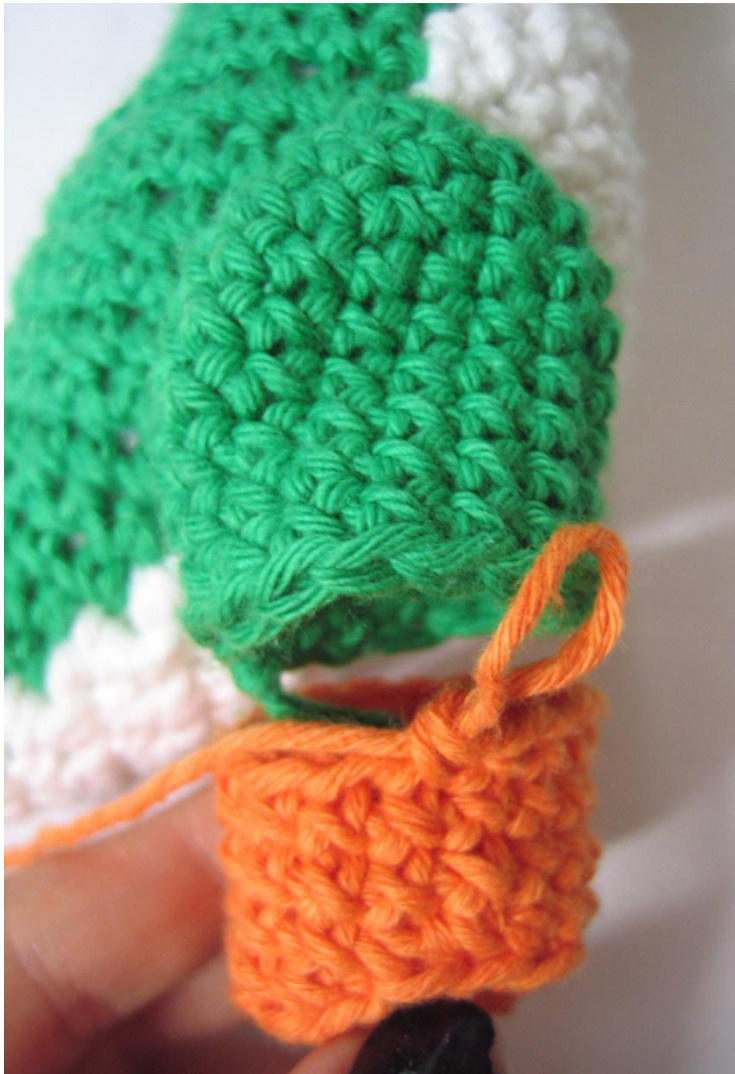
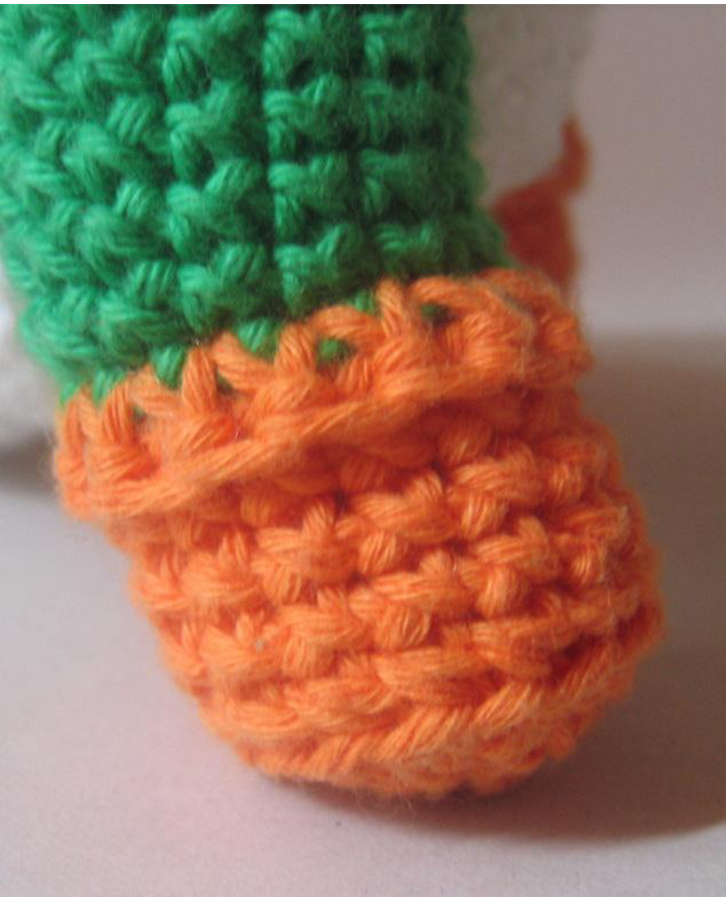
Begin with orange working in rounds. Rd 1: 5 sc Rd 2: [inc] (10 sts) Rd 3: [inc, sc] (15 sts), 1 slst - the beginning of the round is moved Rd 4: [sc in back loop only] [15 sts] Rd 5-8: [sc in both loops] [15 sts] Do not cut off yarn, secure loop by pulling it big or use a safety pin.
Leg
Begin with green working in rounds; leave a tail of approximately 20 cm for sewing. Rd 1: 5 sc Rd 2: [inc] (10 sts) Rd 3: [sc] (10 sts) Rd 4: [inc, sc] (15 sts) Rd 5-10: [sc] (15 sts) Cut of yarn, pull end through loop. Pull the tail from the beginning of the leg to the outside and sew leg against body. Have a look at the photo for the right position. Finish off loose ends.
Continue working with orange. Hold the open sides of shoe and leg opposite to each other (see picture) and sc2tog through one orange and one green stitch. Finish of at the end of one round. Make a second leg the same way.
Arm (work two times)
Begin with green working in rounds; leave a tail of approximately 20 cm for sewing. Rd 1: 5 sc Rd 2: [inc] (10 sts) Rd 3-10: [sc] (10 sts) R 11: inc3tog, 9 sc R 12+13: [sc] (10 sts) Cut of yarn, pull end through loop. Pull the tail from the beginning of the arm to the outside and sew arm against body. Hold arm flat with the inc3tog stitch showing towards belly side as a thumb. Sew the round you stopped working together holding it as two flat edges opposite to each other.
Saddle
Begin with red working in rounds. Rd 1: 5 sc Rd 2: [inc] (10 sts) Rd 3: [inc, sc] (15 sts) Rd 4+5: [sc] (15 sts) Cut of yarn, pull end through loop. Join white yarn to a back loop of last round worked; continue crocheting into back loop only. Rd 6: [inc, 2 sc], slst Cut of yarn leaving a tail of approximately 20 cm, pull end through loop. Finish off loose ends excerpt the longer one. Sew saddle onto back, stuff it when you are done halfway. Finished!


