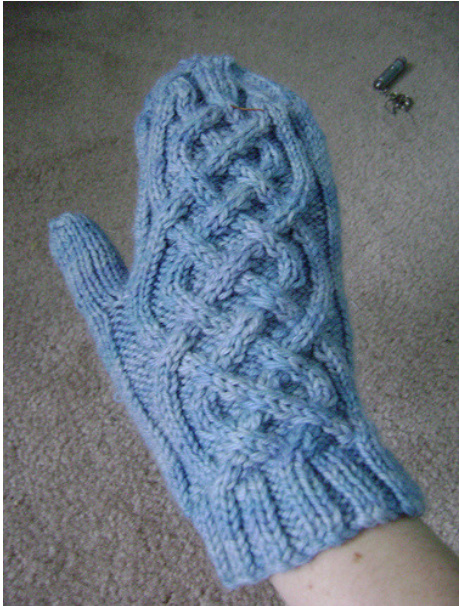
I designed these mittens last winter, when I couldn't find a pattern that I liked. While there are lots of cabled handwarmers and fingerless mittens on Ravelry, I was quite surprised by how few mitten patterns there were. Handwarmers aren't an option in my part of the world, so I came up with these mittens to show off the gorgeous semi-solid blue.
Materials:
1 skein of Carys BFL from Three Irish Girls in Moonrise or approximately 150 meters of worsted weight yarn A small amount of waste yarn for thumbs 4 double pointed needles, $4\mathrm{mm}$ or $4.5\mathrm{mm}$ Cable needle One stitch marker to indicate the beginning of the round
Gauge: 5 stitches per inch
Notes:
$\spadesuit$ The original pattern was designed to be worked in Magic Loop; there may be some difficulties in translating it to DPNs. Please let me know if anything can be clarified. $\spadesuit$ These mittens have a plain “hole” thumb. If I made them again, I'd probably put in a gusset thumb, and if I do, I'll add those directions.
Directions:
For left mitten:
CO 52 stitches and divide as follows: 26 sts on first needle, 13 on second needle, 13 on third needle. PM and join round. Knit ten rounds of klp1 ribbing. (Note: If you like a longer, tighter cuff, work more ribbing using 3.5mm needles.) On next round and all subsequent rounds, work the first needle as follows: pl, knit cable chart, pl, the second needle as pl, k12, and the third needle as k12, p1. Work the cable chart once, and then start it over again. On row nine of the second time through the cable chart, knit the next row of the cable chart on the first needle, and on the second needle, p1, k19, k the next 6 stitches with a smooth waste yarn, then slip the six back on the left hand needle, and k them in pattern (k5, p1) with the working yarn. These stitches will be picked up later and worked for the thumb. After you've completed the cable chart a second time, you will continue to work the chart until the mitten measures approximately $2^{\bullet}$ less than desired length. Next round, begin to work the decreases as follows: for the first needle, k1, sk, work stitches as they present themselves (knit the knits, purl the purls) to last 3 sts, k2tog, k1; for the second needle, k1, ssk, k10, and the third needle as k10, k2tog, k1. (Note: the purl stitches bordering the cable pattern turn into knit stitches for the decreases.) Repeat until 12 sts remain (6 on each needle). Break yarn and thread through stitches, pulling closed. Alternately, graft these 12 stitches using the Kitchener stitch. It is time consuming, but it is prettier. To make thumb, remove the 6 waste stitches and place live stitches on needles. There should be 11 stitches total. Place marker to start round, join yarn and k in the round, picking up 1 or 2 stitches on both sides of the thumb hole. (Number picked up will depend on how wide you want the thumb.) Work until thumb is desired length. K1, k2tog 6 (or 7) times to end of round; k1, k2tog 3 (or 4) times to end of round, break yarn and thread tail through.
Make right mitten:
Follow directions as written for left mitten, but on row nine of the second time through the cable chart, work as follows on the second needle: $\textrm{k}6$ sts with waste yarn, slip the sts back to left needle, k25, p1. Continue following directions for left mitten. Weave in all ends, and enjoy! Cable pattern comes from Barbara Walker's A Treasury of Knitting. Knitter' Symbols fonts used courtesy Knitter's Magazine—Copyright $\circledcirc$ 1998 XRX, Inc.Directions:
Saxony Cable Chart:
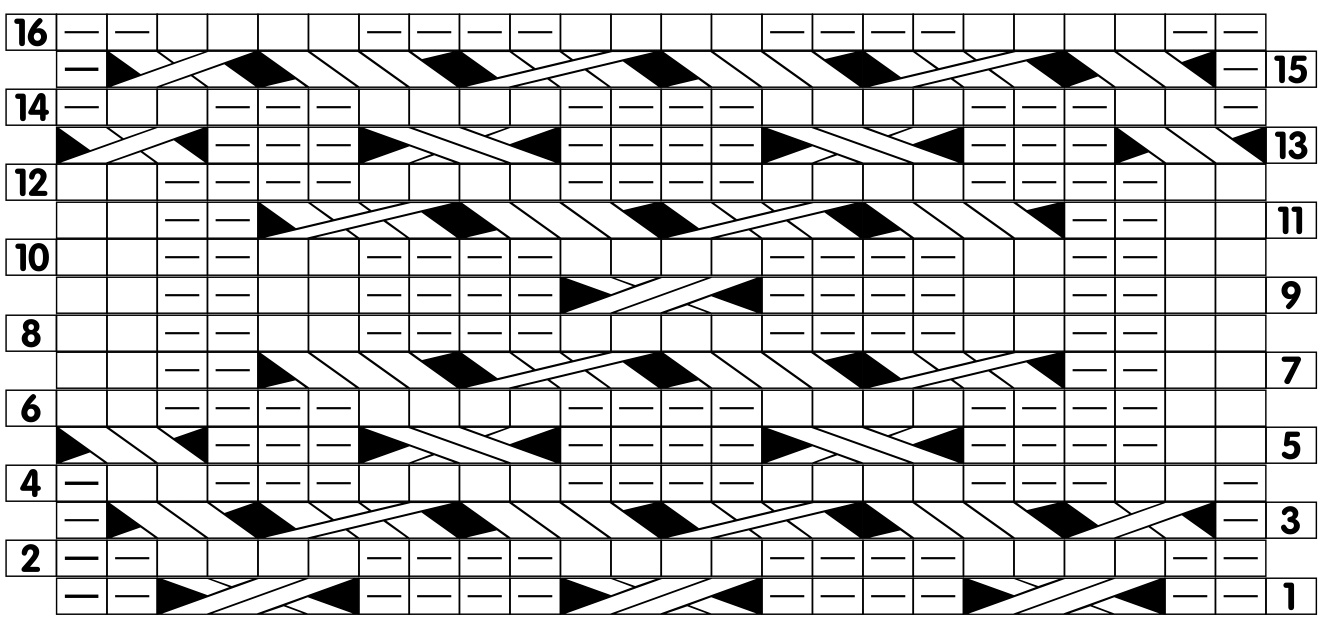
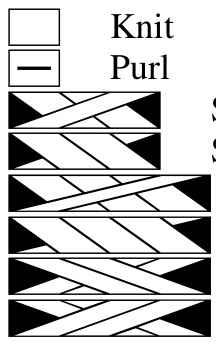
slip next st onto cable needle and hold in back, k2, p1 from cable needle Slip two sts onto cable needle and hold in front, p1, k2 from cable needle Slip two sts onto cable needle and hold in back, k2, p2 from cable needle Slip two sts onto cable needle and hold in front, p2, k2 from cabled needle Slip two sts onto cable needle and hold in front, k2, k2 from needle Slip two sts onto cable needle and hold in back, k2, k2 from needle This pattern is $\copyright$ Rhiannon M. Don, 2009. The entire contents of this patern and the knitted design to whichit reers are subject to copyrightDowloading this pat you agreeto print and se this pat only for your personal non-commercial use. You may not distribute or sell lectronic or paper copies of this patte.


