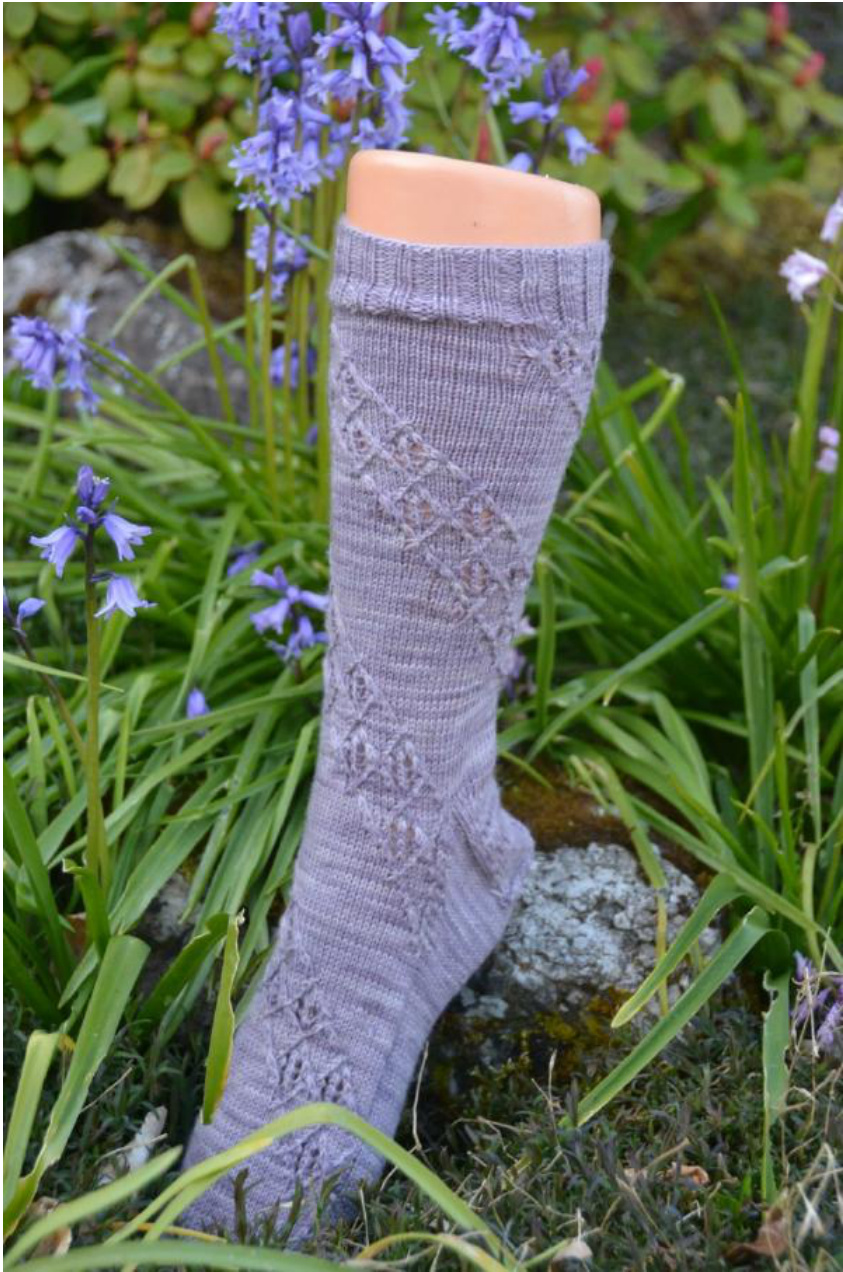
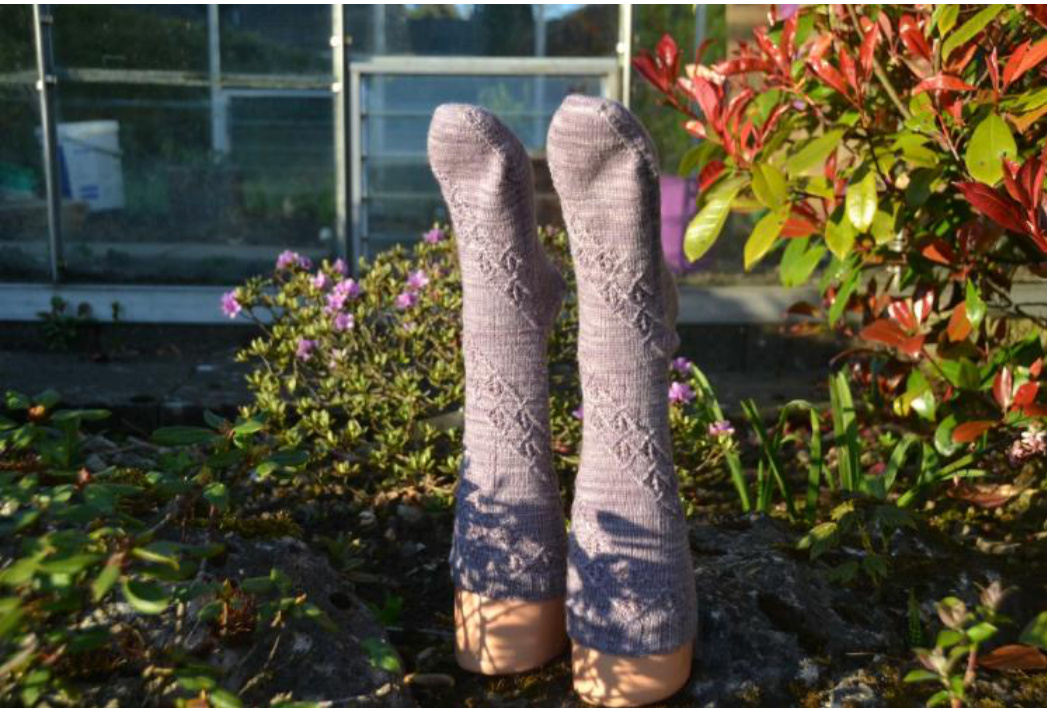
Diamond Jubilation socks
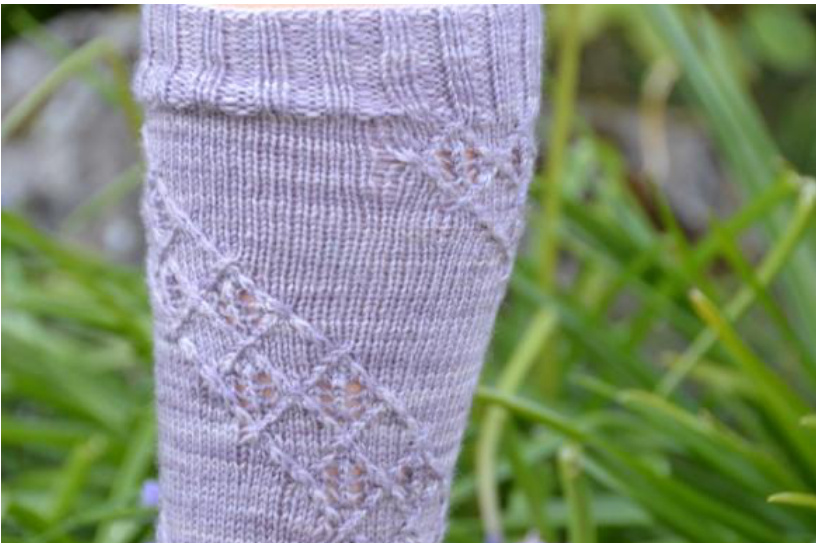
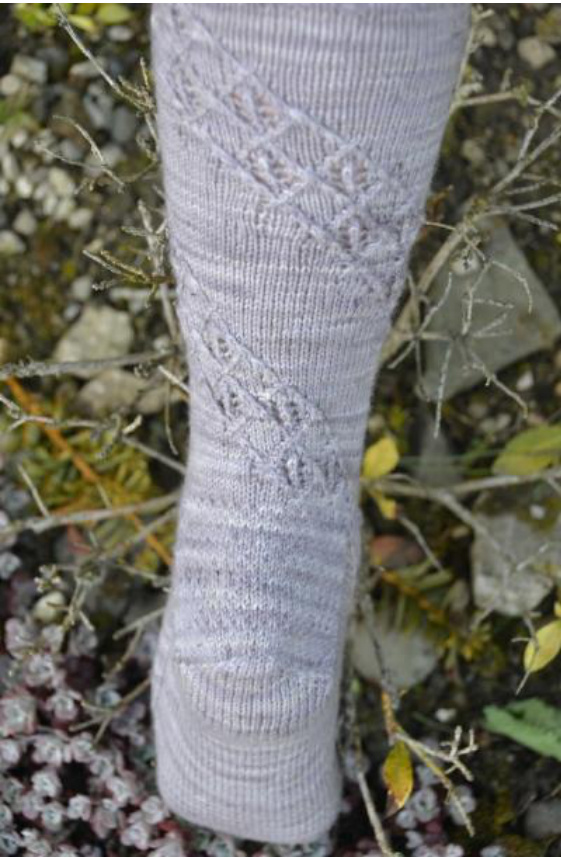
As a Canadian living in the UK, I am really excited to be able to be here to participate in the celebration of Queen Elizabeth Il's Diamond Jubilee. With the Bank Holiday coming up in June, 2012, preparations are underway in our village for a partyon the green, and all the shops are full of bunting and commemorative chinaware. My neighbor and Iare hosting a tea party, and have decided to wear tiaras for the occasion. When I found this stitch pattern in one of my Japanese stitch dictionaries, I knew I had the beginnings ofa pair of socks that would be suitable aswell! This sockis knit top down and consists of a simple lace pattern that swirls down around the leg and continues down the foot, creating a feminine sock that will lookits best in a solid or semi-solid yarn.
Size:
Ladies' Medium(Large) /8"width (8.5" width). Small adjustments to the sizing can be made by using a smaller needle size and /or a light fingering weight yarn. If you are feeling particularly adventurous, sizing can also be altered by changing the width of the st st band betweenthe lace panels. A word of caution on this approach: changingthe width ofthe panels will change the overall length of the sock, as the design is intended to make two full rotations around the leg.
Materials:
100g/400yds fingering sock yarn. Shown in Knitpicks Bare yarn, hand-dyed using all-natural ingredients by myself. One or two circular 2.25 mm needles, per your preference. Needle sizes should be adjusted if necessary to obtain a gauge of 9 sts/in/2.5cm in stockinette stitch.
Tapestry needle for grafting toe Cable needle Stitch markers (optional) Note 1: I have written this pattern for knitting with one or two circular needles, however it can be adjusted to using five double-pointed needles (DPN's)by dividing the stitches of Needle 1 evenly over DPNs 1 & 2, and the stitches of Needle 2 over DPNs 3 &4. One thing to note is that the stitches in the pattern shift every 6 rows, you need to be prepared for lots of shifting overDPNs!
Pattern Abbreviations:
st=stitch N1, N2 = Needle 1, Needle 2 K = Knit on Right side, Purl on the Wrong side P = Purl on right side, Knit on the Wrong Side st st = Stockinette Stitch = K all right-side rows, P all wrong-side rows kfb: Knit front and back = increase one stitch by knitting into the front and then the back of the next stitch on the Left Hand Needle. Sl1 = Slip 1 stitch = slip the next st as ifto purl from the left hand needle to the right hand needle Page 1 of 9 Diamond Jubilation Copyright 2012 Laura Jenkins. All rights reserved. For personal, non-commercial use only. Instructions and charts may be photocopied for personal use only. ssk = Slip, Slip Knit = Slip one stitch knitwise onto the right hand needle, slip a second stitch purlwise onto the right hand nee dle, then insert the left hand needle through the front of both stitches and knit them together. K2Tog =Knit two together =insert the right hand needle into the next 2 sts on the left hand needle and knit themtogether. eginning of Row Marker = a removable stitch marker used to indicate the start of a new round Turn = Turn the knitted fabric around so that the other side is facing you and start working st st in the other direction. You do this at the end of every row when working a flat piece, but when turning a heel using short rows, this turn occurs before you reach the end of a row. Note 1: All the Charts and explanations of the Symbols can be found at the end of this pattern. Note 2: The pattern charts use colours to highlight stitches that require particularattention. Ifyou are working from a printed chart, it is important to be able to see them - you may want to consider using a hilighter or coloured pencils to indicate the colours on black-and-white printouts if necessary.
CUFF
Loosely cast on 68 (76) sts using your favourite method Divide the sts evenly between N1 and N2, place a marker to indicate the beginning of the round, and join to begin working in the round, being careful not to twist your sts. Work 14 rows in K2P2 ribbing as follows: K1, \*(P2, K2), repeat from \* to last st of round, K1. Following Round: Increase 2 sts across the next round as follows: N1: Kfb, \*(P2, K2), repeat from \* to last st, P1. N2: P1, K1, Kfb, \*(P2, K2), repeat from \* to last st, K1.
LEG:
Work all rows of LEG CHART 1, repeating the chart once across the stson N1 and then a second time across the stsonN2.
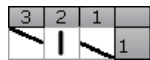
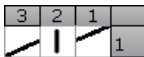
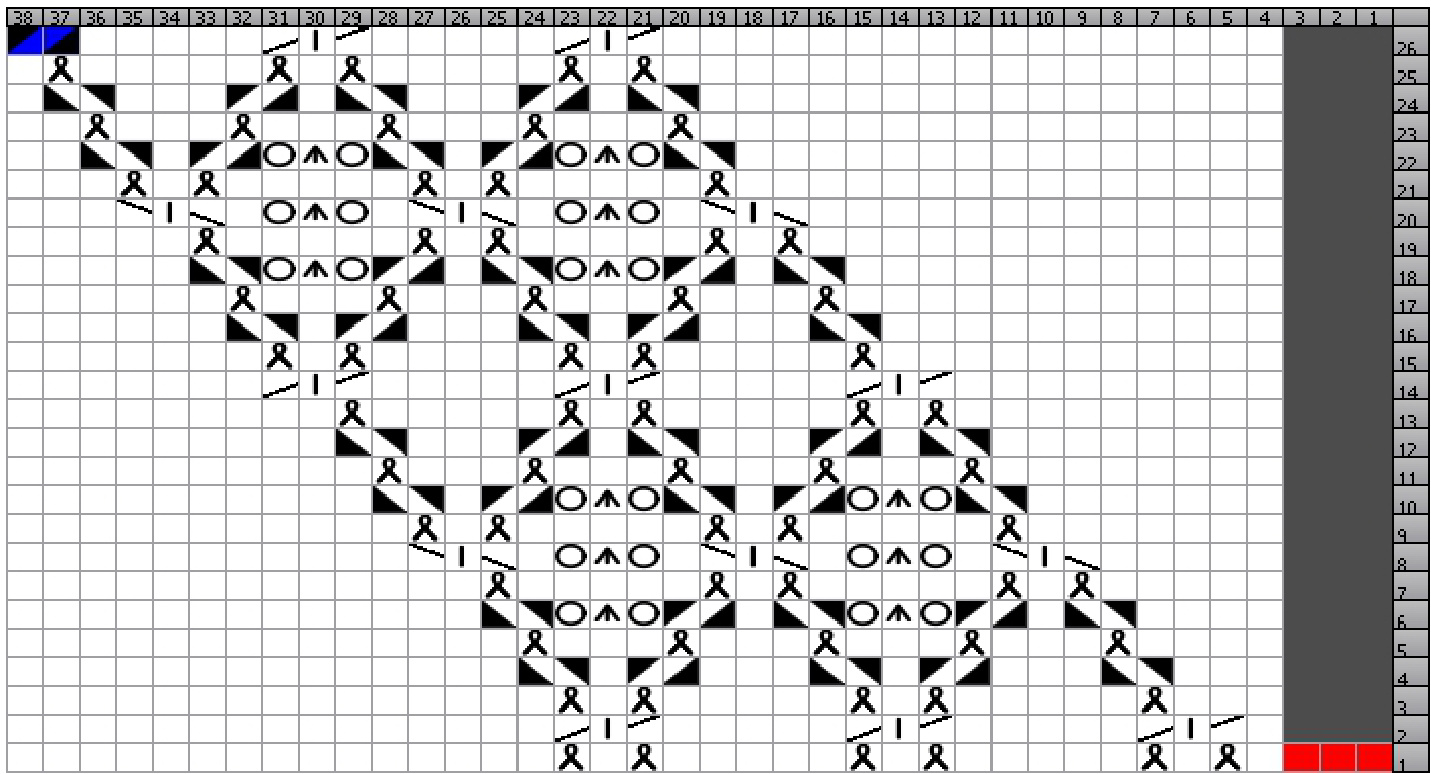
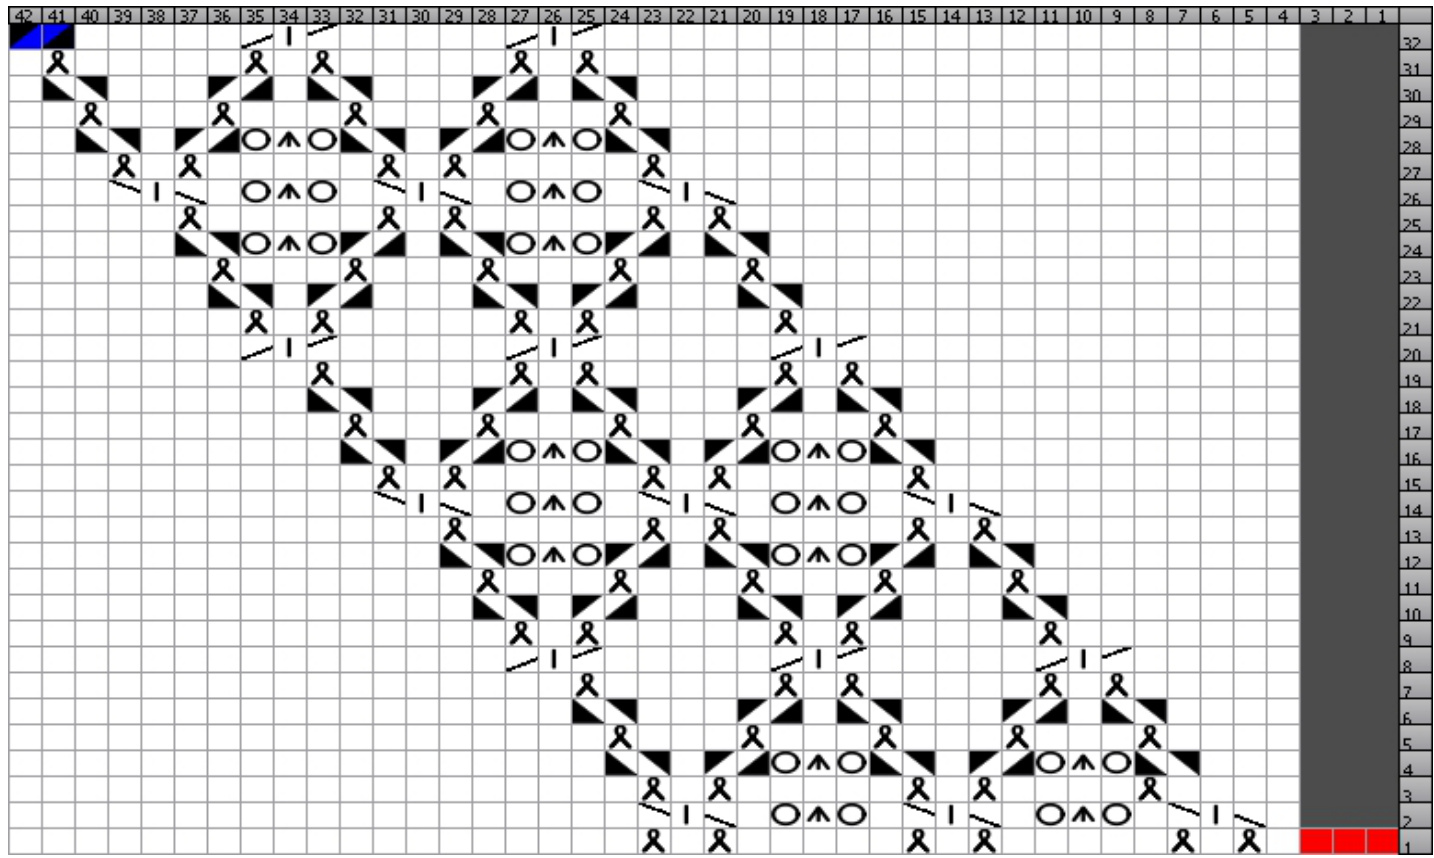
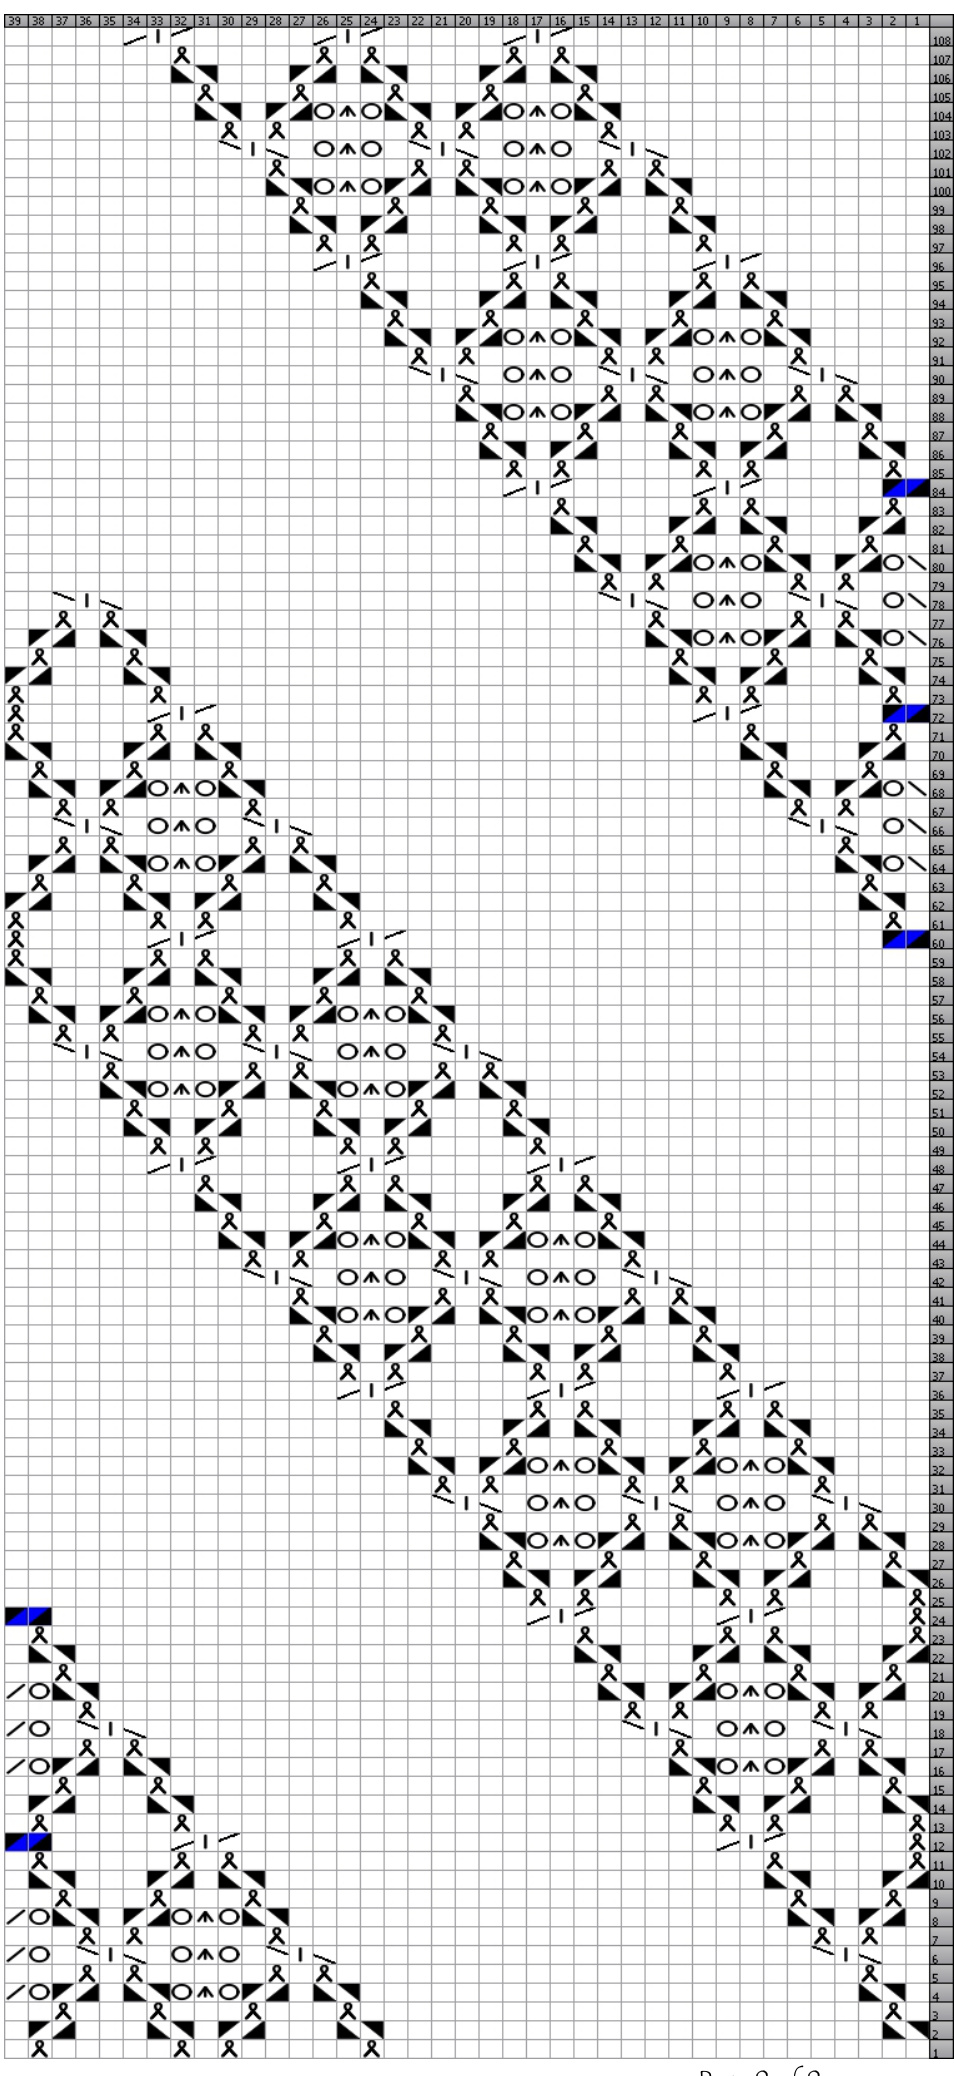
Work rows 1-12 of LEG CHART 2, repeating the chart once across the sts on N1 and then a secondtime across the sts onN2. Repeat LEG CHART 2 a further 3 times Size LARGE ONLY: Work rows 1-6 of LEG CHART 2 oncemore. Note: The pattern in LEG CHART 2 shifts every 6 rows so as to create the spiral effect around the leg. The shift is achieved by knitting the first 4 sts of the row (highlighted as red sts in the chart) and transferring them to the end of the needle that has just been worked. It is thus important to shift the BoR marker every six rows as well to keep track of where you are in the pattern. Work rows 1-26 (1-32) of the size-appropriate LEG CHART 3, repeating the chart once across the sts on N1 and then a second time across the sts onN2. Note: The shift on row 1 of the size-appropriate LEG CHART3 is only 3 sts instead of 4. This is the final shift of the spiral and sets the pattern in place for working both the heel and foot.
HEEL FLAP
Note: The Heel Flap is knit FLAT - that is back and forth across the sts of N2 ONLY. The sts on N1 remain on hold for the foot. Remove the BoR marker and set aside for use once you start back knittingin theround. With the WRONG SIDE ofthe work on N2 facing you, Sl1 then P across the remaining 34(38) sts. 1st row (RS): Sl1, K1, Sl1, K2tog,\*Sl 1, K1, repeat from \* to the last 5 sts on N2, K2tog, Sl1, K2. 33(37 sts) 2nd, 4th and 6th rows (WS): Sl1, Pto end ofrow. 3rd row (RS): Sl1, K2, \*Sl1, K1, repeatfrom \* to end of row 5th row (RS): \*Sl 1, K1, repeat from \* to the last stof row, K1 Repeat rows 3-6 until the heel flap measures 2.5", ending after a WS row. Turn work so that the Right Side of the Heel Flap is facing you.
HEEL TURN
Row 1 (Right Side): Sl1, K17(K19), ssk, K1, Turn work. Row 2 (Wrong Side): Sl1, P4, P2tog P1, Turn work. Row 3 (Right Side): Sl1, K5 ssk, K1 Turn work. Repeat Rows 2 and 3 of the heel turn, increasing the number of sts between the decreases by one st each row until all sts are used up →19 (21) sts remain onthe needle, ending after working a wrong side row. Turn work so that the RIGHT side is facing you.
PICK UP GUSSETS
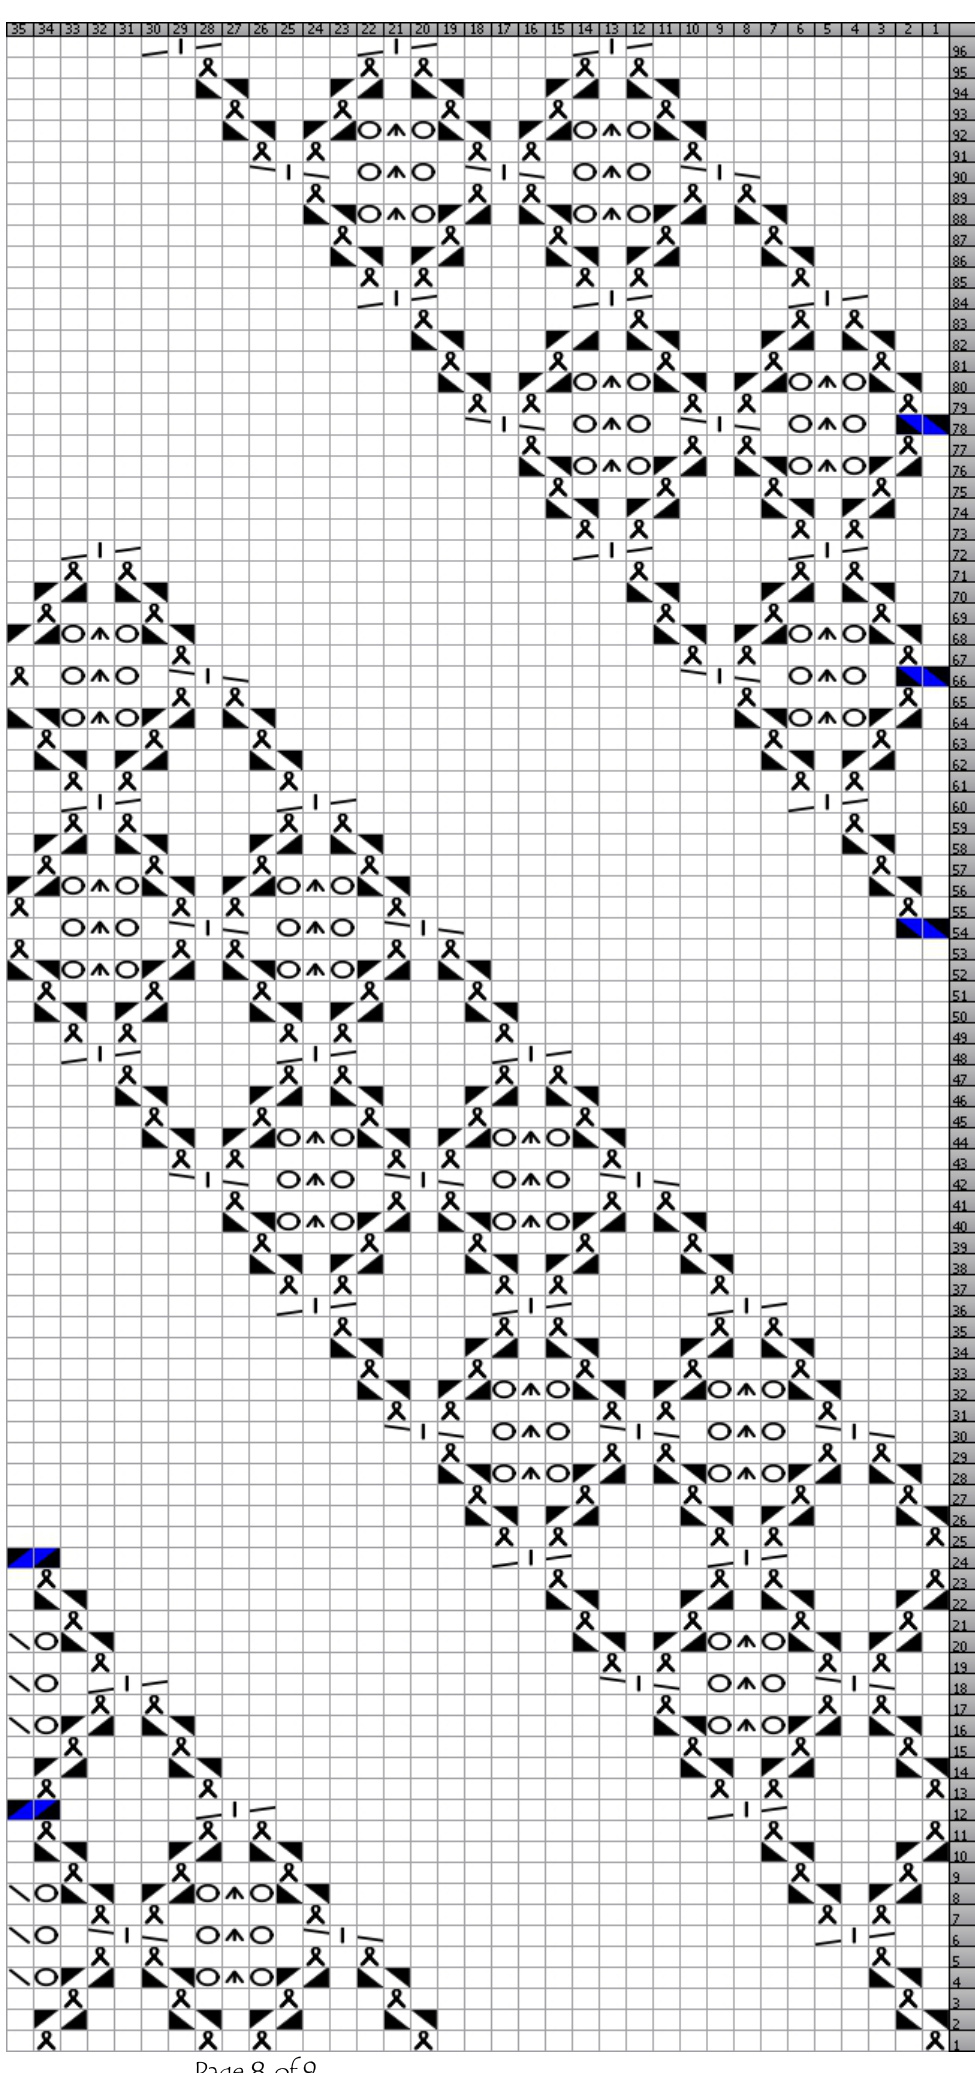
Knit 10(11) heel sts and place a marker to mark the new beginning of the round. Knit across the remaining heel sts,then continuing with the same needle, work down the side ofthe heel flap, picking up the sts along the edge and then one st in between the heel flap and the sts on N1. Knit the first row of the size-appropriate FOOT CHART across the sts held on N1. Pickup one st between N2 and the heel flap, then work back up the heel flap, picking up one st in each of the loops on the edge. Knit to the end ofthe round. Redistribute your sts so that all the gusset and heelsts [approximately 53 (55) sts] are held on one needle (N2) and your foot sts [35 (39) stsJ are held on the other (N 1). Note: The total number of sts picked up for the gussets can vary slightly and will make very little difference to the finished product - don't worryif you're off by one ortwo sts - just continue the decreases until you reach the totals indicated.
GUSSETDECREASES&FOOT
Gusset Decrease Row 1: Knit to 3 sts before the end of N2, K2Tog, K1. Work next ro wofthe sizeappropriate FOOT CHART across the sts on N1. K1, ssk, KNIT to end of row. Gusset Decrease Row 2: Knit all sts to the end of N2. Workthe next row of the size-appropriate FOOT CHART across the sts on N1. Knit to end of row. Repeat Gusset Decrease Rows 1 and 2 untilyou have 70 (78) sts in total. Remove BoR marker, K to the end of the sole sts on N2 and mark new beginning of the row at the start oftop of foot sts (N1). Continue workingthe sts on N1 according to the size-appropriate FOOT CHART and knitting the sole in plain st st until your work measures 2" /5cm (2 12" /6cm) less than the total desired foot length. Note: The FOOT CHARTsinclude enough rows for a US Size 14/Eur 48 foot at the indicated gauge, so you should NOT feel uncomfortable if you are only midway through the chart when you reach the right length. I encourage you to try on the sock at various points during the knitting to check forfit, and use yourjudgment to determine if you should start knitting a second 'swirl" on row 54(62) of the patternif you are getting close to the toes - I didn't as I was only a few rows away from ending for the toes. If further rows are needed and you aren't comfortable in determining what comes next, please feel free to contact me and I can draw up the charts for the next rows.
TOE
Round 1: Kall sts across N1 and N2 Round2: N1: \*K1, ssk, knit to last 3 sts on nee dle, K2tog, K1. Repeat from \* across the sts on N2. Repeat rows 1& 2 until 22(26sts) remain (13 sts per needle).
FINISHING
Graft the toe sts together using Kitchener st - here's a great YouTube video to show you how. Make a second sock to match the first.
IN CASE YOU WERE WONDERING..
My name is Laura Jenkins and I've been knitting since my grandmother Helen Matte took pity on me in my teenage attempts to make my boyfriend a sweater. I am currently attempting to pass my knowle dge on to my 11-year-old daughter Jenny, and am swiftly developing an even deeper appreciation for the time my Neenie spent with me, patiently explaining knitting, purling, increasing and decreasing - this is not an easy skill to teach!! I work full-time in the pharma industry, and am lucky enough to work for one of the larger players, which has given me and my family the absolute privilege of being moved around to a couple of different manufacturing sites in our network. After working for 15 years in my home country of Canada, I was given the opportunity to work for four years in Normandy, France and have just recently relocated to the Lake District in the UK. Both these wonderful areas have inspired me and my designs, and I am very grateful for the supportive and caring communitythat is Ravelry. I started designing socks as a means of challenging myself during the Sock Knitters Anonymous group's DYO month in June 2009, and have been slo wly growing my re pertoire - I hope you enjoy this latest pro duct! If you have any comments on this pattern, please feel free to contact me through Ravelry, where I'm known as LauraJ. Happy knitting!
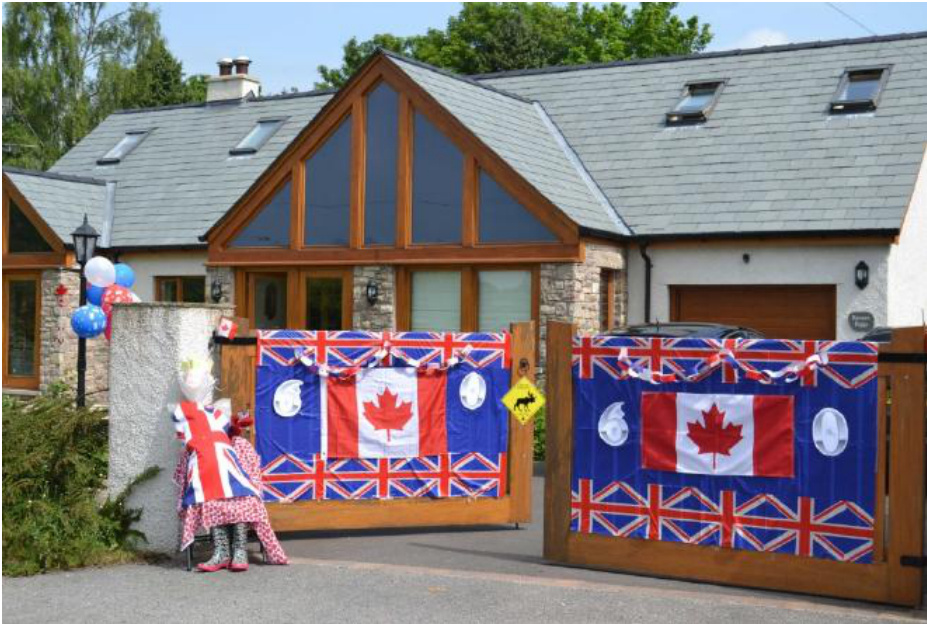
Our gate decorated for the village Jubilee Celebrations June, 2012
Abbreviations & Chart Symbols:
K =Knit
No Stitch

YO = Yarn Over = Bring yarn to front of work and then knit the next stitch by bringing the yarn over the right hand nee dle befo re wrapping it around the stitch. K1tbl = Knit one through the Back Loop = Insert the tip ofthe right hand needle through the back loop of the stitch on the left hand nee dle and knit.
CDD = Centered Double Decrease = Sl 1 st, K2TOG, then pass the slipped stitch over → 2 sts decreased. T2L = Twist 2 Left = Place the next st from the Left Hand needle onto a cable needle and hold to the front of the work. Knit the next stitch, then K1tbl from the cn.

T2R = Twist 2 Right = Place the next st from the Left Hand needle onto a cable needle and hold to the back of the work. Knit the next stitch, then K1 tbl from the cn.
:-Stitch Double Cross Left = Sl 2 sts to cn, holdin front, K1, sl sts backto LN. Then sl 1st st ont. :k. K1, K1 from cn
3stdblcrR = 3-Stitch Double Cross Right = Sl 2 sts to cn, hold in back, K1, sl sts backto LN. Thensl 1st st onto cn, hold in front. K1, K1 from cn SSK K2Tog 4-stitch Shift = Knit the next 4 sts and transfer them to the end of the needle last worked. (the 3-stitch shift is worked perthe same principle, not illustrated here) Special st = pay attentionto this st, it is not part of the "usual" pattern
Page5of 9 Diamond Jubilation Copyright 2012 Laura Jenkins. All rights reserved. For personal, non-commercial use only. Instructions and charts may be photocopied for personal use only.
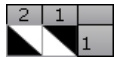
LEG CHART 1
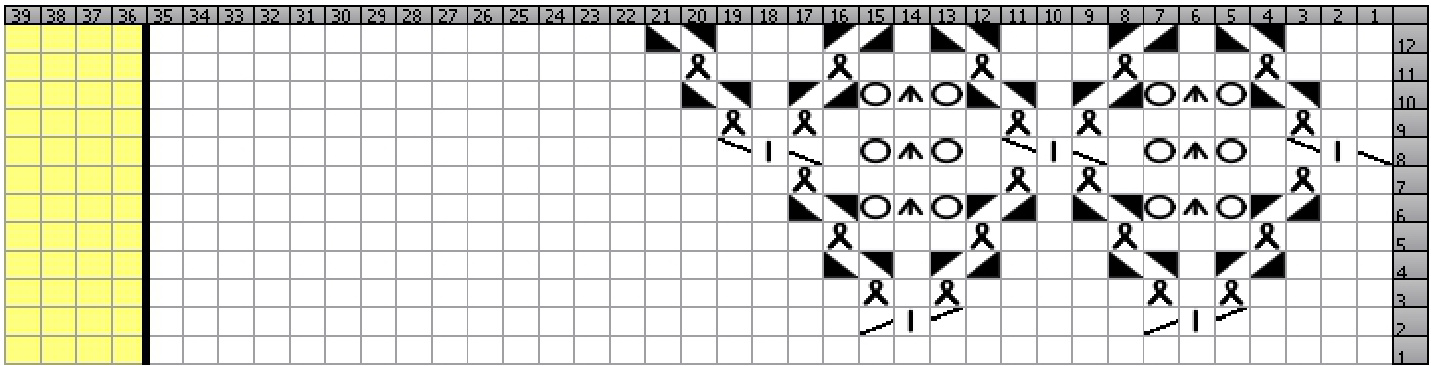
Work Yellow Stitches for size LARGE only
LEGCHART2

LEGCHART3MEDIUM
Page6of9 Diamond Jubilation Copyright 2012 Laura Jenkins. All rights reserved. For personal, non-commercial use only. Instructions and charts may be photocopied for personal use only.
Page8of 9 Diamond Jubilation Copyright 2012 Laura Jenkins. Allrights reserved. For personal, non-commercial use only. Instructions and charts may be photocopied for personal use only.
Page 9of 9 Diamond Jubilation Copyright 2012 Laura Jenkins. Allrights reserved. For personal, non-commercial use only. Instructions and charts may be photocopied for personal use only.


