Manici
mah-nee-kee by Jodie Gordon Lucas www.QueenieKnits.com Ravelry ID: Jodiemom Manici is a universal recipe for electronics sleeves. The pictured Manici is 5 by 7.5 inches and fits a Kindle ereader. However, Manici can be customized to fit any mid
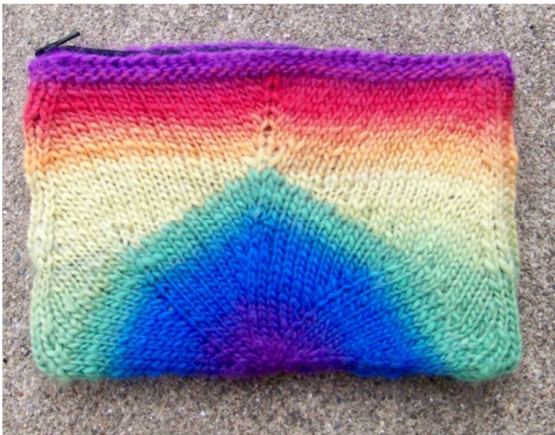
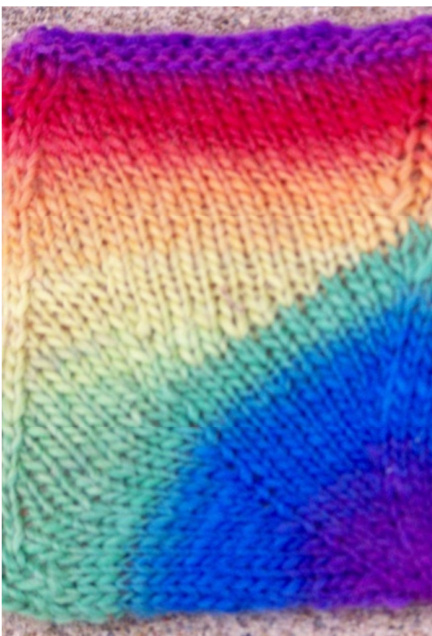
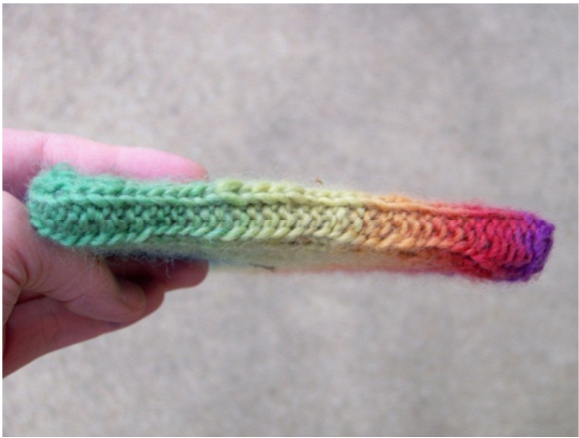
sized, thin, flat, rectangular, electronic devise (net books, thin laptops, tablet computers, etc). The sleeve begins with a circle that will wrap around the long side of the device. The sides are then worked beginning at the lower corner and ending in the top center of the arch. Finally, the sleeve is worked in the round until it equals the length of the shorter side of the device. Manici is finished with a zipper. For an experienced knitter Manici can be made in an afternoon. The original Manici was made for a dear friend and was intended to create a proud rainbow using Knitpicks Chroma in the prism colorway. Manici also looks fabulous when made with many colors of remnant yarn or self-striping yarn. Manici is Greek (ahem—-geek??) for sleeve.
DIMENSIONS
Pictured Manici was made to fit an Kindle ereader (5x7.5 inches) and used 40 g. 21 sts and 24 rows = 4 inches in stockinette. It is not necessary to match gauge. Select a needle size that creates a dense fabric.
YARN
Any worsted weight yarn. Sample pictured in Knitpicks Chroma, worsted, prism. 1. Calculate the surface area of the device excluding sides 2(Length \* Width). 2. Multiply surface area by 0.6. This will be the estimated number of grams of Chromaneeded. 3. Since Chroma has a very long colorway purchase an additional ballif your estimate extends into thelast 25g of a ball.
NEEDLESANDNOTIONS
1 set US 4/ 3.5mm dpns 2, 24 inch or longer Us 4/ 3.5mm circular needles 1 set US 4/3.5 mm straight needles Stitch markers, knit picker, zipper with nylon teeth (!!! no scratched screens !!!) to fit long dimension of rectangle, needle and thread.
NOTES
Kfb: knit front and then back loop of stitch Pfkb: Purl front loop and then knit back loop of stitch. LLinc: Lifted Left Increase-- Pick up the left side of the second stitch below the final stitch on the right needle. Place this stitch on the left needle and knit it. LRinc: Lifted Right Increase—Pick up the right side of the first stitch below the final stitch on the left needle. Place this stitch on the needle and knit it. W&T: Wrap and turn-- bring yarn to front of work, slip 1 stitch purlwise from left needle to right needle, take yarn behind work, return slipped stitch to the left needle, turn work. m1:Lift bar between stitches onto left needle and ktbl K or P wrapped stitch—insert needle first into the wrap and then into the stitch and knit them or purl them together. Directions for three Needle bind off can be found here: http://www.knitty.com/ISSUEfall06/FEATfall06TT.html TIP—long colorways have a direction. To keep the portion of yarn removed when changing position in the colorway going in the same direction as the rest of the ball, break the yarn at the new color and immediately tie an overhand knot in the portion you're removing at the break. When you use the yarn you will know you're going the wrong way if you begin at the knotted end. TIP--lf you would like to accommodate a thicker device (such as a laptop computer) make the following modifications beginning at the sides: Row 1[rs]: P1, LLinc in purl, k1, W&T Row 2[ws]: P1, k3, LLinc, p1, W&T, 4 sts between wraps For remainder of pattern you will work 4 stitches in place of 2 stiches in the center ofeachside. TiP—save yourself some time by writing down your devise dimensions and calculating your Manici Circle Diameter and Minimum Manici Width dimensions before you begin. Keep in mind that devices vary in thickness. You may need to may need make your Manici wider than the device to accommodate the thickness. The only way to know if this is necessary is try it for fit.
| Device length | ManiciCircle Diameter= Devise Length * (0.85) |
| Devisewidth | Minimum Maniciwidth= Devise Width * (0.90) |
CIRCLE
Using dpns cast on 4 sts. Join to work in round (as if starting an I-cord). Switch to circulars when needed. Round 1: Kfb 4 times, 8 sts (2 sts on 4 dpn needles) Round 2:Knit. Round 3: {K1,[LLinc, k1] 3 times, LLinc], twice, 16 sts. Round 4: [K2, LLinc, k5, LLinc, k1] twice, 20 sts. Round 5: {k1, [k1, LLinc, k1, pm] twice, k1, pm} twice., 28 sts Markernotes:Whileyouareworking ondpns,it is convenienttochangeneedlesat markerpositions.Since markers will slide off dpns place a“mental marker"to use in rounds 9 and 10 and remember to place real markers when you switch to circulars. Markers arereferredtoas1 through8intheorderthey areplaced.Marker4is the mid-way point in the round. Marker 8 is the end of round. Rounds 6,8 and 10:Knit. Round 7: {k1, [k1, LLinc, k2] x 4, k1} twice, 36 Round 8: {p1, k16, p1] twice. Round 9: {p1, [k1, LLinc, k to next marker] 3 times, k1, LLinc, k to 1 stitch before next marker, p1] twice. Repeat rnds 9 and 10 until the diameter of the circle is the target Manici Circle Diameter (0.85\*Devise Length). Work final round. Do not break yarn. Final Round: [p1, k to 1 st before fourth marker, p1] twice.
SIDES
Slip stitches and markers between markers 2 and 6 onto a separate circular needle (markers 2 and 6 are now "mental markers" as in round 5). Each needle now holds half of thestitches.Markers 4 and8willnowbe referred to as Center Markers since they mark the mid-point. Markers 3 and 5 on one needle and 7 and 2 on the other will be referred to as Increase (INC Markers). Note your position in the colorway. For symmetryyouwillneedtoattachinasimilar position on the second side. If Manici is for a large device see pattern note above. There are several things which will be happening simultaneously on the sides:
1. Short rows are worked. Following each stitch worked with its wrap, work 1 stitch then wrap and turn. 2. Every 4th right side row the decreases are worked on either side of the center marker (see row 9). 3. Once short rows have extended past the Increase Markers the center decrease row will include increases at the INC Markers (see row 11) Row 1[rs]: P1, k1, W&T Row 2[ws]: P1, k2, p1, W&T, 4 sts between wraps Row 3[rs]: K1, p2, k1, k wrapped st, k1, W&T. Row 4[ws]: P3, k2, p1, p wrapped st, p1, W&T, 8 sts between wraps Row 5[rs]: K2tog, k1, p2, k1, ssk, k wrapped st, k1, w&T. Row 6[ws]: P4, k2, p2, p wrapped st, p1, W&T, 10 sts between wraps.
Row 7[rs]: K to 1 st before center marker, p2, k to wrapped st, k wrapped st, k1, W&T. Row 8 and all further wrong side rows [ws]: P to 1 st before center marker, k2, p to wrapped st, p wrapped st, p1, W&T. Row 9[rs]: K to 4 sts before center marker, k2tog, k1, p2, k1, ssk, k to wrapped st, k wrapped st, k1, w&T. Rep rows 7 through 10 until a wrong side row begins with at least 1 purl before you reach the first INC marker. Complete the row as written and then proceed to row 11. Row 11[rs]: Knit to first INC Marker, k1, RLinc, k to 1 st before center marker, p2, k to second INC marker, k1, LLinc, k to wrapped stitch, k wrapped stitch, k1 W&T. Rows12and14[ws]:Reprow8. Row 13 [rs]: Rep row 9. If you started with an odd number of knit stitches between markers: Repeat Rows 11 to14 until final right side wrapped stitch is 1 st before the end of the needle. Last RS Row: Work next odd row as if you were continuing the pattern above until wrapped stitch is worked, k1, RLinc into the first stitch on the other needle, turn. Last Ws Row: Sl1, p to 1 st before marker, k2, p to wrapped st, p wrapped, If you started with an even number of knit stitches between markers: Rep rows 11 through 14 until final right side wrapped stitch is the last stitch on the needle. Last Rs Row: Work next odd row as if you were continuing the pattern above until wrapped stitch is worked, RLinc into the first stitch on the other needle, turn. Last Ws Row: P to 1 st before marker, k2, p to wrapped st, p wrapped st. Breakyarn.
TOP
Rearrange stitches so that each needle holds half of the stitch for the round and the needles begin and end at the center marker used for the sides. Each needle's stitches begin and end with a purl. Count the number of stitches on each needle. If you have an even number of stitches mark the center point. If you have an odd number of stitches place marker before the center stitch. Note, Round 2 below is different for odd and even numbers. Rounds 1, 3 and 5: [P1, k to marker, p1] twice. Round 2--Odd Stitch Count: [P1, k1, k to marked stitch, remove marker, k1, pm, RLinc, k to 4 sts from end of needle, k2tog, k1, p1] twice. Round 2--Even Stitch Count: [P1, k1, ssk, k to 1 st before marker, RLinc, k2, LLinc, k to 4 sts from end of needle, k2tog, k1, p1] twice. Round 4: [p1, k1, ssk, k to 1 st before marker, RLinc, k2, LLinc, k to to 4 sts from end of needle, k2tog, k1, p1] twice. Repeat rounds 4 and 5 until sleeve reaches the Minimum Manici Width (0.9 \* Devise Width). Check fit. If sleeve is wide enough continue to final round. End on rnd 5. Final round: Purl. Do not break yarn. Set aside.
ZIPPER (read notes before installing the zipper)
A demonstration on using a knit picker can be found here: http://techknitting.blogspot.com/2010/11/no-sew-zippers.html Zipper end= point where zipper is fully open. Zipper beginning=point where zipper is fully closed.
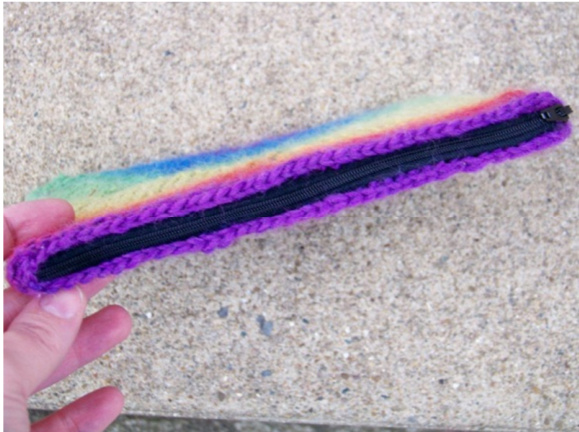
Note: If your zipper has not been shortened therewill be an inch or so of fabric extending beyond the zipper track—do not pick up stitchesin this area. Working at the outer edges of the zipper, mark off the Device Length along each side of the zipper track starting at the end and working toward the beginning. If your zipper is too long cut away the excess from the beginning of the zipper leaving 1.5 inches extra in length. Do not allow zipper pull to leave the zipper track. Count the number of stitches on each circular needle. The knit picker will be used to pull a stitch through from the wrong side of the zipper, evenly spaced, between the device length marks. Check position in the colorway before picking up stitches. For the left side of the zipper begin picking up stitches at the beginning of the zipper. Slip the stitches onto a straight needle as the are picked up. Break yarn. For the right side of the zipper, use a new strand of yarn and begin picking up stitches at the end of the zipper. There are now four separate needles holding stitches—one circular needle along the each top edge, one straight needle along each zipper edge, facing in opposite directions. Hold the needle with the right half of the zipper behind a circular needle. Using the end of the circular needle holding the back stitches as your third needle and attached yarn, bind off the stitches on these two needles with three needle bind off in purl. Turn work so the second side is now facing without breaking yarn. Hold the needle with the left side of the zipper behind the remaining circular needle. Bind off these stitches with three needle bind off in purl. Pick up a stitch in the top of the first bound off stitch, bind it off. If your zipper was shortened use needle and thread to sew the zipper teeth together approximately 1 inch away from new zipper stopping point. Before securing thread confirm that the opening is still wide enough for the device. Use the yarn ends on each end of the zipper used for pulling through stitches to loosely tack the zipper ends along the side seam to prevent the zipper ends from coming into contactwith your device.
FINISHING
Weave in ends. Use the weaving as an opportunity to reinforce the top of the arch where yarn was broken at the end of the sides Pattern and images @2011 Jodie Gordon Lucas


