Proper Trappings: ORIGINAL DESIGNS
NOT SO TINY TOP: GREEN BUTTERFLIES
This “vest' is made in a soft rayon yarn. It is very loose and airy, done in filet mesh with a large gauge. The vest is crocheted all in one piece, starting at the bottom, until it is split for the armholes. The only seams are at the shoulders. The few rows forming the sleeves are crocheted out of the armholes. The whole project is then given a shell edging. · Difficulty: Easy to Intermediate, depending on whether you include the butterflies. ·Size: Since the top is loose fitting and flyaway, it will fit a lot of medium-large sized people (you can also adjust it some with the ribbon). The directions below will give a top that will fi a $36^{\circ}$ 10 $40^{\circ}$ bust. You can make it longer by doing more rows of open filet mesh before you begin the butterflies. Gauge: Approximately 6 squares across and 6 squares down over a $4^{\circ}$ by $4^{\circ}$ $10\;\mathrm{cm}$ by $10\;\mathrm{cm},$ swatch of filet mesh. This translates into 19 stitches and 6 rows.
Main Part of Garment
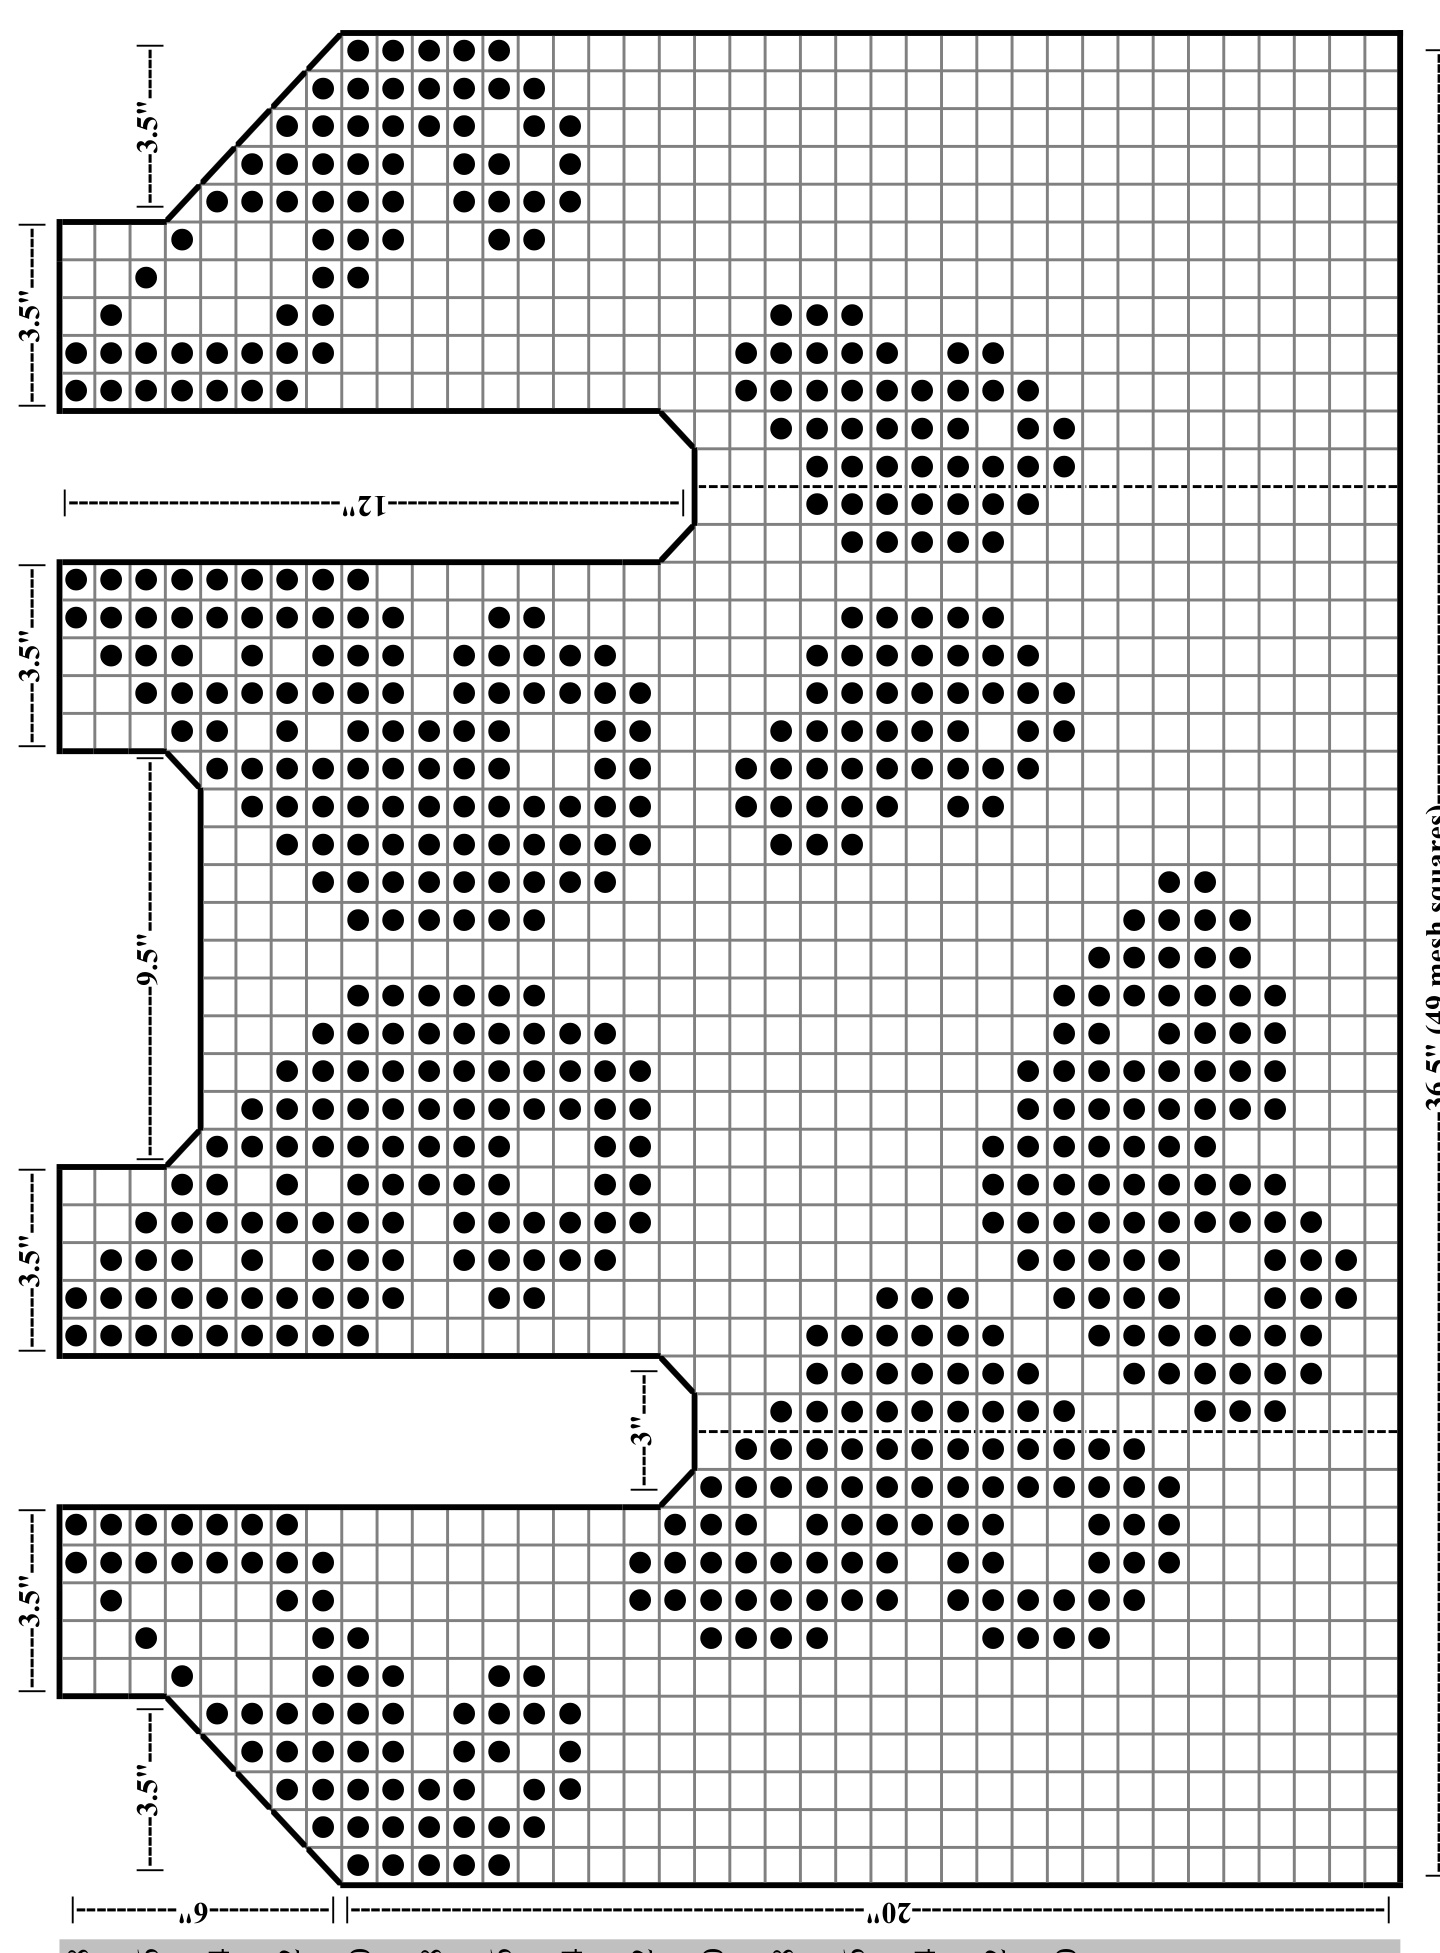
The written instructions below are for making the vest without any butterflies, using only open squares of filet mesh. Additional instructions and a chart for including the butterflies are below. Even if you do not plan to include butterflies, you may find the chart helpful for understanding the shaping.
Bottom of Garment:
Ch148 and turn. Begin filet mesh pattern stitch over 49 mesh squares. Continue for a total of 20 rows and turn. You should now be at the right front edge and ready to start a right-side row. You will now split the work for the armholes.
Right Front:
Do the right front first since that is where your yarn is: ● Row 21: Continuing in filet mesh, do 10 mesh squares, ending with a DC. Skip 2 Ch and Tr in next DC. Turn.
Materials
Yarn: The Wool Peddler Velvet Viscose or any other DK weight yarn with good drape. Quantity: Two hanks (300 yards each) in lime green or color of your choice. (I did not need nearly all 600 yards for this; you may need less of a different yarn.) Hook: Size F $3.75\;\mathrm{mm})$ I or size needed to obtain gauge. Notions: A pretty ribbon for tying it together.
Stitches and Abbreviations
Basic Stitches and Abbreviations Used: chain (Ch), slipstitch, single crochet (SC), double crochet (DC), treble crochet (Tr), double crochet two together (DC2tog). Patterns that repeat are indicated by brackets ([1). Pattern Stitch - Filet Mesh (based on a multiple of 3 stitches, plus 1): - Begin a row with Ch5 (counts as DC, Ch2), skip $1^{\mathrm{st}}\,3$ stitches (the $1^{\mathrm{st}}\,\mathrm{DC}$ and 2 chains), DC into next DC. - Continue with [Ch2, skip 2 chains, DC into next DC] across the row until one mesh square remains. - End with Ch2 and DC into $3^{\mathrm{rd}}$ chain (into the chain, not the chain space) of the Ch5 from the previous row. Continue in filet mesh over 10 mesh squares for another 9 rows. You will now begin the neckline shaping. Place a marker at the front edge before starting Row 31. · Row 31: Ch4 (counts as Tr), skip 2 Ch, DC in next DC, continue in filet mesh to end of row. Turn. Row 32: Continue in filet mesh until one mesh square remains. Skip 2 Ch and Tr in last DC. Turn. · Row 33: Repeat Row 31. · Row 34: Repeat Row 32. · Row 35: Repeat Row 31. · Row 36: Continuing in filet mesh, do 5 mesh squares. Repeat Row 36 two more times. Fasten off.
Left Front:
This front is worked from the armhole edge to the front edge. It is identical to the right front but with all shaping reversed. With the right side facing you, attach your yarn to the double crochet that is 11 squares from the left front edge. Continue in filet mesh to end (10 mesh squares). Turn. Continue in filet mesh over 10 mesh squares for another 9 rows. You will now begin the neckline shaping. Again, place a marker at the front edge before starting Row 31. · Row 31: Continue in filet mesh until one mesh square remains. Skip 2 Ch and Tr in last DC. Turn. · Row 32: Ch4 (counts as Tr), skip 2 Ch, DC in next DC. Continue in filet mesh to end of row. Turn. · Row 33: Repeat Row 31. · Row 34: Repeat Row 32. · Row 35: Repeat Row 31. · Row 36: Continuing in filet mesh, do 5 mesh squares. Repeat Row 36 two more times. Fasten off.
Back:
The back is worked from the right back to the left back armhole edge. With the right side facing, attach your yarn to the double crochet that is 13 squares from the left front edge. · Row 21: Ch4 (counts as Tr), skip 2 Ch, DC in next DC. Continue in filet mesh for 21 mesh squares. (You should be 14 mesh squares from the left front edge.) Skip 2 Ch, Tr in next DC. Turn. Continue in filet mesh over 21 mesh squares for another 13 rows. You will now begin the back neckline shaping. For the right back neck: ● Row 35 (right back neck): Continuing in filet mesh, do 5 squares. Skip 2 Ch and Tr to last DC. Turn. Continuing in filet mesh, do 3 more rows of 5 mesh squares. Fasten off. For the left back neck, with the right side facing, attach your yarn to the double crochet that is 6 squares from the left back armhole edge. ● Row 35 (left back neck): Ch4 (counts as Tr), skip 2 Ch, DC in next DC. Continue in filet mesh to end of row (5 mesh squares). Turn. Continuing in filet mesh, do three more rows of 5 mesh squares. Fasten off. Sew shoulder seams (across the 5 mesh squares) using your favorite seaming method.
Sleeves
The sleeves are crocheted in the round straight out from the armhole openings. You should have 38 mesh squares around each armhole (although two of these will just be triangles formed from the underarm shaping). Reattach your yarn at the bottom center of one armhole (between the two triangles). · Row 1: Do one round of filet crochet around the armhole, beginning with Ch5, until one square remains. Ch2 and slipstitch to the $3^{\mathrm{rd}}$ chain of the Ch5 from the beginning of the round (38 squares). Do not turn. · Row 2: Repeat Row 1. · Row 3: Ch5 (counts as DC, 2 Ch), DC2tog the next two DCs (skipping the $2\;\mathrm{Ch}$ in between). Continue around the armhole in filet mesh until 3 mesh squares remain. Ch2, DC2tog the next two DCs (again skipping the $2\,\mathrm{Ch}$ in between). Ch2 and slipstitch to the $3^{\mathrm{rd}}$ chain of the Ch5 from the beginning of the round. Do not turn. Do two more rows of filet crochet around the armhole like Row 1 (but now on 36 mesh squares). Fasten off. Repeat for the other sleeve.
Edgings
Beginning anywhere that you like along the bottom edge, with the right side facing, reattach your yarn to line up with a DC in the $1^{\mathrm{{st}}}$ row. You will start with a round of single crochet around all the edges, and then do a round of shells.
First Round:
Begin with Ch1 as a “turning chain": · Along the bottom: Place one SC in each DC (or equivalent) and 2 SC in each chain space. (For the edging, you want to crochet into the chain spaces, not the chains themselves.) · Bottom Corner: Do 2 SC in the space, then 1 SC in the corner stitch, then 2 more SC in the space. · Front Opening: Just like along the bottom, until you get to the neckline shaping at the marker. · Front Neckline: For the long spaces formed by the trebles and Ch4s, do 3 SC in these spaces. · Back Neckline: Just like along the bottom. Continue around the rest of the garment using 2 SC in standard mesh snaces and 3 SC in longer ones until vou return to where you started. Slipstitch to the Ch1 at the beginning of the round. Do not turn.
Second Round:
The edging is a simple shell consisting of: [skip 2 SC, DC 7 times in next SC, skip 2 SC, SC in next SCj. Begin with Ch1 (counts as 1 SC), then start the shells. ● Along the bottom: Each shell should cover 2 mesh squares, so that both the middles of the shells and the SCs in between line up with DCs from the body of the garment. · Bottom corner: DC 11 times into the corner SC. (If this does not quite lie flat for you, try 10 or 12 DCs.) · Front Opening: Just like along the bottom, until you get to the neckline shaping at the marker. · Front Neckline: Continue in the shell stitch up to the shoulder seam, making sure that your last SC of this section is at the seam. Since there are a few extra stitches along this edge, you may need to adjust a bit by skipping or adding some stitches to make this section lie flat; I have six shells between the beginning of the neckline and the shoulder seam, but you might have seven. · Back Neckline: Once you reach the shoulder seam, you should be back with 1 shell for each 2 mesh squares. When you have returned to the start, adjusting the other neckline and corner accordingly, slipstitch to the Ch1 that began the round. Fasten off. For the edgings for the sleeves, attach your yarn anywhere that you like to line up with a DC (under the arm is good). Ch1 and do one round of SC, placing 1 SC into each DC (or equivalent) and 2 SC in each mesh space. Slipstitch to the Ch1 at the beginning to finish the round. Do not turn. The round of shells is done exactly as above. Begin with Ch1 (counts as 1 SC), then begin [skip 2 SC, DC 7 times in next SC, skip 2 SC, SC in next SC] to the beginning of the round (you should have 18 shells over the 36 mesh squares). Finish with a slipstitch to the Ch1 that began the round and fasten off.
Finishing
Depending on your yarn and hooking style, you may find it helpful to block this garment to square up the design. Once that is done, head off to your favorite ribbon store and find something that you like. Thread it through an accessible hole at the front of your garment (where the markers were). Enjoy!
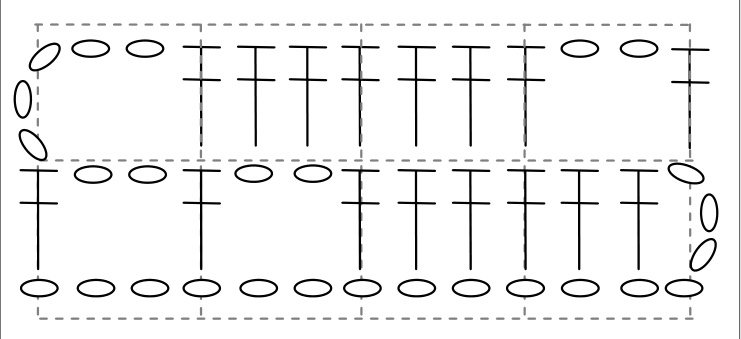
If It Is Your First Time Following a Filet Mesh Chart
If you have followed filet mesh charts before, including the butterflies should be straightforward. As usual, the chart is read from right to left on right-side rows and left to right on wrong side rows. The shaping is also shown in the chart. For the “diagonal' stitches at the end of a row, use a treble crochet; at the beginning of a row, Ch4 (counts as a treble). If you are new to doing pictures in filet, the pictures are formed by combinations of open squares and filled-in squares (see Figure below). Each square is defined by a double crochet on each side. An open square has two chains between these double crochets; a filled-in square has two double crochets in-between. Each square in the chart represents a filet square, rather than a stitch. For this pattern, when doing double-crochets into a chain from the previous row, crochet into the chain stitches themselves rather than into the open space. For turning chains, if your first square is filled-in, begin with Ch3 just like in any double crochet pattern. If your first square is an open space, begin with Ch5 (counts as DC, Ch2).