Reversible Ribbed Rainbow Scarf with End Variation
Yarn: Sport weight yarn in six rainbow colors or colors of your choice. (1 50 g. skein each). We used Patons Look at Me - 60% Acrylic, 40% Nylon, 152 yds/50 g. Needles: U.S. #5 double pointed Gauge: Not super-critical. Make sure you like the drape of the fabric you are creating. Only one color is worked at a time. Each colored stripe is begun separately, and then joined to the scarf in progress. Because the scarf is reversible and invertible, it doesn't matter whether you begin your rainbow with red or purple, but colors should be worked in the desired order from that point forward. Several different end treatments are given: a simple scalloped edge; a scalloped edge with a length of I-cord “fringe” hanging from each scallop; and double I-cord “fringe” (without scallops) -- any of which can be also be tabbed, with tabs hanging either straight or unevenly. The length of the tabs or the fringe can be adjusted to the whim of the knitter. (By “"tabs” we mean that the ends of each colored stripe can hang freely from their neighbors for a short length.)
Stripe Beginning
Using Cable Cast On, CO 5 stitches. Choose one of the next three options. If no end treatment is desired, it is possible to cast on 10 stitches and proceed directly to instructions for Stripe Body. However the end of your scarf may wind up looking a little distorted and unfinished. Single I-cord Fringe: Work 3-5 inches of I-cord, pulling yarn somewhat firmly across the back of the work to make a neat cord. When desired length has been reached (without turning work) slip rightmost two stitches to another needle. Fold the two needles together so that the stitches of the I-cord go naturally around in a circle instead of being stretched out in a row as they were previously. Arrange the work so that the needle with three stitches is in back of the other needle, with the working yarn coming off the back needle to the right. With third needle, (K1 from back needle, K1 from front needle) twice, K1 from back needle. Turn. Work in rows from this point forward. Proceed to instructions for Scallops. Double I-cord Fringe: Make two I-cord Fringes as above (breaking yarn and leaving an end to be darned in later on the first one. At last step, put all 10 stitches on same needle, with working yarn coming off end of needle. Proceed to instructions for Tabs (if desired) or Stripe Body. Scallops: K across for two rows, working slightly loosely on these rows only. Row 3 (RS): K into front and back loops of each stitch across. (10 stitches.) Row 4 (WS): S1, P1, (K1, P1) across. Place removable marker in first stitch of this row. Proceed to instructions for Tabs (if desired) or Stripe Body. Tabs: Do 2, 4 or 6 more rows of ribbing as desired, slipping all first stitches purlwise with yarn in front, to create free-hanging tabs at the ends of each stripe. (Place removable marker in first stitch of last row worked.) If even tabs are desired, work same number of extra rows each time. For uneven tabs, work any even number of rows desired (sometimes more than 6 to allow tab to hang lower than previous one). Proceed to instructions for Stripe Body. 2007 Jeri Lea Kisala and Melissa Kisala, Brighton, MA Pattern may be used for personal use only.
SNOWBOW! SCARF
Stripe Body
First color: Continue working in ribbing pattern, slipping all first stitches purlwise with yarn in front, until desired length of scarf is reached (70-80" is a good, generous length). Work end variant of choice (below) to match beginning. (For first color, skip instructions for Tabs.) For all other colors, proceed as follows: With body of scarf to your right, with RS facing, and needle with live stitches to the left of it, also RS facing, pick up a loop of the working yarn through the slipped stitch at the leftmost edge of the scarf body that corresponds to the row you will be working next on the new stripe. (In most cases this will be the edge stitch above the marker; for uneven tabs, it can be up to you which stitch you choose.) Pull to create a lot of slack in the loop. Using the yarn you have pulled up, K1 P1 across the 10 stitches of the stripe. Turn and work back (continuing to slip the first stitch as before). Pull working yarn gently from the back to remove remaining slack in the loop.
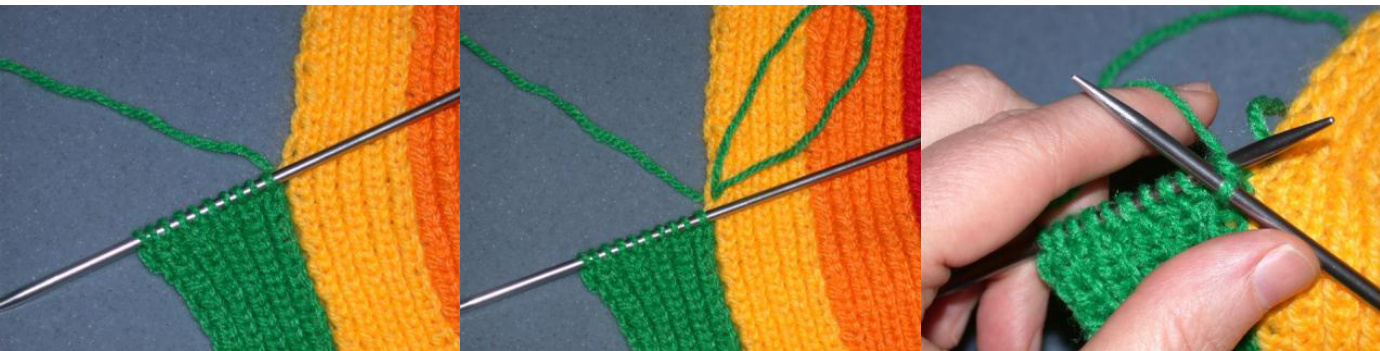
Draw up a loop in the next edge stitch, and work across and back in the same manner. Continue in this way until the stripe is the correct length to begin working chosen end variant. (For tabs, this means that you stop working at the point you want the stripes to separate; otherwise, continue until all edge stitches of previous stripe have been used.)
Stripe End
From this point on, do not pull up a loop of yarn in edge stitch of previous color, but work only with the live stitches of the current color. Next Row (RS): S1, P1, (K1, P1) across. Tabs: Work in pattern for 2, 4 or 6 rows to correspond to the stripe beginning for even tabs; work even number of rows to desired length (which may be shorter or longer than adjacent stripe) for uneven tabs. Proceed to instructions for Double I-cord Fringe or Scallops. Double I-cord Fringe: Slip second half of stitches to spare needle. Follow instructions for Icord fringe below on remaining stitches. Repeat for stitches from spare needle, breaking and reattaching working yarn. Scallops: On next row, K2 tog across. Work two rows in garter stitch. Bind off all stitches or proceed to instructions for I-cord Fringe. For I-cord Fringe: Slip stitches to two needles, slipping first, third and fifth stitches to back needle, second and fourth stitches to front needle. Working yarn is coming off of back needle to the right. With third needle, K2 from front needle, turn, and K3 from back needle. (5 stitches now on one needle.) Make 5-stitch I-cord to correspond to beginning. Bind off. Secure and weave in all yarn ends. There is no need to block. 2007 Jeri Lea Kisala and Melissa Kisala, Brighton, MA Pattern may be used for personal use only.


