FRAULEIN BAVARI
BY NATALIA VASILIEVA SKILL LEVEL: EXPERIENCED.
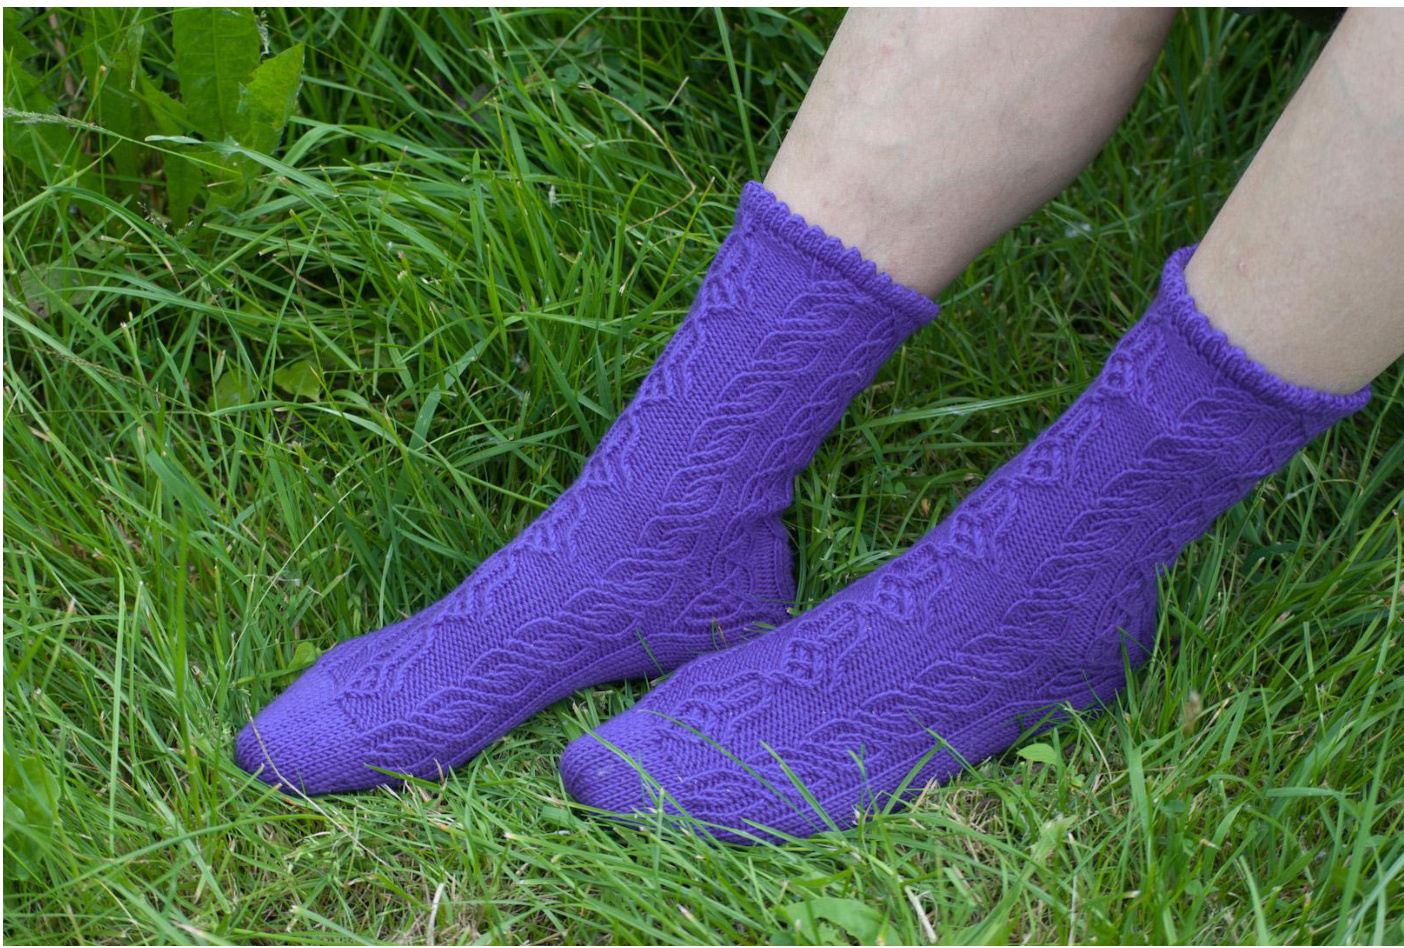
Photo @ Anna Hromova TECHNIQUES USED: MAGIC LOOP, FOLLOWING CHARTS,TWISTED-STITCH KNITTING, TRAVELLING STITCHES, CABLES, JUDY'S MAGIC CAST-ON, PROVISIONAL CAST-ON, STOCKINETTE GRAFTING, LIFTED INCREASES, ADVANCED MODIFIED T-SHAPED HEEL, SHORT-ROWS (ANY METHOD), CABLING WITHOUT CABLE NEEDLE (DESIRABLE).
FINISHED MEASUREMENTS
Sock length: 83/4" (22 cm) to fit foot length 10" (24.5 cm). Sock circumference: 7" (18 cm), to fit foot circumference 83/" (22 cm). Leg length: 87/8" (22.5 cm).
TOOLS AND MATERIALS
· Lana Grossa Merino Superfein (100% superwash merino; 175 yds (160 m) per 50 g): 3 skeins in #586 (purple) · Circular needles US 212 (3 mm) or size to get the gauge; at least 32" (80 cm) length ·Cable needle ·Blunt sewing needle
GAUGE
Stockinette: 11 sts x 20 rows = 2" x 2" (5 x 5 cm).
PATTERN NOTES
These socks are worked in Magic Loop technique with beginning of the round (BOR) at the inner side of leg. You may utilize any other technique of your choice preserving BOR position. Socks have picot hem at the cuff, advanced modified T-shaped heel with patterned heel flap featuring short-rows to turn the gussets, and round toe.
DIRECTIONS
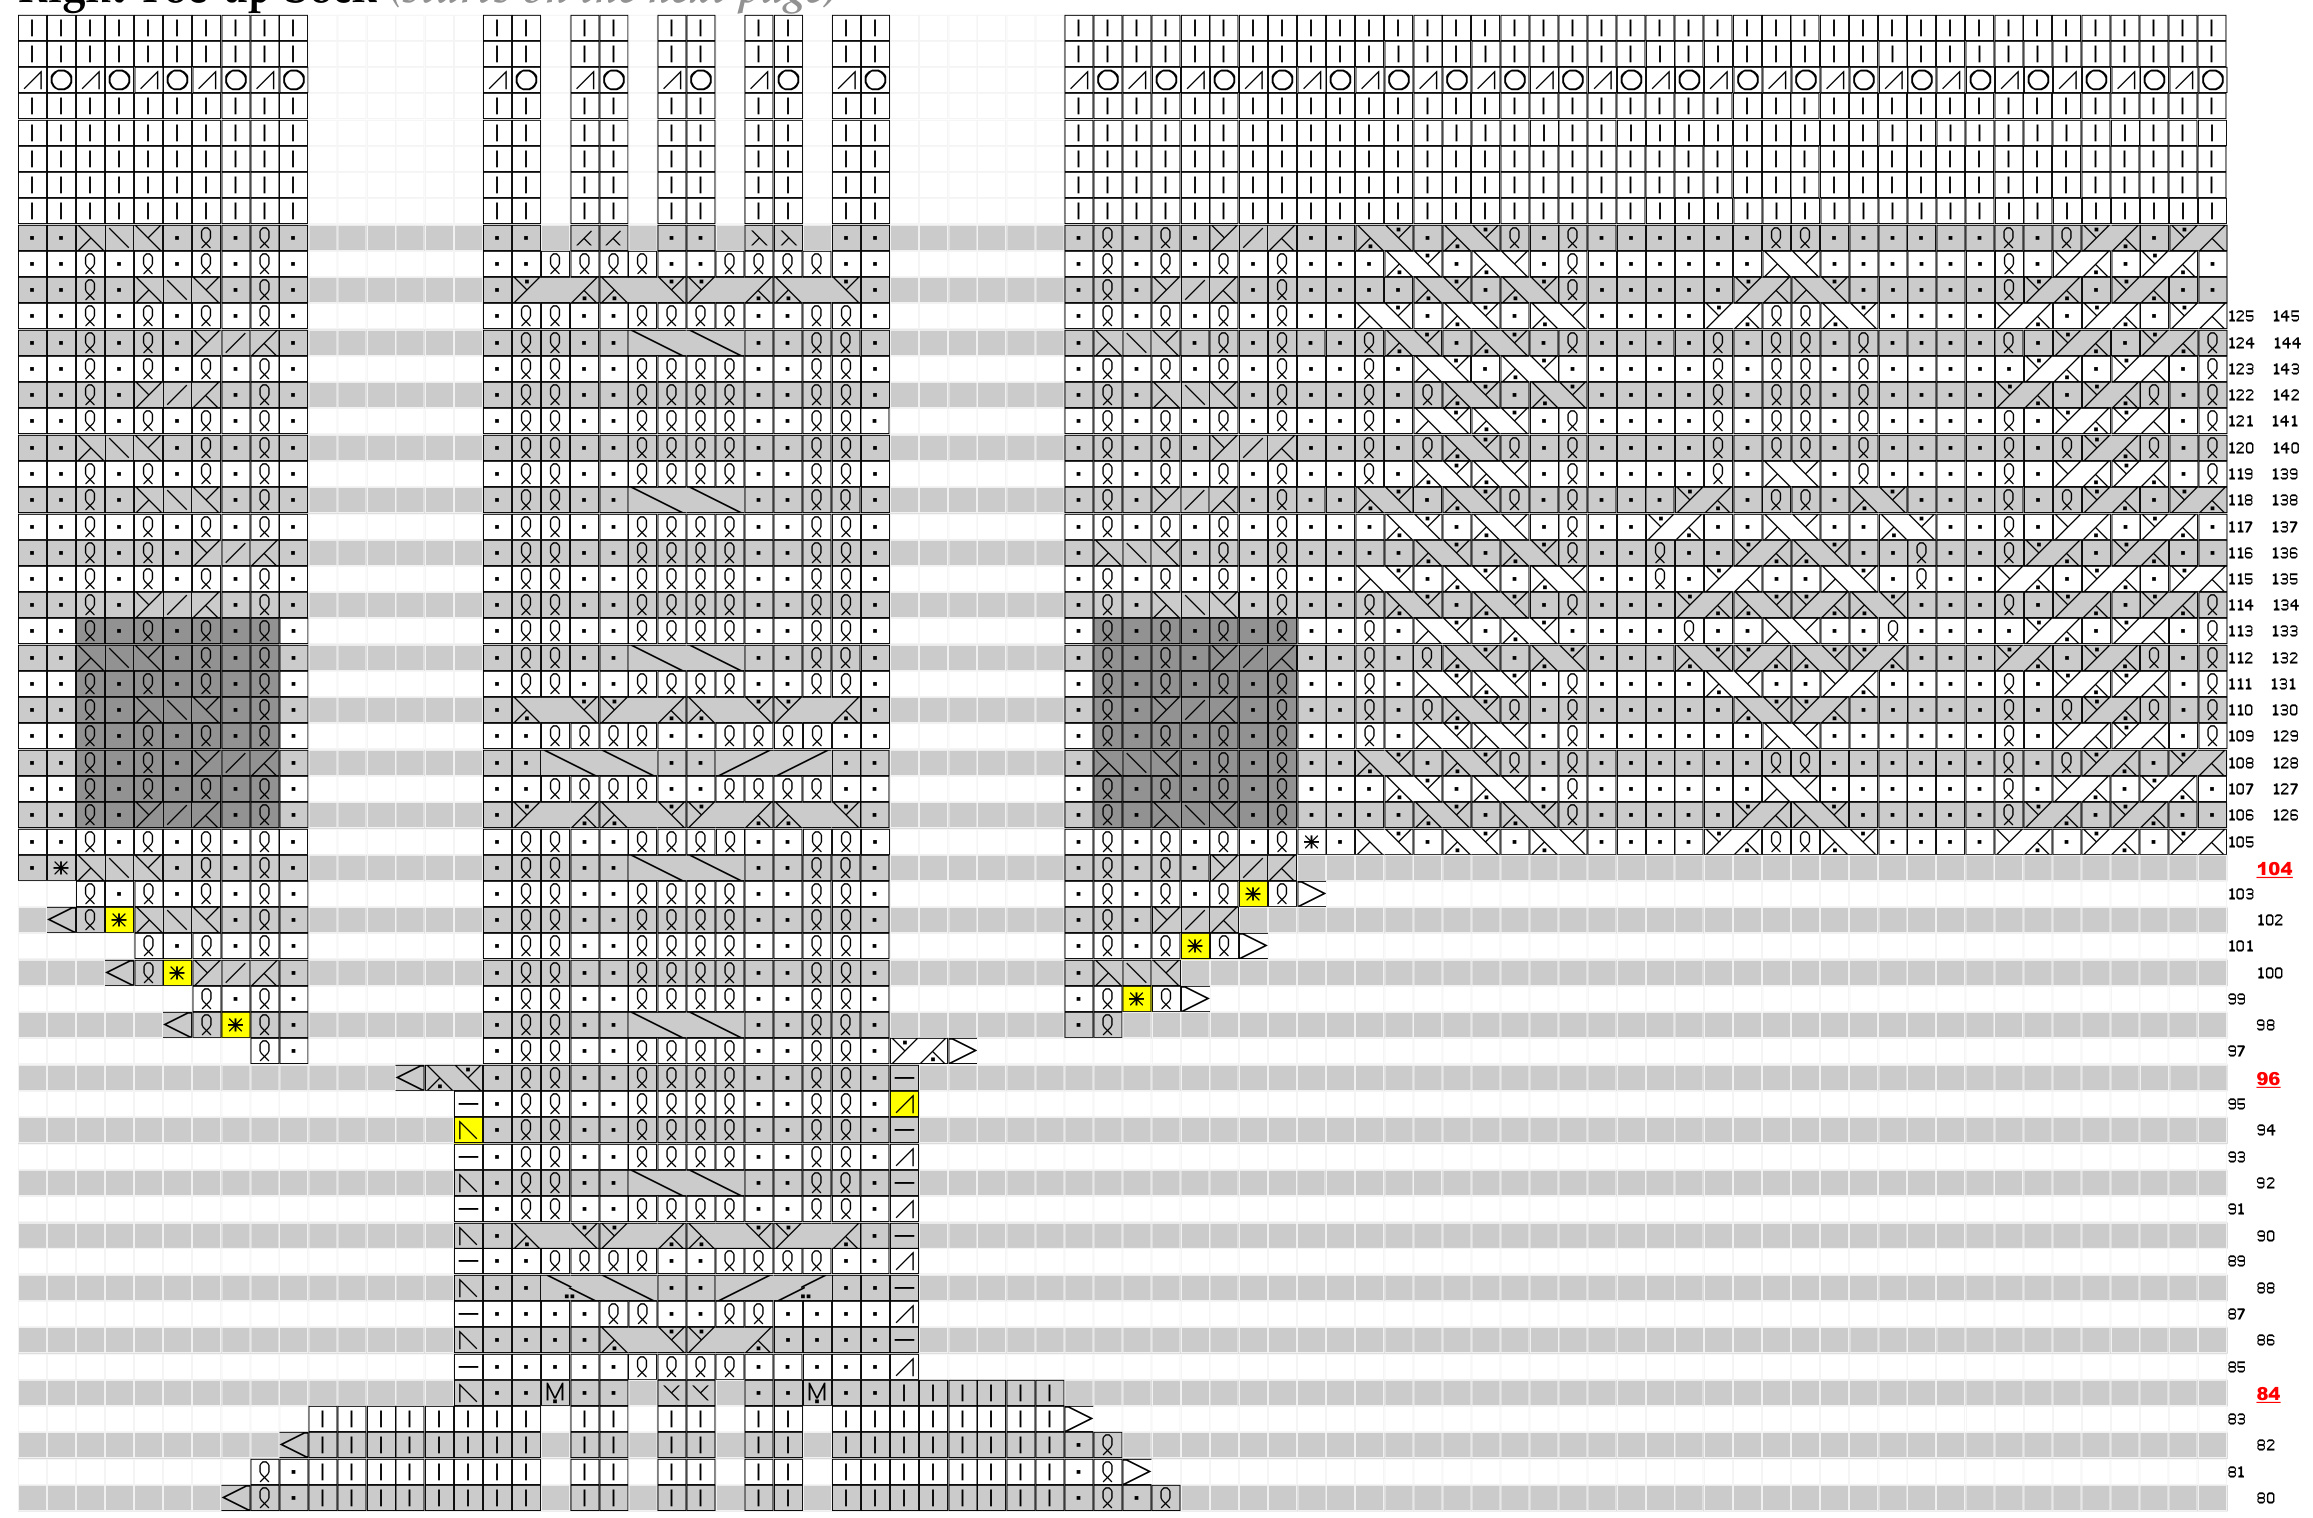
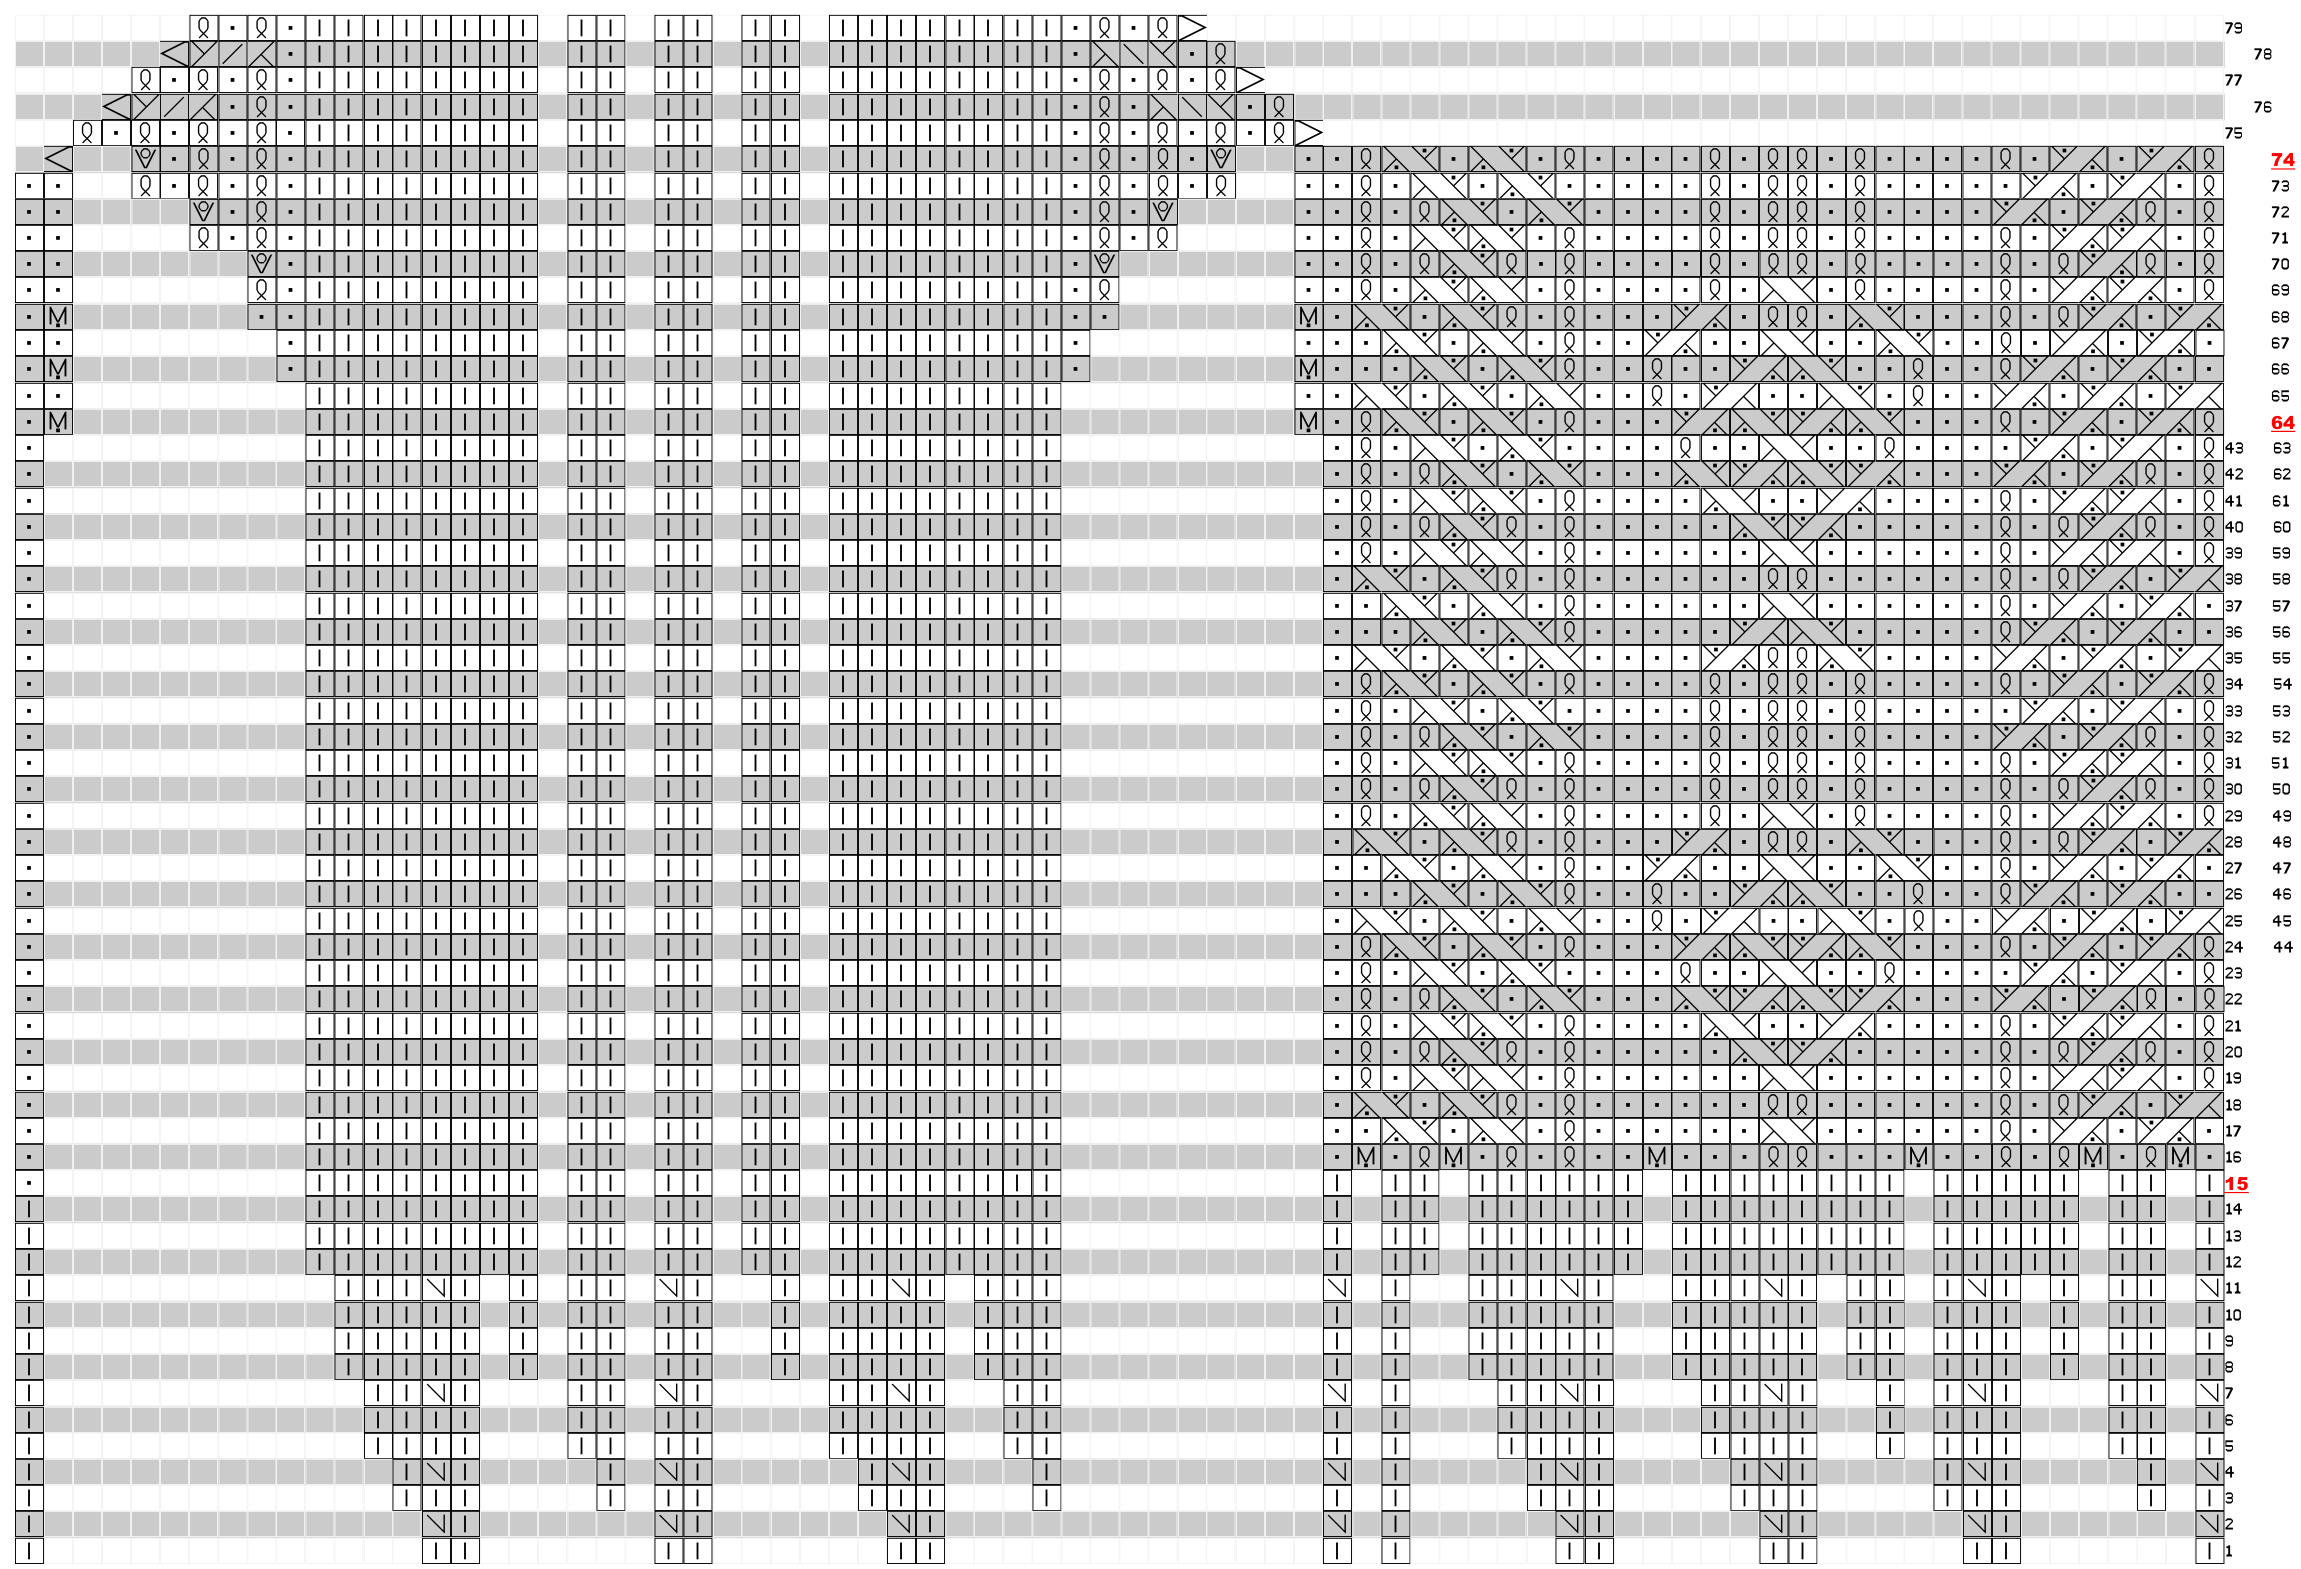
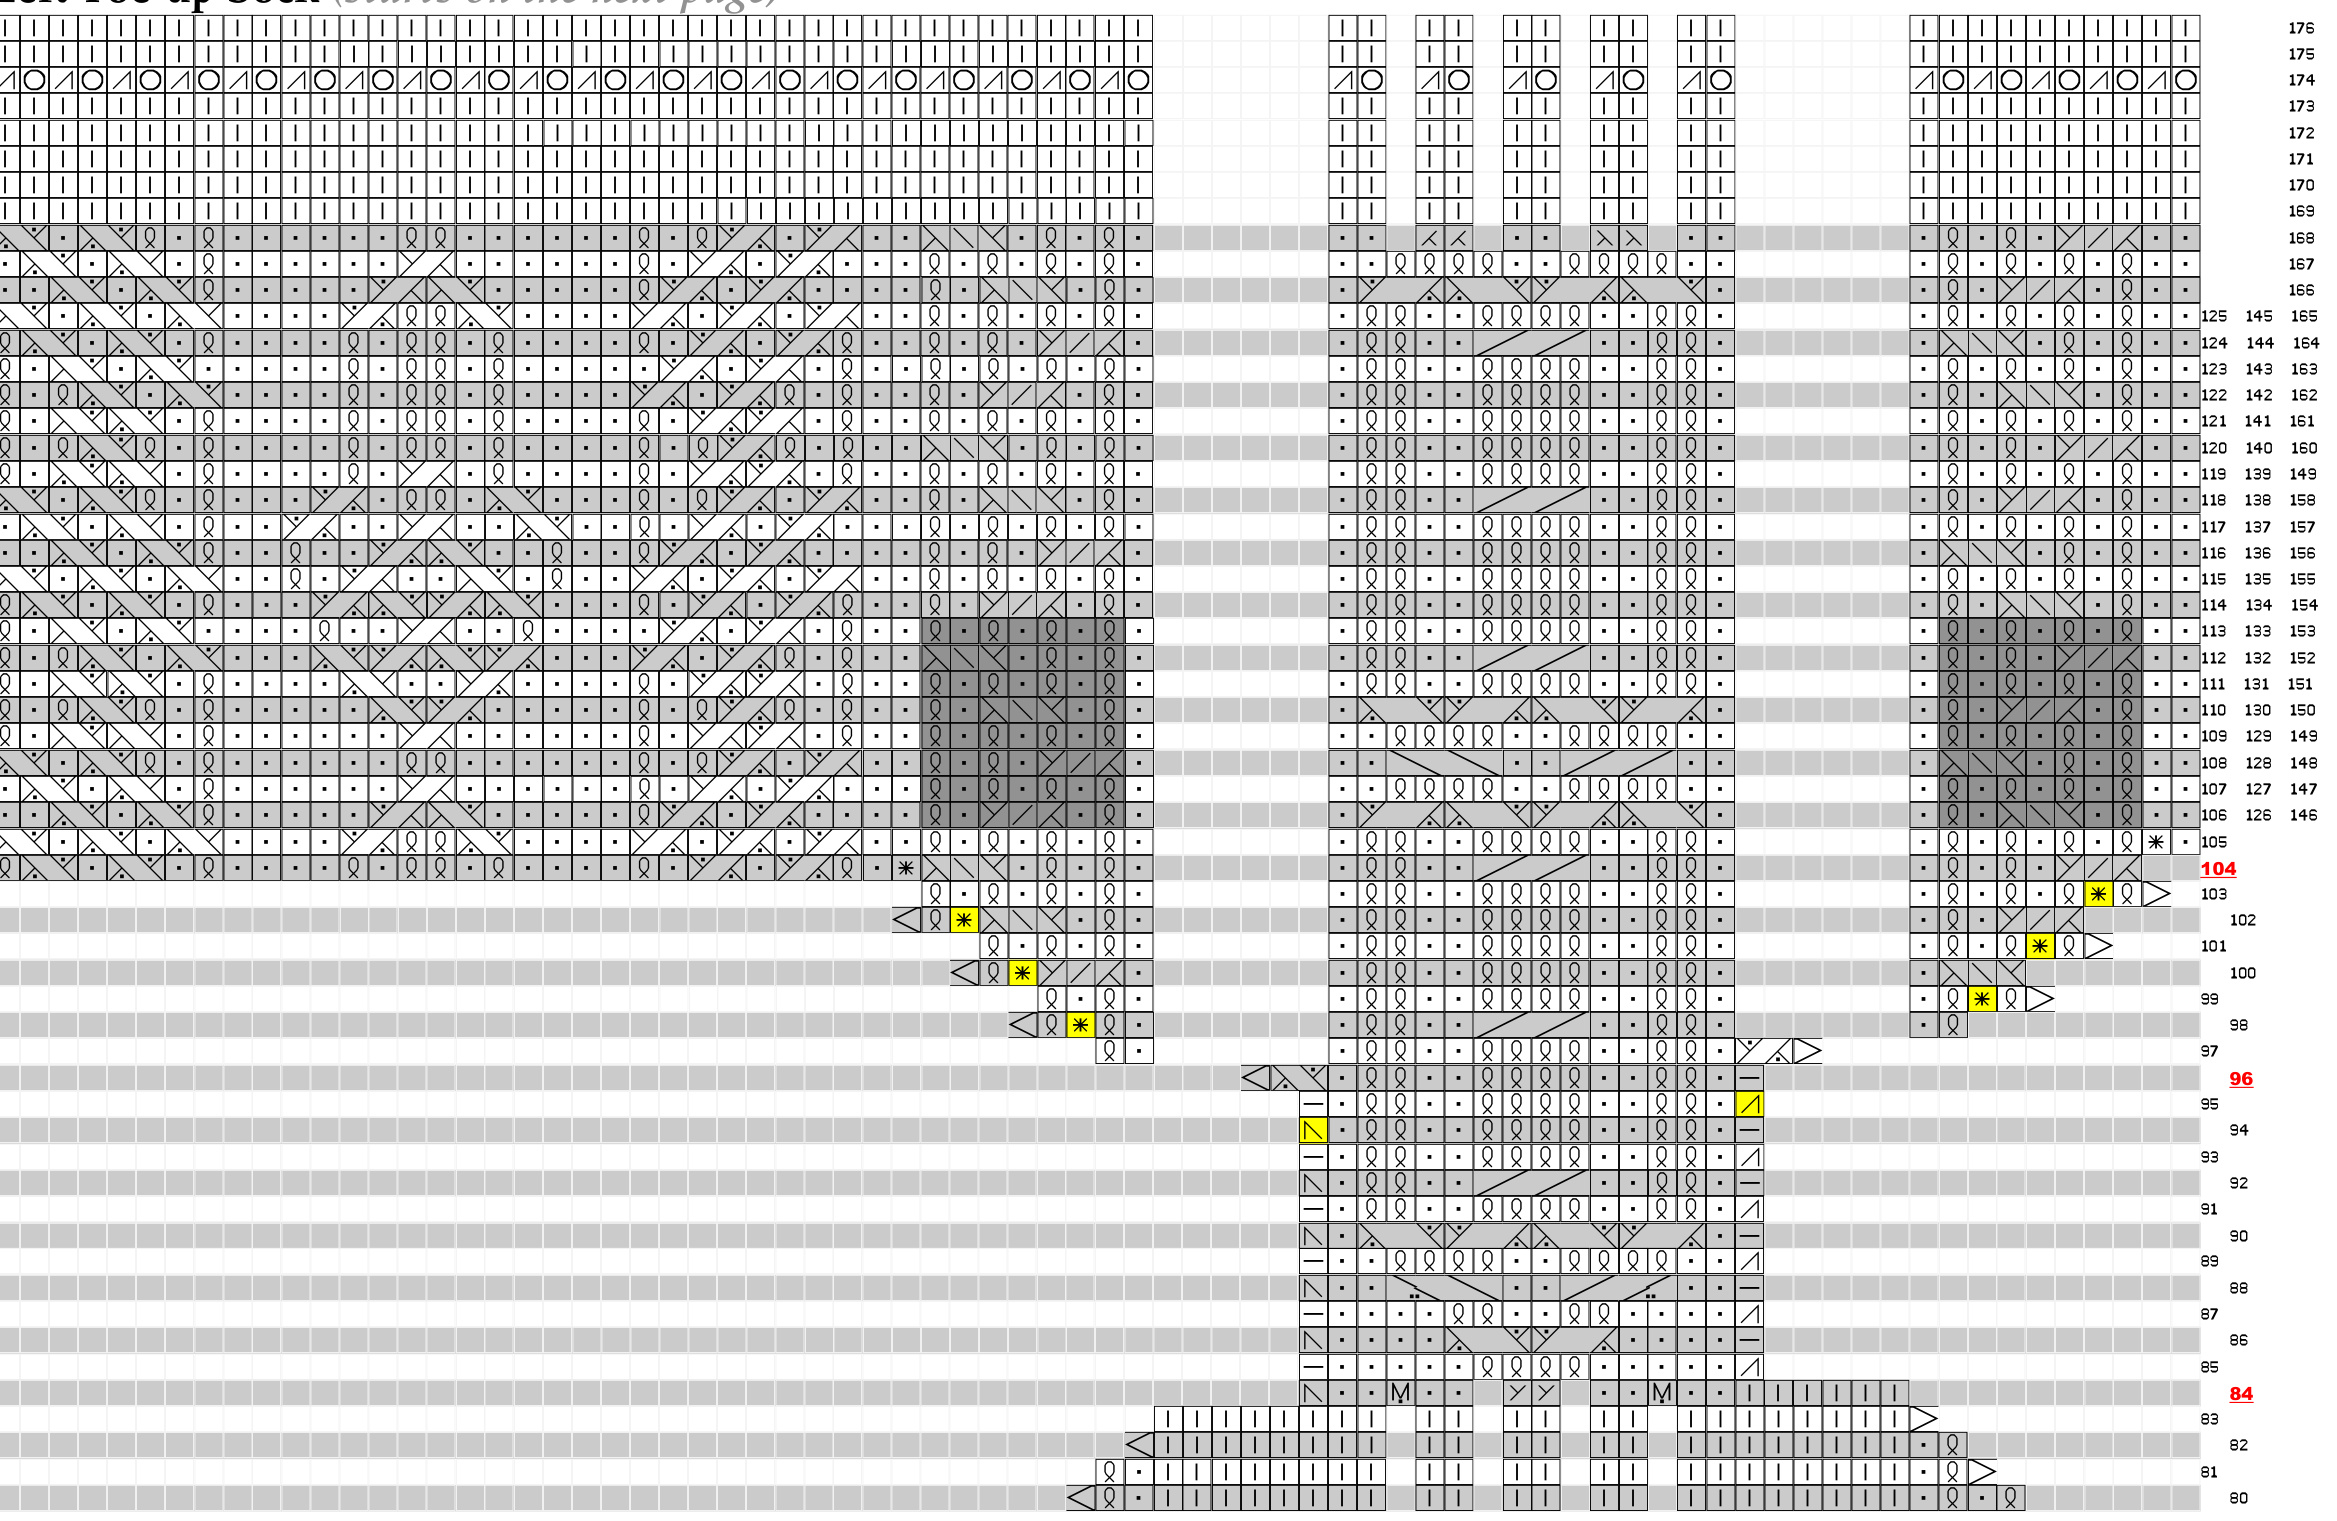
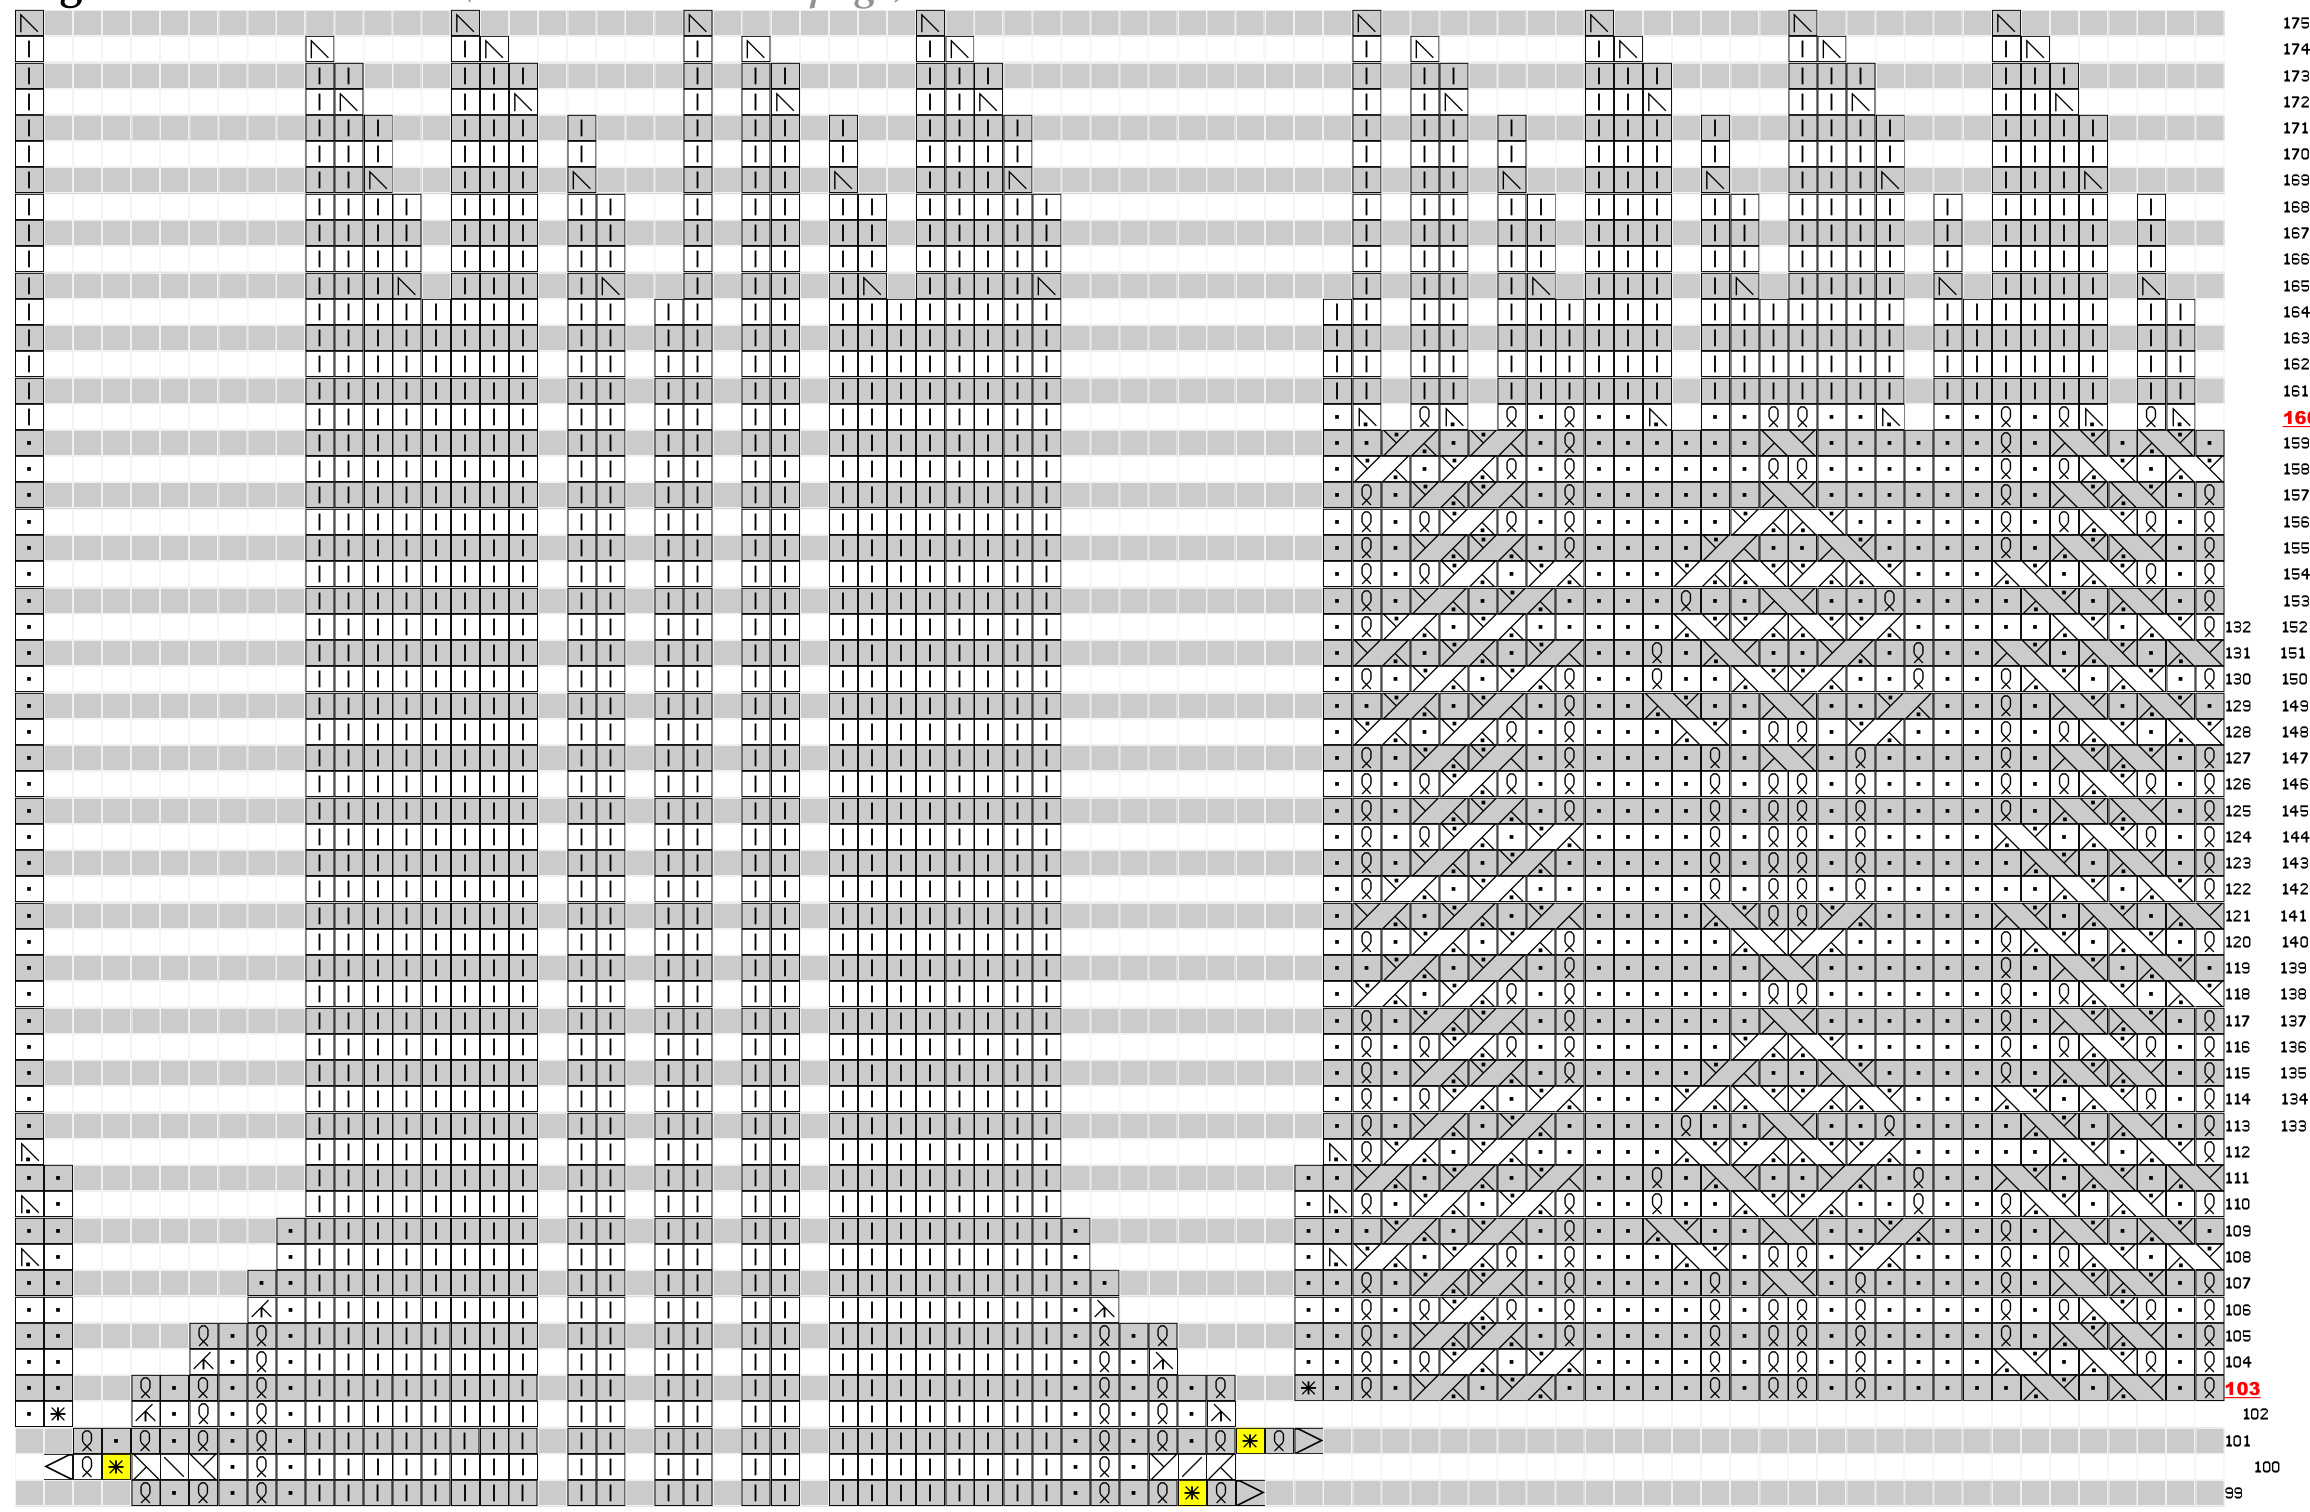
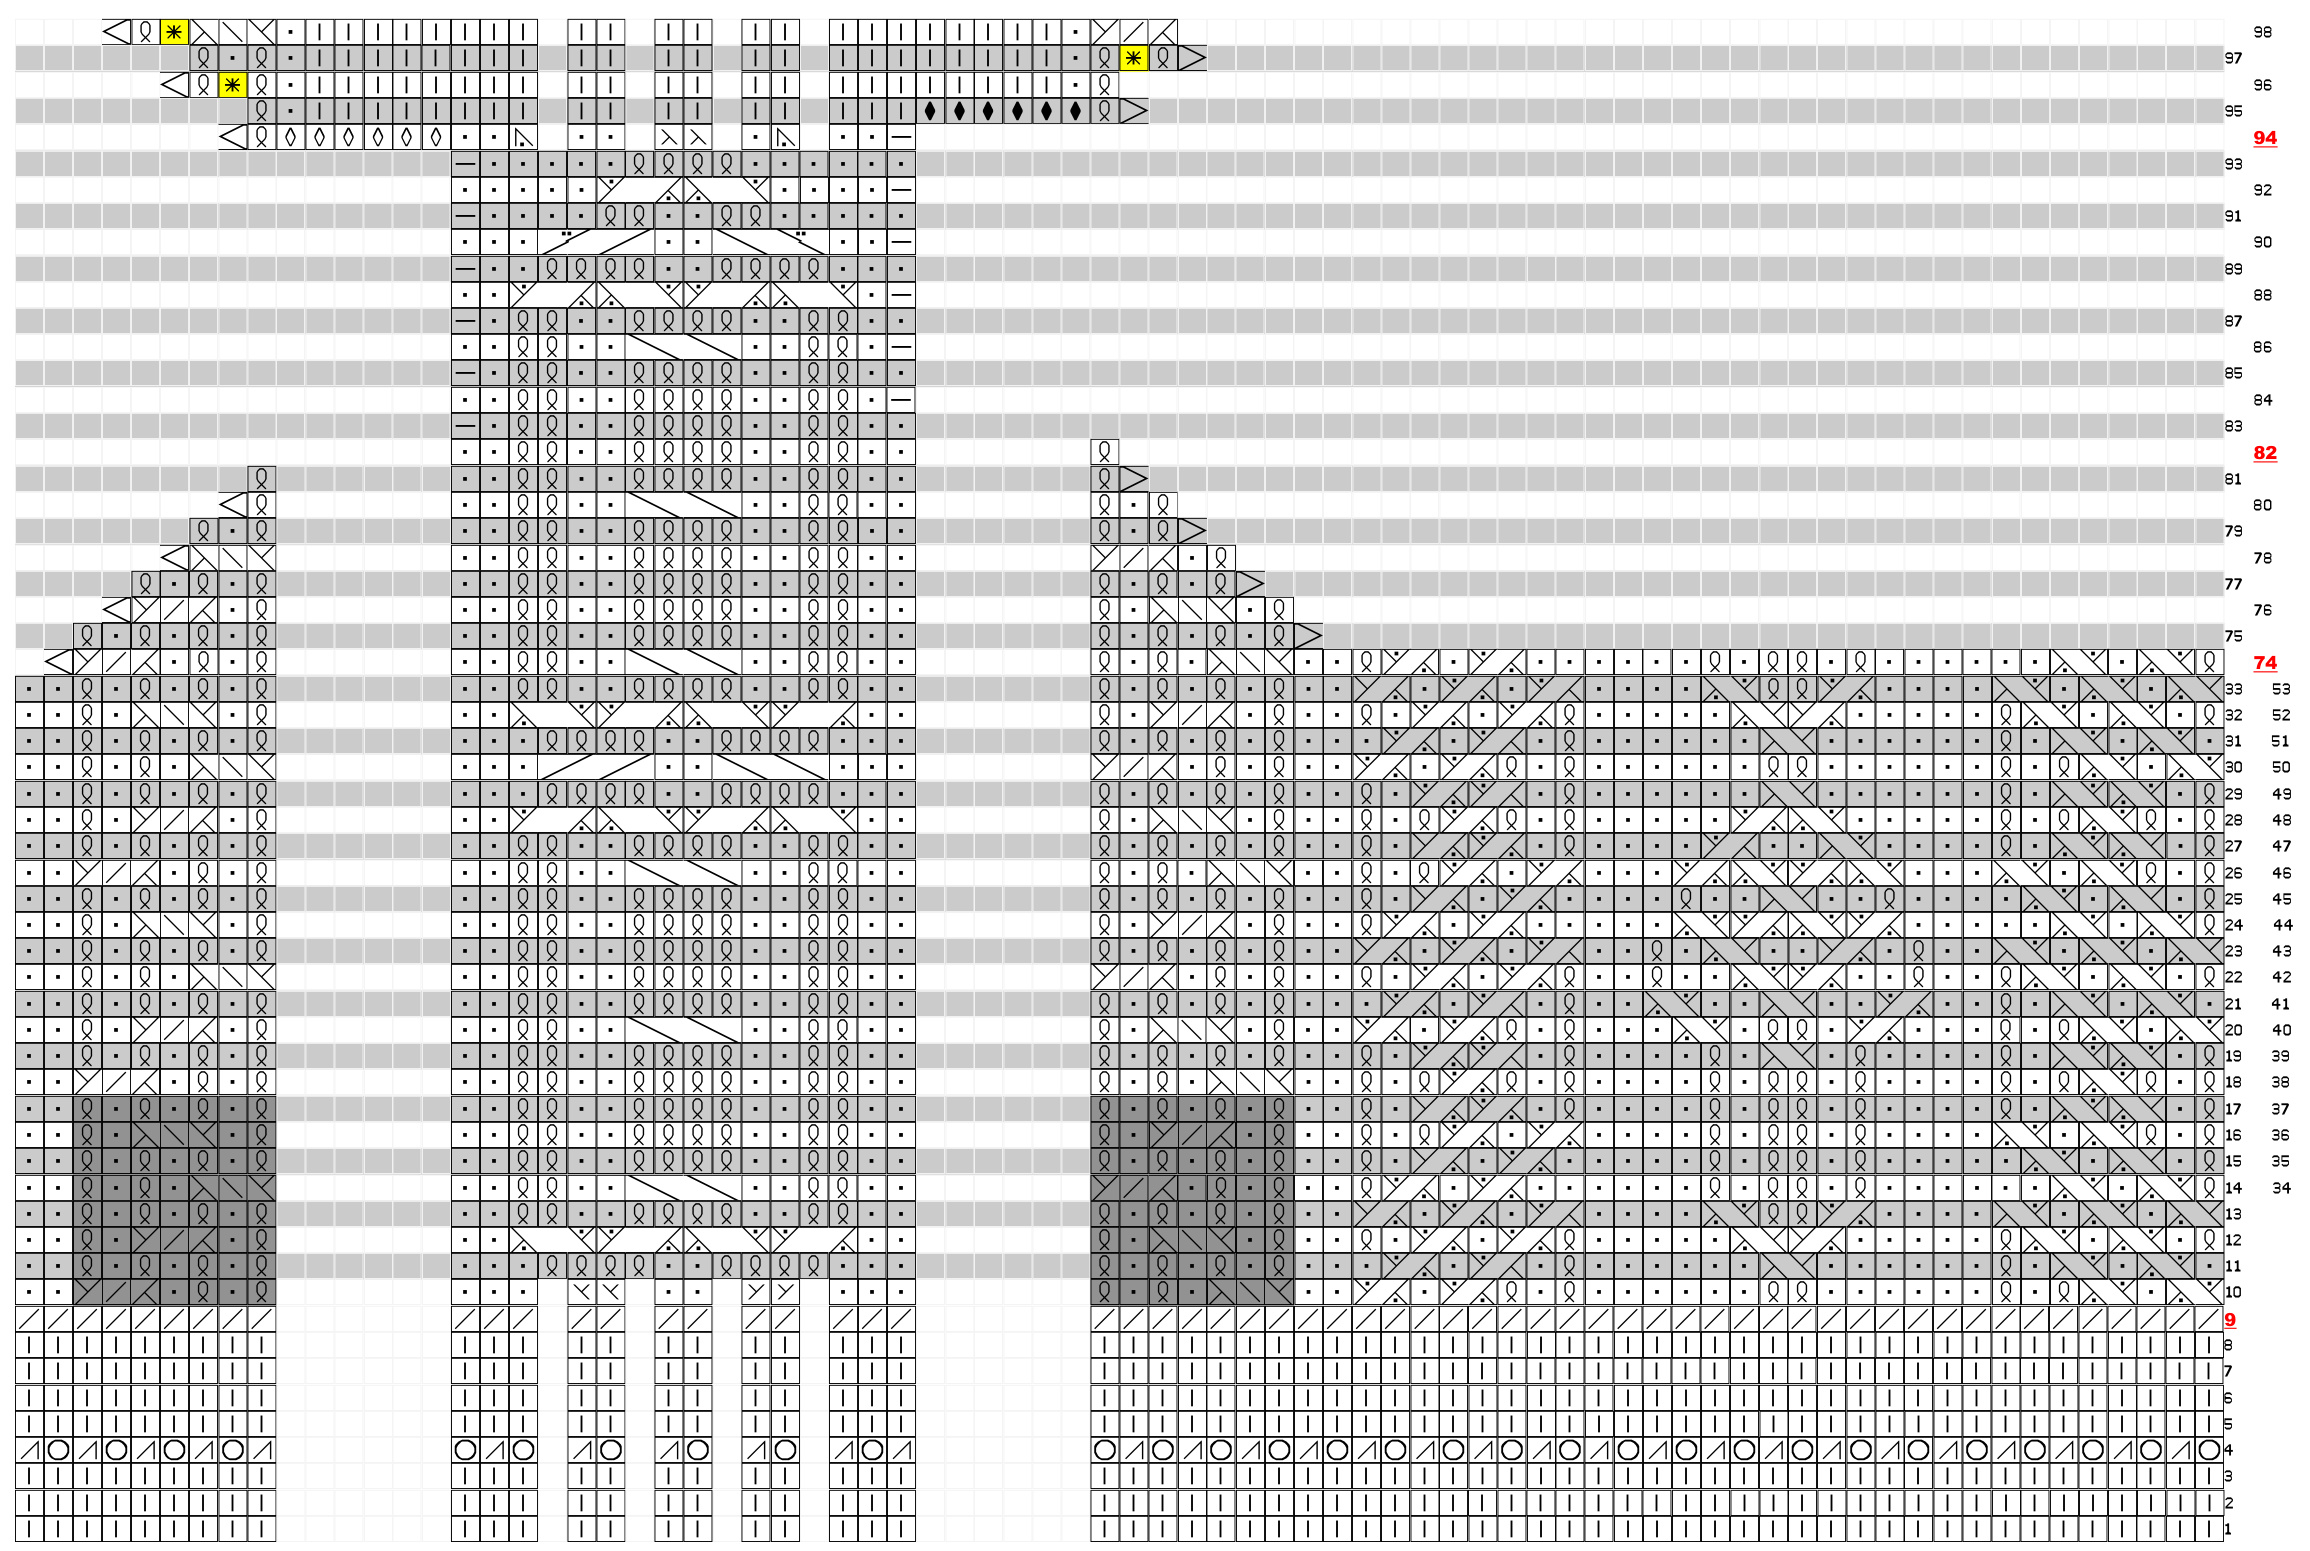
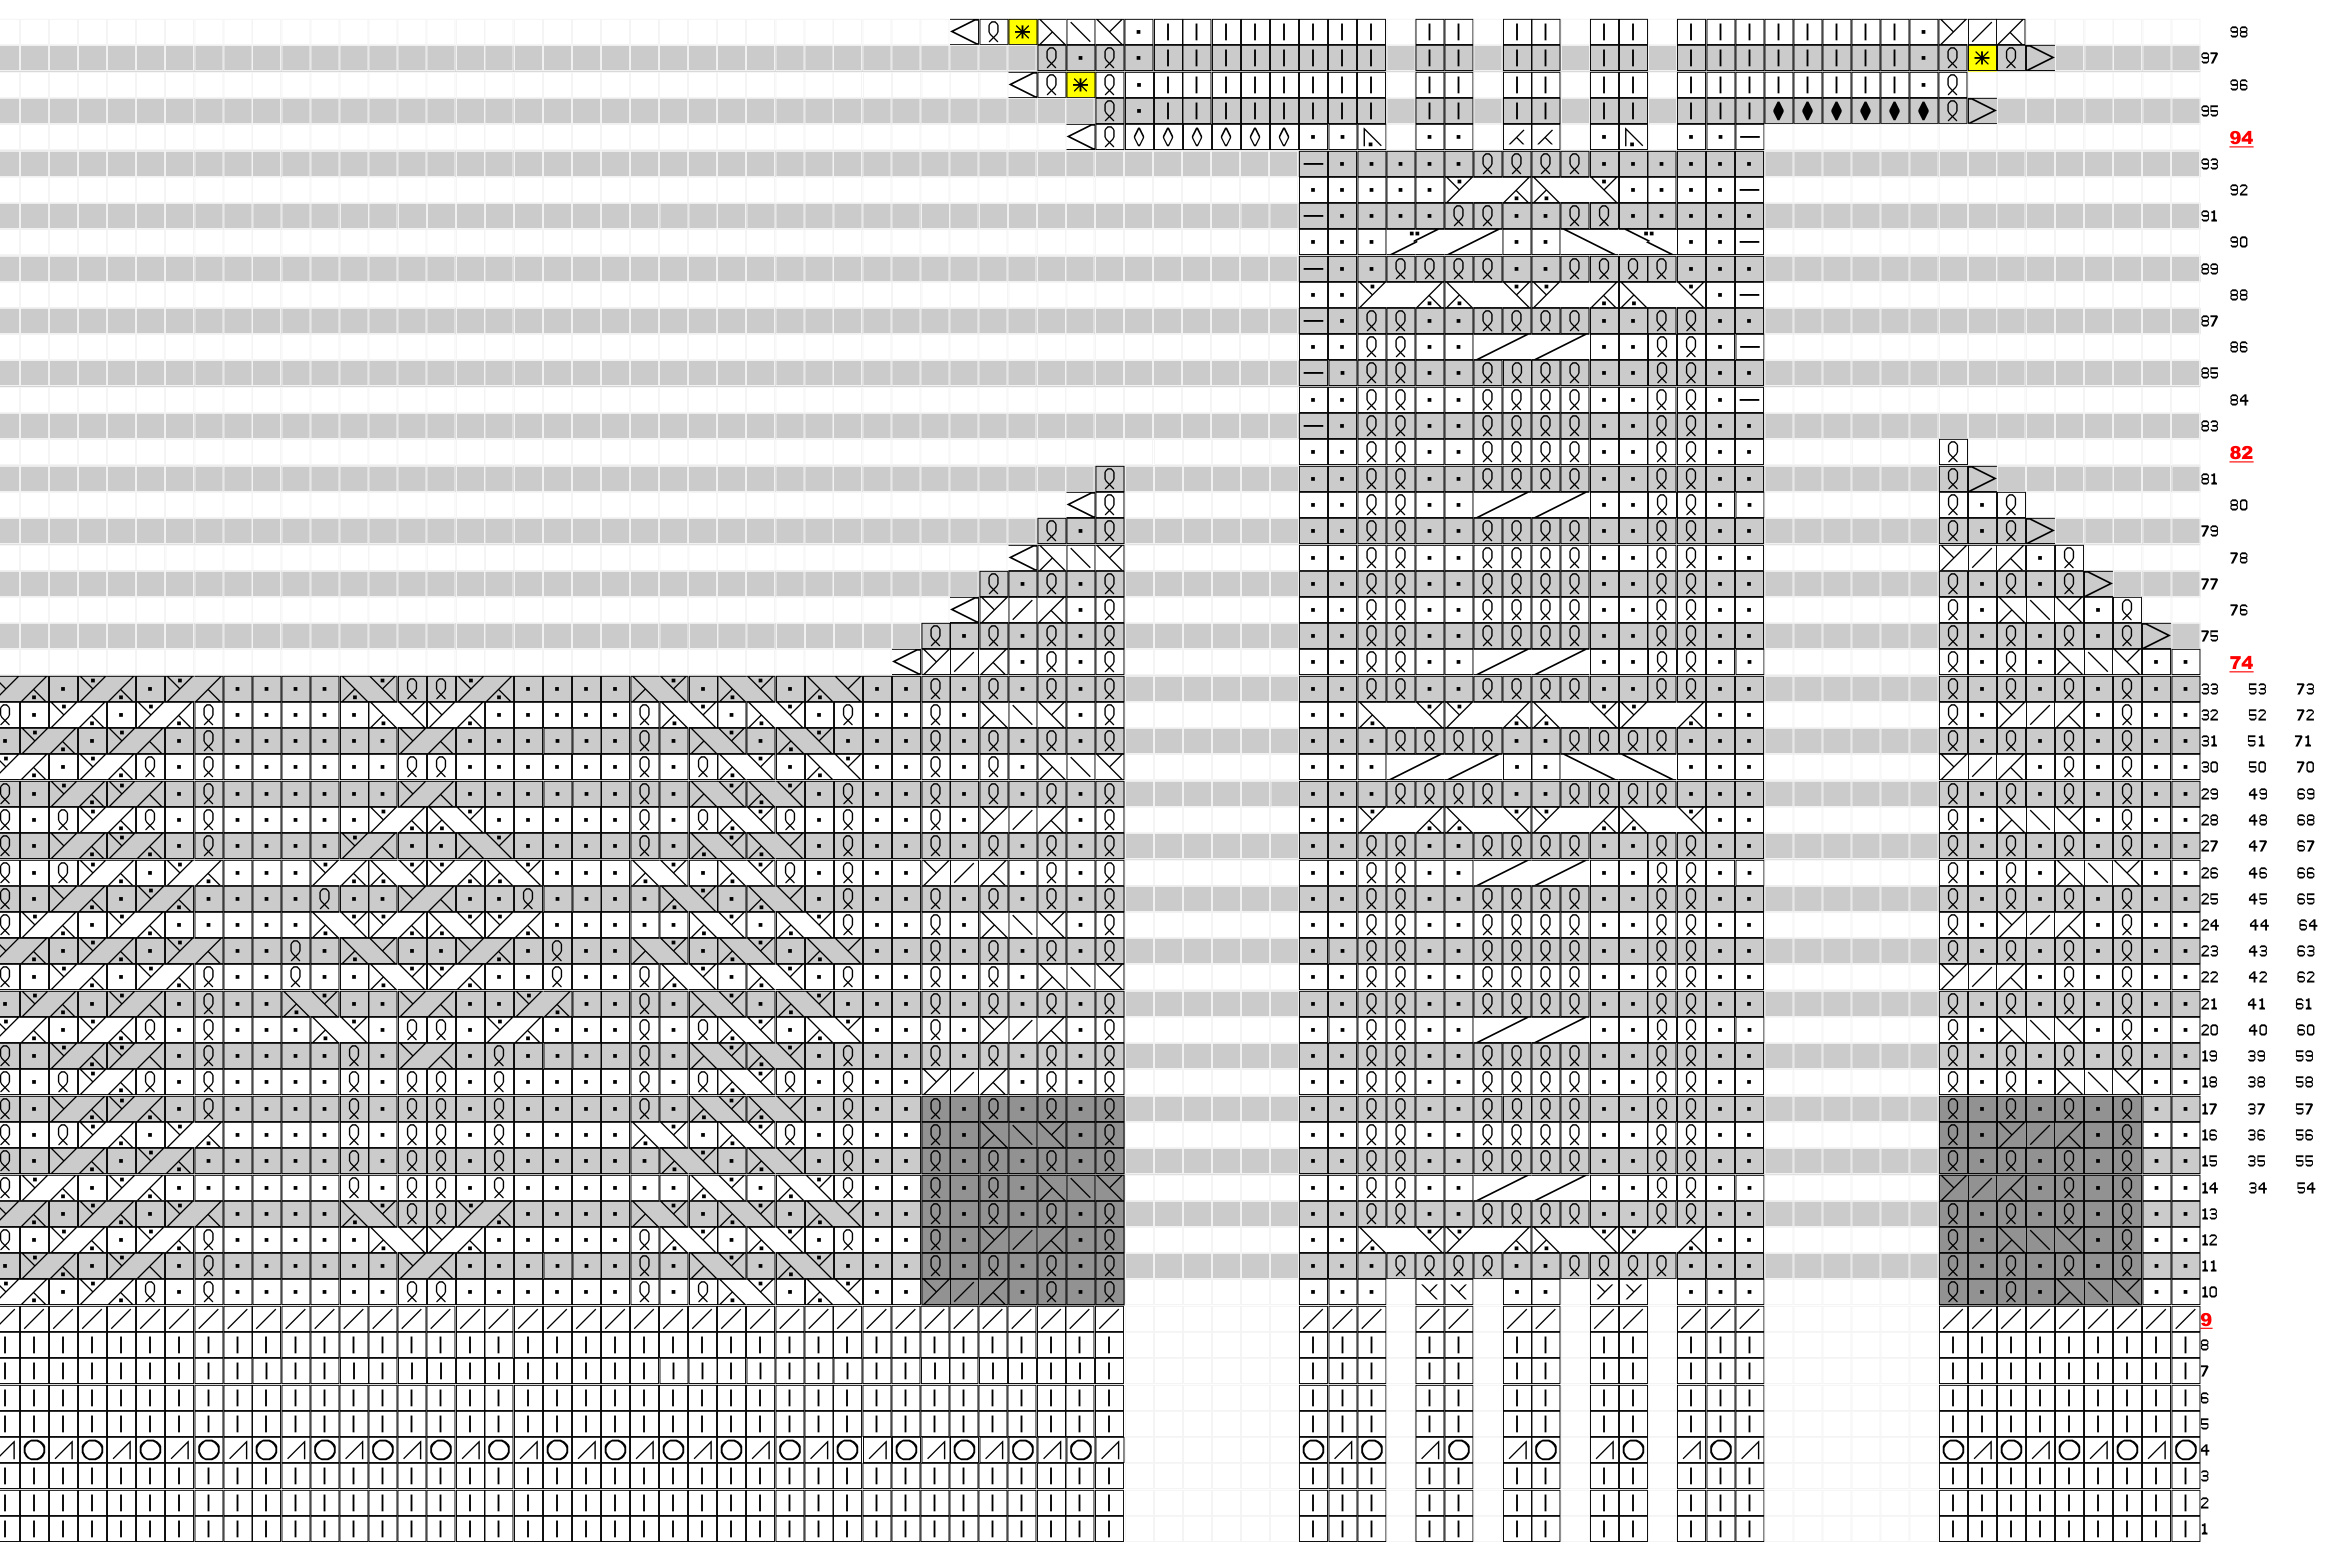
Socks are fully charted. These written directions only describe briefly how to follow such charts. (You may find more detailed instructions in special issues of "Verena" magazine about socks.) Each chart represents the whole sock taking vertical repeats into consideration, except for cast-on and bind-off spelled in the directions specifically; most symbols stand for 1 stitch and 1 row/round, cable and twist symbols stand for 2-3-4 consequent stitches in a row/round. Row numbers are placed at the right side of the chart; the important row/rounds are marked red. Also there are "no stitch" symbols: they are needed to keep the chart aligned providing a space for internal increases and decreases; when knitting, just skip those empty spaces. After cast-on, knitting starts at the lower right corner of the chart which corresponds with inner side of the leg. Read rounds (for foot and leg) from right to left. Heel is worked with short-row turns to preserve the continuity of the gusset stitch panels and should be read from right to left on RS rows and from left to right on WS rows: that's why numbers for Rows 74-103 (101) shift back and forth. You can find a photo-tutorial on cuff-down modified T-shaped heel with mock short-rows here, to get a general idea on this heel construction.
Toeup..Version
Cast on 8 sts using JMCO and leaving 8" (20 cm) tail. Holding both working yarn and cast-on tail together, knit 8. Round 1: Knit each double loop as separate stitches = 16 sts. Proceed to Right Toe-up Sock Chart or Left Toe-up Sock Chart respectively. Work Rounds 2-73 for foot, then put instep stitches on hold and make a heel back and forth on sole stitches according to Rows 74-103, and then resume knitting in the round for leg and picot hem to the end of chart. Please note that gusset panels have 8-rounds repeats and should be worked on leg accordingly. This particular arrangement allows to end up all panels simultaneously. Cut the yarn leaving 48" (120 cm) tail, thread the blunt sewing needle and sew open loops of hem lining to purl bumps between the first hem round and the last patterned round from the inside.
FINISHING
Weave in all ends. Block if desired.
Right Toe-up Sock (starts on the next page)
Left Toe-up Sock (starts on the next page)
| 79 78 77 76 75 74 72 | ||||||||||||||
| 71 | ||||||||||||||
| 70 | ||||||||||||||
| 69 | ||||||||||||||
| 89 | ||||||||||||||
| 的的 | ||||||||||||||
| 64 | ||||||||||||||
| 63 | ||||||||||||||
| 62 | ||||||||||||||
| 61 09 | ||||||||||||||
| 65 | ||||||||||||||
| 58 | ||||||||||||||
| 57 | ||||||||||||||
| 56 55 | ||||||||||||||
| 54 | ||||||||||||||
| 53 52 | ||||||||||||||
| 51 | ||||||||||||||
| S0 | ||||||||||||||
| 6t | ||||||||||||||
| 45 | ||||||||||||||
Key to Toe-up Chars
口no stitch 日knit 1knit 1 through back loop on RS, purl through back loop on WS 口purl 1 on RS, knit 1 on WS 回yarnover ≤ssk k2tog on RS, p2tog on WS ssk on RS concealing short-row turm i you wish p2tog on WS concealing short-row turn if you wish liftedincreasetoright: pick uprigt gof stitchfrm rowbelw stitchonlt needle andkit it,thenkit titchont e lifed increaetolft kit 1, th pickul l f tchtwrowsbw stithonright nee andkt M1 purl - any purl increase will work (k1 through back loop-yo-k1 through back loop) the same stitch 三slip 1 Nshort-row turn on RS Mshort-row turn on WS conceal short-row turn conceal short-row turn or work stitch as it's presented it won't show behind cable right cabl inreas thougbacklp,thnpcupuruind2eost stchonrig ndle and ki th 2 sts incread 圆left cable increase: knit inserting right needle tip into pul bumps behind rghtmost stitches on lt needle, then knithose stchs through back loops - 2 sts increased right cable decrease: slip 2 to cable needle and hold toback,then knit together throughback loop1 stitch from left needle with 1 stitch from cable ned twice - 2 sts decreased 国left cable decrease: slip 2 to cable needle and hold to front, then knit together through back loop 1 stitch from cable needle with 1 stitch from left nedle twice - 2 sts decreased right cable 1/1: slip 1 to cable needle and hold to back, k1 through back loop, then k1 through back loop from cable needle left cable 1/1: slip 1 to cable needle and hold to front, k1 through back loop, then k1 through back loop from cable needle right twist 1/1 (worked similar in both cases): slip 1 to cable needle and hold to back, k1 through back loop, then p1 from cable needle Mleftwist 1/1 (worked similar inboth cases) slip1 to cable nedle and hold tofront pl, thenk1 throughback loop fromcable neede right cable 1/1/1: slip 2 to cable needle and hold to back, k1 through back loop, then p1, k1 through back loop from cable needle leftcable 1/1/1: slip1 to cable needle and hold to front, k1 throughback loop, p1, then k1 throughback loop frm cable needle right twist 2/1: slip 1 to cable needle and hold to back, k2 through back loops, then p1 from cable needle left twist 2/1: slip 2 to cable nedle and hold to front, p1, then k2 through back loops from cable needle right cable 2/2 (worked similar in both cases): slip 2 to cable needle and hold to back, k2 through back loops, then k2 through back loops from cable needle VMM left cable 2/2 (worked similar in both cases): slip 2 to cable needle and hold to front, k2 through back loops, then k2 through back loops from cable need
Cuff-down..ersion
Picot hem: Using any provisional method cast on 60 sts. Join in the round being careful not to twist the stitches, and knit for 3 rounds. Note: If you use Invisible method, then you may need only 2 rounds. Eyelets round: (\*) yo, k2tog, repeat from (\*) across. Knit 4 more rounds. Retrieve 60 live loops from provisional cast-on. Work next round knitting together 1 stitch from left needle with corresponding live loop. Proceed to Right Cuff-down Sock Chart or Left Cuff-down Sock Chart respectively. Work Rounds 10-73 for leg, then put instep stitches on hold and make a heel back and forth on back-of-leg stitches according to Rows 74-101, and then resume knitting in the round for foot and toe to the end of chart. Please note that gusset panels have 8-rounds repeats and should be worked on leg accordingly. This particular arrangement allows to end up all panels simultaneously. After completing chart cut the yarn, pull the tail through remaining stitches and draw tight.
FINISHING
Weave in all ends. Block if desired.
Right Cuff-down Sock (starts on the next page)
Left Cuff-down Sock (starts on the next page)

Key to Cuff-down Charts
no stitch 日knit 1knit 1 through back loop on RS, purl 1 through back loop on WS 口purl 1 on RS, knit 1 on WS yarnover k2tog on RS, p2tog on WS knit together sitch from left needle with corresponding live loop from provisional cast-on ssk p2tog 囚k3tog sssk 日slip 1pick up and purl inserting right needle tip through both selvedge loops of heel flap from WS to RS so selvedge chain shows on RS 口pick up and knit inserting right needle tip through both selvedge loops of hel flap from WS to RS so selvedge chain shows on RS Nshort-row turn on RS Mshort-row turn on Ws conceal short-row turn conceal short-row turn or work stitch as it's presented, it won't show behind cable right cable increase: k2 through back loop,then pick up purl bumps behind 2 leftmost stitches on right needle and knit them - 2 sts increased 圆left cable increase: knit 2 inserting right needle ipinto pur bumps behind 2 rightmost stitches on left needle, then knit those 2 stches through back lop: increased right cable decrease: slip 2 to cable needle and hold to back, then knit together through back loop1 stitch from left needle with 1 stitch from cable needle t 2 sts decreased left cable decrease: slip 2 to cable needle and hold to front,then knit together through back loop 1 stitch from cable needle with 1 stitch from left needle t 2 sts decreased right cable 1/1 worked similar inboth cases): slip 1 to cable nele and hold toback, k1 through back lop, thenk1 throughback loop from cable needle eft ableorkedsimilarinbthcassliptcableneedle andholdtfrontkthroughbackloopthnk1throughbacloopfrmcableneedle right twist 1/1 worked similar inboth cases): slip1 to cable needle and hold to back, k1 throughback loop, then pl from cable needie leftwist /worked similar inbothcasesslip1tocableneedleandholdto frontp1,thenk througbackloopfrmcablen right cable 1/1/1: slip 2 to cable needle and hold to back, k1 through back loop, then p1, k1 through back loop from cable needle MN left cable 1//1: slip 1 to cable needle and hold to front, k1 through back loop, pl, then k1 through back loop from cable needle right twist 2/1: slip 1 to cable needle and hold to back, k2 through back loops, then p1 from cable needle Mleft twist 2/1: slip 2 to cable needle and hold to front, p1, then k2 through back loops from cable needle right cable 2/2: slip 2 to cable needle and hold to back, k2 through back loops, then k2 through back loops from cable needle left cable 2/2: slip 2 to cable needle and hold to front, k2 through back loops, then k2 through back loops from cable needle right twist 2/2: slip 2 to cable needle and hold to back, k2 through back loops, then p2 from cable needle left twist 2/2: slip 2 to cable needle and hold to front, p2, then k2 through back loops from cable needle


