Dapper DS Case
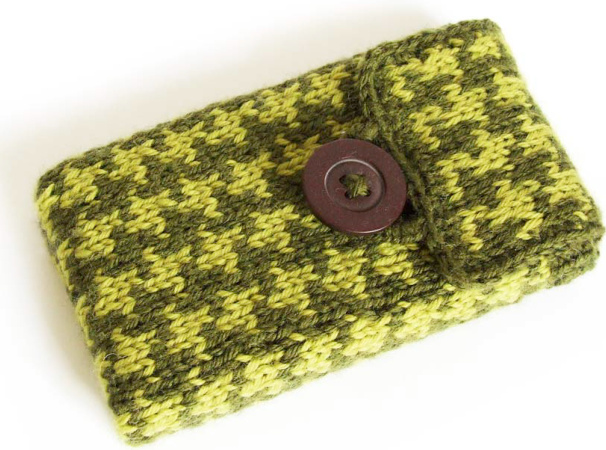
A sophisticated yet playful protective cosy for your DS Lite or DSi console (fits both models). Made from small amounts of DK yarn, this is perfect for using up any odds and ends.
Materials
· $15\8$ DK yarn in each of two colours of your choice (a darker shade and a lighter shade works best). · 1" button to co-ordinate.
Needles:
· 3.5mm straight needles. · 3.5mm crochet hook (optional $\cdot$ for a crochet edging simple blanket stitch may be used for a frm edge around cosy 'flap' if preferred). Notions: · Blunt ended knitter's needle for sewing up.
Notes:
· Gauge: 24sts 0ver 4"/10cm
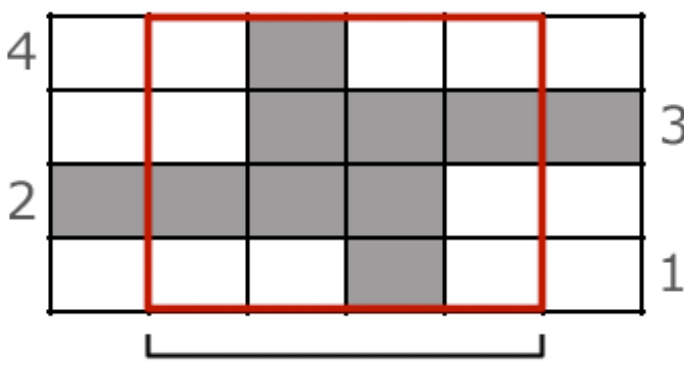
· Chart A incorporates l edge stitch at either side of the knitted piece - this allows the cosy to be seamed up invisibly, with no interruption to the pattern. If you decide to convert this pattern for knitting in the round, these stitches shouid be omitted. Beware, however, that this will result in the pattern having a jog' where one round ends and the next begins.
Instructions:
· c/o 46 stitches (two of these stitches are edge stitches, please see pattern notes).Charts should both be knitted in stockinette stitch. · Start Chart A, beginning with one edge stitch, repeating the 4 stitch repeat section 11 times in total, and finishing with the other edge stitch. Complete 9 full repeats of this chart. (36 rows total). · Row 37: [Using Main colour] K2, Pl, [now, using both colours as established] , knit row 1 of Chart B, [using only main colour] (Pl, K1) 12 times, K1. · Row 38: [MC] P1, (P1, K1) 12 times, [MC & CC] complete row 2 of Chart B, [MC] K1, P2. · Row 39: [MC] K2, P1, [MC &e CC] knit row 3 of Chart B, [MC](Pl, K1) 12 times, K1. · Row 40: [MC] P1, (P1, K1) 12 times, [MC & CC] complete row 2 of Chart B, [MC] K1, P2. · Row 41: [MC] loosely B/0 3 sts, [MC & CC] Knit row i of Chart B, [MC] loosely B/O remaining sts and break yarn. · Rejoin yarn and knit rows 2-4 of Chart B · Knit all rows of Chart B a further 3 times. · B/O all stitches. $\bullet$ Finishing up: Sew up bottom and side edges as neatly as possible. Use either single crochet or blanket stitch to neaten up the edges of the flap of the cosy if desired. Sew a button loop on to edge of flap (see below), insert DS and foid flap over to determine placement of button and attach with yarn or matching thread. Here is a fantastic tutorial on how to create your own sewn button-loops - a great technique that you'llfind yourself using in many projects: http://autoscopia.com/amelia/archives/2005/12/buttonloops.html

If you have any questions/queries about this pattern please feel free to drop me a line on mimi $@$ eskimimi.com and I will endeavor to get back to you as soon asI am able. $\copyright$ Mimi Hill. Please feel free to link to this pattern or to tell others where to find it, but do not distribute copies of the pattern yourself either electronically or in physical form. Items made using this pattern are not to be sold for profit, though private use (making the items for yourself or as a gift) is permitted and encouraged, and Mimi would love to hear from you if you enjoyed the pattern. Making items from this pattern for charity and fundraising are permitted and wholeheartedly encouraged.


