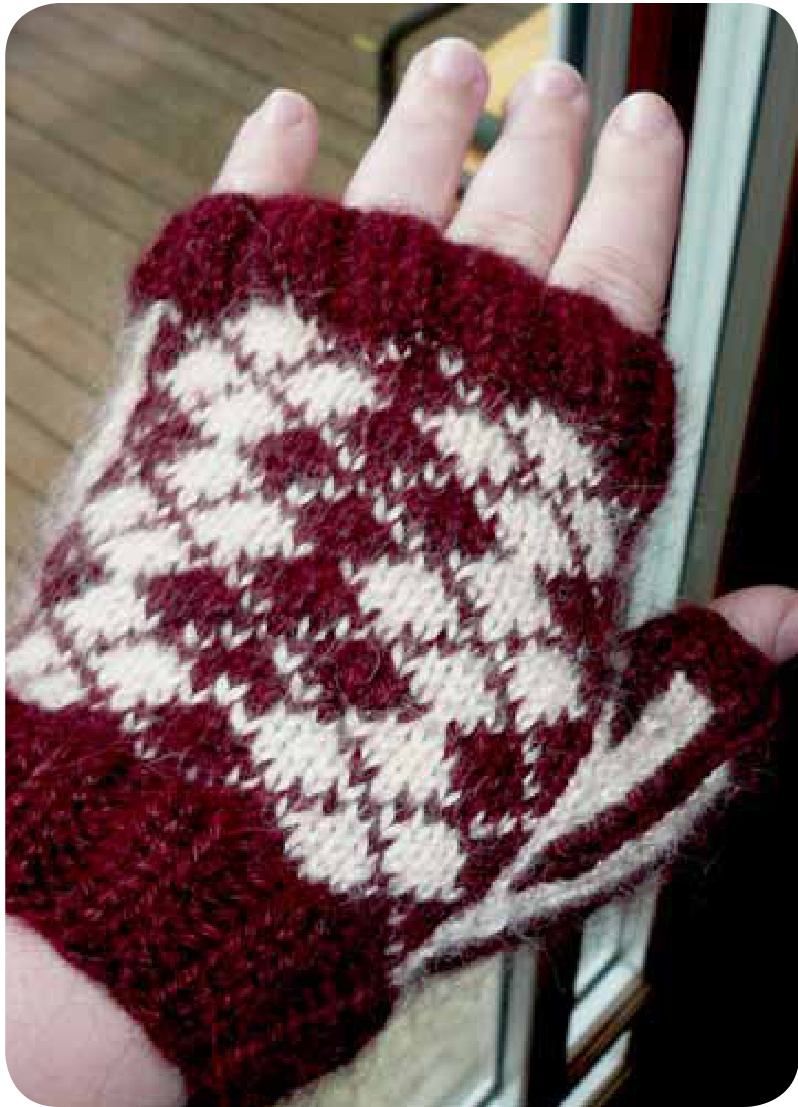
DAPPER DAME FINGERLESS MITTS BY SHARON MOORE
RAVELRY: TRIBALDANCER
Materials
1 ball each of two contrasting yarns & DPN or Magic Loop Needles Dapper Dame (regular): Sport weight yarn designed with KnitPicks Andean Treasure 100% Alpaca Size US2 & USO needles (gauge=7.5sts/in) Dapper Dude (large): DK/worsted weight yarn designed with Debbie Bliss Merino DK 100% Merino superwash Size US4 & US2 needles (gauge=7sts/in)
stitchesUsed
K2Tog - knit 2 together KFB - knit into front and back of stitch. Inc I stitch. MIF - pick up bar between stitches\* from row below through front, knit through back. Inc I stitch. MIB - pick up bar between stitches\* from row below through back, knit through front. Inc I stitch. \*Bar picked up should be in the same color of yarn as you intend to knit. If necessary, pick up floating yarn carried behind previous row.
Tips for successful colorwork:
Carry yarn not in use loosely behind work.Tight float tension will create puckering, and/or a restricting fit. On longer floats, stretch the stitches across your needle before you bring the yarn over for the post-float stitch. This pattern does not require twisting, wrapping, or otherwise catching floats. However, if you prefer a more neatly tailored inside of your mitt, anchor your floats longer than 3 stitches. Remember, work floats loosely! If you continue to have tension issues and/or cannot get gauge, try going up a single needle size.
Additional Notes & Ideas:
Occasionally, the larger size will call for a different number of repeats of a given instruction, noted in {. For even easier reading, cut out and tape the thumb gusset chart to align with the "increase section" on the argyle pattern chart . Grey bars line up with the increase rows. Finished mitt should be snug, but not restrictive. Keep in mind mitts wil stretch a little to shape with blocking or after being worn a little while. Want longer cuffs? Lengthen the cuff ribbing section to your liking. For'manly mitts",try light & dark shades of grey, blue, or green. For a punky look,invert your colors for the second mitt. For a bit more whimsy, do all 2X2 rib in stripe colorwork as well, or in a third color altogether!
tnstructions
C/O 57 sts in MC on smaller needles
Cuff:
I: Set up: Kl, [P2-K2] rib around to last two stitches, Kl, knit last stitch and first stitch of previous round together. (56 stitches) 2-8: 2X2 rib around for 7 {9} more rows 9: K around, decreasing 2 stitches evenly
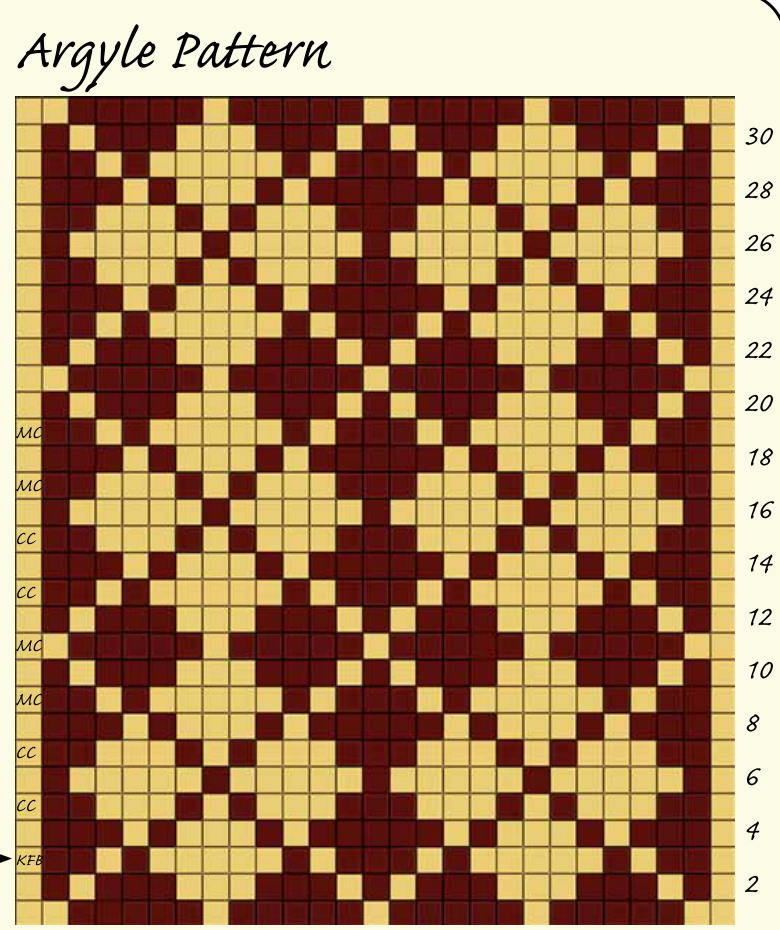
Argyle and Thumb Gusset: (see charts)
Switch to larger needles I-2: Begin Argyle Pattern chart, knit around in pattern 3: Knit 27 sts in pattern, PM, lift MC float from the back then KFB in MC, PM, continue to end 4: K around in pattern 5: Knit in pattern to marker, slip marker, [M1F, K2, MI B] in pattern, slip marker, continue 6-20: Continue like this in pattern until all thumb gusset increases are complete. (refer to Thumb Gusset chart) 21: K to marker, remove marker, put 18 stitches on waste yarn, remove marker, continue, pulling join across thumbside stitches firmly to prevent laddering. (54 stitches) 21-3l: K in pattern to end of chart, break CC yarn 32: K around in MC, increasing 2 stitches evenly (56 stitches) 33-37: Switch to smaller needles, work in K2-P2 rib around 5 {7} rows 38: Bind off in rib.
Thumb
I: P/U live thumb gusset stitches with larger needles, starting where the MC gusset stitches meet the mitt body, and remove waste yarn. Knit in pattern around, P/U two stitches from body and knit in CC. (20 stitches) 2-5: Continue K in pattern 4 rounds, break CC yarn 6: K around in MC 7-9: Switch to smaller needles, K2-P2 3 rows I0: Bind off in rib Weave in ends
Notes on reading these charts:
Mitts are same front and back, and are identical for both right and left mitts. Chart can be read either direction, as the pattern is mirrored, though it is notated in standard right-to-left, bottom-to-top (exactly as your move across your work). Knit across argyle chart once for the back of the mitt, then repeat same row for the palm of the mitt. For thumb gusset increase rows, knit across pattern once, then across thumb gusset chart, then repeat across argyle pattern chart again.