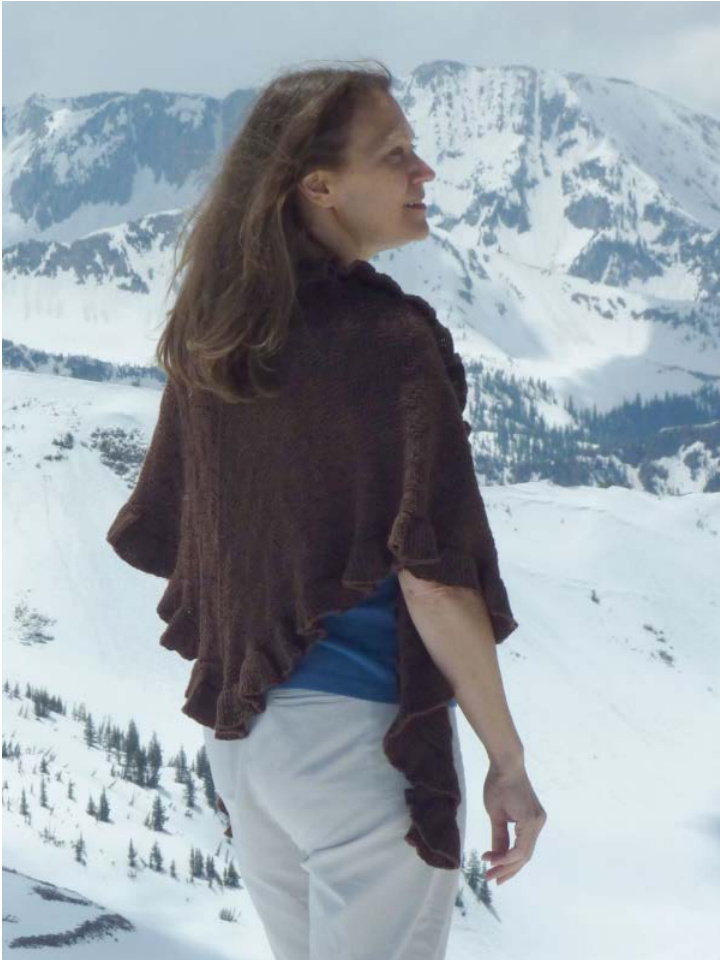
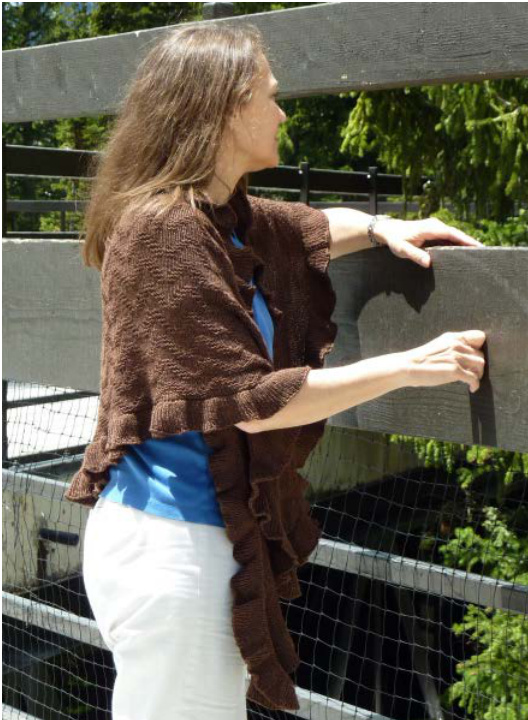
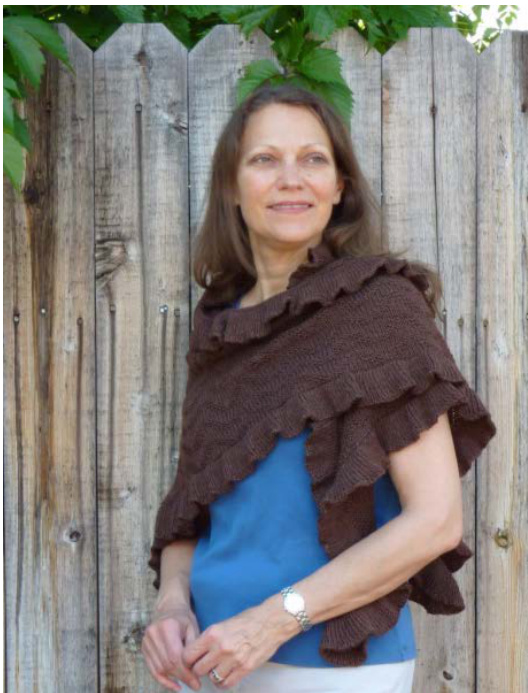
Ubiquitous Kate
designed by Cheryl Schumer This top-down triangular shawl has extra increases to create a shallower, curved triangle with longer wings. The body of the shawl is worked in an easy zigzag texture stitch. A flirty ruffle is worked in around the entire edge of the shawl - or just the bottom, if you prefer. Instructions are given for both a 1x1 rib ruffle as well as a stockinette ruffle.
Finished Measurements
20" down the spine, and 62" wingspan, EXCLUDING the ruffle, 24" by 66" INCLUDING the ruffle.
Materials
Yarn: Knit Picks Gloss Fingering (55% merino wool, 33% microfibre, 12% cashmere); "Timber"; 6 skeins. Knitting Needles: Two US 4 (3.5mm) circular needles, one at least 40", and one at least 47" (see below). Yarn Needle Stitch marker When working the ruffle, you will need to use two
large circular needles (one for the bottom edges, and one for the top). I used a 47" needle for the body and bottom ruffle, and a 40" needle for the ruffle along the top edge, and they were barely long enough. I recommend using 47" and 60" if possible. Tip: If you have interchangeable needles, you don't need two sets of tips in the same size - put one of your working needle size tips on each of two cables, and a smaller tip on the other end of each needle. Just make sure that you are always knitting the stitches OFF the smaller tip in the left hand, onto the correct size tip in your right hand. If you don't have access to a 60" needle, you might try using two 30" needles (one for each side of the triangle), for a total of three needles. A note on yarn substitutions: I chose this yarn because it is solid-colored, soft, smooth, and has good stitch definition and drape. If you substitute yarns, I suggest looking for the same qualities. Gloss is on the fluffier side for fingering-weight yarn, so thinner yarns or dense, tightly-twisted sock yarns may not work up well at the same gauge. Sport-weight yarns may make the best substitute. The shawl shown in the photographs used about 5 14 skeins, so there is plenty of yardage allowed for swatching, or for a slightly longer ruffle. I would recommend at planning on least 1200 yards, plus whatever is needed for swatching. The ruffle took about half the total yardage of the yarn, although the stockinette version of the ruffle would probably take a little less yarn.
Gauge
20 stitches x 36 rows over 4" in pattern stitch after blocking. The yarn will relax and “grow" a bit after washing, so be sure to wet-block your swatch!
Abbreviations
kknit kfb knit into the front and back of the stitch M1L make 1 left M1R make 1 right ppurl pm place marker RS right side sl slip st(s) stitch(es) WS wrong side
Pattern Instructions
Garter Tab:
Start with a 7-stitch garter tab: Cast on 2 sts. Knit 6 rows in garter stitch (knit every row) Next row: k2, rotate the work 1/4 turn to the right, and pick up one st in each of the three garter ridges, then one stitch in each of the two cast-on stitches (7 sts on needle). Continue to the “Body" section.
Body:
Knit the body of the shawl, following either the "Chart Instructions" or the "Written Instructions". DO NOT SLiP THE EDGE STITCHES - you will be picking up stitches for the ruffle, and slipped stitches won't give you the correct number of stitches to pick up.
Chart Instructions - Be sure to read this section carefully before beginning:
Two charts have been provided below - you may use whichever one you prefer: Chart A: This is a typical chart, representing the RS of the work. The knit/purl stitch pattern is worked on RS rows, and every wS row is a purl row. Chart B: If you would prefer to have “knit-back" rows instead of "purl-back" rows, you can use Chart B instead, which shows the pattern as seen from the Ws. The texture pattern is worked on wS rows, and every RS row is a knit row. The advantage to Chart A is being able to see the texture pattern and “read" the knitting as you work the pattern rows, while the advantage to Chart B is having much less purling. After you have chosen a chart, follow the instructions provided with each chart. Continue to follow the chart until your shawl is the desired size. Sample shown has 5 vertical repeats of the repeat section, to a total of 403 sts (Chart A) or 407 sts (Chart B). Continue to “Ruffle” section.
Written Directions
Setup (work once): Row 1 (WS): p1, kfb, p3, kfb, p1 (9 st) Row 2:k1, kfb, p2, M1R, pm, k1, M1L, p2, kfb, k1 (13 st) Row 3: p1, kfb, p to last 2 sts (slipping marker), kfb, p1 (15 st) Row 4: k1, kfb, p5, M1R, sm, k1, M1L, p5, kfb, k1 (19 st) Row 5: repeat row 3 (21 st) Row 6: k1, kfb, k1, p3, k1, p3, M1R, sm, k1, M1l, p3, k1, p3, k1, kfb, k1 (25 st) Row 7: repeat row 3 (27 st) Row 8: k1, kfb, k2, p3, k3, p3, M1R, sm, k1, M1L, p3, k3, p3, k2, kfb, k1 (31 st) Row 9: repeat row 3 (33 st) Row 10: k1, kfb, p2, k1, p3, k5, p3, M1R, sm, k1, M1L, p3, k5, p3,k1, p2, kfb, k1 (37 st) Row 11: repeat row 3 (39 st) Row 12: k1, kfb, k2, p2, k1, p2, k7, p2, k2, M1R, sm, k1, M1L,k2, p2, k7, p2, k1, p2, k2, kfb, k1 (43 st) Row 13: repeat row 3 (45 st)
Pattern Repeat:
Row 1 (ws), and all ws rows: p1, kfb, p to last 2 sts (slipping marker), kfb, p1 Row 2 (RS): k1, kfb, p2, \*k9, p3, repeat from \* until 6 sts before marker, k6, M1R, sm, k1, M1L, k6, \*\*p3, k9, repeat from \*\* to last 4 sts; p2, kfb,k1 Row 4: k1, kfb, p5, \*k7, p5, repeat from \* until 6 sts before marker, k6, M1R, sm, k1, M1L, k6, \*\* p5, k7, repeat from \*\* to last 7 sts; p5, kfb, k1 Row 6: k1, kfb, k1, \*p3, k1, p3, k5, repeat from \* until 1 sts before marker; p1, M1R, sm, k1, M1l, p1, \*\*k5, p3, k1, p3, repeat from \*\* to last 3 sts; k1, kfb, k1 Row 8: k1, kfb, k2, p3, \*k3, p3, repeat from \* to marker; M1R, SM, K1, M1L, \*\*p3, k3, repeat from \*\* to last 7 st; p3, k2, kfb, k1 Row 10: k1, kfb, p2, k1, p3, \*k5, p3, k1, p3, repeat from \* to 2 sts before marker, k2, M1R, k1, M1l, k2 \*\*p3, k1, p3, k5, repeat from \*\* to last 8 sts; p3, k1, p2, kfb, k1 Row 12: k1, kfb, k2, p2, k1, \*p2, k7, p2, k1, repeat from \* to 6 sts before marker; p2, k4, M1R, sm, k1, M1L, k4, p2, \*\*k1, p2, k7, p2, repeat from \*\* to last 7 sts, k1, p2, k2, kfb, k1 Row 14: k1, kfb, p2, \*k9, p3, repeat from \* to marker; M1R, sm, k1, M1L, \*\*p3, k9, repeat from \*\* to last 4 sts, p2, kfb, k1 Row 16: k1, kfb, \*p5, k7, repeat from \* until 5 sts before marker, p5, M1R, sm, k1, M1l, p5, \*\*k7, p5, repeat from \*\* to last 2 sts, kfb, k1 Row 18: k1, kfb, k1, \*p3, k1, p3, k5, repeat from \* until 7 sts before marker; p3, k1, p3, M1R, sm, k1, M1L, p3, k1, p3, \*\*k5, p3, k1, p3, repeat from \*\* to last 3 sts; k1, kfb, k1 Row 20: k1, kfb, k2, p3, \*k3, p3, repeat from \* to marker; MiR, sm, k1, M1L, \*\*p3, k3, repeat from \*\* to last 7 st; p3, k2, kfb, k1 Row 22: k1, kfb, p2, \*k1, p3, k5, p3, repeat from \* to marker; M1R, sm, k1, M1l, \*\*p3, k5, p3, k1, repeat from \*\* to last 4 sts, p2, kfb, k1 Row 24: k1, kfb, k2, \*p2, k1, p2, k7, repeat from \* until 3 sts before marker, p2, k2, M1R, sm, k1, M1L, k2, p2, \*\*k7, p2, k1, p2, repeat from \*\* to last 4 sts, k2, kfb, k1 Repeat rows 1-24 a total of 5 times, or until shawl is of desired size. For the full-ruffle option, finish with a RS row--do not work last WS row. (403 sts). For the partial ruffle option, finish working the body with a WS row (405 sts). Continue to "Ruffle” section.
Ruffle:
ictions for full ruffle, in 1x1 rib - see end of section for additional options.
Your working yarn should be at the right side of the top edge of the shawl when viewed from the RS. With right-side of the shawl facing, and using the second circular needle, pick up and knit one stitch in each stitch along the top edge of the shawl. (I picked up 270 sts, but the number does not need to be exact.) You will now begin working in the round, using one needle for the top edge of the shawl, and one for the bottom. If desired, use a pin or removable marker to indicate the beginning of the round. As you work around the shawl, be sure you are always working with only one needle at a time - use the opposite end of the SAME needle when knitting each section. Make sure you are not knitting the stitches from one circular needle to the other, and that you do not turn the work - the RS should always be facing you, and you should be knitting a continuous ruffle around the border of the shawl. The next two rounds do the increases for the ruffle, and will result in 3 stitches to every 1 original stitch. This is the ruffle shown on the sample/swatch. If you prefer less ruffle, you could omit Round 1 and just work Round 2 before continuing with the rib. For extreme ruffle, omit round 1 and work Round 2 twice. The first option will require less yarn, and the second will require more yarn. Round 1 (increase round): \* k1, kfb; repeat from \* to end of round. Depending on the number of stitches picked up, you may end with either a k1 or kfb. Round 2 (increase round): kfb in every stitch to end of round. Round 3: \* k1, p1; repeat from \* to end of round Repeat round 3 for a total of 12 rounds (1 7/8"), or to desired ruffle length. Bind off in pattern. Stockinette Ruffle Option: If you would like to knit a stockinette ruffle instead of 1x1 rib, work increase Rounds 1 and 2 as indicated, then replace Round 3 with "knit to end of round". Bind off purlwise. Note that the stockinette ruffle will be more "ruffly" than the 1x1 rib over the same number of stitches. Warning: depending on the yarn you use, the bound-off edge of the ruffle may curl up. This didn't seem to be a problem with the Gloss yarn, but it will be a problem with many yarns. If you're concerned about the curling, I would suggest knitting a swatch that is two pattern repeats wide, adding a ruffle to it, then blocking it to see how it behaves. Partial ruffle option: If you don't want a ruffle on the top edge of the shawl, follow the instructions above without picking up any stitches along the top edge - just start with the increase rounds. You will be working the "Rounds" as rows. Row 1 should be a RS row. If you are knitting a stockinette ruffle, bind off on aRSrowpurlwise.
Finishing:
Weave in ends and wet-block: soak the shawl in room-temperature water, then lay it out on a smooth, flat surface to dry. Pinning is not necessary - just pat the shawl into shape, and pinch the ruffles into shape withyour fingers.
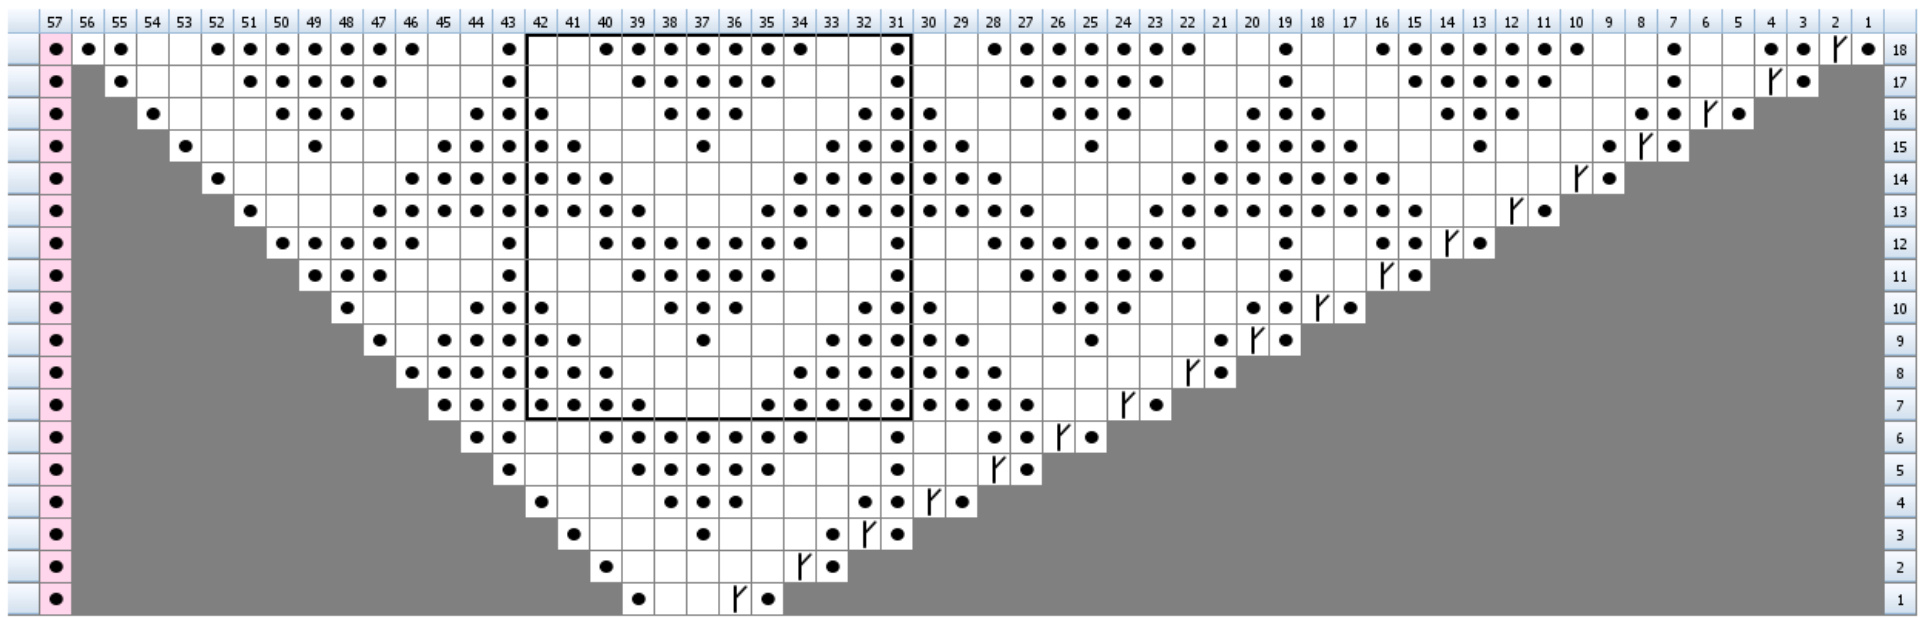
Chart A
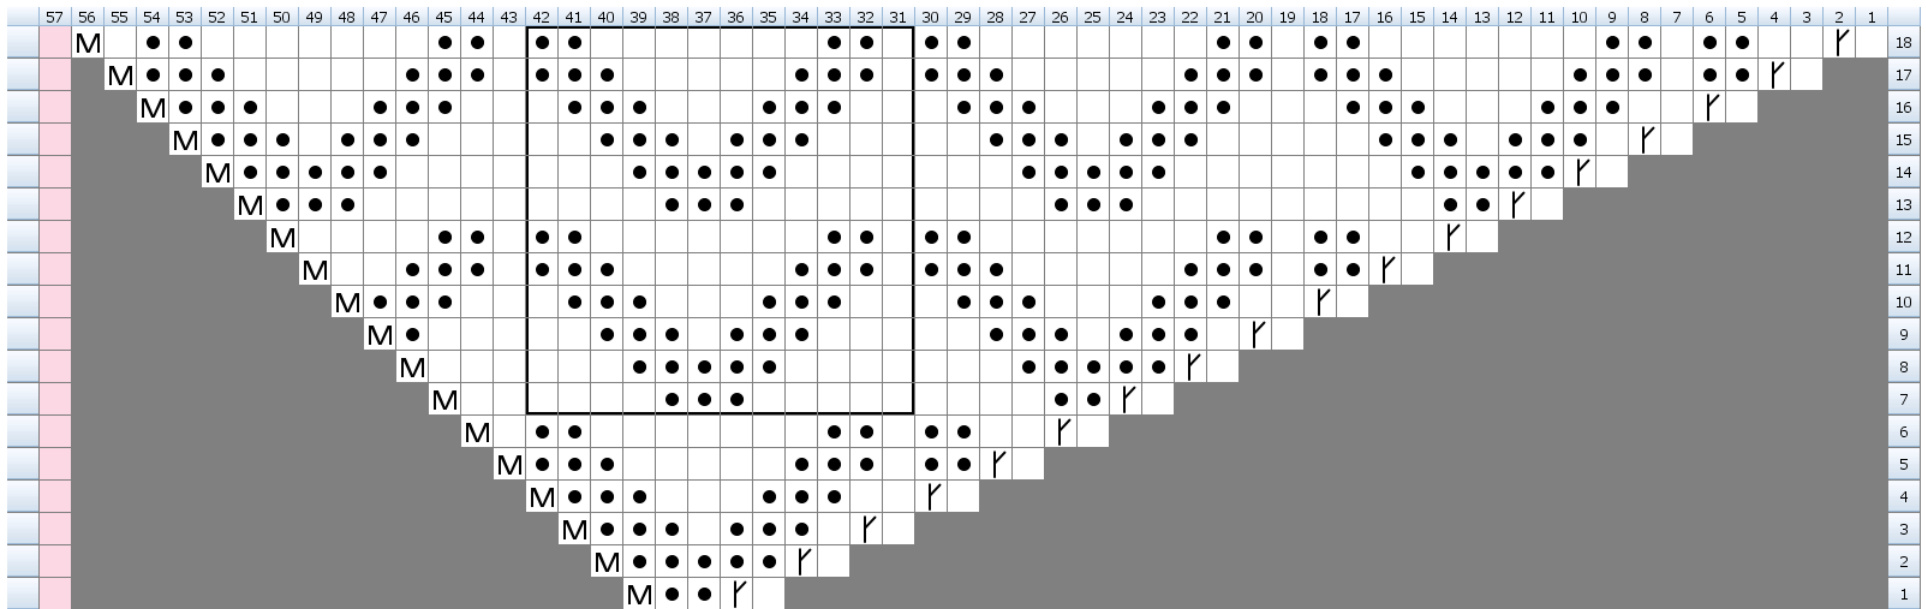
Legend:
Only half of the shawl is shown. Work the chart from right to left, including the center stitch (the far left column, shown in pink on the chart), then work back from left to right for the second half of theshawl.
| No Stitch | |
| knit | |
| F | kfb |
| purl | |
| M | make one |
Chart Setup: Before starting the chart, work one row as follows: p1, kfb, p3, kfb, p1, marking the center stitch if desired. (9 st) For the “Make One" stitch, use M1R before the center stitch, and M1L after. After the setup row, begin working the chart, starting with Row 1. Work the vertical repeat section a total of 5 times, or until the shawl is the desired size. Only the RS rows are shown. Work each wS row as follows: P1, kfb, p to last 2 sts, kfb, p1 or the full-ruffle option, finish with a RS row--do not work last WS row. (403 sts). or the partial ruffle option, finish working the body with a WS row (405 sts).
Chart B
Legend:
This chart shows the work as seen from the wrong side. You will be working the chart from the WS, as if it were the RS of a traditional chart. Work the symbols as shown on the chart (knit the knit symbols, purl the purl symbols).
| No Stitch | |
| knit | |
| r | kfb |
| purl | |
| M | make one |
Only half of the shawl is shown. Work the chart from right to left, including the center stitch (the far left column, in pink on the chart), then work back from left to right. Chart Setup: Before starting the chart, work one row as follows: K2, kfb, M1R, pm, k1 (center st), pm, M1L, kfb, k2 (11 st) For the “make one” stitch, use M1R before the center stitch, and M1L after. After the setup row, begin working the chart, starting with Row 1. Work a total of 5 vertical repeats of the repeat section, or until the shawl is the desired size. Only theWS rows are shown on the chart. Work eachRS row as follows: K2, kfb, K to marker, M1R, sm, K1, sm, M1L, K to last 3 sts, kfb, k1 For the full-ruffle option, finish working the body with a RS (knit-back) row. (407 st) For the partial ruffle option, finish working the body with a WS (charted) row. (403 st)


